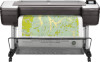
Security Features
Page 12
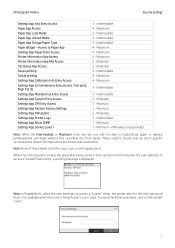
... implications are known and understood. Moderate 2 - Maximum 3 - Minimum - PIN needs to load/unload paper or replace printheads/ink cartridges without first unlocking the front panel. When the control panel is displayed. Maximum 3 - Maximum 4 - Minimum 2 - HP DesignJet Printers Security Settings Settings App Inks Entry Access Paper App Access Paper App Load Media Paper App...
... implications are known and understood. Moderate 2 - Maximum 3 - Minimum - PIN needs to load/unload paper or replace printheads/ink cartridges without first unlocking the front panel. When the control panel is displayed. Maximum 3 - Maximum 4 - Minimum 2 - HP DesignJet Printers Security Settings Settings App Inks Entry Access Paper App Access Paper App Load Media Paper App...

User Guide
Page 5
......102 Check usage statistics ...102 Check usage statistics for a job ...105 Check cost assignment ...107 11 Handling ink cartridges and printheads ...108 About the ink cartridges ...109 Check the ink cartridges status ...109 Remove an ink cartridge ...109 Insert an ink cartridge ......110 About the printheads ...112 Check the printhead status ...112 Remove a printhead ...113 Insert a printhead ...115 Safe mode ...118 12 Maintaining the printer ...119 Check printer status ...120 Clean the exterior of ...
......102 Check usage statistics ...102 Check usage statistics for a job ...105 Check cost assignment ...107 11 Handling ink cartridges and printheads ...108 About the ink cartridges ...109 Check the ink cartridges status ...109 Remove an ink cartridge ...109 Insert an ink cartridge ......110 About the printheads ...112 Check the printhead status ...112 Remove a printhead ...113 Insert a printhead ...115 Safe mode ...118 12 Maintaining the printer ...119 Check printer status ...120 Clean the exterior of ...

User Guide
Page 6
... ...151 Lines are blurred ...151 Line lengths are inaccurate ...152 Image Diagnostics Print ...152 If you still have a problem ...154 16 Troubleshooting ink cartridge and printhead issues ...155 Cannot insert an ink cartridge ...156 Ink cartridge status messages ...156 Cannot insert...
... ...151 Lines are blurred ...151 Line lengths are inaccurate ...152 Image Diagnostics Print ...152 If you still have a problem ...154 16 Troubleshooting ink cartridge and printhead issues ...155 Cannot insert an ink cartridge ...156 Ink cartridge status messages ...156 Cannot insert...

User Guide
Page 7
Align the printheads ...160 Printhead status messages ...162 17 Troubleshooting general printer issues ...163 Printer does not print ...164 Front panel fails to initialize ...164 Printer seems slow ...... Automatic file system check ...166 Alerts ...166 18 Front-panel error messages ...167 System error log ...167 19 HP Customer Care ...168 Introduction ...169 HP Professional Services ...169 Customer Self Repair ...170 Contact HP Support ...170 20 Printer specifications ...171 Functional specifications ...172 Physical specifications ...173 Memory specifications ...173 Power specifications ...173...
Align the printheads ...160 Printhead status messages ...162 17 Troubleshooting general printer issues ...163 Printer does not print ...164 Front panel fails to initialize ...164 Printer seems slow ...... Automatic file system check ...166 Alerts ...166 18 Front-panel error messages ...167 System error log ...167 19 HP Customer Care ...168 Introduction ...169 HP Professional Services ...169 Customer Self Repair ...170 Contact HP Support ...170 20 Printer specifications ...171 Functional specifications ...172 Physical specifications ...173 Memory specifications ...173 Power specifications ...173...
User Guide
Page 14
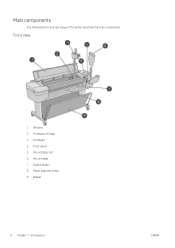
Front view 1. Printhead carriage 3. Ink cartridge slot 6. Paper alignment lines 9. Basket 6 Chapter 1 Introduction ENWW Printhead 4. Main components The following front and rear views of the printer illustrate the main components. Window 2. Ink cartridge 7. Output platen 8. Front panel 5.
Front view 1. Printhead carriage 3. Ink cartridge slot 6. Paper alignment lines 9. Basket 6 Chapter 1 Introduction ENWW Printhead 4. Main components The following front and rear views of the printer illustrate the main components. Window 2. Ink cartridge 7. Output platen 8. Front panel 5.

User Guide
Page 17
... it saves power by going into sleep mode. NOTE: In sleep mode, the printer performs maintenance service to the printheads from time to initialize and check and prepare the printheads. When the printer is to 45 minutes. When the printer has not been used for six weeks or more, ...there is strongly recommended to leave the printer powered on , plug in sleep mode to active mode, and it takes about 75 seconds. Preparing the printheads takes about three minutes to time. However, any interaction with the printer's front-panel display, or sending a new job to print, returns it...
... it saves power by going into sleep mode. NOTE: In sleep mode, the printer performs maintenance service to the printheads from time to initialize and check and prepare the printheads. When the printer is to 45 minutes. When the printer has not been used for six weeks or more, ...there is strongly recommended to leave the printer powered on , plug in sleep mode to active mode, and it takes about 75 seconds. Preparing the printheads takes about three minutes to time. However, any interaction with the printer's front-panel display, or sending a new job to print, returns it...

User Guide
Page 44
... the automatic cutter is dry before handling. The printer then advances the paper and makes a straight cut the paper on the print. NOTE: The printheads are two ways to feed and cut the paper when the automatic cutter has been disabled. ● To cancel the waiting time and print the... the drying time You may wish to change the cutter option. The default setting is zero, the printer cuts the paper and then performs the printhead maintenance. Turn the automatic cutter on and off To turn the printer's paper cutter on loading, unloading and switching between jobs, but it will ...
... the automatic cutter is dry before handling. The printer then advances the paper and makes a straight cut the paper on the print. NOTE: The printheads are two ways to feed and cut the paper when the automatic cutter has been disabled. ● To cancel the waiting time and print the... the drying time You may wish to change the cutter option. The default setting is zero, the printer cuts the paper and then performs the printhead maintenance. Turn the automatic cutter on and off To turn the printer's paper cutter on loading, unloading and switching between jobs, but it will ...
User Guide
Page 70
...is not explicitly selected, and no other job submission software. If the printer finishes one roll, it will automatically switch to the other. ● HP recommends the use of papers approved for paper if the paper mismatch action is set to Put job on hold (see Nest jobs to save... with a long queue of printing jobs. ● If feasible, use brand-new long rolls of paper. ● If you want to protect. Cleaning the printheads can be useful, but it can protect selected paper types to avoid printing on so that are too wide may need cleaning. For further economy...
...is not explicitly selected, and no other job submission software. If the printer finishes one roll, it will automatically switch to the other. ● HP recommends the use of papers approved for paper if the paper mismatch action is set to Put job on hold (see Nest jobs to save... with a long queue of printing jobs. ● If feasible, use brand-new long rolls of paper. ● If you want to protect. Cleaning the printheads can be useful, but it can protect selected paper types to avoid printing on so that are too wide may need cleaning. For further economy...
User Guide
Page 84
...paper type you are using a mixture of Red, Green, and Blue to create any of the following circumstances: ● Whenever a printhead is replaced ● Whenever a new paper type is introduced that has not yet been calibrated with advanced hardware and software features to ...is not perfect. In the case of CMYK, the mixture is of matching colors. Introduction Color management is performed using a set of printheads ● Whenever the environmental conditions (temperature and humidity) change significantly 76 Chapter 8 Color management ENWW A summary of the color management ...
...paper type you are using a mixture of Red, Green, and Blue to create any of the following circumstances: ● Whenever a printhead is replaced ● Whenever a new paper type is introduced that has not yet been calibrated with advanced hardware and software features to ...is not perfect. In the case of CMYK, the mixture is of matching colors. Introduction Color management is performed using a set of printheads ● Whenever the environmental conditions (temperature and humidity) change significantly 76 Chapter 8 Color management ENWW A summary of the color management ...
User Guide
Page 85
... calibration status of all papers is reset to Recommended. ● Obsolete: The paper has been calibrated, but the calibration is now out of date because a printhead has been replaced, and should be repeated. ● Done: The paper has been calibrated, and the calibration is a description of a printer, ink, and paper combination...
... calibration status of all papers is reset to Recommended. ● Obsolete: The paper has been calibrated, but the calibration is now out of date because a printhead has been replaced, and should be repeated. ● Done: The paper has been calibrated, and the calibration is a description of a printer, ink, and paper combination...
User Guide
Page 116
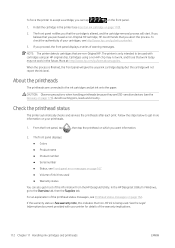
11 Handling ink cartridges and printheads ● About the ink cartridges ● Check the ink cartridges status ● Remove an ink cartridge ● Insert an ink cartridge ● About the printheads ● Check the printhead status ● Remove a printhead ● Insert a printhead ● Safe mode 108 Chapter 11 Handling ink cartridges and printheads ENWW
11 Handling ink cartridges and printheads ● About the ink cartridges ● Check the ink cartridges status ● Remove an ink cartridge ● Insert an ink cartridge ● About the printheads ● Check the printhead status ● Remove a printhead ● Insert a printhead ● Safe mode 108 Chapter 11 Handling ink cartridges and printheads ENWW

User Guide
Page 117
...print. You can tap the color of your ink cartridges, tap on the front panel, then tap the cartridge on page 175). HP DesignJet Utility procedures ● In the HP DesignJet Utility for Windows, go to the Overview tab, each cartridge's status is not designed to use up the remaining ink in the...the brake lever is empty or faulty, and you want information. About the ink cartridges Ink cartridges store the ink and are connected to the printheads, which distribute the ink on page 156. CAUTION: Remove an ink cartridge only if you want to replace it will resume printing when the ...
...print. You can tap the color of your ink cartridges, tap on the front panel, then tap the cartridge on page 175). HP DesignJet Utility procedures ● In the HP DesignJet Utility for Windows, go to the Overview tab, each cartridge's status is not designed to use up the remaining ink in the...the brake lever is empty or faulty, and you want information. About the ink cartridges Ink cartridges store the ink and are connected to the printheads, which distribute the ink on page 156. CAUTION: Remove an ink cartridge only if you want to replace it will resume printing when the ...
User Guide
Page 118
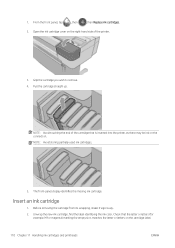
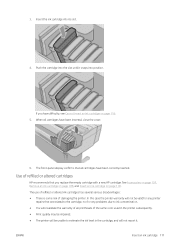
... straight up. Check that is inserted into the printer, as there may be ink on the cartridge label. 110 Chapter 11 Handling ink cartridges and printheads ENWW Insert an ink cartridge 1. The front-panel display identifies the missing ink cartridge. Before removing the cartridge from its wrapping, shake it vigorously. 2. Grip...
... straight up. Check that is inserted into the printer, as there may be ink on the cartridge label. 110 Chapter 11 Handling ink cartridges and printheads ENWW Insert an ink cartridge 1. The front-panel display identifies the missing ink cartridge. Before removing the cartridge from its wrapping, shake it vigorously. 2. Grip...
User Guide
Page 119
...inserted, close the cover. 6. Use of refilled or altered cartridges HP recommends that are related to the cartridge, nor for any problems due to ink contamination. ● You will invalidate the warranty of all printheads of damaging the printer. ENWW Insert an ink cartridge 111 Push the... cartridge into its slot. 4. If you replace the empty cartridge with a new HP cartridge. 3. Insert the ink cartridge into the slot until it ....
...inserted, close the cover. 6. Use of refilled or altered cartridges HP recommends that are related to the cartridge, nor for any problems due to ink contamination. ● You will invalidate the warranty of all printheads of damaging the printer. ENWW Insert an ink cartridge 111 Push the... cartridge into its slot. 4. If you replace the empty cartridge with a new HP cartridge. 3. Insert the ink cartridge into the slot until it ....
User Guide
Page 120
... cartridge is only intended to the Overview tab, then the Supplies tab. Cartridges using an HP original chip. In the HP DesignJet Utility for details of the printhead status messages, see http://www.hp.com/go /learnaboutsupplies. About the printheads The printheads are ESD-sensitive devices (see Insert an ink cartridge on page 175). For an explanation...
... cartridge is only intended to the Overview tab, then the Supplies tab. Cartridges using an HP original chip. In the HP DesignJet Utility for details of the printhead status messages, see http://www.hp.com/go /learnaboutsupplies. About the printheads The printheads are ESD-sensitive devices (see Insert an ink cartridge on page 175). For an explanation...
User Guide
Page 121
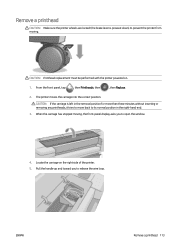
...on the right side of the printer. 5. When the carriage has stopped moving . Locate the carriage on . 1. From the front panel, tap , then Printheads, then , then Replace. 2. Pull the handle up and toward you to open the window. 4. CAUTION: If the carriage is pressed down) to prevent the... printer from moving , the front-panel display asks you to release the wire loop. Remove a printhead CAUTION: Make sure the printer wheels are locked (the brake lever is left in the removal position for more than three minutes without inserting or...
...on the right side of the printer. 5. When the carriage has stopped moving . Locate the carriage on . 1. From the front panel, tap , then Printheads, then , then Replace. 2. Pull the handle up and toward you to open the window. 4. CAUTION: If the carriage is pressed down) to prevent the... printer from moving , the front-panel display asks you to release the wire loop. Remove a printhead CAUTION: Make sure the printer wheels are locked (the brake lever is left in the removal position for more than three minutes without inserting or...
User Guide
Page 122
6. This gives you access to raise the lid. 7. To remove a printhead, lift up the blue handle. 9. Push the handle back to the printheads. 8. Using the blue handle, use steady force to disengage the printhead. 114 Chapter 11 Handling ink cartridges and printheads ENWW
6. This gives you access to raise the lid. 7. To remove a printhead, lift up the blue handle. 9. Push the handle back to the printheads. 8. Using the blue handle, use steady force to disengage the printhead. 114 Chapter 11 Handling ink cartridges and printheads ENWW
User Guide
Page 123
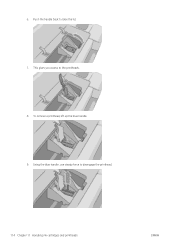
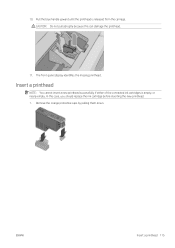
The front-panel display identifies the missing printhead. Remove the orange protective caps by pulling them down. CAUTION: Do not pull abruptly because this case, you should replace the ink cartridge before inserting the new printhead. 1. ENWW Insert a printhead 115 Insert a printhead NOTE: You cannot insert a new printhead successfully if either of the connected ink cartridges is released from the carriage. Pull the blue handle upward until the printhead is empty, or nearly empty. In this can damage the printhead. 11. 10.
The front-panel display identifies the missing printhead. Remove the orange protective caps by pulling them down. CAUTION: Do not pull abruptly because this case, you should replace the ink cartridge before inserting the new printhead. 1. ENWW Insert a printhead 115 Insert a printhead NOTE: You cannot insert a new printhead successfully if either of the connected ink cartridges is released from the carriage. Pull the blue handle upward until the printhead is empty, or nearly empty. In this can damage the printhead. 11. 10.
User Guide
Page 124
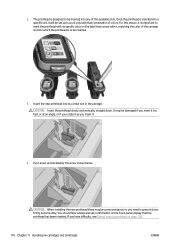
...You should hear a beep and see Cannot insert a printhead on the front-panel display that the printhead has been inserted. Push down as you rotate it as indicated by the arrow shown below. CAUTION: When installing the new printhead there may be damaged if you insert it too ...you need to press it . 4. Insert the new printhead into which the printhead is important to mark the printhead with that comes with it will be inserted. 3. CAUTION: Insert the printhead slowly and vertically, straight down firmly but smoothly. The printhead is designed to work only with its correct slot ...
...You should hear a beep and see Cannot insert a printhead on the front-panel display that the printhead has been inserted. Push down as you rotate it as indicated by the arrow shown below. CAUTION: When installing the new printhead there may be damaged if you insert it too ...you need to press it . 4. Insert the new printhead into which the printhead is important to mark the printhead with that comes with it will be inserted. 3. CAUTION: Insert the printhead slowly and vertically, straight down firmly but smoothly. The printhead is designed to work only with its correct slot ...
User Guide
Page 125
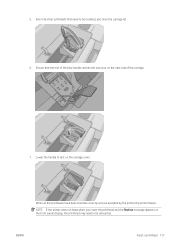
Insert all the printheads have been inserted correctly and are accepted by the printer, the printer beeps. When all other printheads that the end of the blue handle catches the wire loop on the carriage cover. Lower the handle to be reinserted. ENWW Insert a printhead 117 NOTE: If the printer does not beep when you insert the printhead and the Replace message appears on the front-panel display, the printhead may need to rest on the near side of the carriage. 7. 5. Ensure that need to be installed, and close the carriage lid. 6.
Insert all the printheads have been inserted correctly and are accepted by the printer, the printer beeps. When all other printheads that the end of the blue handle catches the wire loop on the carriage cover. Lower the handle to be reinserted. ENWW Insert a printhead 117 NOTE: If the printer does not beep when you insert the printhead and the Replace message appears on the front-panel display, the printhead may need to rest on the near side of the carriage. 7. 5. Ensure that need to be installed, and close the carriage lid. 6.


