
End User License Agreement
Page 1
... governs your HP product ("HP Product"), that it is used only for use on more than one computer. You may not separate component parts of this EULA: a. e. Other software may load the Software ON THE CONDITION THAT YOU Product into the local memory or storage device of... the Software Product, provided the copy contains all rights not expressly granted to this EULA. END-USER LICENSE AGREEMENT PLEASE READ CAREFULLY BEFORE USING THIS EQUIPMENT: This End-User license Agreement ("EULA") is a legal agreement between you and HP or its suppliers. d. HP...
... governs your HP product ("HP Product"), that it is used only for use on more than one computer. You may not separate component parts of this EULA: a. e. Other software may load the Software ON THE CONDITION THAT YOU Product into the local memory or storage device of... the Software Product, provided the copy contains all rights not expressly granted to this EULA. END-USER LICENSE AGREEMENT PLEASE READ CAREFULLY BEFORE USING THIS EQUIPMENT: This End-User license Agreement ("EULA") is a legal agreement between you and HP or its suppliers. d. HP...
HP Client Manager 6.1
Page 3
...installations are Web-downloadable software packages made available by each computer individually. 3 You can automatically and remotely update the BIOS on your non-HP client computers. • Health monitoring: The health monitoring capabilities of HPCM allow you to select from a set of client-side events, .... HPCM can use HPCM to change the BIOS settings, such as the Storage Options or the Boot Order, as new or missing PCs, memory, battery, disk drives, CPUs, and monitors. HPCM will install the drivers only on the HPCM Server. When one of computers. ...
...installations are Web-downloadable software packages made available by each computer individually. 3 You can automatically and remotely update the BIOS on your non-HP client computers. • Health monitoring: The health monitoring capabilities of HPCM allow you to select from a set of client-side events, .... HPCM can use HPCM to change the BIOS settings, such as the Storage Options or the Boot Order, as new or missing PCs, memory, battery, disk drives, CPUs, and monitors. HPCM will install the drivers only on the HPCM Server. When one of computers. ...
HP Client Manager 6.1
Page 4
.... - Point-and-click to keep the HP tool components (e.g. Perform diagnostics on newer desktops and workstations (notebooks coming soon) 4 Connect to an HP Support Representative through an Active Chat session if needed to your computers. - Information collected includes manufacturer, OS, language, processor, memory, and free disk space. • HP Tool Update Wizard provides an easy...
.... - Point-and-click to keep the HP tool components (e.g. Perform diagnostics on newer desktops and workstations (notebooks coming soon) 4 Connect to an HP Support Representative through an Active Chat session if needed to your computers. - Information collected includes manufacturer, OS, language, processor, memory, and free disk space. • HP Tool Update Wizard provides an easy...
HP Client Manager 6.1
Page 8
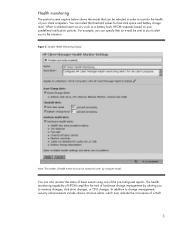
... responds based on your client computers. In addition to change management by computer model. Figure 5. You can be sent to you to alert you to memory changes, disk drive changes, or CPU changes. For example, you can specify that an e-mail be monitored varies by alerting you to the situation. Sample...
... responds based on your client computers. In addition to change management by computer model. Figure 5. You can be sent to you to alert you to memory changes, disk drive changes, or CPU changes. For example, you can specify that an e-mail be monitored varies by alerting you to the situation. Sample...
HP Client Manager 6.1
Page 9
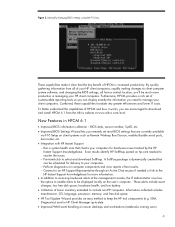
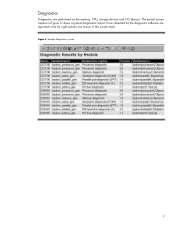
Sample Diagnostics screen 9 Errors detected by the diagnostic software are performed on the memory, CPU, storage devices and I/O devices. Diagnostics Diagnostics are reported in the far right column (not shown in Figure 6 shows a typical diagnostics report. Figure 6. The partial screen capture in this screen shot).
Sample Diagnostics screen 9 Errors detected by the diagnostic software are performed on the memory, CPU, storage devices and I/O devices. Diagnostics Diagnostics are reported in the far right column (not shown in Figure 6 shows a typical diagnostics report. Figure 6. The partial screen capture in this screen shot).
Computer Setup (F10) Utility Guide
Page 5
... Full Boot but does not run during a Full Boot. I Change factory default settings. Computer Setup (F10) Utility Guide 1 I Configure Quiet Drive options (for processor, graphics, memory, audio, storage, communications, and input devices.
... Full Boot but does not run during a Full Boot. I Change factory default settings. Computer Setup (F10) Utility Guide 1 I Configure Quiet Drive options (for processor, graphics, memory, audio, storage, communications, and input devices.
Computer Setup (F10) Utility Guide
Page 6
... manually switch to change the display status of the mode selected. I Enable the power-on password prompt during system restarts (warm boots) as well as memory count, product name, and other non-error text messages. I Solve system configuration errors detected but not automatically fixed during the Power-On Self-Test (POST...
... manually switch to change the display status of the mode selected. I Enable the power-on password prompt during system restarts (warm boots) as well as memory count, product name, and other non-error text messages. I Solve system configuration errors detected but not automatically fixed during the Power-On Self-Test (POST...
Computer Setup (F10) Utility Guide
Page 8
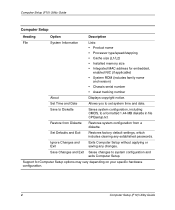
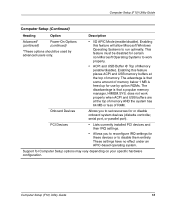
... Guide Computer Setup Heading Option Description File System Information Lists: • Product name • Processor type/speed/stepping • Cache size (L1/L2) • Installed memory size • Integrated MAC address for Computer Setup options may vary depending on your specific hardware configuration. 4 Computer Setup (F10) Utility Guide Support for embedded...
... Guide Computer Setup Heading Option Description File System Information Lists: • Product name • Processor type/speed/stepping • Cache size (L1/L2) • Installed memory size • Integrated MAC address for Computer Setup options may vary depending on your specific hardware configuration. 4 Computer Setup (F10) Utility Guide Support for embedded...
Computer Setup (F10) Utility Guide
Page 19
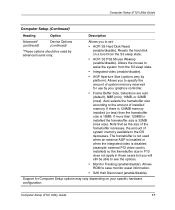
...feature must be used by option ROMs. The disadvantage is that some amount of memory below 1 MB is that a popular memory manager, HIMEM.SYS, does not work properly. • ACPI and USB Buffer @ Top of Memory (enable/disable). These settings have no effect under an APIC-based operating system.... Support for these devices or to work properly when ACPI and USB buffers are at the top of memory. The advantage is freed up for certain non-Microsoft Operating Systems to disable them entirely. Enabling this feature will allow Microsoft Windows Operating...
...feature must be used by option ROMs. The disadvantage is that some amount of memory below 1 MB is that a popular memory manager, HIMEM.SYS, does not work properly. • ACPI and USB Buffer @ Top of Memory (enable/disable). These settings have no effect under an APIC-based operating system.... Support for these devices or to work properly when ACPI and USB buffers are at the top of memory. The advantage is freed up for certain non-Microsoft Operating Systems to disable them entirely. Enabling this feature will allow Microsoft Windows Operating...
Computer Setup (F10) Utility Guide
Page 21
...min), 16MB, or 32MB (max). Note that as the size of the framebuffer increases, the amount of installed memory. Computer Setup (F10) Utility Guide 17 If there is 128MB memory installed (or less) then the framebuffer size is 32MB (max size). If more than 128MB is installed the framebuffer...sleep state. • ACPI S3 PS2 Mouse Wakeup (enable/disable). Auto selects the framebuffer size according to the amount of system memory available to see the options. • Monitor Tracking (enable/disable). Resets the hard disk on your graphics controller. • Frame Buffer Size....
...min), 16MB, or 32MB (max). Note that as the size of the framebuffer increases, the amount of installed memory. Computer Setup (F10) Utility Guide 17 If there is 128MB memory installed (or less) then the framebuffer size is 32MB (max size). If more than 128MB is installed the framebuffer...sleep state. • ACPI S3 PS2 Mouse Wakeup (enable/disable). Auto selects the framebuffer size according to the amount of system memory available to see the options. • Monitor Tracking (enable/disable). Resets the hard disk on your graphics controller. • Frame Buffer Size....
D315, Evo D500 Series, D300 Series, D300v Series Worldwide Limited Warranty and Technical Support
Page 6
...Warranty terms, service availability, and service response times may be required to repair your warranty. In some processors with ECC cache memory identified by the business day following request for response time in the destination country. A customer may vary. Types of Warranty Service... Your Compaq Limited Warranty consists of repair or replacement of defective parts, including hard drives, ECC memory, and some countries and under certain supplier constraints, response time may be an additional charge. On-site Warranty Service Your Compaq ...
...Warranty terms, service availability, and service response times may be required to repair your warranty. In some processors with ECC cache memory identified by the business day following request for response time in the destination country. A customer may vary. Types of Warranty Service... Your Compaq Limited Warranty consists of repair or replacement of defective parts, including hard drives, ECC memory, and some countries and under certain supplier constraints, response time may be an additional charge. On-site Warranty Service Your Compaq ...
Hardware Reference Guide -- Compaq D315
Page 3
... Easy Access Buttons 1-5 Windows Logo Key 1-6 Special Mouse Functions 1-6 Serial Number Location 1-7 2 Hardware Upgrades Serviceability Features 2-1 Installation Sequence 2-1 Removing the Computer Access Panel 2-2 Installing Additional Memory 2-5 DIMMs 2-5 DDR-SDRAM DIMMs 2-5 Installing DDR-SDRAM DIMMs 2-6 Removing or Upgrading a Drive 2-8 Locating Drive Positions 2-9 Removing a Drive 2-10 Replacing a Drive 2-13 Removing or Installing an...
... Easy Access Buttons 1-5 Windows Logo Key 1-6 Special Mouse Functions 1-6 Serial Number Location 1-7 2 Hardware Upgrades Serviceability Features 2-1 Installation Sequence 2-1 Removing the Computer Access Panel 2-2 Installing Additional Memory 2-5 DIMMs 2-5 DDR-SDRAM DIMMs 2-5 Installing DDR-SDRAM DIMMs 2-6 Removing or Upgrading a Drive 2-8 Locating Drive Positions 2-9 Removing a Drive 2-10 Replacing a Drive 2-13 Removing or Installing an...
Hardware Reference Guide -- Compaq D315
Page 17
DIMMs The memory sockets on the system board can be industry-standard 184-pin, unbuffered PC 2100 266 MHz-compliant, 2.5 volt DDR-SDRAM DIMMs. The DDR-SDRAM DIMMs must support CAS Latency 2 or 2.5 (CL = 2 or CL = 2.5). DDR-SDRAM DIMMs For proper... also contain the mandatory Joint Electronic Device Engineering Council (JEDEC) Serial Presence Detect (SPD) information. They must be populated with at least one preinstalled memory module. To achieve the maximum memory support, you may be required to replace the preinstalled DIMM with Double Data Rate-Synchronous dynamic random access...
DIMMs The memory sockets on the system board can be industry-standard 184-pin, unbuffered PC 2100 266 MHz-compliant, 2.5 volt DDR-SDRAM DIMMs. The DDR-SDRAM DIMMs must support CAS Latency 2 or 2.5 (CL = 2 or CL = 2.5). DDR-SDRAM DIMMs For proper... also contain the mandatory Joint Electronic Device Engineering Council (JEDEC) Serial Presence Detect (SPD) information. They must be populated with at least one preinstalled memory module. To achieve the maximum memory support, you may be required to replace the preinstalled DIMM with Double Data Rate-Synchronous dynamic random access...
Hardware Reference Guide -- Compaq D315
Page 18
... cards. Hardware Upgrades Installing DDR-SDRAM DIMMs Ä CAUTION: Your memory module sockets have gold metal contacts. Refer to Appendix E, "Electrostatic Discharge," for more information. Ä CAUTION: When handling a memory module, be careful not to prevent corrosion and/or oxidation resulting from... Doing so may damage the module. 1. Remove the cover and locate the memory module sockets. Å WARNING: To reduce risk of the contacts. When upgrading your memory, it is important to use memory modules with each other. Ä CAUTION: Static electricity can damage the electronic...
... cards. Hardware Upgrades Installing DDR-SDRAM DIMMs Ä CAUTION: Your memory module sockets have gold metal contacts. Refer to Appendix E, "Electrostatic Discharge," for more information. Ä CAUTION: When handling a memory module, be careful not to prevent corrosion and/or oxidation resulting from... Doing so may damage the module. 1. Remove the cover and locate the memory module sockets. Å WARNING: To reduce risk of the contacts. When upgrading your memory, it is important to use memory modules with each other. Ä CAUTION: Static electricity can damage the electronic...
Hardware Reference Guide -- Compaq D315
Page 19
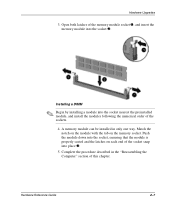
... "Reassembling the Computer" section of the socket snap into the socket, ensuring that the module is properly seated and the latches on the memory socket. Open both latches of the sockets. 4. Installing a DIMM ✎ Begin by installing a module into the socket nearest the preinstalled... module, and install the modules following the numerical order of the memory module socket 1, and insert the memory module into the socket 2. Push the module down into place 3. 5. Hardware Upgrades 3. Match the notch on the module ...
... "Reassembling the Computer" section of the socket snap into the socket, ensuring that the module is properly seated and the latches on the memory socket. Open both latches of the sockets. 4. Installing a DIMM ✎ Begin by installing a module into the socket nearest the preinstalled... module, and install the modules following the numerical order of the memory module socket 1, and insert the memory module into the socket 2. Push the module down into place 3. 5. Hardware Upgrades 3. Match the notch on the module ...
Hardware Reference Guide -- Compaq D315
Page 53
... F front bezel removing 2-4 replacing 2-20 front panel components 1-2 H hard drive installation 2-8 installation guidelines B-1 K keyboard 1-4 Easy Access Keyboard 1-4 port 1-3 Windows Logo Key 1-6 L latch drive bracket 2-12 M memory installing 2-5 mouse Index-1
... F front bezel removing 2-4 replacing 2-20 front panel components 1-2 H hard drive installation 2-8 installation guidelines B-1 K keyboard 1-4 Easy Access Keyboard 1-4 port 1-3 Windows Logo Key 1-6 L latch drive bracket 2-12 M memory installing 2-5 mouse Index-1


