

User Guide
Page 17
Table 1-9 Service label components (continued) Component (3) Serial number (4) Warranty period ● Regulatory label(s)-Provide(s) regulatory information about the computer. ● Wireless certification label(s)-Provide(s) information about optional wireless devices and the approval markings for the countries or regions in which the devices have been approved for use. Labels 11
Table 1-9 Service label components (continued) Component (3) Serial number (4) Warranty period ● Regulatory label(s)-Provide(s) regulatory information about the computer. ● Wireless certification label(s)-Provide(s) information about optional wireless devices and the approval markings for the countries or regions in which the devices have been approved for use. Labels 11

User Guide
Page 27
The voltage and current for your computer is designed for use with this section might be supplied by HP for IT power systems in this computer. The computer operates on DC power, which can be helpful if you plan to -phase voltage not exceeding ... W 19.5 V dc @ 3.33 A - 65 W 19.5 V dc @ 4.62 A - 90 W 19.5 V dc @ 6.15 A - 120 W 19.5 V dc @ 6.9 A - 135 W 19.5 V dc @ 7.70 A - 150 W 19.5 V dc @ 10.3 A - 200 W 19.5 V dc @ 11.8 A - 230 W 19.5 V dc @ 16.92 A - 330 W NOTE: This product is located on DC power within one or more of the following specifications.
The voltage and current for your computer is designed for use with this section might be supplied by HP for IT power systems in this computer. The computer operates on DC power, which can be helpful if you plan to -phase voltage not exceeding ... W 19.5 V dc @ 3.33 A - 65 W 19.5 V dc @ 4.62 A - 90 W 19.5 V dc @ 6.15 A - 120 W 19.5 V dc @ 6.9 A - 135 W 19.5 V dc @ 7.70 A - 150 W 19.5 V dc @ 10.3 A - 200 W 19.5 V dc @ 11.8 A - 230 W 19.5 V dc @ 16.92 A - 330 W NOTE: This product is located on DC power within one or more of the following specifications.
User Guide
Page 37
... charging 15 factory sealed 15 light 1 Bluetooth label 11 brightness down action key 8 brightness up action key 8 buttons power 3 C camera light, identifying 5 camera, identifying 5 Chromebook Recovery Utility, installing 18 components bottom 9 display ...HP Assistive Policy 24 I input power 21 internal microphone 5 internal microphone, identifying 5 International Association of Accessibility Professionals 24 J jacks audio-in (microphone) 1 audio-out (headphone) 1 K key lock action key 8 keys esc 7 L labels Bluetooth 11 regulatory 11 serial number 10 service 10 wireless certification 11 WLAN 11...
... charging 15 factory sealed 15 light 1 Bluetooth label 11 brightness down action key 8 brightness up action key 8 buttons power 3 C camera light, identifying 5 camera, identifying 5 Chromebook Recovery Utility, installing 18 components bottom 9 display ...HP Assistive Policy 24 I input power 21 internal microphone 5 internal microphone, identifying 5 International Association of Accessibility Professionals 24 J jacks audio-in (microphone) 1 audio-out (headphone) 1 K key lock action key 8 keys esc 7 L labels Bluetooth 11 regulatory 11 serial number 10 service 10 wireless certification 11 WLAN 11...

User Guide
Page 38
...and legislation, accessibility 26 support 20 swiping touch screen gesture 14 system recovery Chrome operating system 18 Chromebook Recovery Utility 18 recovery media 18 WLAN device 11 WLAN label 11 T tap gestures 12 touch screen gestures one-finger scrolling 13 one-finger swipe 14 two-finger ...pinch zoom 14 TouchPad and touch screen gestures, tap 12 TouchPad gestures, scrolling 13 TouchPad zone, identifying 6 traveling with the computer 11 two-finger pinch zoom touch screen gesture 14 U USB SuperSpeed port, identifying 1, 3 USB Type-C power connector and port, identifying 2, 3 ...
...and legislation, accessibility 26 support 20 swiping touch screen gesture 14 system recovery Chrome operating system 18 Chromebook Recovery Utility 18 recovery media 18 WLAN device 11 WLAN label 11 T tap gestures 12 touch screen gestures one-finger scrolling 13 one-finger swipe 14 two-finger ...pinch zoom 14 TouchPad and touch screen gestures, tap 12 TouchPad gestures, scrolling 13 TouchPad zone, identifying 6 traveling with the computer 11 two-finger pinch zoom touch screen gesture 14 U USB SuperSpeed port, identifying 1, 3 USB Type-C power connector and port, identifying 2, 3 ...
Part Locator
Page 1
... navigate to the views) On this page you wish to use it ! On every page there is a link that view. That's it ... Interactive Part Locator HP Chromebook x360 11 G3 EE Welcome to the interactive part locator for this product. To view a specific part and its location in the product, click the part name... you to navigate to whatever view or part you will find large icons of each of the external views of the replaceable parts for the HP Chromebook x360 11 G3 EE Here's how to review.
... navigate to the views) On this page you wish to use it ! On every page there is a link that view. That's it ... Interactive Part Locator HP Chromebook x360 11 G3 EE Welcome to the interactive part locator for this product. To view a specific part and its location in the product, click the part name... you to navigate to whatever view or part you will find large icons of each of the external views of the replaceable parts for the HP Chromebook x360 11 G3 EE Here's how to review.
Maintenance and Service Guide
Page 1
Maintenance and Service Guide HP Chromebook x360 11 G3 Education Edition IMPORTANT! This document is intended for HP authorized service providers only.
Maintenance and Service Guide HP Chromebook x360 11 G3 Education Edition IMPORTANT! This document is intended for HP authorized service providers only.
Maintenance and Service Guide
Page 7
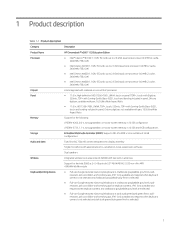
1 Product description Table 1-1 Product description Category Description Product Name HP Chromebook™ x360 11 G3 Education Edition Processor ● Intel® Celeron™ N4120 1.1 GHz (SC turbo up to 2.6 GHz) quad core processor (4.0 MB L2 cache, 2400 MHz FSB,..., 220nits, TOP+ with Corning Gorilla Glass (GG3), touch and bonding included in panel, Chicony digitizer, available with pen; 16:9 Ultra Wide Aspect Ratio ● 11.6 in, HD (1366×768) , UWVA, TOP+, touch, 220nits, TOP+ with Corning Gorilla Glass (GG3), touch and bonding included in panel, Chicony digitizer...
1 Product description Table 1-1 Product description Category Description Product Name HP Chromebook™ x360 11 G3 Education Edition Processor ● Intel® Celeron™ N4120 1.1 GHz (SC turbo up to 2.6 GHz) quad core processor (4.0 MB L2 cache, 2400 MHz FSB,..., 220nits, TOP+ with Corning Gorilla Glass (GG3), touch and bonding included in panel, Chicony digitizer, available with pen; 16:9 Ultra Wide Aspect Ratio ● 11.6 in, HD (1366×768) , UWVA, TOP+, touch, 220nits, TOP+ with Corning Gorilla Glass (GG3), touch and bonding included in panel, Chicony digitizer...

Maintenance and Service Guide
Page 17
Labels 11 Table 2-7 Service label components (continued) Component (3) Serial number (4) Warranty period ● Regulatory label(s)-Provide(s) regulatory information about the computer. ● Wireless certification label(s)-Provide(s) information about optional wireless devices and the approval markings for the countries or regions in which the devices have been approved for use.
Labels 11 Table 2-7 Service label components (continued) Component (3) Serial number (4) Warranty period ● Regulatory label(s)-Provide(s) regulatory information about the computer. ● Wireless certification label(s)-Provide(s) information about optional wireless devices and the approval markings for the countries or regions in which the devices have been approved for use.
Maintenance and Service Guide
Page 22
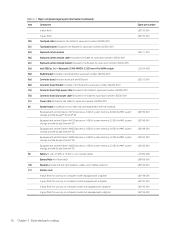
includes cable) Battery Mylar (not illustrated) (10) Speakers (include left and right speakers, cables, and 2 rubber isolators) (11) Bottom cover: In blue finish for use only on computer models equipped with a digitizer In gray finish for use only on computer models equipped with a ...
includes cable) Battery Mylar (not illustrated) (10) Speakers (include left and right speakers, cables, and 2 rubber isolators) (11) Bottom cover: In blue finish for use only on computer models equipped with a digitizer In gray finish for use only on computer models equipped with a ...

Maintenance and Service Guide
Page 23
... 3-2 Display component spare part information Item Component Spare part number (1) Display panel assembly (includes bezel and display panel cable): 11.6-in, HD, brightview, LED, UWVA, touchscreen display panel with digitizer L92338-001 11.6-in, HD, brightview, LED, UWVA, touchscreen display panel without digitizer L92337-001 (2) Webcam module (includes double-sided adhesive) L92213...
... 3-2 Display component spare part information Item Component Spare part number (1) Display panel assembly (includes bezel and display panel cable): 11.6-in, HD, brightview, LED, UWVA, touchscreen display panel with digitizer L92338-001 11.6-in, HD, brightview, LED, UWVA, touchscreen display panel without digitizer L92337-001 (2) Webcam module (includes double-sided adhesive) L92213...

Maintenance and Service Guide
Page 27
... vinyl tray Removing DIPS from polystyrene foam Removing bubble pack from PCB Packing PCBs in foam-lined box 10% 35,000 V 12,000 V 6,000 V 2,000 V 11,500 V 14,500 V 26,500 V 21,000 V Relative humidity 40% 15,000 V 5,000 V 800 V 700 V 4,000 V 5,000 V 20,000... V 11,000 V 55% 7,500 V 3,000 V 400 V 400 V 2,000 V 3,500 V 7,000 V 5,000 V Packaging and transporting guidelines Follow these grounding guidelines when packaging and transporting equipment: ● To ...
... vinyl tray Removing DIPS from polystyrene foam Removing bubble pack from PCB Packing PCBs in foam-lined box 10% 35,000 V 12,000 V 6,000 V 2,000 V 11,500 V 14,500 V 26,500 V 21,000 V Relative humidity 40% 15,000 V 5,000 V 800 V 700 V 4,000 V 5,000 V 20,000... V 11,000 V 55% 7,500 V 3,000 V 400 V 400 V 2,000 V 3,500 V 7,000 V 5,000 V Packaging and transporting guidelines Follow these grounding guidelines when packaging and transporting equipment: ● To ...

Maintenance and Service Guide
Page 33
... of the keyboard/top cover (1) as far as it will open. 10. 7. Open the computer as far as the keyboard cable and touchpad cable allow. 11. Use a thin plastic tool (1) to which the touchpad board cable is connected, and then disconnect the keyboard camera cable from the bottom cover. 8.
... of the keyboard/top cover (1) as far as it will open. 10. 7. Open the computer as far as the keyboard cable and touchpad cable allow. 11. Use a thin plastic tool (1) to which the touchpad board cable is connected, and then disconnect the keyboard camera cable from the bottom cover. 8.

Maintenance and Service Guide
Page 50
Reverse this procedure to the bottom cover. 12. 11. Remove the system board (2) by sliding it rests at an angle. Remove the six Phillips M2.0×4.2 screws (1) that secure the system board to install the system board. 44 Chapter 5 Removal and replacement procedures Lift the left side the system board (1) until it up and to the left at an angle. 13.
Reverse this procedure to the bottom cover. 12. 11. Remove the system board (2) by sliding it rests at an angle. Remove the six Phillips M2.0×4.2 screws (1) that secure the system board to install the system board. 44 Chapter 5 Removal and replacement procedures Lift the left side the system board (1) until it up and to the left at an angle. 13.

Maintenance and Service Guide
Page 55
10. Slide the display assembly (2) to the right at an angle to separate the top edge of the display panel assembly from the keyboard/top cover. 11. Use a case utility tool (1) or a similar thin plastic tool to release the left hinge from the display back cover. Remove the display panel assembly by following these steps: a. Remove the display assembly. 12. Component replacement procedures 49
10. Slide the display assembly (2) to the right at an angle to separate the top edge of the display panel assembly from the keyboard/top cover. 11. Use a case utility tool (1) or a similar thin plastic tool to release the left hinge from the display back cover. Remove the display panel assembly by following these steps: a. Remove the display assembly. 12. Component replacement procedures 49

Maintenance and Service Guide
Page 59
... by an AC or a DC power source. The voltage and current for your computer is supplied and approved by HP for use with the computer. Table 6-1 Computer specifications Metric U.S. Dimensions: Width 29.5 cm 11.6 in Depth 20.5 cm 8.1 in Height 2.1 cm 0.8 in this computer. The AC power source must be supplied by... W 19.5 V dc @ 3.33 A - 65 W 19.5 V dc @ 4.62 A - 90 W 19.5 V dc @ 6.15 A - 120 W 19.5 V dc @ 6.9 A - 135 W 19.5 V dc @ 7.70 A - 150 W 19.5 V dc @ 10.3 A - 200 W 19.5 V dc @ 11.8 A - 230 W 19.5 V dc @ 16.92 A - 330 W Computer specifications 53
... by an AC or a DC power source. The voltage and current for your computer is supplied and approved by HP for use with the computer. Table 6-1 Computer specifications Metric U.S. Dimensions: Width 29.5 cm 11.6 in Depth 20.5 cm 8.1 in Height 2.1 cm 0.8 in this computer. The AC power source must be supplied by... W 19.5 V dc @ 3.33 A - 65 W 19.5 V dc @ 4.62 A - 90 W 19.5 V dc @ 6.15 A - 120 W 19.5 V dc @ 6.9 A - 135 W 19.5 V dc @ 7.70 A - 150 W 19.5 V dc @ 10.3 A - 200 W 19.5 V dc @ 11.8 A - 230 W 19.5 V dc @ 16.92 A - 330 W Computer specifications 53

Maintenance and Service Guide
Page 68
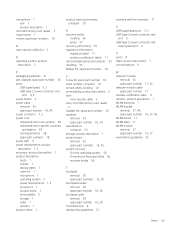
...battery light 3 battery Mylar spare part number 16, 35 Bluetooth label 11 bottom cover spare part number 16 Bracket Kit, spare part number 18 C Cable, spare part number 18 camera 7 camera light 7 chipset, product description 1 Chromebook Recovery Utility, installing 56 components bottom 9 display 7 left side 5... spare part number 16 keyboard/top cover removal 24 spare part numbers 13, 14, 15, 24 L labels Bluetooth 11 regulatory 11 serial number 10 service 10 wireless certification 11 WLAN 11 lights AC adapter 3 battery 3 camera 7 power 5 lock, spare part number 18 M memory, product description 1...
...battery light 3 battery Mylar spare part number 16, 35 Bluetooth label 11 bottom cover spare part number 16 Bracket Kit, spare part number 18 C Cable, spare part number 18 camera 7 camera light 7 chipset, product description 1 Chromebook Recovery Utility, installing 56 components bottom 9 display 7 left side 5... spare part number 16 keyboard/top cover removal 24 spare part numbers 13, 14, 15, 24 L labels Bluetooth 11 regulatory 11 serial number 10 service 10 wireless certification 11 WLAN 11 lights AC adapter 3 battery 3 camera 7 power 5 lock, spare part number 18 M memory, product description 1...
Maintenance and Service Guide
Page 69
...1 product name and number, computer 10 R recovery media creating 56 erase 57 recovery, performing 55 regulatory information regulatory label 11 wireless certification labels 11 removal/replacement procedures 24 resetting 55 Rubber Kit, spare part number 18 S Screw Kit, spare part number 18 serial number..., product description 1 system board removal 42 spare part numbers 16, 42 system recovery Chrome operating system 56 Chromebook Recovery Utility 56 recovery media 56 traveling with the computer 11 U USB SuperSpeed port 3, 5 USB Type-C power connector and port 5 USB Type-C power connector and ...
...1 product name and number, computer 10 R recovery media creating 56 erase 57 recovery, performing 55 regulatory information regulatory label 11 wireless certification labels 11 removal/replacement procedures 24 resetting 55 Rubber Kit, spare part number 18 S Screw Kit, spare part number 18 serial number..., product description 1 system board removal 42 spare part numbers 16, 42 system recovery Chrome operating system 56 Chromebook Recovery Utility 56 recovery media 56 traveling with the computer 11 U USB SuperSpeed port 3, 5 USB Type-C power connector and port 5 USB Type-C power connector and ...
LED Simulator
Page 1
... this platform's LED diagnostic states) On this product's external views. To identify the location of the LEDs for the HP Chromebook x360 11 G3 EE Here's how to use it ! That's it ... Interactive LED simulator HP Chromebook x360 11 G3 EE Welcome to the interactive LED diagnostic viewer for each LED, hover over the information icon ( i ) above the...
... this platform's LED diagnostic states) On this product's external views. To identify the location of the LEDs for the HP Chromebook x360 11 G3 EE Here's how to use it ! That's it ... Interactive LED simulator HP Chromebook x360 11 G3 EE Welcome to the interactive LED diagnostic viewer for each LED, hover over the information icon ( i ) above the...


