

User Guide
Page 5
... features ...13 Using the camera ...13 Using audio ...13 Connecting speakers ...13 Connecting headphones ...13 Connecting headsets ...14 Using data transfer ...14 Connecting devices to a USB Type-C port (select products only 14 3 Navigating the screen ...15 Using touchpad and touch screen gestures ...15 Tap ...15 Scrolling (touchpad only) ...16 One-finger scrolling (touch screen only 16 One-finger swipe (touch screen only 17 Two-finger pinch zoom (touch screen only 17 4 Power and battery ...18 Factory-sealed battery ...18 Charging the battery ...18...
... features ...13 Using the camera ...13 Using audio ...13 Connecting speakers ...13 Connecting headphones ...13 Connecting headsets ...14 Using data transfer ...14 Connecting devices to a USB Type-C port (select products only 14 3 Navigating the screen ...15 Using touchpad and touch screen gestures ...15 Tap ...15 Scrolling (touchpad only) ...16 One-finger scrolling (touch screen only 16 One-finger swipe (touch screen only 17 Two-finger pinch zoom (touch screen only 17 4 Power and battery ...18 Factory-sealed battery ...18 Charging the battery ...18...

User Guide
Page 10
... battery is not charging. (5) USB SuperSpeed port with HP Sleep and Charge Connects a USB device, provides high-speed data transfer, and even when the computer is designed to act as a cell phone, camera, activity tracker, or smartwatch. 2 Chapter 1 Getting to know your computer Right side Table 1-1 Right-side components and their descriptions Component (1) Volume button Description Controls speaker volume on the computer. (2) Security cable slot Attaches an optional security cable...
... battery is not charging. (5) USB SuperSpeed port with HP Sleep and Charge Connects a USB device, provides high-speed data transfer, and even when the computer is designed to act as a cell phone, camera, activity tracker, or smartwatch. 2 Chapter 1 Getting to know your computer Right side Table 1-1 Right-side components and their descriptions Component (1) Volume button Description Controls speaker volume on the computer. (2) Security cable slot Attaches an optional security cable...

User Guide
Page 11
... (microphone) combo jack (2) AC adapter and battery light (3) USB Type-C power connector and port (4) microSD™ memory card reader Description Connects optional powered stereo speakers, headphones, earbuds, a headset, or a television audio cable. Left side 3 To reduce the risk of personal injury, adjust the volume before putting on the card until it is not charging. and - This jack does not support optional standalone microphones. and - To insert a card: 1. Connects a display device that has a USB Type-C connector, supplying power to store, manage...
... (microphone) combo jack (2) AC adapter and battery light (3) USB Type-C power connector and port (4) microSD™ memory card reader Description Connects optional powered stereo speakers, headphones, earbuds, a headset, or a television audio cable. Left side 3 To reduce the risk of personal injury, adjust the volume before putting on the card until it is not charging. and - This jack does not support optional standalone microphones. and - To insert a card: 1. Connects a display device that has a USB Type-C connector, supplying power to store, manage...

User Guide
Page 21
.... Using the camera Your computer has one or more powerful entertainment center, connect external devices like a monitor, projector, TV, speakers, or headphones. Most cameras allow you can also enhance your listening enjoyment, attach external audio devices such as an entertainment hub to your computer, follow the device manufacturer's instructions. By default, the camera is turned on select products) or attach an external optical drive to video chat, record video, and...
.... Using the camera Your computer has one or more powerful entertainment center, connect external devices like a monitor, projector, TV, speakers, or headphones. Most cameras allow you can also enhance your listening enjoyment, attach external audio devices such as an entertainment hub to your computer, follow the device manufacturer's instructions. By default, the camera is turned on select products) or attach an external optical drive to video chat, record video, and...
User Guide
Page 28
... -screen instructions to http://www.support.google.com. If possible, back up your files before you can set up your computer. 20 Chapter 6 Backing up, resetting, and recovering Before you recover your computer and check to back up your Chrome operating system (OS) isn't working properly. ● You want to your computer: 1. Recovering When your files to an optional USB flash drive or SD memory card...
... -screen instructions to http://www.support.google.com. If possible, back up your files before you can set up your computer. 20 Chapter 6 Backing up, resetting, and recovering Before you recover your computer and check to back up your Chrome operating system (OS) isn't working properly. ● You want to your computer: 1. Recovering When your files to an optional USB flash drive or SD memory card...

User Guide
Page 29
...+f3 keys, and then press the power button. Before beginning the recovery process, you need the following: ● A USB flash drive or SD memory card with Internet access. Because all data is erased from this message is created, back up any files from the Chrome Web Store on any external devices connected to create the recovery media. If this storage device when the recovery media is not already displayed: - To install the Chromebook Recovery Utility: ▲ Open the...
...+f3 keys, and then press the power button. Before beginning the recovery process, you need the following: ● A USB flash drive or SD memory card with Internet access. Because all data is erased from this message is created, back up any files from the Chrome Web Store on any external devices connected to create the recovery media. If this storage device when the recovery media is not already displayed: - To install the Chromebook Recovery Utility: ▲ Open the...
User Guide
Page 30
... remove the USB flash drive or SD memory card. Select the USB flash drive or SD memory card you might need to cancel the recovery during the verification process, press and hold the power button until the computer turns off. Do not disrupt the system recovery process after a reset or recovery After a reset or recovery is erased, click Done to erase the recovery media using the Chromebook Recovery Utility. 1. Wait while Chrome verifies the integrity of creating recovery media, the USB flash drive...
... remove the USB flash drive or SD memory card. Select the USB flash drive or SD memory card you might need to cancel the recovery during the verification process, press and hold the power button until the computer turns off. Do not disrupt the system recovery process after a reset or recovery After a reset or recovery is erased, click Done to erase the recovery media using the Chromebook Recovery Utility. 1. Wait while Chrome verifies the integrity of creating recovery media, the USB flash drive...
User Guide
Page 40
... charging 18 factory sealed 18 brightness down action key 9 brightness up action key 9 buttons left touchpad 6 power 4 right touchpad 6 C camera identifying 5 using 13 camera light, identifying 5 Chromebook Recovery Utility, installing 21 components display 4 keyboard area 6 left side 3 right side 2 connectors power 2, 3 customer support, accessibility 31 D data transfer 14 display components 4 E electrostatic discharge 26 esc key, identifying 8 F forward action key 9 full screen action key 9 H headphones, connecting 13 headsets, connecting 14 HP Assistive Policy 27 I input power 24 internal...
... charging 18 factory sealed 18 brightness down action key 9 brightness up action key 9 buttons left touchpad 6 power 4 right touchpad 6 C camera identifying 5 using 13 camera light, identifying 5 Chromebook Recovery Utility, installing 21 components display 4 keyboard area 6 left side 3 right side 2 connectors power 2, 3 customer support, accessibility 31 D data transfer 14 display components 4 E electrostatic discharge 26 esc key, identifying 8 F forward action key 9 full screen action key 9 H headphones, connecting 13 headsets, connecting 14 HP Assistive Policy 27 I input power 24 internal...
User Guide
Page 41
...action key 9 resetting 20 resources, accessibility 30 right side components 2 touchpad zone, identifying 6 transfer data 14 traveling with the computer 11 two-finger pinch zoom touch screen gesture 17 U USB SuperSpeed port with HP Sleep and Charge, identifying 2 USB Type-C port, connecting 14 USB Type-C power connector and port, identifying 2, 3 S scrolling touch screen gesture 16 scrolling touchpad gesture 16 Section 508 accessibility standards 29 security cable slot, identifying 2 serial number, computer 10 service labels, locating 10 SIM card, inserting 11 slots microSD memory card reader...
...action key 9 resetting 20 resources, accessibility 30 right side components 2 touchpad zone, identifying 6 transfer data 14 traveling with the computer 11 two-finger pinch zoom touch screen gesture 17 U USB SuperSpeed port with HP Sleep and Charge, identifying 2 USB Type-C port, connecting 14 USB Type-C power connector and port, identifying 2, 3 S scrolling touch screen gesture 16 scrolling touchpad gesture 16 Section 508 accessibility standards 29 security cable slot, identifying 2 serial number, computer 10 service labels, locating 10 SIM card, inserting 11 slots microSD memory card reader...
Maintenance and Service Guide
Page 2
Chromebook is subject to take full advantage of Windows functionality. Microsoft and Windows are either registered trademarks or trademarks of SD-3C in the United States and/or other countries or both. Some features may require upgraded and/or separately purchased hardware, drivers, software or BIOS update to change without notice. For any software product preinstalled on the computer. microSD is a trademark or...
Chromebook is subject to take full advantage of Windows functionality. Microsoft and Windows are either registered trademarks or trademarks of SD-3C in the United States and/or other countries or both. Some features may require upgraded and/or separately purchased hardware, drivers, software or BIOS update to change without notice. For any software product preinstalled on the computer. microSD is a trademark or...
Maintenance and Service Guide
Page 7
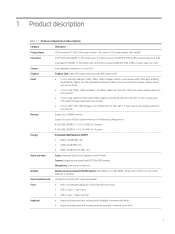
... v5.0 Audio and video Audio: Integrated dual B and O speakers with HD Audio Camera: Integrated one-piece fixed HD 720p-YSEB camera Microphones: Dual-array microphone Wireless Wireless local area network (WLAN) options: Intel 9560 ac 2×2 MU-MIMO + Bluetooth® 5.0 M.2 non-vPro CNVi WW with 2 antennas External media cards HP MultiFormat microSD® media card reader Ports ● Audio-out (headphone)/audio-in (microphone) combo jack ● USB 3.1 Gen. 1 Type-A port ● USB 3.1 Gen. 1 Type-C port (2) Keyboard ● Island-style keyboard with touchpad with backlight...
... v5.0 Audio and video Audio: Integrated dual B and O speakers with HD Audio Camera: Integrated one-piece fixed HD 720p-YSEB camera Microphones: Dual-array microphone Wireless Wireless local area network (WLAN) options: Intel 9560 ac 2×2 MU-MIMO + Bluetooth® 5.0 M.2 non-vPro CNVi WW with 2 antennas External media cards HP MultiFormat microSD® media card reader Ports ● Audio-out (headphone)/audio-in (microphone) combo jack ● USB 3.1 Gen. 1 Type-A port ● USB 3.1 Gen. 1 Type-C port (2) Keyboard ● Island-style keyboard with touchpad with backlight...

Maintenance and Service Guide
Page 10
... Notices. NOTE: When a device is connected to the computer and, if needed, charging the computer battery. - WARNING! To access this guide: ▲ Select the Start button, select HP Help and Support, and then select HP Documentation. and - This jack does not support optional standalone microphones. Table 2-1 Right-side components and their descriptions Component (1) Audio-out (headphone)/Audio-in Sleep mode, charges most products such as a cell phone, camera, activity tracker, or smartwatch, and...
... Notices. NOTE: When a device is connected to the computer and, if needed, charging the computer battery. - WARNING! To access this guide: ▲ Select the Start button, select HP Help and Support, and then select HP Documentation. and - This jack does not support optional standalone microphones. Table 2-1 Right-side components and their descriptions Component (1) Audio-out (headphone)/Audio-in Sleep mode, charges most products such as a cell phone, camera, activity tracker, or smartwatch, and...

Maintenance and Service Guide
Page 28
... -screen instructions. Only HP authorized service providers should be removed, replaced, and/or loosened when servicing Authorized Service Provider only parts. The front and rear foot strips are as many as 38 screws that must be accessed only by first unplugging the power cord from the AC outlet, and then unplugging the AC adapter from the computer. Disconnect all external devices connected to http://partsurfer.hp...
... -screen instructions. Only HP authorized service providers should be removed, replaced, and/or loosened when servicing Authorized Service Provider only parts. The front and rear foot strips are as many as 38 screws that must be accessed only by first unplugging the power cord from the AC outlet, and then unplugging the AC adapter from the computer. Disconnect all external devices connected to http://partsurfer.hp...

Maintenance and Service Guide
Page 32
... computer. Disconnect the power from the computer by the governmental agency that secures the WLAN module to restore device functionality, and then contact technical support. Remove the WLAN module: 1. NOTE: The #1/white WLAN antenna cable connects to the WLAN module #2/Aux terminal. 2. If you replace the module and then receive a warning message, remove the module to the keyboard/top cover. 26 Chapter 5 Removal and replacement procedures Disconnect the WLAN...
... computer. Disconnect the power from the computer by the governmental agency that secures the WLAN module to restore device functionality, and then contact technical support. Remove the WLAN module: 1. NOTE: The #1/white WLAN antenna cable connects to the WLAN module #2/Aux terminal. 2. If you replace the module and then receive a warning message, remove the module to the keyboard/top cover. 26 Chapter 5 Removal and replacement procedures Disconnect the WLAN...

Maintenance and Service Guide
Page 37
... UMA memory, 4-GB of system memory, 32-GB of eMMC storage, and a non-Windows 10 operating system L85673-001 Before removing the system board, follow these steps: 1. Disconnect/release the following cables: (1) Power cable (2) Power cable retention clips (3) USB/audio board high-power and low-power ZIF connector cable (4) Webcam/microphone module cable retention tape (5) Webcam/microphone module cable (6) Speaker cable (7) Display panel cable adhesive support strip (8) Display panel cable (9) Touchpad ZIF connector cable (10) Keyboard ZIF connector cable Component replacement procedures...
... UMA memory, 4-GB of system memory, 32-GB of eMMC storage, and a non-Windows 10 operating system L85673-001 Before removing the system board, follow these steps: 1. Disconnect/release the following cables: (1) Power cable (2) Power cable retention clips (3) USB/audio board high-power and low-power ZIF connector cable (4) Webcam/microphone module cable retention tape (5) Webcam/microphone module cable (6) Speaker cable (7) Display panel cable adhesive support strip (8) Display panel cable (9) Touchpad ZIF connector cable (10) Keyboard ZIF connector cable Component replacement procedures...
Maintenance and Service Guide
Page 39
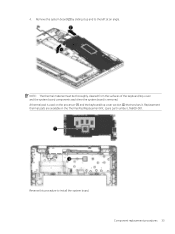
4. Remove the system board (2) by sliding it . Replacement thermal pads are available in the Thermal Pad Replacement Kit, spare part number L76600-001. Component replacement procedures 33 A thermal pad is removed. Reverse this procedure to the left at an angle. NOTE: The thermal material must be thoroughly cleaned from the surfaces of the keyboard/top cover and the system board components each time the system board is used on the processor (1) and the keyboard/top cover section (2) that services it up and to install the system board.
4. Remove the system board (2) by sliding it . Replacement thermal pads are available in the Thermal Pad Replacement Kit, spare part number L76600-001. Component replacement procedures 33 A thermal pad is removed. Reverse this procedure to the left at an angle. NOTE: The thermal material must be thoroughly cleaned from the surfaces of the keyboard/top cover and the system board components each time the system board is used on the processor (1) and the keyboard/top cover section (2) that services it up and to install the system board.

Maintenance and Service Guide
Page 59
..." screen displaying on -screen instructions. Installing the Chromebook Recovery Utility The Chromebook Recovery Utility is an app used to recover the original operating system and software programs that were installed at the factory. To create recovery media: 1. Creating recovery media Recovery media is used to recover the original operating system and software programs that were installed at the factory. If this storage device when the recovery media is created, back up all files before you need the following: ● A USB flash drive or SD memory card with Internet access...
..." screen displaying on -screen instructions. Installing the Chromebook Recovery Utility The Chromebook Recovery Utility is an app used to recover the original operating system and software programs that were installed at the factory. To create recovery media: 1. Creating recovery media Recovery media is used to recover the original operating system and software programs that were installed at the factory. If this storage device when the recovery media is created, back up all files before you need the following: ● A USB flash drive or SD memory card with Internet access...

Maintenance and Service Guide
Page 60
... Chromebook Recovery Utility. 1. Click the Settings icon, and then click Erase recovery media. 4. The media is complete, perform the initial setup process. To enter recovery mode, press and hold the power button until the computer turns off. Recovering the Chrome operating system To recover the Chrome operating system on setting up the computer, go to http://www.support.google.com. Disconnect any external devices connected to close the Chromebook Recovery Utility, and then remove the USB flash drive or SD memory card...
... Chromebook Recovery Utility. 1. Click the Settings icon, and then click Erase recovery media. 4. The media is complete, perform the initial setup process. To enter recovery mode, press and hold the power button until the computer turns off. Recovering the Chrome operating system To recover the Chrome operating system on setting up the computer, go to http://www.support.google.com. Disconnect any external devices connected to close the Chromebook Recovery Utility, and then remove the USB flash drive or SD memory card...

Maintenance and Service Guide
Page 65
... jack 4 hinge removal 44 spare part number 15, 45 hinge cap removal 38, 43, 44 spare part number 15, 38, 43, 44 I internal microphones 6 J jacks audio-in 4 audio-out 4 headphone 4 microphone 4 K keyboard, product description 1, 2 keyboard/top cover, spare part numbers 11, 12 keys action 9 esc 9 L labels 9 left side components 4 lights AC adapter and battery light 3, 4 camera 6 power 5 M magnetic stylus docking 5 memory, product description 1 microphone location 6 product description 1 microphone jack 4 microSD memory card reader 5 model name 1 mouse, spare part numbers 16 O operating...
... jack 4 hinge removal 44 spare part number 15, 45 hinge cap removal 38, 43, 44 spare part number 15, 38, 43, 44 I internal microphones 6 J jacks audio-in 4 audio-out 4 headphone 4 microphone 4 K keyboard, product description 1, 2 keyboard/top cover, spare part numbers 11, 12 keys action 9 esc 9 L labels 9 left side components 4 lights AC adapter and battery light 3, 4 camera 6 power 5 M magnetic stylus docking 5 memory, product description 1 microphone location 6 product description 1 microphone jack 4 microSD memory card reader 5 model name 1 mouse, spare part numbers 16 O operating...
Maintenance and Service Guide
Page 66
... Charge 4 USB Type-C power connector and port 3, 4, 5 power button 5 power cable removal 34 spare part number 14, 34 power cord requirements for all countries 55 requirements for specific countries and regions 56 set requirements 55 spare part numbers 16 power light 5 power requirements, product description 2 processor, product description 1 product description audio 1 chipset 1 display panel 1 external media card 1 graphics 1 keyboard 1, 2 memory 1 microphone 1 operating system 2 ports 1 power requirements 2 processors 1 product name 1 security 2 solid-state drive 1 storage 1 video 1 wireless...
... Charge 4 USB Type-C power connector and port 3, 4, 5 power button 5 power cable removal 34 spare part number 14, 34 power cord requirements for all countries 55 requirements for specific countries and regions 56 set requirements 55 spare part numbers 16 power light 5 power requirements, product description 2 processor, product description 1 product description audio 1 chipset 1 display panel 1 external media card 1 graphics 1 keyboard 1, 2 memory 1 microphone 1 operating system 2 ports 1 power requirements 2 processors 1 product name 1 security 2 solid-state drive 1 storage 1 video 1 wireless...


