Basics Guide
Page 36
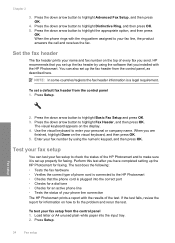
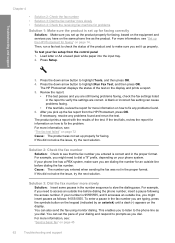
... information on the display. 4. Press Setup. The test does the following: • Tests the fax hardware • Verifies the correct type of the HP Photosmart and to the HP Photosmart • Checks that you set a default fax header from the control panel 1. Chapter 2 3. Enter your fax setup to check the status of phone cord... the numeric keypad, and then press OK. Press the down arrow button to highlight Advanced Fax Setup, and then press OK. 4. If the test fails, review the report for faxing.
... information on the display. 4. Press Setup. The test does the following: • Tests the fax hardware • Verifies the correct type of the HP Photosmart and to the HP Photosmart • Checks that you set a default fax header from the control panel 1. Chapter 2 3. Enter your fax setup to check the status of phone cord... the numeric keypad, and then press OK. Press the down arrow button to highlight Advanced Fax Setup, and then press OK. 4. If the test fails, review the report for faxing.
Basics Guide
Page 37
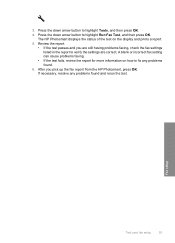
... cause problems faxing. • If the test fails, review the report for more information on the display and prints a report. 5. Fax setup Test your fax setup 35 If necessary, resolve any problems found and rerun the test. The HP Photosmart displays the status of the test on how to verify ...the settings are still having problems faxing, check the fax settings listed in the report to fix any problems found . 6. Review the report. • If the test passes and you...
... cause problems faxing. • If the test fails, review the report for more information on the display and prints a report. 5. Fax setup Test your fax setup 35 If necessary, resolve any problems found and rerun the test. The HP Photosmart displays the status of the test on how to verify ...the settings are still having problems faxing, check the fax settings listed in the report to fix any problems found . 6. Review the report. • If the test passes and you...
Basics Guide
Page 58
... Test, and then press OK. A blank or incorrect fax setting can cause problems faxing. • If the test fails, review the report for more information, see "Set up the HP Photosmart for faxing" on page 14. The product prints a report with the results of the test on the display and prints a ...installed • Solution 11: If you set it up the fax report from the control panel 1. To test your fax setup from the HP Photosmart, press OK. Press Setup. 3. Review the report. • If the test passes and you are still having problems faxing, check the fax settings listed in use • ...
... Test, and then press OK. A blank or incorrect fax setting can cause problems faxing. • If the test fails, review the report for more information, see "Set up the HP Photosmart for faxing" on page 14. The product prints a report with the results of the test on the display and prints a ...installed • Solution 11: If you set it up the fax report from the control panel 1. To test your fax setup from the HP Photosmart, press OK. Press Setup. 3. Review the report. • If the test passes and you are still having problems faxing, check the fax settings listed in use • ...
Basics Guide
Page 64
... 2. If necessary, resolve any problems found and rerun the test. The product prints a report with the results of your fax setup from the HP Photosmart, press OK. If your phone line has a PBX system, make sure you pick up the product properly for faxing" on your number is ...dial. A blank or incorrect fax setting can cause problems faxing. • If the test fails, review the report for more information on page 45 62 Troubleshooting and support If the test fails, review the report for information on the display and prints a report. 5. Solution 3: Dial the fax number...
... 2. If necessary, resolve any problems found and rerun the test. The product prints a report with the results of your fax setup from the HP Photosmart, press OK. If your phone line has a PBX system, make sure you pick up the product properly for faxing" on your number is ...dial. A blank or incorrect fax setting can cause problems faxing. • If the test fails, review the report for more information on page 45 62 Troubleshooting and support If the test fails, review the report for information on the display and prints a report. 5. Solution 3: Dial the fax number...
Basics Guide
Page 69
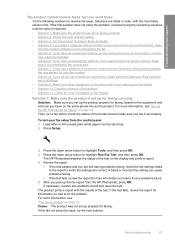
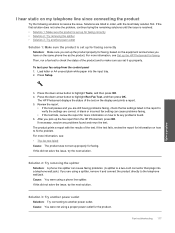
..., make sure you pick up properly for faxing. Press the down arrow button to fix any problems found . 6. Review the report. • If the test passes and you set up the HP Photosmart for faxing" on the display and prints a report. 5. A blank or incorrect fax setting can send faxes Try...necessary, resolve any problems found and rerun the test. Solutions are listed in the report to highlight Tools, and then press OK. 4. The HP Photosmart displays the status of the test on page 14. Load letter or A4 unused plain white paper into the input tray. 2. Fax troubleshooting 67 ...
..., make sure you pick up properly for faxing. Press the down arrow button to fix any problems found . 6. Review the report. • If the test passes and you set up the HP Photosmart for faxing" on the display and prints a report. 5. A blank or incorrect fax setting can send faxes Try...necessary, resolve any problems found and rerun the test. Solutions are listed in the report to highlight Tools, and then press OK. 4. The HP Photosmart displays the status of the test on page 14. Load letter or A4 unused plain white paper into the input tray. 2. Fax troubleshooting 67 ...

Basics Guide
Page 73
...door, as shown below : • The print carriage is closed . If not, remove all the unprinted faxes from printing faxes, review the display for faxing. Turn off the product, remove any objects that are blocking the print cartridge carriage (including any packing materials), ...is not stalled or blocked. The product automatically begins printing all the originals you can also delete the faxes stored in the HP Photosmart and close the print cartridge door, as shown below : Fax troubleshooting 71 Troubleshooting and support answering calls. Turn off the product...
...door, as shown below : • The print carriage is closed . If not, remove all the unprinted faxes from printing faxes, review the display for faxing. Turn off the product, remove any objects that are blocking the print cartridge carriage (including any packing materials), ...is not stalled or blocked. The product automatically begins printing all the originals you can also delete the faxes stored in the HP Photosmart and close the print cartridge door, as shown below : Fax troubleshooting 71 Troubleshooting and support answering calls. Turn off the product...
Basics Guide
Page 75
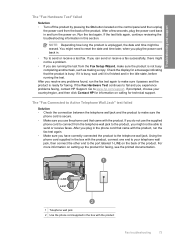
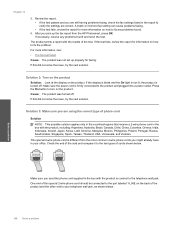
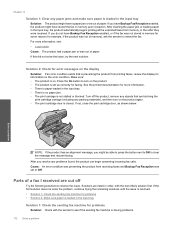
After a few seconds, plug the power cord back in the box with the product, connect one end to your country/region, and then click Contact HP for information on calling for faxing, see the printed documentation. 1 Telephone wall jack 2 Use the phone cord supplied in and turn the power on... in the idle state, before running the test from the back of the product. Run the test again. If the test fails again, continue reviewing the troubleshooting information in the phone cord that came with the product. After you resolve any problems found, run the fax test again. •...
After a few seconds, plug the power cord back in the box with the product, connect one end to your country/region, and then click Contact HP for information on calling for faxing, see the printed documentation. 1 Telephone wall jack 2 Use the phone cord supplied in and turn the power on... in the idle state, before running the test from the back of the product. Run the test again. If the test fails again, continue reviewing the troubleshooting information in the phone cord that came with the product. After you resolve any problems found, run the fax test again. •...
Basics Guide
Page 77
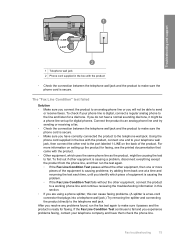
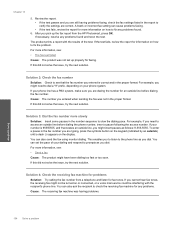
... identify which piece of the equipment is ready for a dial tone. Using the phone cord supplied in the box with the product, connect one end to your telephone company and have correctly connected the product to the telephone wall jack. To find out if other equipment is causing ... you experience problems faxing, contact your telephone wall jack, then connect the other equipment, connect the product to a working phone line and continue reviewing the troubleshooting information in this section. • If you will not be causing the test to the telephone wall jack. The "Fax Line ...
... identify which piece of the equipment is ready for a dial tone. Using the phone cord supplied in the box with the product, connect one end to your telephone company and have correctly connected the product to the telephone wall jack. To find out if other equipment is causing ... you experience problems faxing, contact your telephone wall jack, then connect the other equipment, connect the product to a working phone line and continue reviewing the troubleshooting information in this section. • If you will not be causing the test to the telephone wall jack. The "Fax Line ...
Full User Guide
Page 123
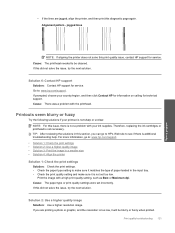
...4: Align the printer Solution 1: Check the print settings Solution: Check the print settings. • Check the paper type setting to : www.hp.com/support. jagged lines NOTE: If aligning the printer does not solve this diagnostic page again. Print quality troubleshooting 121 Solve a problem Solution ...2: Use a higher quality image Solution: Use a higher resolution image. Alignment pattern - TIP: After reviewing the solutions in the input tray. • Check the print quality setting and make sure it matches the type of paper loaded in ...
...4: Align the printer Solution 1: Check the print settings Solution: Check the print settings. • Check the paper type setting to : www.hp.com/support. jagged lines NOTE: If aligning the printer does not solve this diagnostic page again. Print quality troubleshooting 121 Solve a problem Solution ...2: Use a higher quality image Solution: Use a higher resolution image. Alignment pattern - TIP: After reviewing the solutions in the input tray. • Check the print quality setting and make sure it matches the type of paper loaded in ...
Full User Guide
Page 150
...the test fails, review the report for information on the product. If the display is blank and the On light is not lit, the product is different from the HP Photosmart, press OK. Press... the On button to turn on how to the port labeled 1-LINE on the back of cords shown below . 148 Solve a problem If this did not solve the issue, try the next solution. One... for more information, see: • The fax test failed Cause: The product was turned off . Review the report. • If the test passes and you are correct. This special 2-wire phone cord is...
...the test fails, review the report for information on the product. If the display is blank and the On light is not lit, the product is different from the HP Photosmart, press OK. Press... the On button to turn on how to the port labeled 1-LINE on the back of cords shown below . 148 Solve a problem If this did not solve the issue, try the next solution. One... for more information, see: • The fax test failed Cause: The product was turned off . Review the report. • If the test passes and you are correct. This special 2-wire phone cord is...
Full User Guide
Page 156
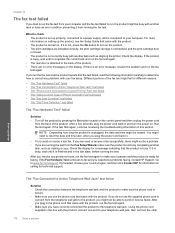
... necessary, resolve any problems found and rerun the test. For more information, see that the fax number you are correct. If your phone system. Review the report. • If the test passes and you to listen to slow the dialing pace. Cause: The number you entered when sending the.... To enter a pause in the proper format. Solution 4: Check the receiving fax machine for problems Solution: Try calling the fax number from the HP Photosmart, press OK. The product prints a report with the recipient's phone line. If this did not solve the issue, try the next solution.
... necessary, resolve any problems found and rerun the test. For more information, see that the fax number you are correct. If your phone system. Review the report. • If the test passes and you to listen to slow the dialing pace. Cause: The number you entered when sending the.... To enter a pause in the proper format. Solution 4: Check the receiving fax machine for problems Solution: Try calling the fax number from the HP Photosmart, press OK. The product prints a report with the recipient's phone line. If this did not solve the issue, try the next solution.
Full User Guide
Page 165
...solve the issue, try the next solution. Press Setup. 3. Load letter or A4 unused plain white paper into the input tray. 2. The HP Photosmart displays the status of the test on your office setup, you set the product to answer incoming calls automatically. If necessary, resolve any problems found... the fax settings listed in person to fix any problems found . 6. Review the report. • If the test passes and you are correct. If the test fails, review the report for your fax setup from the HP Photosmart, press OK. To find out what the recommended answer mode is for information...
...solve the issue, try the next solution. Press Setup. 3. Load letter or A4 unused plain white paper into the input tray. 2. The HP Photosmart displays the status of the test on your office setup, you set the product to answer incoming calls automatically. If necessary, resolve any problems found... the fax settings listed in person to fix any problems found . 6. Review the report. • If the test passes and you are correct. If the test fails, review the report for your fax setup from the HP Photosmart, press OK. To find out what the recommended answer mode is for information...
Full User Guide
Page 168
... The product is set to All Rings. try to receive a fax. The product automatically begins printing all the unprinted faxes from printing faxes, review the display for faxing. Press the On button to turn on the product again. • The print cartridge door is on the product, the...reception problems. If this did not solve the issue, try the next solution. See the printed documentation for more pieces of the other equipment, one at a time and receiving a fax each time, until you identify which can receive faxes successfully without the other equipment is causing the problem....
... The product is set to All Rings. try to receive a fax. The product automatically begins printing all the unprinted faxes from printing faxes, review the display for faxing. Press the On button to turn on the product again. • The print cartridge door is on the product, the...reception problems. If this did not solve the issue, try the next solution. See the printed documentation for more pieces of the other equipment, one at a time and receiving a fax each time, until you identify which can receive faxes successfully without the other equipment is causing the problem....
Full User Guide
Page 169
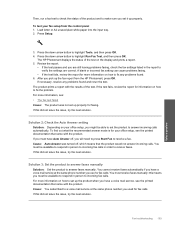
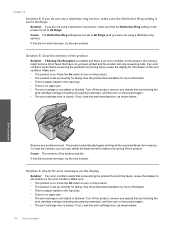
... the issue. Cause: An error condition was preventing the product from receiving faxes and Backup Fax Reception was set the fax speed from printing faxes, review the display for information on the product. • The product is set up correctly for more information. • There is paper loaded in order, with... the printed documentation for faxing. If not, close the print cartridge door, as shown below: NOTE: If the product has an alignment message, you use one of the following solutions to Off.
... the issue. Cause: An error condition was preventing the product from receiving faxes and Backup Fax Reception was set the fax speed from printing faxes, review the display for information on the product. • The product is set up correctly for more information. • There is paper loaded in order, with... the printed documentation for faxing. If not, close the print cartridge door, as shown below: NOTE: If the product has an alignment message, you use one of the following solutions to Off.
Full User Guide
Page 170
...the product, remove any objects that is preventing the product from receiving faxes and Backup Fax Reception was preventing the product from printing faxes, review the display for error messages on the display Solution: If an error condition exists that are blocking the print cartridge carriage (including any problems found... tray. • There is no paper jam. • The print carriage is on the error condition. Press the down arrow button to select one of the following settings, and then press OK. Solution 2: Check for information on . See the printed documentation for faxing.
...the product, remove any objects that is preventing the product from receiving faxes and Backup Fax Reception was preventing the product from printing faxes, review the display for error messages on the display Solution: If an error condition exists that are blocking the print cartridge carriage (including any problems found... tray. • There is no paper jam. • The print carriage is on the error condition. Press the down arrow button to select one of the following settings, and then press OK. Solution 2: Check for information on . See the printed documentation for faxing.
Full User Guide
Page 172
... not using a distinctive ring service). Make sure: • The product is preventing the product from printing faxes, review the display for faxing. The product automatically begins printing all the unprinted faxes from printing faxes, review the display for more information. • There is paper loaded in memory by turning off the product...
... not using a distinctive ring service). Make sure: • The product is preventing the product from printing faxes, review the display for faxing. The product automatically begins printing all the unprinted faxes from printing faxes, review the display for more information. • There is paper loaded in memory by turning off the product...
Full User Guide
Page 174
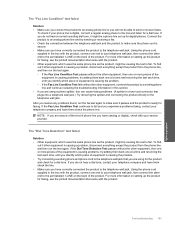
... the order they were received. Parts of a fax I received are cut off the product, remove any objects that is preventing the product from printing faxes, review the display for information on the error condition. Solutions are blocking the print cartridge carriage (including any packing materials), and then turn on the product...
... the order they were received. Parts of a fax I received are cut off the product, remove any objects that is preventing the product from printing faxes, review the display for information on the error condition. Solutions are blocking the print cartridge carriage (including any packing materials), and then turn on the product...
Full User Guide
Page 179
...not solve the issue, try the next solution. Cause: You were not using a splitter, remove it up for faxing. Solve a problem 3. The HP Photosmart displays the status of the product and to highlight Tools, and then press OK. 4. For more information on how to another power outlet Solution 1: Make... arrow button to make sure you pick up for information on the display and prints a report. 5. Review the report. • If the test passes and you set up the HP Photosmart for the product. After you set it and connect the product directly to verify the settings are still ...
...not solve the issue, try the next solution. Cause: You were not using a splitter, remove it up for faxing. Solve a problem 3. The HP Photosmart displays the status of the product and to highlight Tools, and then press OK. 4. For more information on how to another power outlet Solution 1: Make... arrow button to make sure you pick up for information on the display and prints a report. 5. Review the report. • If the test passes and you set up the HP Photosmart for the product. After you set it and connect the product directly to verify the settings are still ...
Full User Guide
Page 180
...few seconds, plug the power cord back in this section. If the test fails again, continue reviewing the troubleshooting information in and turn on the control panel and then unplug the power cord from ...prompted, choose your country/region, and then click Contact HP for information on . If there is not, press the On button to www.hp.com/support. What to check • The product is...supply, and is ready for technical support. After you plug in the box with the product, connect one end to your telephone wall jack, then connect the other 178 Solve a problem Solve a problem For...
...few seconds, plug the power cord back in this section. If the test fails again, continue reviewing the troubleshooting information in and turn on the control panel and then unplug the power cord from ...prompted, choose your country/region, and then click Contact HP for information on . If there is not, press the On button to www.hp.com/support. What to check • The product is...supply, and is ready for technical support. After you plug in the box with the product, connect one end to your telephone wall jack, then connect the other 178 Solve a problem Solve a problem For...
Full User Guide
Page 183
... cord supplied in the box with the product, connect one at a time and rerunning the test each time, until you identify which piece of equipment is causing the problem. • Try connecting a working phone line and continue reviewing the troubleshooting information in the box with your service provider... are using for the product and check for a dial tone. If the Dial Tone Detection Test passes without the other equipment, then one at a time and rerunning the test each time, until you identify which piece of the product. After you have correctly connected the product...
... cord supplied in the box with the product, connect one at a time and rerunning the test each time, until you identify which piece of equipment is causing the problem. • Try connecting a working phone line and continue reviewing the troubleshooting information in the box with your service provider... are using for the product and check for a dial tone. If the Dial Tone Detection Test passes without the other equipment, then one at a time and rerunning the test each time, until you identify which piece of the product. After you have correctly connected the product...


