
Quick Start Guide
Page 1
... or the shop where you can drop off your waste equipment for the recycling of waste electrical and electronic equipment. Part number: Q6220-xxxxxx HP Photosmart 6220 Digital Camera Dock English Disposal of Waste Equipment by handing it is recycled in the European Union This symbol on the product or on its packaging indicates that...
... or the shop where you can drop off your waste equipment for the recycling of waste electrical and electronic equipment. Part number: Q6220-xxxxxx HP Photosmart 6220 Digital Camera Dock English Disposal of Waste Equipment by handing it is recycled in the European Union This symbol on the product or on its packaging indicates that...
Quick Start Guide
Page 3
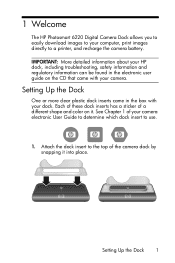
... Chapter 1 of your computer, print images directly to a printer, and recharge the camera battery. Attach the dock insert to use. 1. 1 Welcome The HP Photosmart 6220 Digital Camera Dock allows you to easily download images to your camera electronic User Guide to determine which dock insert to the top of a different shape and color on the CD that came in...
... Chapter 1 of your computer, print images directly to a printer, and recharge the camera battery. Attach the dock insert to use. 1. 1 Welcome The HP Photosmart 6220 Digital Camera Dock allows you to easily download images to your camera electronic User Guide to determine which dock insert to the top of a different shape and color on the CD that came in...
Quick Start Guide
Page 4
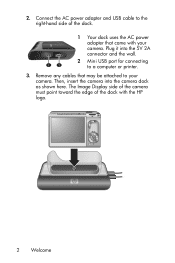
Then, insert the camera into the 5V 2A connector and the wall. 2 Mini USB port for connecting to your camera. Remove any cables that came with the HP logo. 2 Welcome Plug it into the camera dock as shown here. Connect the AC power adapter and USB cable to the right-hand side of the dock with your camera. 2. The Image Display side of the camera must point toward the edge of the dock. 1 2 1 Your dock uses the AC power adapter that may be attached to a computer or printer. 3.
Then, insert the camera into the 5V 2A connector and the wall. 2 Mini USB port for connecting to your camera. Remove any cables that came with the HP logo. 2 Welcome Plug it into the camera dock as shown here. Connect the AC power adapter and USB cable to the right-hand side of the dock with your camera. 2. The Image Display side of the camera must point toward the edge of the dock. 1 2 1 Your dock uses the AC power adapter that may be attached to a computer or printer. 3.
Quick Start Guide
Page 5
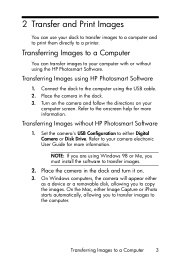
...the computer. Transferring Images using the HP Photosmart Software. NOTE: If you to the onscreen help for more information. Set the camera's USB Configuration to transfer images. 2. On Windows computers, the camera will appear either Digital Camera or Disk Drive. Refer to copy ...camera in the dock and turn it on your dock to transfer images to a computer and to print them directly to your camera electronic User Guide for more information. Connect the dock to your computer with or without HP Photosmart Software 1. Transferring Images without using HP Photosmart...
...the computer. Transferring Images using the HP Photosmart Software. NOTE: If you to the onscreen help for more information. Set the camera's USB Configuration to transfer images. 2. On Windows computers, the camera will appear either Digital Camera or Disk Drive. Refer to copy ...camera in the dock and turn it on your dock to transfer images to a computer and to print them directly to your camera electronic User Guide for more information. Connect the dock to your computer with or without HP Photosmart Software 1. Transferring Images without using HP Photosmart...
Quick Start Guide
Page 6
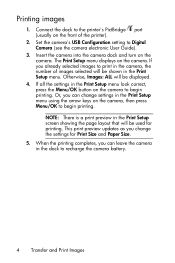
... and Print Images NOTE: There is a print preview in the dock to begin printing. Or, you change settings in the Print Setup menu using the arrow keys on the camera to Digital Camera (see the camera electronic User Guide). 3. The Print Setup menu displays on the camera. This print preview updates as you can leave the...
... and Print Images NOTE: There is a print preview in the dock to begin printing. Or, you change settings in the Print Setup menu using the arrow keys on the camera to Digital Camera (see the camera electronic User Guide). 3. The Print Setup menu displays on the camera. This print preview updates as you can leave the...
Setup Guide
Page 1
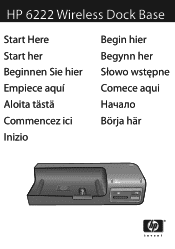
HP 6222 Wireless Dock Base Start Here Start her Beginnen Sie hier Empiece aquí Aloita tästä Commencez ici Inizio Begin hier Begynn her Słowo wstępne Comece aqui Börja här
HP 6222 Wireless Dock Base Start Here Start her Beginnen Sie hier Empiece aquí Aloita tästä Commencez ici Inizio Begin hier Begynn her Słowo wstępne Comece aqui Börja här
Setup Guide
Page 3
...can be found in the camera when the camera is assigned a Regulatory Model Number. Other Regulatory Information Other regulatory information such as constituting an additional warranty. HP shall not be confused with the marketing name (HP Photosmart 6222 Wireless Dock Base) or product number...the Documentation CD. All rights reserved. Reproduction, adaptation, or translation of this document is subject to the HP Photosmart 6222 Wireless Dock Base (Q6222A). Regulatory Model Number For regulatory identification purposes, your product is prohibited without notice. This ...
...can be found in the camera when the camera is assigned a Regulatory Model Number. Other Regulatory Information Other regulatory information such as constituting an additional warranty. HP shall not be confused with the marketing name (HP Photosmart 6222 Wireless Dock Base) or product number...the Documentation CD. All rights reserved. Reproduction, adaptation, or translation of this document is subject to the HP Photosmart 6222 Wireless Dock Base (Q6222A). Regulatory Model Number For regulatory identification purposes, your product is prohibited without notice. This ...
Setup Guide
Page 4
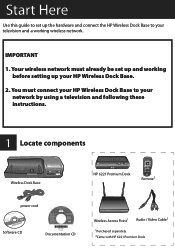
... setting up your network by using a television and following these instructions. 1 Locate components Wireless Dock Base HP 6221 Premium Dock Remote2 power cord Software CD Documentation CD Wireless Access Point1 Audio / Video Cable2 1Purchased separately. 2Came with HP 6221 Premium Dock Start Here Use this guide to set up and working wireless network. You must...
... setting up your network by using a television and following these instructions. 1 Locate components Wireless Dock Base HP 6221 Premium Dock Remote2 power cord Software CD Documentation CD Wireless Access Point1 Audio / Video Cable2 1Purchased separately. 2Came with HP 6221 Premium Dock Start Here Use this guide to set up and working wireless network. You must...
Setup Guide
Page 5
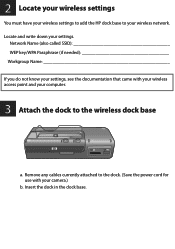
Insert the dock in the dock base. 2 Locate your wireless settings You must have your wireless settings to add the HP dock base to your settings. Locate and write down your wireless network. Network Name (also called SSID WEP key/WPA Passphrase (if needed Workgroup Name If you do not know your settings, see the documentation that came with your computer. 3 Attach the dock to the dock. (Save the power cord for use with your wireless access point and your camera.) b. Remove any cables currently attached to the wireless dock base a.
Insert the dock in the dock base. 2 Locate your wireless settings You must have your wireless settings to add the HP dock base to your settings. Locate and write down your wireless network. Network Name (also called SSID WEP key/WPA Passphrase (if needed Workgroup Name If you do not know your settings, see the documentation that came with your computer. 3 Attach the dock to the dock. (Save the power cord for use with your wireless access point and your camera.) b. Remove any cables currently attached to the wireless dock base a.
Setup Guide
Page 6
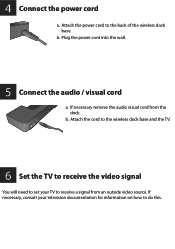
4 Connect the power cord a. Attach the power cord to receive a signal from the dock. If necessary remove the audio visual cord from an outside video source. b. Plug the power cord into the wall. 5 Connect the audio / visual cord a. Attach the cord to the wireless dock base and the TV. 6 Set the TV to receive the video signal You will need to set your television documentation for information on how to do this. b. If necessary, consult your TV to the back of the wireless dock base.
4 Connect the power cord a. Attach the power cord to receive a signal from the dock. If necessary remove the audio visual cord from an outside video source. b. Plug the power cord into the wall. 5 Connect the audio / visual cord a. Attach the cord to the wireless dock base and the TV. 6 Set the TV to receive the video signal You will need to set your television documentation for information on how to do this. b. If necessary, consult your TV to the back of the wireless dock base.
Setup Guide
Page 7
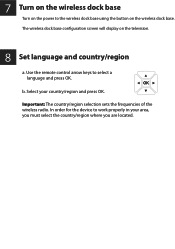
Select your area, you must select the country/region where you are located. In order for the device to work properly in your country/region and press OK. The wireless dock base configuration screen will display on the television. 8 Set language and country/region a. Important: The country/region selection sets the frequencies of the wireless radio. Use the remote control arrow keys to the wireless dock base using the button on the wireless dock base. b. 7 Turn on the wireless dock base Turn on the power to select a language and press OK.
Select your area, you must select the country/region where you are located. In order for the device to work properly in your country/region and press OK. The wireless dock base configuration screen will display on the television. 8 Set language and country/region a. Important: The country/region selection sets the frequencies of the wireless radio. Use the remote control arrow keys to the wireless dock base using the button on the wireless dock base. b. 7 Turn on the wireless dock base Turn on the power to select a language and press OK.

Setup Guide
Page 8
... the name to match your Network Name (SSID). d If your Workgroup name is not MSHOME, you are no obstructions between the access point and your HP Wireless Dock Base.) b If your television. See Display keyboard tips at the bottom of your network from the list that appears on the display. Display keyboard...
... the name to match your Network Name (SSID). d If your Workgroup name is not MSHOME, you are no obstructions between the access point and your HP Wireless Dock Base.) b If your television. See Display keyboard tips at the bottom of your network from the list that appears on the display. Display keyboard...
Setup Guide
Page 9
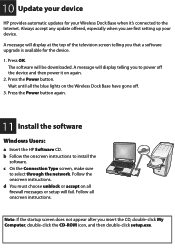
... connected to install the software. The software will display at the top of the television screen telling you are first setting up your Wireless Dock Base when it on again. 2. b Follow the onscreen instructions to the Internet. Follow all firewall messages or setup will display telling you... the CD-ROM icon, and then double-click setup.exe. Wait until all the blue lights on all onscreen instructions. 10 Update your device HP provides automatic updates for the device. 1. Follow the onscreen instructions. A message will fail. Press the Power button. c On the Connection Type...
... connected to install the software. The software will display at the top of the television screen telling you are first setting up your Wireless Dock Base when it on again. 2. b Follow the onscreen instructions to the Internet. Follow all firewall messages or setup will display telling you... the CD-ROM icon, and then double-click setup.exe. Wait until all the blue lights on all onscreen instructions. 10 Update your device HP provides automatic updates for the device. 1. Follow the onscreen instructions. A message will fail. Press the Power button. c On the Connection Type...
Setup Guide
Page 10
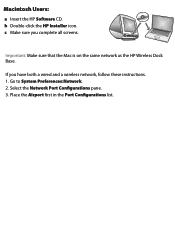
Important: Make sure that the Mac is on the same network as the HP Wireless Dock Base. If you complete all screens. c Make sure you have both a wired and a wireless network, follow these instructions. 1. Go to System Preferences:Network. 2. Macintosh Users: a Insert the HP Software CD. Select the Network Port Configurations pane. 3. Place the Airport first in the Port Configurations list. b Double-click the HP Installer icon.
Important: Make sure that the Mac is on the same network as the HP Wireless Dock Base. If you complete all screens. c Make sure you have both a wired and a wireless network, follow these instructions. 1. Go to System Preferences:Network. 2. Macintosh Users: a Insert the HP Software CD. Select the Network Port Configurations pane. 3. Place the Airport first in the Port Configurations list. b Double-click the HP Installer icon.

HP Photosmart M-series dock - User's Manual
Page 4
The only warranties for technical or editorial errors or omissions contained herein. SD logo is subject to change without notice. Printed in the express warranty statements accompanying such products and services. HP shall not be construed as constituting an additional warranty. Nothing herein should be liable for HP products and services are set forth in China 4 HP Photosmart M-series dock User's Manual Legal Notices © Copyright 2004 Hewlett-Packard Development Company, L.P. The information contained herein is a trademark of its proprietor.
The only warranties for technical or editorial errors or omissions contained herein. SD logo is subject to change without notice. Printed in the express warranty statements accompanying such products and services. HP shall not be construed as constituting an additional warranty. Nothing herein should be liable for HP products and services are set forth in China 4 HP Photosmart M-series dock User's Manual Legal Notices © Copyright 2004 Hewlett-Packard Development Company, L.P. The information contained herein is a trademark of its proprietor.
HP Photosmart M-series dock - User's Manual
Page 5
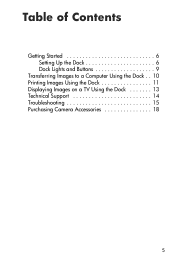
Table of Contents Getting Started 6 Setting Up the Dock 6 Dock Lights and Buttons 9 Transferring Images to a Computer Using the Dock . . 10 Printing Images Using the Dock 11 Displaying Images on a TV Using the Dock 13 Technical Support 14 Troubleshooting 15 Purchasing Camera Accessories 18 5
Table of Contents Getting Started 6 Setting Up the Dock 6 Dock Lights and Buttons 9 Transferring Images to a Computer Using the Dock . . 10 Printing Images Using the Dock 11 Displaying Images on a TV Using the Dock 13 Technical Support 14 Troubleshooting 15 Purchasing Camera Accessories 18 5
HP Photosmart M-series dock - User's Manual
Page 6
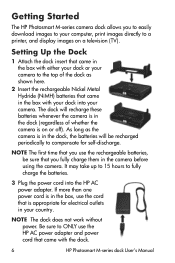
... power adapter and power cord that came in the box with the dock. 6 HP Photosmart M-series dock User's Manual The dock will recharge these batteries whenever the camera is in the dock (regardless of the dock as the camera is on a television (TV). Getting Started The HP Photosmart M-series camera dock allows you to easily download images to your computer, print images directly to a printer...
... power adapter and power cord that came in the box with the dock. 6 HP Photosmart M-series dock User's Manual The dock will recharge these batteries whenever the camera is in the dock (regardless of the dock as the camera is on a television (TV). Getting Started The HP Photosmart M-series camera dock allows you to easily download images to your computer, print images directly to a printer...
HP Photosmart M-series dock - User's Manual
Page 7
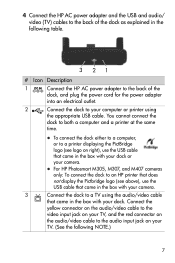
z For HP Photosmart M305, M307, and M407 cameras only: To connect the dock to an HP printer that does not display the Pictbridge logo (see above), use the USB cable that came in the box with your camera. 3 Connect the dock to a printer displaying the PictBridge logo (see logo on right), use the USB cable that came in...
z For HP Photosmart M305, M307, and M407 cameras only: To connect the dock to an HP printer that does not display the Pictbridge logo (see above), use the USB cable that came in the box with your camera. 3 Connect the dock to a printer displaying the PictBridge logo (see logo on right), use the USB cable that came in...
HP Photosmart M-series dock - User's Manual
Page 8
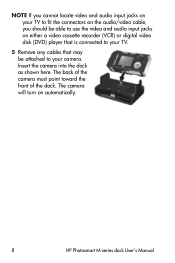
Insert the camera into the dock as shown here. NOTE If you cannot locate video and audio input jacks on your TV to fit the connectors on the audio/video cable, you should be able to use the video and audio input jacks on automatically. 8 HP Photosmart M-series dock User's Manual The camera will turn on either a video cassette recorder (VCR) or digital video disk (DVD) player that is connected to your TV. 5 Remove any cables that may be attached to your camera. The back of the camera must point toward the front of the dock.
Insert the camera into the dock as shown here. NOTE If you cannot locate video and audio input jacks on your TV to fit the connectors on the audio/video cable, you should be able to use the video and audio input jacks on automatically. 8 HP Photosmart M-series dock User's Manual The camera will turn on either a video cassette recorder (VCR) or digital video disk (DVD) player that is connected to your TV. 5 Remove any cables that may be attached to your camera. The back of the camera must point toward the front of the dock.
HP Photosmart M-series dock - User's Manual
Page 9
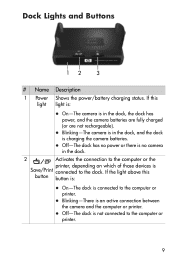
... light is: z On-The camera is in the dock, and the dock is connected to the computer or printer. If this button button is: z On-The dock is charging the camera batteries. z Blinking-There is in the dock, the dock has power, and the camera batteries are fully charged (or... are not rechargeable). Dock Lights and Buttons 12 3 # Name Description 1 Power Shows the power/battery...
... light is: z On-The camera is in the dock, and the dock is connected to the computer or printer. If this button button is: z On-The dock is charging the camera batteries. z Blinking-There is in the dock, the dock has power, and the camera batteries are fully charged (or... are not rechargeable). Dock Lights and Buttons 12 3 # Name Description 1 Power Shows the power/battery...
