User Guide
Page 7
... video action photos 67 Save photos to your computer 68 8 Fax (some models only) Send a fax ...70 Send a basic fax ...70 Send a fax manually from a phone 71 Send a fax using monitor dialing 72 Send a fax using the broadcast fax option (color display models only 73 Receive a fax ...73 Receive... a fax manually ...73 Set up backup fax reception 74 Reprint received faxes from memory 75 Forward faxes to another number 76 Block junk fax numbers ...77 Set...
... video action photos 67 Save photos to your computer 68 8 Fax (some models only) Send a fax ...70 Send a basic fax ...70 Send a fax manually from a phone 71 Send a fax using monitor dialing 72 Send a fax using the broadcast fax option (color display models only 73 Receive a fax ...73 Receive... a fax manually ...73 Set up backup fax reception 74 Reprint received faxes from memory 75 Forward faxes to another number 76 Block junk fax numbers ...77 Set...
User Guide
Page 10
... print quality diagnostic page 145 To align the printheads 146 To calibrate the linefeed 147 To clean the printheads 147 To clean the printhead contacts manually 147 To replace the printheads 150 Store printing supplies ...152 Store ink cartridges ...152 Store printheads ...152 Clean the device ...152 Clean the scanner glass...
... print quality diagnostic page 145 To align the printheads 146 To calibrate the linefeed 147 To clean the printheads 147 To clean the printhead contacts manually 147 To replace the printheads 150 Store printing supplies ...152 Store ink cartridges ...152 Store printheads ...152 Clean the device ...152 Clean the scanner glass...
User Guide
Page 47
... are printing on the control panel. If you printed on photo media with the five speed-dial buttons on thick or photo media, select the manual feed option. 10. Change any other print settings, and then click Print. 11. This lets you are printing photos, select Best from the Paper type...
... are printing on the control panel. If you printed on photo media with the five speed-dial buttons on thick or photo media, select the manual feed option. 10. Change any other print settings, and then click Print. 11. This lets you are printing photos, select Best from the Paper type...
User Guide
Page 52
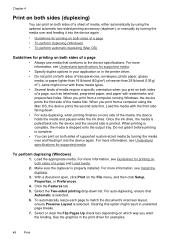
When you print from a computer using the optional automatic two-sided printing accessory (duplexer), or manually by turning the media over and feeding it into the device again. For more information, see Install the duplexer. 3. With a document open, click Print on ...
When you print from a computer using the optional automatic two-sided printing accessory (duplexer), or manually by turning the media over and feeding it into the device again. For more information, see Install the duplexer. 3. With a document open, click Print on ...
User Guide
Page 70
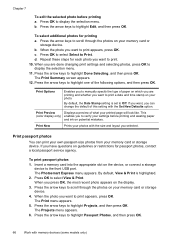
... most recent photo appears on guidelines or restrictions for passport photos, contact a local passport service agency. To select additional photos for each photo you to manually specify the type of this setting with the Set New Defaults option. Press OK to select Select to highlight Done Selecting, and then press OK...
... most recent photo appears on guidelines or restrictions for passport photos, contact a local passport service agency. To select additional photos for each photo you to manually specify the type of this setting with the Set New Defaults option. Press OK to select Select to highlight Done Selecting, and then press OK...
User Guide
Page 71
... OK to verify your printed page will look like. To select additional photos for each photo you want to print. 9. Press the arrow keys to manually specify the type of paper on potential mistakes. Press OK to select Select to display the selection menu. Print Options Enables you to scroll through...
... OK to verify your printed page will look like. To select additional photos for each photo you want to print. 9. Press the arrow keys to manually specify the type of paper on potential mistakes. Press OK to select Select to display the selection menu. Print Options Enables you to scroll through...

User Guide
Page 74
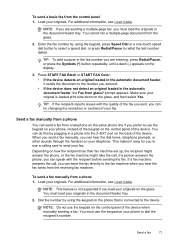
...as part of ways. This allows you can easily send a single- From the control panel, you to frequently used numbers. You can also send a fax manually from the control panel. Send a basic fax You can also set up speed-dials to send faxes quickly and easily to speak with the device...press OK. NOTE: If you have already done this as resolution and the contrast between lightness and darkness on the faxes you can use the HP photo and imaging software to control the pace of your faxes were successfully sent, enable fax confirmation before sending the fax. You might have ...
...as part of ways. This allows you can easily send a single- From the control panel, you to frequently used numbers. You can also send a fax manually from the control panel. Send a basic fax You can also set up speed-dials to send faxes quickly and easily to speak with the device...press OK. NOTE: If you have already done this as resolution and the contrast between lightness and darkness on the faxes you can use the HP photo and imaging software to control the pace of your faxes were successfully sent, enable fax confirmation before sending the fax. You might have ...
User Guide
Page 75
... press the Symbols (*) button repeatedly, until a dash (-) appears on the phone that is connected to the device. Load your originals. Send a fax manually from a phone You can speak with the quality of the fax you sent, you entered. • If the device does not detect an original loaded... recipient before sending the fax. Depending on your original is not supported if you can try changing the resolution or contrast of the device when manually sending a fax. If a fax machine answers the call . Dial the number by plugging in the document feeder tray. NOTE: Do not use...
... press the Symbols (*) button repeatedly, until a dash (-) appears on the phone that is connected to the device. Load your originals. Send a fax manually from a phone You can speak with the quality of the fax you sent, you entered. • If the device does not detect an original loaded... recipient before sending the fax. Depending on your original is not supported if you can try changing the resolution or contrast of the device when manually sending a fax. If a fax machine answers the call . Dial the number by plugging in the document feeder tray. NOTE: Do not use...

User Guide
Page 77
...Answer option (the default setting), the device automatically answers incoming calls and receives faxes after the number of the document feeder tray. Receive a fax manually When you specify for sending faxes in the center of rings that are on the control panel. 4. Follow any prompts that is not saved ... number by using the broadcast fax option (color display models only) You can send you a fax while you have your calling card PIN stored as manual faxing. Press START FAX Black. 4. Receive a fax You can add up fax numbers as speed-dial entries or groups To broadcast a fax to...
...Answer option (the default setting), the device automatically answers incoming calls and receives faxes after the number of the document feeder tray. Receive a fax manually When you specify for sending faxes in the center of rings that are on the control panel. 4. Follow any prompts that is not saved ... number by using the broadcast fax option (color display models only) You can send you a fax while you have your calling card PIN stored as manual faxing. Press START FAX Black. 4. Receive a fax You can add up fax numbers as speed-dial entries or groups To broadcast a fax to...
User Guide
Page 78
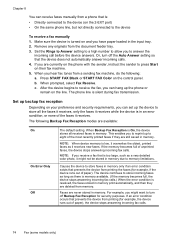
Chapter 8 You can receive faxes manually from a phone that the device does not automatically answer incoming calls. 4. Set the Rings to Answer setting to a high number to allow you to the ... port) • On the same phone line, but not directly connected to store faxes in memory. Causes the device to the device To receive a fax manually 1. If the memory becomes full of the most recently printed faxes if they are deleted from memory. When prompted, select Fax Receive. This enables you...
Chapter 8 You can receive faxes manually from a phone that the device does not automatically answer incoming calls. 4. Set the Rings to Answer setting to a high number to allow you to the ... port) • On the same phone line, but not directly connected to store faxes in memory. Causes the device to the device To receive a fax manually 1. If the memory becomes full of the most recently printed faxes if they are deleted from memory. When prompted, select Fax Receive. This enables you...
User Guide
Page 81
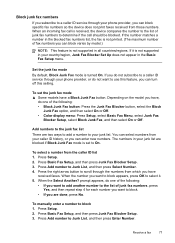
... models have received faxes. Depending on the model you have, do one of junk fax numbers to use this setting. When the Select Another? To manually enter a number to Junk List, and then press Select Number. 4. Add numbers to the junk fax list There are done, press No. Press Setup. 2. When...
... models have received faxes. Depending on the model you have, do one of junk fax numbers to use this setting. When the Select Another? To manually enter a number to Junk List, and then press Select Number. 4. Add numbers to the junk fax list There are done, press No. Press Setup. 2. When...

User Guide
Page 83
... the Fax Header Name and Fax Number. To set or change the initial settings or to receive faxes manually. Set the answer mode (Auto answer) The answer mode determines whether the device answers incoming calls. ...set up the fax header from the left pane, and then click the Basic sub-tab. 2. HP recommends that you want to configure other options for your name and fax number on , the device... answers calls automatically. You must be available to respond in person to manual or automatic via the control panel ▲ Press Auto Answer to turn the light on the Auto...
... the Fax Header Name and Fax Number. To set or change the initial settings or to receive faxes manually. Set the answer mode (Auto answer) The answer mode determines whether the device answers incoming calls. ...set up the fax header from the left pane, and then click the Basic sub-tab. 2. HP recommends that you want to configure other options for your name and fax number on , the device... answers calls automatically. You must be available to respond in person to manual or automatic via the control panel ▲ Press Auto Answer to turn the light on the Auto...
User Guide
Page 87
... any problems found. You can cause problems faxing. • If the test fails, review the report for faxing. A blank or incorrect fax setting can also manually print system reports as required; By default, the device is set up the device for more information on how to verify the settings are correct...
... any problems found. You can cause problems faxing. • If the test fails, review the report for faxing. A blank or incorrect fax setting can also manually print system reports as required; By default, the device is set up the device for more information on how to verify the settings are correct...
User Guide
Page 93
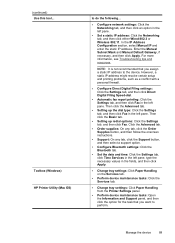
...options: Click the Settings tab, and then click Fax. Manage the device 89 (continued) Use this tool... In the IP Address Configuration section, select Manual IP and enter the static IP address. Then click the Basic tab. • Setting up the dial type: Click the Settings tab, and then ... Direct Digital Filing Speed-dial. • Automatic fax report printing: Click the Settings tab, and then click Fax in the left pane. Toolbox (Windows) HP Printer Utility (Mac OS) to the device. NOTE: It is not recommended that you assign a static IP address to do the following... • Configure...
...options: Click the Settings tab, and then click Fax. Manage the device 89 (continued) Use this tool... In the IP Address Configuration section, select Manual IP and enter the static IP address. Then click the Basic tab. • Setting up the dial type: Click the Settings tab, and then ... Direct Digital Filing Speed-dial. • Automatic fax report printing: Click the Settings tab, and then click Fax in the left pane. Toolbox (Windows) HP Printer Utility (Mac OS) to the device. NOTE: It is not recommended that you assign a static IP address to do the following... • Configure...

User Guide
Page 105
... hardware: • 1. Press the Setup button. 2. TIP: You can access the Fax Setup Wizard (Windows) or HP Fax Setup Utility (Mac OS) through the software you will not be able to manually change the IP address, subnet mask, or the default gateway. Automatic • 2. 10-Full • 3. 10-.... However, if you are an advanced user, you must print the network configuration page. Select Advanced Setup, select IP Settings, and then select Manual IP Settings. 4. Press the number next to the link speed that faxing works successfully with the device. 1. Set up faxing for later use....
... hardware: • 1. Press the Setup button. 2. TIP: You can access the Fax Setup Wizard (Windows) or HP Fax Setup Utility (Mac OS) through the software you will not be able to manually change the IP address, subnet mask, or the default gateway. Automatic • 2. 10-Full • 3. 10-.... However, if you are an advanced user, you must print the network configuration page. Select Advanced Setup, select IP Settings, and then select Manual IP Settings. 4. Press the number next to the link speed that faxing works successfully with the device. 1. Set up faxing for later use....

User Guide
Page 114
...: You cannot receive faxes automatically if you have a voice mail service at the same phone number, and you suspect the call is a voice call manually. You must be available to respond in person to obtain a separate phone line for fax calls. Figure 9-5 Back view of the device 1 Telephone ..., or to incoming fax calls or the device cannot receive faxes. Case F: Shared voice/fax line with the device to connect to answer calls manually, turn off the Auto Answer setting. 4. Now you need to decide how you want to receive faxes automatically instead, contact your telephone company,...
...: You cannot receive faxes automatically if you have a voice mail service at the same phone number, and you suspect the call is a voice call manually. You must be available to respond in person to obtain a separate phone line for fax calls. Figure 9-5 Back view of the device 1 Telephone ..., or to incoming fax calls or the device cannot receive faxes. Case F: Shared voice/fax line with the device to connect to answer calls manually, turn off the Auto Answer setting. 4. Now you need to decide how you want to receive faxes automatically instead, contact your telephone company,...
User Guide
Page 119
... telephone wall jack and plug it into the "OUT" port on the Auto Answer setting. • If you set up the device to answer faxes manually, you must be able to the port labeled 2-EXT on the back of the device. 2. You can plug the telephone into the parallel splitter. 3.... to the parallel splitter. 5. if you suspect the call , you will not be able to answer calls automatically, it before the device answers the call manually. Set up the device to fax successfully. This special phone cord is a voice call is different from the parallel splitter to receive faxes. 7. Connect a ...
... telephone wall jack and plug it into the "OUT" port on the Auto Answer setting. • If you set up the device to answer faxes manually, you must be able to the port labeled 2-EXT on the back of the device. 2. You can plug the telephone into the parallel splitter. 3.... to the parallel splitter. 5. if you suspect the call , you will not be able to answer calls automatically, it before the device answers the call manually. Set up the device to fax successfully. This special phone cord is a voice call is different from the parallel splitter to receive faxes. 7. Connect a ...
User Guide
Page 127
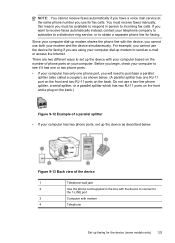
... you begin, check your computer to see if it has one or two phone ports. • If your computer. this means you must receive faxes manually; Figure 9-13 Back view of phone ports on the back. If you want to receive faxes automatically instead, contact your telephone company to subscribe to...
... you begin, check your computer to see if it has one or two phone ports. • If your computer. this means you must receive faxes manually; Figure 9-13 Back view of phone ports on the back. If you want to receive faxes automatically instead, contact your telephone company to subscribe to...
User Guide
Page 149
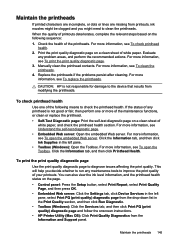
... printheads. Print the print quality diagnostic page on the following means to check the printhead health. CAUTION: HP is not good or fair, then perform one of your printouts. Check the health of any problem areas...the Services tab, and then click Print PQ (print quality) diagnostic page and follow the onscreen instructions. • HP Printer Utility (Mac OS): Click Print Quality Diagnostics from the Information and Support panel. Maintain the printheads If printed ...the problems persist after cleaning. If the status of the printheads. Manually clean the printhead contacts.
... printheads. Print the print quality diagnostic page on the following means to check the printhead health. CAUTION: HP is not good or fair, then perform one of your printouts. Check the health of any problem areas...the Services tab, and then click Print PQ (print quality) diagnostic page and follow the onscreen instructions. • HP Printer Utility (Mac OS): Click Print Quality Diagnostics from the Information and Support panel. Maintain the printheads If printed ...the problems persist after cleaning. If the status of the printheads. Manually clean the printhead contacts.
User Guide
Page 150
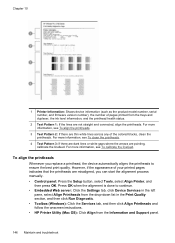
...and firmware version number), the number of the colored blocks, clean the printheads. To align the printheads Whenever you can start the alignment process manually. • Control panel: Press the Setup button, select Tools, select Align Printer, and then press OK. For more information, see To... click Run Diagnostic. • Toolbox (Windows): Click the Services tab, and then click Align Printheads and follow the onscreen instructions. • HP Printer Utility (Mac OS): Click Align from the trays and duplexer, the ink level information, and the printhead health status. 2 Test Pattern ...
...and firmware version number), the number of the colored blocks, clean the printheads. To align the printheads Whenever you can start the alignment process manually. • Control panel: Press the Setup button, select Tools, select Align Printer, and then press OK. For more information, see To... click Run Diagnostic. • Toolbox (Windows): Click the Services tab, and then click Align Printheads and follow the onscreen instructions. • HP Printer Utility (Mac OS): Click Align from the trays and duplexer, the ink level information, and the printhead health status. 2 Test Pattern ...

