Windows Help
Page 2
Contents Contents 1 HP Photosmart C8100 All-in-One series Help 7 2 HP All-in-One overview The HP All-in-One at a glance...9 Control panel overview...10 Control panel features...11 Display icons...12 Display sleep state...12 Menu overview...12 Photosmart Express Menu 13 Copy Menu...13 Scan Menu...13 CD/DVD Menu...14 Setup Menu...14 Enter text using...
Contents Contents 1 HP Photosmart C8100 All-in-One series Help 7 2 HP All-in-One overview The HP All-in-One at a glance...9 Control panel overview...10 Control panel features...11 Display icons...12 Display sleep state...12 Menu overview...12 Photosmart Express Menu 13 Copy Menu...13 Scan Menu...13 CD/DVD Menu...14 Setup Menu...14 Enter text using...
Windows Help
Page 5
... memory card or storage device 115 Scan an original to a CD/DVD 116 Scan slides or negative film 116 Edit a scanned image...117 Edit a scanned preview image 118 Edit a scanned photo or graphic 118 Edit a scanned document 118 Share a scanned image with friends and relatives 118 Stop scanning...119 10 Use the copy features ...129 Stop copying...130 11 Print reports and forms Print a self-test report...131 Print forms...132 12 Maintain the HP All-in-One Clean the HP All-in-One...133 Clean the glass...133 Clean the lid backing...134 Clean the exterior...134 Check the estimated ink levels 134 ...
... memory card or storage device 115 Scan an original to a CD/DVD 116 Scan slides or negative film 116 Edit a scanned image...117 Edit a scanned preview image 118 Edit a scanned photo or graphic 118 Edit a scanned document 118 Share a scanned image with friends and relatives 118 Stop scanning...119 10 Use the copy features ...129 Stop copying...130 11 Print reports and forms Print a self-test report...131 Print forms...132 12 Maintain the HP All-in-One Clean the HP All-in-One...133 Clean the glass...133 Clean the lid backing...134 Clean the exterior...134 Check the estimated ink levels 134 ...
Windows Help
Page 6
...164 Print troubleshooting...172 Memory card and front USB port troubleshooting 179 Scan troubleshooting...183 Copy troubleshooting...186 Errors...190 Device messages...190 File messages...193 Supported file types for the HP All-in-One 194 General user messages 195 Paper messages...199 Power and connection ......213 Placing a call...213 After the phone support period 213 Additional warranty options...213 HP Quick Exchange Service (Japan 214 Call HP Korea customer support 214 Prepare the HP All-in-One for shipment 215 Secure the ink system...215 Remove the control panel faceplate 215 Pack...
...164 Print troubleshooting...172 Memory card and front USB port troubleshooting 179 Scan troubleshooting...183 Copy troubleshooting...186 Errors...190 Device messages...190 File messages...193 Supported file types for the HP All-in-One 194 General user messages 195 Paper messages...199 Power and connection ......213 Placing a call...213 After the phone support period 213 Additional warranty options...213 HP Quick Exchange Service (Japan 214 Call HP Korea customer support 214 Prepare the HP All-in-One for shipment 215 Secure the ink system...215 Remove the control panel faceplate 215 Pack...
Windows Help
Page 8
...scan features" on page 113 • "Use the copy features" on page 121 • "Print reports and forms" on page 131 • "Maintain the HP All-in-One" on page 133 • "Shop for ink supplies" on page 143 • "HP warranty and support" on page 211 • "Technical information" on page 219 HP Photosmart... C8100 All-inOne series Help HP Photosmart C8100 All-in -One" on page 17 • "Finish setting up the HP All-in -One series Help 7 1 HP Photosmart C8100 All-inOne series Help For information about the HP All-in-One, see: • "HP All-in-One overview" on...
...scan features" on page 113 • "Use the copy features" on page 121 • "Print reports and forms" on page 131 • "Maintain the HP All-in-One" on page 133 • "Shop for ink supplies" on page 143 • "HP warranty and support" on page 211 • "Technical information" on page 219 HP Photosmart... C8100 All-inOne series Help HP Photosmart C8100 All-in -One" on page 17 • "Finish setting up the HP All-in -One series Help 7 1 HP Photosmart C8100 All-inOne series Help For information about the HP All-in-One, see: • "HP All-in-One overview" on...
Windows Help
Page 10
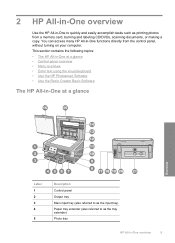
... • Control panel overview • Menu overview • Enter text using the visual keyboard • Use the HP Photosmart Software • Use the Roxio Creator Basic Software The HP All-in-One at a glance Overview Label 1 2 3 4 5 Description Control panel Output tray Main input tray (also referred to... accomplish tasks such as the tray extender) Photo tray HP All-in -One functions directly from a memory card, burning and labeling CD/DVDs, scanning documents, or making a copy. 2 HP All-in-One overview Use the HP All-in-One to as printing photos from the control panel, without ...
... • Control panel overview • Menu overview • Enter text using the visual keyboard • Use the HP Photosmart Software • Use the Roxio Creator Basic Software The HP All-in-One at a glance Overview Label 1 2 3 4 5 Description Control panel Output tray Main input tray (also referred to... accomplish tasks such as the tray extender) Photo tray HP All-in -One functions directly from a memory card, burning and labeling CD/DVDs, scanning documents, or making a copy. 2 HP All-in-One overview Use the HP All-in-One to as printing photos from the control panel, without ...

Windows Help
Page 13
... the icon corresponds to the color of the ink cartridge, and the fill level of the icon corresponds ... 50% full. Indicates the presence and signal strength of inactivity. This icon might appear if an ink cartridge contains non-HP ink. The display turns back on when you touch the display, press a control panel button, insert a memory card or...than 50% full, the ink cartridge icons do not appear on the HP All-in-One display. • Photosmart Express Menu • Copy Menu • Scan Menu 12 HP All-in -One from a connected computer. Overview Display sleep state To prolong the life ...
... the icon corresponds to the color of the ink cartridge, and the fill level of the icon corresponds ... 50% full. Indicates the presence and signal strength of inactivity. This icon might appear if an ink cartridge contains non-HP ink. The display turns back on when you touch the display, press a control panel button, insert a memory card or...than 50% full, the ink cartridge icons do not appear on the HP All-in-One display. • Photosmart Express Menu • Copy Menu • Scan Menu 12 HP All-in -One from a connected computer. Overview Display sleep state To prolong the life ...
Windows Help
Page 14
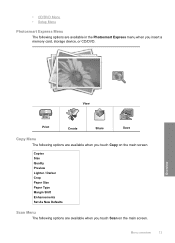
• CD/DVD Menu • Setup Menu Photosmart Express Menu The following options are available when you touch Copy on the main screen. Overview View Print Create Share Save Copy Menu The following options are available when you insert a memory card, storage device, or CD/DVD. Copies Size Quality Preview Lighter / Darker Crop Paper Size Paper Type Margin Shift Enhancements Set As New Defaults Scan Menu The following options are available in the Photosmart Express menu when you touch Scan on the main screen. Menu overview 13
• CD/DVD Menu • Setup Menu Photosmart Express Menu The following options are available when you touch Copy on the main screen. Overview View Print Create Share Save Copy Menu The following options are available when you insert a memory card, storage device, or CD/DVD. Copies Size Quality Preview Lighter / Darker Crop Paper Size Paper Type Margin Shift Enhancements Set As New Defaults Scan Menu The following options are available in the Photosmart Express menu when you touch Scan on the main screen. Menu overview 13
Windows Help
Page 15
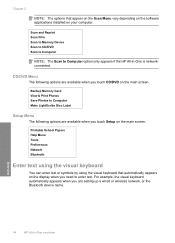
... Save Photos to Computer option only appears if the HP All-in -One overview For example, the visual keyboard automatically appears when you are available when you need to enter text. Scan and Reprint Scan Film Scan to Memory Device Scan to CD/DVD Scan to Computer NOTE: The Scan to Computer Make LightScribe Disc Label Setup Menu... Tools Preferences Network Bluetooth Enter text using the visual keyboard You can enter text or symbols by using the visual keyboard that appear on the Scan Menu vary depending on the software applications installed on the main screen. Overview 14...
... Save Photos to Computer option only appears if the HP All-in -One overview For example, the visual keyboard automatically appears when you are available when you need to enter text. Scan and Reprint Scan Film Scan to Memory Device Scan to CD/DVD Scan to Computer NOTE: The Scan to Computer Make LightScribe Disc Label Setup Menu... Tools Preferences Network Bluetooth Enter text using the visual keyboard You can enter text or symbols by using the visual keyboard that appear on the Scan Menu vary depending on the software applications installed on the main screen. Overview 14...
Windows Help
Page 22
...Touch to scroll through the options, and then touch Restore Factory Defaults. To set up the HP All-in-One to play a slideshow on the display, similar to what they were when you purchased the HP Allin-One. You can restore the current settings to a screensaver on or off . Touch Setup. 2.... all the menu options. 3. Restore the factory defaults You can perform this process from a Bluetooth device Set the default paper tray to scan settings and the language and country/region settings. Set your preferences 21 Touch Setup on the display. 2. Touch Setup on the display. 2....
...Touch to scroll through the options, and then touch Restore Factory Defaults. To set up the HP All-in-One to play a slideshow on the display, similar to what they were when you purchased the HP Allin-One. You can restore the current settings to a screensaver on or off . Touch Setup. 2.... all the menu options. 3. Restore the factory defaults You can perform this process from a Bluetooth device Set the default paper tray to scan settings and the language and country/region settings. Set your preferences 21 Touch Setup on the display. 2. Touch Setup on the display. 2....
Windows Help
Page 45
...your network components will not be connected to an active network, otherwise the setting will not stay when you exit from the HP All-in -One Touch Network. Touch one of the following topics: • Access the Embedded Web Server • Use the Embedded Web Server setup wizard 44 Finish... Web Server help within the Embedded Web Server. NOTE: If the menu option you want is a web-based user interface that lets you scan photos and documents from the menu. Touch IP Settings. 5. Also, the Embedded Web Server enables you to monitor status and order printer supplies...
...your network components will not be connected to an active network, otherwise the setting will not stay when you exit from the HP All-in -One Touch Network. Touch one of the following topics: • Access the Embedded Web Server • Use the Embedded Web Server setup wizard 44 Finish... Web Server help within the Embedded Web Server. NOTE: If the menu option you want is a web-based user interface that lets you scan photos and documents from the menu. Touch IP Settings. 5. Also, the Embedded Web Server enables you to monitor status and order printer supplies...
Windows Help
Page 56
... section contains links to commonly performed tasks, such as printing photos, burning and labeling CD/DVDs, scanning, and making copies. • "How do I? 55 on page 115 • "How do I make a black-and-white or color copy of the paper?" on page 116 • "How do I create special projects from a memory card...
... section contains links to commonly performed tasks, such as printing photos, burning and labeling CD/DVDs, scanning, and making copies. • "How do I? 55 on page 115 • "How do I make a black-and-white or color copy of the paper?" on page 116 • "How do I create special projects from a memory card...
Windows Help
Page 58
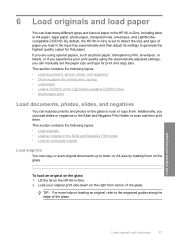
... negatives You can load documents and photos on loading an original, refer to the engraved guides along the edge of paper you can copy or scan original documents up to detect the size and type of the glass. 6 Load originals and load paper You can load many different types and sizes... the lid on the glass 1. TIP: For more help on the glass to generate the highest quality output for that paper. By default, the HP All-in-One is set the paper size and type for printing and copying • Load paper • Load a CD/DVD in the Slide and Negative Film...
... negatives You can load documents and photos on loading an original, refer to the engraved guides along the edge of paper you can copy or scan original documents up to detect the size and type of the glass. 6 Load originals and load paper You can load many different types and sizes... the lid on the glass 1. TIP: For more help on the glass to generate the highest quality output for that paper. By default, the HP All-in-One is set the paper size and type for printing and copying • Load paper • Load a CD/DVD in the Slide and Negative Film...
Windows Help
Page 59
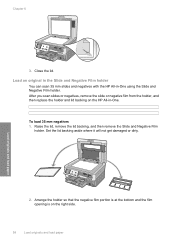
Load originals and load paper 2. Load an original in the Slide and Negative Film holder You can scan 35 mm slides and negatives with the HP All-in -One. Raise the lid, remove the lid backing, and then remove the Slide and Negative Film holder. Set the lid backing aside where it will not... holder so that the negative film portion is at the bottom and the film opening is on the HP All-in -One using the Slide and Negative Film holder. Close the lid. After you scan slides or negatives, remove the slide or negative film from the holder, and then replace the holder and...
Load originals and load paper 2. Load an original in the Slide and Negative Film holder You can scan 35 mm slides and negatives with the HP All-in -One. Raise the lid, remove the lid backing, and then remove the Slide and Negative Film holder. Set the lid backing aside where it will not... holder so that the negative film portion is at the bottom and the film opening is on the HP All-in -One using the Slide and Negative Film holder. Close the lid. After you scan slides or negatives, remove the slide or negative film from the holder, and then replace the holder and...
Windows Help
Page 60
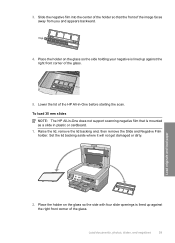
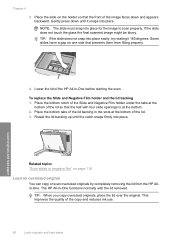
... Load originals and load paper 2. Place the holder on the glass so the side with four slide openings is mounted as a slide in -One before starting the scan. Place the holder on the glass so the side holding your negative is lined up against the right front corner of the image faces... away from you and appears backward. 4. To load 35 mm slides NOTE: The HP All-in-One does not support scanning negative film that the front of the glass. 5. Load documents, photos, slides, and negatives 59 Lower the lid of the glass.
... Load originals and load paper 2. Place the holder on the glass so the side with four slide openings is mounted as a slide in -One before starting the scan. Place the holder on the glass so the side holding your negative is lined up against the right front corner of the image faces... away from you and appears backward. 4. To load 35 mm slides NOTE: The HP All-in-One does not support scanning negative film that the front of the glass. 5. Load documents, photos, slides, and negatives 59 Lower the lid of the glass.
Windows Help
Page 61
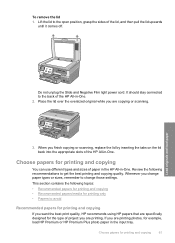
...Place the bottom tabs of the HP All-in the slots at the bottom. 2. NOTE: The slide must snap into place. If the slide does not touch the glass the final scanned image might be blurry. Lower the lid of the lid backing in -One before starting the scan. Rotate the lid backing up... topics "Scan slides or negative film" on one side that the half with the lid removed. TIP: When you copy oversized originals, place the lid over the original. Gently press down and appears backward. To replace the Slide and Negative Film holder and the lid backing 1. The HP All-in-One functions normally...
...Place the bottom tabs of the HP All-in the slots at the bottom. 2. NOTE: The slide must snap into place. If the slide does not touch the glass the final scanned image might be blurry. Lower the lid of the lid backing in -One before starting the scan. Rotate the lid backing up... topics "Scan slides or negative film" on one side that the half with the lid removed. TIP: When you copy oversized originals, place the lid over the original. Gently press down and appears backward. To replace the Slide and Negative Film holder and the lid backing 1. The HP All-in-One functions normally...
Windows Help
Page 62
Choose papers for example, load HP Premium or HP Premium Plus photo paper in -One. To remove the lid 1. When you are printing. Place the lid over the oversized original while you finish copying or scanning, replace the lid by inserting the tabs on the lid back into the appropriate slots...-in the input tray. If you are copying or scanning. 3. Whenever you want the best print quality, HP recommends using HP papers that are printing photos, for printing and copying You can use different types and sizes of the HP All-in -One. 2. Choose papers for the type of project you...
Choose papers for example, load HP Premium or HP Premium Plus photo paper in -One. To remove the lid 1. When you are printing. Place the lid over the oversized original while you finish copying or scanning, replace the lid by inserting the tabs on the lid back into the appropriate slots...-in the input tray. If you are copying or scanning. 3. Whenever you want the best print quality, HP recommends using HP papers that are printing photos, for printing and copying You can use different types and sizes of the HP All-in -One. 2. Choose papers for the type of project you...
Windows Help
Page 113
...want to the front USB port, or insert a CD/DVD (label side up) into the LightScribe drive. To flip the scanned film image horizontally 1. The Photosmart Express menu appears, with the most recent photo shown on page 118 112 Use the photo features The View Photos screen appears.... -One, connect a storage device to edit appears, touch it. 5. While previewing your photos. 4. The image is then shown by itself on a perimage basis. Touch Edit. The Options menu appears. 2. Touching this option flips the image, which is flipped horizontally and appears by itself on the HP All...
...want to the front USB port, or insert a CD/DVD (label side up) into the LightScribe drive. To flip the scanned film image horizontally 1. The Photosmart Express menu appears, with the most recent photo shown on page 118 112 Use the photo features The View Photos screen appears.... -One, connect a storage device to edit appears, touch it. 5. While previewing your photos. 4. The image is then shown by itself on a perimage basis. Touch Edit. The Options menu appears. 2. Touching this option flips the image, which is flipped horizontally and appears by itself on the HP All...
Windows Help
Page 114
... (photos, magazine articles, film negatives, slides, and text documents) on the HP All-in-One. Touch Scan. Scan 9 Use the scan features Scanning is set to Automatic, and load photo paper in the HP All-in-One. You can use the scanning features of the HP All-in-One to detect the type of the following: To reprint your computer. For...
... (photos, magazine articles, film negatives, slides, and text documents) on the HP All-in-One. Touch Scan. Scan 9 Use the scan features Scanning is set to Automatic, and load photo paper in the HP All-in-One. You can use the scanning features of the HP All-in-One to detect the type of the following: To reprint your computer. For...
Windows Help
Page 115
... can restore full functionality by starting the HP Photosmart Software. Chapter 9 To change the paper type. d. NOTE: Touch Settings to scan images. Touch or to a CD/DVD • Scan slides or negative film Scan 114 Use the scan features Scan an image You can also use the scan features, the HP All-in -One. This section explains how to edit...
... can restore full functionality by starting the HP Photosmart Software. Chapter 9 To change the paper type. d. NOTE: Touch Settings to scan images. Touch or to a CD/DVD • Scan slides or negative film Scan 114 Use the scan features Scan an image You can also use the scan features, the HP All-in -One. This section explains how to edit...
Windows Help
Page 116
... connection in -One. 2. Touch the appropriate computer application. To save a scan to Computer. 4. Scan an image 115 Scan Scan an original to a computer You can edit it. 8. The Scan Menu appears. 3. b. To scan to the preview image, and then click Accept when you can scan originals placed on the glass by using HP Photosmart Software" on page 118 Scan an original...
... connection in -One. 2. Touch the appropriate computer application. To save a scan to Computer. 4. Scan an image 115 Scan Scan an original to a computer You can edit it. 8. The Scan Menu appears. 3. b. To scan to the preview image, and then click Accept when you can scan originals placed on the glass by using HP Photosmart Software" on page 118 Scan an original...


