

Bluetooth Wireless Technology Basics
Page 7
... BWT driver. Follow the instructions in the Folders pane of Windows Explorer and select Bluetooth Setup Wizard to your notebook user documentation if you can use the Bluetooth Setup wizard to white. Then you need help locating the wireless button and light. Enable BWT functionality. 3. Install the BWT software The required BWT software comes preloaded on your BWT-enabled notebook PC: 1. Enable BWT functionality If the wireless light (ICON) is enabled, a Bluetooth icon will change from red to configure the service...
... BWT driver. Follow the instructions in the Folders pane of Windows Explorer and select Bluetooth Setup Wizard to your notebook user documentation if you can use the Bluetooth Setup wizard to white. Then you need help locating the wireless button and light. Enable BWT functionality. 3. Install the BWT software The required BWT software comes preloaded on your BWT-enabled notebook PC: 1. Enable BWT functionality If the wireless light (ICON) is enabled, a Bluetooth icon will change from red to configure the service...

Bluetooth Wireless Technology Basics
Page 8
... Today screen to activate BWT functionality, to create BWT connections, or to manage and change the default BWT settings and set the level of discoverability of your notebook, select Start > My Programs > My Bluetooth Places to another BWT-enabled device. iPAQ Pocket PCs Certain h1900, h3800, h3900, and all h2200, h4000, h5000 Series iPAQ Pocket PCs are within range, they perform a service discovery during which they report a list...
... Today screen to activate BWT functionality, to create BWT connections, or to manage and change the default BWT settings and set the level of discoverability of your notebook, select Start > My Programs > My Bluetooth Places to another BWT-enabled device. iPAQ Pocket PCs Certain h1900, h3800, h3900, and all h2200, h4000, h5000 Series iPAQ Pocket PCs are within range, they perform a service discovery during which they report a list...
Security - Windows Vista
Page 8
... not case sensitive. ● A password must be entered at a Windows prompt. Because most passwords are not displayed as screen-saver passwords, select Start > Help and Support. 2 Chapter 2 Using passwords ENWW Use the following topics list Windows and Setup Utility passwords and describe their functions. NOTE: Select models include a separate numeric keypad, which functions exactly like the keyboard number keys. ● A password must be set and entered with the embedded numeric keypad. 2 Using passwords A password is a group of characters that...
... not case sensitive. ● A password must be entered at a Windows prompt. Because most passwords are not displayed as screen-saver passwords, select Start > Help and Support. 2 Chapter 2 Using passwords ENWW Use the following topics list Windows and Setup Utility passwords and describe their functions. NOTE: Select models include a separate numeric keypad, which functions exactly like the keyboard number keys. ● A password must be set and entered with the embedded numeric keypad. 2 Using passwords A password is a group of characters that...
Security - Windows Vista
Page 18
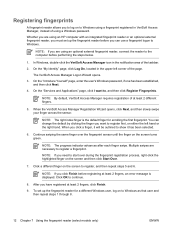
... Wizard opens, click Next, and then slowly swipe your finger across the sensor. NOTE: If you click Finish before registering at least 2 different fingers. 5. On the "Introduce Yourself" page, enter the user's Windows password, if one has been established, and then click Next. 4. Click a different finger on the screen turns green. NOTE: By default, VeriSoft Access Manager requires registration of using a Windows password...
... Wizard opens, click Next, and then slowly swipe your finger across the sensor. NOTE: If you click Finish before registering at least 2 different fingers. 5. On the "Introduce Yourself" page, enter the user's Windows password, if one has been established, and then click Next. 4. Click a different finger on the screen turns green. NOTE: By default, VeriSoft Access Manager requires registration of using a Windows password...

Wireless Setup Guide
Page 3
... problems at any time during this setup. 2 Make sure that the blue wireless light next to the instructions included with the router. router manufacturer or your Web browser and accessing a Web site. Location of the network and to configure the wireless router. 1 Set up and turn it off by pressing the wireless on page 2. Web site. 3 Record this process your setup with the wireless router Ethernet cable connected, remove...
... problems at any time during this setup. 2 Make sure that the blue wireless light next to the instructions included with the router. router manufacturer or your Web browser and accessing a Web site. Location of the network and to configure the wireless router. 1 Set up and turn it off by pressing the wireless on page 2. Web site. 3 Record this process your setup with the wireless router Ethernet cable connected, remove...
Wireless Setup Guide
Page 7
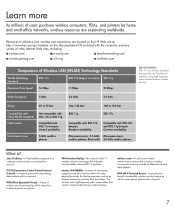
.../go/wireless, on number-sequence encryption. The network uses high-frequency radio waves rather than wires to a network. TCP/IP (Transmission Control Protocol/Internet Protocol)-A network protocol for transmitting data packets within the same physical proximity for sharing resources such as an Internet connection, printers, files, and drives. WPA (Wi-Fi Protected Access)-A specificationbased, interoperable wireless security feature for which a pass phrase (password) is connected...
.../go/wireless, on number-sequence encryption. The network uses high-frequency radio waves rather than wires to a network. TCP/IP (Transmission Control Protocol/Internet Protocol)-A network protocol for transmitting data packets within the same physical proximity for sharing resources such as an Internet connection, printers, files, and drives. WPA (Wi-Fi Protected Access)-A specificationbased, interoperable wireless security feature for which a pass phrase (password) is connected...
Software Updates - Windows Vista
Page 7
... as installing applications, running utilities, or changing Windows settings. NOTE: Windows® includes the User Account Control feature to improve the security of your computer model, product category, and series or family. NOTE: The computer system BIOS is connected to Windows Help for data transfer among hardware devices, including the time and date. Access the updates on the HP Web site. Identify your computer. The BIOS initializes the operating system...
... as installing applications, running utilities, or changing Windows settings. NOTE: Windows® includes the User Account Control feature to improve the security of your computer model, product category, and series or family. NOTE: The computer system BIOS is connected to Windows Help for data transfer among hardware devices, including the time and date. Access the updates on the HP Web site. Identify your computer. The BIOS initializes the operating system...

Software Updates - Windows Vista
Page 8
... the system BIOS currently installed. To exit the Setup Utility, use the Setup Utility for your computer: Select Start > Help and Support, and then select the software and drivers update. 2. Downloading a BIOS update CAUTION: To prevent damage to the computer or an unsuccessful installation, download and install a BIOS update only when the computer is selected, BIOS and other identifier. Do not insert, remove, connect, or disconnect any device, cable, or cord. Follow the instructions on or...
... the system BIOS currently installed. To exit the Setup Utility, use the Setup Utility for your computer: Select Start > Help and Support, and then select the software and drivers update. 2. Downloading a BIOS update CAUTION: To prevent damage to the computer or an unsuccessful installation, download and install a BIOS update only when the computer is selected, BIOS and other identifier. Do not insert, remove, connect, or disconnect any device, cable, or cord. Follow the instructions on or...

Drives - Windows Vista
Page 14
... the display. 3. Disconnect all external devices connected to the computer. 4. Remove the 2 hard drive screws (1). 8 Chapter 5 Replacing the hard drive With the hard drive bay toward you are not sure whether the computer is on a flat surface. 6. Shut down the computer through the operating system. Turn the computer upside down on , in the Sleep state, or in Hibernation, turn the computer on by pressing the power button. 5 Replacing the hard drive...
... the display. 3. Disconnect all external devices connected to the computer. 4. Remove the 2 hard drive screws (1). 8 Chapter 5 Replacing the hard drive With the hard drive bay toward you are not sure whether the computer is on a flat surface. 6. Shut down the computer through the operating system. Turn the computer upside down on , in the Sleep state, or in Hibernation, turn the computer on by pressing the power button. 5 Replacing the hard drive...

Notebook Tour - Windows Vista
Page 15
.... Connects an optional S-Video device such as a television, VCR, camcorder, overhead projector, or video capture card. Supports the following optional digital card formats: Secure Digital (SD) Memory Card, MultiMediaCard (MMC), Memory Stick (MS), Memory Stick Pro (MSP), xD-Picture Card (XD). Connects an optional modem cable. Connects an optional USB device. Left-side components Component (1) Power connector (2) RJ-11 (modem) jack (3) RJ-45 (network) jack (4) External monitor port (5) S-Video-out jack (6) Digital Media Slot (7) USB port Description Connects an AC adapter. Left...
.... Connects an optional S-Video device such as a television, VCR, camcorder, overhead projector, or video capture card. Supports the following optional digital card formats: Secure Digital (SD) Memory Card, MultiMediaCard (MMC), Memory Stick (MS), Memory Stick Pro (MSP), xD-Picture Card (XD). Connects an optional modem cable. Connects an optional USB device. Left-side components Component (1) Power connector (2) RJ-11 (modem) jack (3) RJ-45 (network) jack (4) External monitor port (5) S-Video-out jack (6) Digital Media Slot (7) USB port Description Connects an AC adapter. Left...

Notebook Tour - Windows Vista
Page 15
..., or video capture card. Supports the following optional digital card formats: Secure Digital (SD) Memory Card, MultiMediaCard (MMC), Memory Stick (MS), Memory Stick Pro (MSP), xD-Picture Card (XD). Left-side components Component (1) Power connector (2) RJ-11 (modem) jack (3) RJ-45 (network) jack (4) External monitor port (5) S-Video-out jack (6) Digital Media Slot (7) USB port Description Connects an AC adapter. Left-side components 9 Connects an external VGA monitor or projector. Connects an optional USB device. Connects an optional modem cable. Connects a network cable.
..., or video capture card. Supports the following optional digital card formats: Secure Digital (SD) Memory Card, MultiMediaCard (MMC), Memory Stick (MS), Memory Stick Pro (MSP), xD-Picture Card (XD). Left-side components Component (1) Power connector (2) RJ-11 (modem) jack (3) RJ-45 (network) jack (4) External monitor port (5) S-Video-out jack (6) Digital Media Slot (7) USB port Description Connects an AC adapter. Left-side components 9 Connects an external VGA monitor or projector. Connects an optional USB device. Connects an optional modem cable. Connects a network cable.

Pointing Devices and Keyboard - Windows Vista
Page 15
.... (Num lock is turned off at the factory.) For example: ● When num lock is on, most keypad keys type numbers. ● When num lock is turned on. When num lock on an external keypad is turned off, the num lock light on the computer is off . When the embedded numeric keypad is turned on, each key on the keypad performs the function indicated by using the fn key or...
.... (Num lock is turned off at the factory.) For example: ● When num lock is on, most keypad keys type numbers. ● When num lock is turned on. When num lock on an external keypad is turned off, the num lock light on the computer is off . When the embedded numeric keypad is turned on, each key on the keypad performs the function indicated by using the fn key or...
HP G7000 Notebook PC and Compaq Presario C700 Notebook PC - Maintenance and Service Guide
Page 94
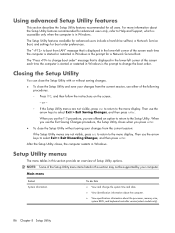
When you use either of the Setup Utility menu items listed in the lower-left corner of the screen each time the computer is started or restarted in Windows. The Setup Utility features available for advanced users include a hard drive self-test, a Network Service Boot, and settings for advanced users only, refer to Help and Support, which is accessible only when the computer is in Windows is the prompt to change the system...
When you use either of the Setup Utility menu items listed in the lower-left corner of the screen each time the computer is started or restarted in Windows. The Setup Utility features available for advanced users include a hard drive self-test, a Network Service Boot, and settings for advanced users only, refer to Help and Support, which is accessible only when the computer is in Windows is the prompt to change the system...
HP G7000 Notebook PC and Compaq Presario C700 Notebook PC - Maintenance and Service Guide
Page 95
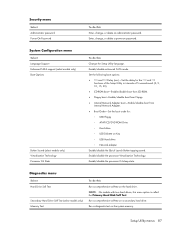
...; Internal Network Adapter boot―Enable/disable boot from Internal Network Adapter. ● Boot Order―Set the boot order for: ◦ USB Floppy ◦ ATAPI CD/DVD ROM Drive ◦ Hard drive ◦ USB Diskette on the system memory. Security menu Select Administrator password Power-On Password To do this Run a comprehensive self-test on the hard drive. NOTE: On models with two hard drives, this Change the Setup Utility language. System Configuration menu Select Language Support Enhanced SATA support (select models only) Boot Options Button Sound (select models only...
...; Internal Network Adapter boot―Enable/disable boot from Internal Network Adapter. ● Boot Order―Set the boot order for: ◦ USB Floppy ◦ ATAPI CD/DVD ROM Drive ◦ Hard drive ◦ USB Diskette on the system memory. Security menu Select Administrator password Power-On Password To do this Run a comprehensive self-test on the hard drive. NOTE: On models with two hard drives, this Change the Setup Utility language. System Configuration menu Select Language Support Enhanced SATA support (select models only) Boot Options Button Sound (select models only...
HP G7000 Notebook PC and Compaq Presario C700 Notebook PC - Maintenance and Service Guide
Page 135
... audio-out jack location 10 pin assignments 115 B backpack, spare part number 24, 26 backup 110 base enclosure, spare part numbers 17, 28 battery location 12 removal 40 spare part number 17, 28, 40 battery bay 12 battery light 8 battery release latch 12 boot options 87 boot order 87 bottom components 12 button components 6 button sound 87 buttons power 6 wireless 6 C cables, service considerations 33 camera cable spare part numbers 31 camera light location 5 camera location 5 camera module removal 60 spare part number 60 spare part numbers 31 caps lock LED board removal 64 spare part number...
... audio-out jack location 10 pin assignments 115 B backpack, spare part number 24, 26 backup 110 base enclosure, spare part numbers 17, 28 battery location 12 removal 40 spare part number 17, 28, 40 battery bay 12 battery light 8 battery release latch 12 boot options 87 boot order 87 bottom components 12 button components 6 button sound 87 buttons power 6 wireless 6 C cables, service considerations 33 camera cable spare part numbers 31 camera light location 5 camera location 5 camera module removal 60 spare part number 60 spare part numbers 31 caps lock LED board removal 64 spare part number...
HP G7000 Notebook PC and Compaq Presario C700 Notebook PC - Maintenance and Service Guide
Page 136
... Drive precautions 33 removal 48 spare part number 19, 23, 28, 48 specifications 91 DVD±RW and CD-RW Combo Drive precautions 33 removal 48 spare part numbers 19, 23, 28, 48 specifications 91 E electrostatic discharge 34 enhanced SATA support 87 esc key 7 Ethernet, product description 3 external media cards, product description 3 external monitor port location 11 pin assignments 116 F fan removal 68 spare part number 16, 29, 68 feet locations 39 spare part number 39 fingerprint reader...
... Drive precautions 33 removal 48 spare part number 19, 23, 28, 48 specifications 91 DVD±RW and CD-RW Combo Drive precautions 33 removal 48 spare part numbers 19, 23, 28, 48 specifications 91 E electrostatic discharge 34 enhanced SATA support 87 esc key 7 Ethernet, product description 3 external media cards, product description 3 external monitor port location 11 pin assignments 116 F fan removal 68 spare part number 16, 29, 68 feet locations 39 spare part number 39 fingerprint reader...
HP G7000 Notebook PC and Compaq Presario C700 Notebook PC - Maintenance and Service Guide
Page 137
... audio 3 chipset 1 diskette drive 3 display panel 2 docking support 3 Ethernet 3 external media cards 3 graphics 2 hard drives 2 keyboard 4 memory module 2 microphone 3 modem 3 operating system 4 optical drives 2 pointing devices 4 ports 3 power requirements 4 processors 1 product name 1 security 4 serviceability 4 wireless 3 product name 1 R recovery discs 113 recovery, system 114 remote control, spare part numbers 24, 26 removal/replacement preliminaries 32 procedures 38 restore points 111 RF input adapter cable, spare part number 24, 26 right-side components 10 RJ-11 jack location...
... audio 3 chipset 1 diskette drive 3 display panel 2 docking support 3 Ethernet 3 external media cards 3 graphics 2 hard drives 2 keyboard 4 memory module 2 microphone 3 modem 3 operating system 4 optical drives 2 pointing devices 4 ports 3 power requirements 4 processors 1 product name 1 security 4 serviceability 4 wireless 3 product name 1 R recovery discs 113 recovery, system 114 remote control, spare part numbers 24, 26 removal/replacement preliminaries 32 procedures 38 restore points 111 RF input adapter cable, spare part number 24, 26 right-side components 10 RJ-11 jack location...
HP G7000 Notebook PC and Compaq Presario C700 Notebook PC - Maintenance and Service Guide
Page 138
... security cable slot 10 Security menu 87 security, product description 4 selecting in the Setup Utility 85 serial number 13, 38 service considerations 32 serviceability, product description 4 Setup Utility changing the language 84 Diagnostics menu 87 displaying system information 85 Main menu 86 navigating 85 overview 84 Security menu 87 selecting 85 starting 84 System Configuration menu 87 using advanced features 86 speakers removal 70 spare part number 16, 29, 70 specifications computer 88 display 89 DVD...
... security cable slot 10 Security menu 87 security, product description 4 selecting in the Setup Utility 85 serial number 13, 38 service considerations 32 serviceability, product description 4 Setup Utility changing the language 84 Diagnostics menu 87 displaying system information 85 Main menu 86 navigating 85 overview 84 Security menu 87 selecting 85 starting 84 System Configuration menu 87 using advanced features 86 speakers removal 70 spare part number 16, 29, 70 specifications computer 88 display 89 DVD...

Power Management - Windows Vista
Page 9
... click Sleep. Using power-saving states 3 NOTE: You cannot initiate any type of networking connection or perform any computer functions while the computer is initiated, the power lights blink and the screen clears. 2 Setting power options Using power-saving states The computer has two power-saving states enabled at the factory to initiate Sleep after 10 minutes of inactivity when running on battery power and 25 minutes of inactivity when running on external power. Your work...
... click Sleep. Using power-saving states 3 NOTE: You cannot initiate any type of networking connection or perform any computer functions while the computer is initiated, the power lights blink and the screen clears. 2 Setting power options Using power-saving states The computer has two power-saving states enabled at the factory to initiate Sleep after 10 minutes of inactivity when running on battery power and 25 minutes of inactivity when running on external power. Your work...
Power Management - Windows Vista
Page 29
... is possible. 1. Save your work and close all open programs. 2. If the computer is unresponsive and you are unable to use the preceding shutdown procedures, try the following conditions: ● When you need to replace the battery or access components inside the computer ● When you are connecting an external hardware device that does not connect to the Lock button. 3. Shut down the computer...
... is possible. 1. Save your work and close all open programs. 2. If the computer is unresponsive and you are unable to use the preceding shutdown procedures, try the following conditions: ● When you need to replace the battery or access components inside the computer ● When you are connecting an external hardware device that does not connect to the Lock button. 3. Shut down the computer...


