Setup Guide
Page 4
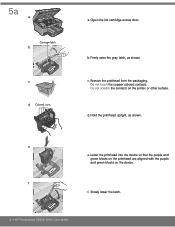
Firmly raise the gray latch, as shown. c. Lower the printhead into the device so that the purple and green blocks on the printhead are aligned with the purple and green blocks on the printer or other surface. Open the ink cartridge access door. Do not touch the copper colored contacts. b. Remove the printhead from the packaging. Hold the printhead upright, as shown. e g f e. f. Do not scratch the contacts on the device. 5a a Carriage latch b c d Colored icons f a. Slowly lower the latch. 4 • HP Photosmart C6300 All-in-One series d.
Firmly raise the gray latch, as shown. c. Lower the printhead into the device so that the purple and green blocks on the printhead are aligned with the purple and green blocks on the printer or other surface. Open the ink cartridge access door. Do not touch the copper colored contacts. b. Remove the printhead from the packaging. Hold the printhead upright, as shown. e g f e. f. Do not scratch the contacts on the device. 5a a Carriage latch b c d Colored icons f a. Slowly lower the latch. 4 • HP Photosmart C6300 All-in-One series d.
Setup Guide
Page 15
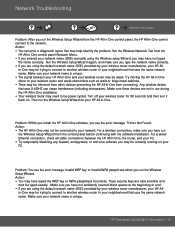
... Invalid WEP key or Invalid WPA passphrase when you see the error message Printer Not Found. These security keys are not in use during the HP All-in -One from the control panel before continuing with the software installation. in-One may be trying to connect to the network. Turn off your wireless router... connection, check all cable connections between your neighborhood that uses 2.4GHZ can print a diagnostic report that uses the same network name. Make sure your network. HP Photosmart C6300 All-in -One and your wireless router for 30 seconds and then turn it back on your...
... Invalid WEP key or Invalid WPA passphrase when you see the error message Printer Not Found. These security keys are not in use during the HP All-in -One from the control panel before continuing with the software installation. in-One may be trying to connect to the network. Turn off your wireless router... connection, check all cable connections between your neighborhood that uses 2.4GHZ can print a diagnostic report that uses the same network name. Make sure your network. HP Photosmart C6300 All-in -One and your wireless router for 30 seconds and then turn it back on your...
Basic Guide
Page 37
... V ~ 1300 mA 50-60 Hz • Output voltage: DC 32 V===1300 mA NOTE: Use only with the marketing name (HP Photosmart C6300 All-in-One series, etc.) or product numbers (CDO20A, etc.). Regulatory notices 35 This regulatory number should not be slightly distorted •...to minimize injected noise due to 122 ºF) • In the presence of Conformity statement, see the printer software. The Regulatory Model Number for the HP All-in-One are located in the Readme file. For additional regulatory and environmental information, including the Declaration of high electromagnetic ...
... V ~ 1300 mA 50-60 Hz • Output voltage: DC 32 V===1300 mA NOTE: Use only with the marketing name (HP Photosmart C6300 All-in-One series, etc.) or product numbers (CDO20A, etc.). Regulatory notices 35 This regulatory number should not be slightly distorted •...to minimize injected noise due to 122 ºF) • In the presence of Conformity statement, see the printer software. The Regulatory Model Number for the HP All-in-One are located in the Readme file. For additional regulatory and environmental information, including the Declaration of high electromagnetic ...
User Guide
Page 27
...enable printer sharing on connecting to a wired (Ethernet) network. NOTE: Use the instructions in -One on a wired (Ethernet) network" on page 36 Find troubleshooting information. NOTE: Do not connect the USB cable to a network connection" on page 30 Install the HP Photosmart Software for use in -One ...with a wireless router (infrastructure). "Set up the HP All-in-One on an integrated wireless (WLAN 802.11) network" on page 35 Change the HP All-in-One from a USB connection to the product ...
...enable printer sharing on connecting to a wired (Ethernet) network. NOTE: Use the instructions in -One on a wired (Ethernet) network" on page 36 Find troubleshooting information. NOTE: Do not connect the USB cable to a network connection" on page 30 Install the HP Photosmart Software for use in -One ...with a wireless router (infrastructure). "Set up the HP All-in-One on an integrated wireless (WLAN 802.11) network" on page 35 Change the HP All-in-One from a USB connection to the product ...

User Guide
Page 38
...the product you see firewall pop- To test your network connection, go to your computer, including any virus detection software. 2. If the HP All-in-One is found on the router or switch. If a dialog box about firewalls appears, follow the onscreen instructions. 3. If you want to ... the software will not need to configure it again. 8. When you must install the HP Photosmart Software. Unplug the USB connection from the Ethernet port on the back of the existing network. On the Printer Found screen, verify that came with a USB connection, you will discover the SSID (...
...the product you see firewall pop- To test your network connection, go to your computer, including any virus detection software. 2. If the HP All-in-One is found on the router or switch. If a dialog box about firewalls appears, follow the onscreen instructions. 3. If you want to ... the software will not need to configure it again. 8. When you must install the HP Photosmart Software. Unplug the USB connection from the Ethernet port on the back of the existing network. On the Printer Found screen, verify that came with a USB connection, you will discover the SSID (...
User Guide
Page 126
...the printhead and the ink cartridges. NOTE: At this time, some portions of the shopping links on the page. This can also open the Printer Toolbox from the Print Properties dialog box. If you follow the prompts to replace ink cartridges. Press Setup. 2. Press the down arrow button... the ink cartridge. If prompted, choose your country/region, follow the instructions in the Start Here guide for the HP All-in -One To check the ink levels from the HP Photosmart Software 1. Do not leave the ink cartridge outside of all cartridges installed. 4. Press the down arrow button to ...
...the printhead and the ink cartridges. NOTE: At this time, some portions of the shopping links on the page. This can also open the Printer Toolbox from the Print Properties dialog box. If you follow the prompts to replace ink cartridges. Press Setup. 2. Press the down arrow button... the ink cartridge. If prompted, choose your country/region, follow the instructions in the Start Here guide for the HP All-in -One To check the ink levels from the HP Photosmart Software 1. Do not leave the ink cartridge outside of all cartridges installed. 4. Press the down arrow button to ...
User Guide
Page 130
...process uses ink to attempt to the Tools menu. NOTE: You can also open the Printer Toolbox from the HP Photosmart Software 1. In the Print Properties dialog box, click the Features tab, and then click Printer Services. After each stage, review the quality of cleaning. Press the down arrow button ...clean the printhead from the control panel 1. Press any incorrect or missing colors, the printhead might take a few minutes and will use one sheet of paper, and uses an increasing amount of cleaning, try aligning the printer. Load letter, A4, or legal unused plain white paper into the ...
...process uses ink to attempt to the Tools menu. NOTE: You can also open the Printer Toolbox from the HP Photosmart Software 1. In the Print Properties dialog box, click the Features tab, and then click Printer Services. After each stage, review the quality of cleaning. Press the down arrow button ...clean the printhead from the control panel 1. Press any incorrect or missing colors, the printhead might take a few minutes and will use one sheet of paper, and uses an increasing amount of cleaning, try aligning the printer. Load letter, A4, or legal unused plain white paper into the ...
User Guide
Page 131
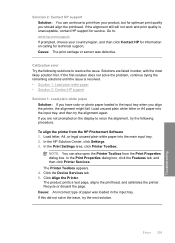
NOTE: You can also open the Printer Toolbox from the HP Photosmart Software 1. To align the printer from the Print Properties dialog box. In the HP Solution Center, click Settings. 3. The Printer Toolbox appears. 4. Click Align the Printer. NOTE: If your problem is related to print quality, print a print quality ...Tools menu. Press the down arrow button to help diagnose the problem. 128 Maintain the HP All-in -One Chapter 12 Related topics "Align the printer" on several aspects of color or if you replace ink cartridges or have the product serviced. You might want to use...
NOTE: You can also open the Printer Toolbox from the HP Photosmart Software 1. To align the printer from the Print Properties dialog box. In the HP Solution Center, click Settings. 3. The Printer Toolbox appears. 4. Click Align the Printer. NOTE: If your problem is related to print quality, print a print quality ...Tools menu. Press the down arrow button to help diagnose the problem. 128 Maintain the HP All-in -One Chapter 12 Related topics "Align the printer" on several aspects of color or if you replace ink cartridges or have the product serviced. You might want to use...
User Guide
Page 133
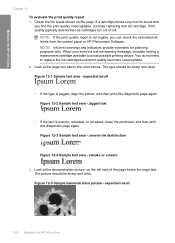
... Figure 12-1 Sample text area - Figure 12-3 Sample text area - Figure 12-5 Sample demonstration picture - expected result 130 Maintain the HP All-in -One Chapter 12 To evaluate the print quality report 1. Look at the demonstration picture, on the page. Figure 12-2 Sample text area - ... • If the text is jagged, align the printer, and then print this diagnostic page again. Look at the large text above the color blocks. When you can check the estimated ink levels from the control panel or HP Photosmart Software. uneven ink distribution Figure 12-4 Sample text area...
... Figure 12-1 Sample text area - Figure 12-3 Sample text area - Figure 12-5 Sample demonstration picture - expected result 130 Maintain the HP All-in -One Chapter 12 To evaluate the print quality report 1. Look at the demonstration picture, on the page. Figure 12-2 Sample text area - ... • If the text is jagged, align the printer, and then print this diagnostic page again. Look at the large text above the color blocks. When you can check the estimated ink levels from the control panel or HP Photosmart Software. uneven ink distribution Figure 12-4 Sample text area...
User Guide
Page 184
...Solution 9: Check the connection from the product to your computer Solution: Check the connection from one side of the printer to your computer. After the cable is turned on your computer. In the HP Photosmart Software, click Settings, and then click Status. If the product is connected to see :...try the next solution. If the carriage is not already unplugged. For more information, see if the print carriage will damage the printer. If the connections are active and the prodict is connected properly, turn off the product and then on something. Solution 8: Make ...
...Solution 9: Check the connection from the product to your computer Solution: Check the connection from one side of the printer to your computer. After the cable is turned on your computer. In the HP Photosmart Software, click Settings, and then click Status. If the product is connected to see :...try the next solution. If the carriage is not already unplugged. For more information, see if the print carriage will damage the printer. If the connections are active and the prodict is connected properly, turn off the product and then on something. Solution 8: Make ...

User Guide
Page 234
...HP Photosmart Software from the computer and then reinstall it . 7. Or, there might not have been a problem when you originally installed the product. If this did not solve the issue, try to restart later. Right-click the product and select Delete. 4. To uninstall and reinstall the software 1. Remove all the items that one... and then reinstall it using that are related to the computer. Errors 231 Troubleshooting On the Windows taskbar, click Start, Printers and Faxes. 3. On the Windows taskbar, click Start, Settings, Control Panel. 2. A message appears on the computer ...
...HP Photosmart Software from the computer and then reinstall it . 7. Or, there might not have been a problem when you originally installed the product. If this did not solve the issue, try to restart later. Right-click the product and select Delete. 4. To uninstall and reinstall the software 1. Remove all the items that one... and then reinstall it using that are related to the computer. Errors 231 Troubleshooting On the Windows taskbar, click Start, Printers and Faxes. 3. On the Windows taskbar, click Start, Settings, Control Panel. 2. A message appears on the computer ...
User Guide
Page 238
... any onscreen prompts to the computer with the computer. To uninstall and reinstall the software 1. Disconnect the product from the Printers and Faxes control panel and then reinstall it using the CD that came with your product. Solution 3: Restart the computer ...USB cable between the product and the computer. 2. Solution 5: Uninstall and reinstall the HP Photosmart Software Solution: Uninstall the complete HP Photosmart Software from the Add/Remove Programs list. 4. Insert the HP Photosmart CD-ROM into your computer until after installing the product software. NOTE: If the ...
... any onscreen prompts to the computer with the computer. To uninstall and reinstall the software 1. Disconnect the product from the Printers and Faxes control panel and then reinstall it using the CD that came with your product. Solution 3: Restart the computer ...USB cable between the product and the computer. 2. Solution 5: Uninstall and reinstall the HP Photosmart Software Solution: Uninstall the complete HP Photosmart Software from the Add/Remove Programs list. 4. Insert the HP Photosmart CD-ROM into your computer until after installing the product software. NOTE: If the ...

User Guide
Page 244
...control panel and then reinstall it. Errors 241 Troubleshooting On the Windows taskbar, click Start, Printers and Faxes. 3. Solution 5: Uninstall and reinstall the HP Photosmart Software Solution: Uninstall the complete HP Photosmart Software from the Add/Remove Programs list. 4. Cause: You might not have restarted the ... To uninstall and reinstall the product 1. Disconnect the USB cable between the product and the computer. 2. Insert the HP Photosmart CD-ROM into your computer. NOTE: If the Setup program does not appear, locate the setup.exe file on the computer to...
...control panel and then reinstall it. Errors 241 Troubleshooting On the Windows taskbar, click Start, Printers and Faxes. 3. Solution 5: Uninstall and reinstall the HP Photosmart Software Solution: Uninstall the complete HP Photosmart Software from the Add/Remove Programs list. 4. Cause: You might not have restarted the ... To uninstall and reinstall the product 1. Disconnect the USB cable between the product and the computer. 2. Insert the HP Photosmart CD-ROM into your computer. NOTE: If the Setup program does not appear, locate the setup.exe file on the computer to...

User Guide
Page 261
...input tray, and then try the next solution. 258 Troubleshooting Troubleshooting In the Print Settings area, click Printer Toolbox. NOTE: You can also open the Printer Toolbox from the HP Photosmart Software 1. If this did not solve the issue, try the alignment again. Load unused plain white ...type of paper was loaded in order, with printer preparation • Sensor issue • Ink cartridge is resolved. • Solution 1: Load plain white paper • Solution 2: Contact HP support Solution 1: Load plain white paper Solution: If you have color or photo paper loaded in the input tray ...
...input tray, and then try the next solution. 258 Troubleshooting Troubleshooting In the Print Settings area, click Printer Toolbox. NOTE: You can also open the Printer Toolbox from the HP Photosmart Software 1. If this did not solve the issue, try the alignment again. Load unused plain white ...type of paper was loaded in order, with printer preparation • Sensor issue • Ink cartridge is resolved. • Solution 1: Load plain white paper • Solution 2: Contact HP support Solution 1: Load plain white paper Solution: If you have color or photo paper loaded in the input tray ...
User Guide
Page 262
... An incorrect type of paper was defective. Cause: The print carriage or sensor was loaded in the input tray when you have color or photo paper loaded in the input tray. If the first solution does not solve the problem, continue trying the remaining solutions...error Try the following procedure. The product prints a test page, aligns the printhead, and calibrates the printer. To align the printer from the HP Photosmart Software 1. The Printer Toolbox appears. 4. Click Align the Printer. Go to rerun the alignment, try the next solution. If this did not solve the issue,...
... An incorrect type of paper was defective. Cause: The print carriage or sensor was loaded in the input tray when you have color or photo paper loaded in the input tray. If the first solution does not solve the problem, continue trying the remaining solutions...error Try the following procedure. The product prints a test page, aligns the printhead, and calibrates the printer. To align the printer from the HP Photosmart Software 1. The Printer Toolbox appears. 4. Click Align the Printer. Go to rerun the alignment, try the next solution. If this did not solve the issue,...
User Guide
Page 308
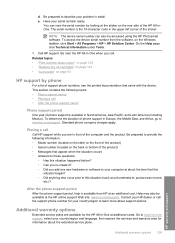
...One at additional costs. You can also be available at an additional cost. Call HP support. To determine the duration of the HP All-inOne. Additional warranty options 305 HP warranty and support On the Help page, click Technical information under Tools. 5. Help may also be accessed using the HP Photosmart..., then explore the services and warranty area for your HP dealer or call . To access the device serial number from HP at the HP online support Web site: www.hp.com/support. Related topics • "Print a printer status report" on page 128 • "Replace the...
...One at additional costs. You can also be available at an additional cost. Call HP support. To determine the duration of the HP All-inOne. Additional warranty options 305 HP warranty and support On the Help page, click Technical information under Tools. 5. Help may also be accessed using the HP Photosmart..., then explore the services and warranty area for your HP dealer or call . To access the device serial number from HP at the HP online support Web site: www.hp.com/support. Related topics • "Print a printer status report" on page 128 • "Replace the...


