Setup Guide
Page 1
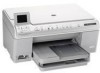
Start Here 1 USB cable users: Do not connect the USB cable until prompted. Wired and Wireless setup instructions are provided following the USB instructions. 2 Installation CD Power Cable Basics Guide Verify the box contents. The contents of your box may differ. *May be included Color Cartridges Printhead 4 X 6 photo paper * USB Cable* HP Photosmart C6300 All-in-One series
Start Here 1 USB cable users: Do not connect the USB cable until prompted. Wired and Wireless setup instructions are provided following the USB instructions. 2 Installation CD Power Cable Basics Guide Verify the box contents. The contents of your box may differ. *May be included Color Cartridges Printhead 4 X 6 photo paper * USB Cable* HP Photosmart C6300 All-in-One series
Setup Guide
Page 2
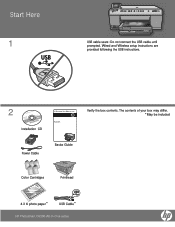
b b. Adjust the display and remove its protective film. Open the device and remove all tape from inside the device. 2 • HP Photosmart C6300 All-in-One series 3 a a. Remove all the packaging materials from the front and back of the device.
b b. Adjust the display and remove its protective film. Open the device and remove all tape from inside the device. 2 • HP Photosmart C6300 All-in-One series 3 a a. Remove all the packaging materials from the front and back of the device.
Setup Guide
Page 3
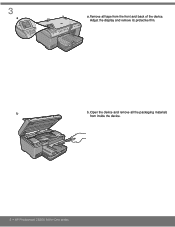
b c c. b. HP Photosmart C6300 All-in -One. 4 a a. If prompted, select your language and country/region. Connect the power cord and adapter. Press to turn on the HP All-in -One series • 3
b c c. b. HP Photosmart C6300 All-in -One. 4 a a. If prompted, select your language and country/region. Connect the power cord and adapter. Press to turn on the HP All-in -One series • 3
Setup Guide
Page 4
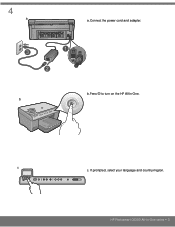
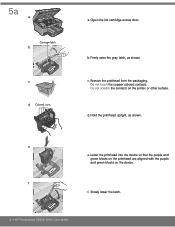
Remove the printhead from the packaging. f. d. e g f e. Open the ink cartridge access door. b. Slowly lower the latch. 4 • HP Photosmart C6300 All-in-One series Firmly raise the gray latch, as shown. 5a a Carriage latch b c d Colored icons f a. Do not scratch the contacts on the device. c. Lower the printhead into the device so that the purple and green blocks on the printhead are aligned with the purple and green blocks on the printer or other surface. Do not touch the copper colored contacts. Hold the printhead upright, as shown.
Remove the printhead from the packaging. f. d. e g f e. Open the ink cartridge access door. b. Slowly lower the latch. 4 • HP Photosmart C6300 All-in-One series Firmly raise the gray latch, as shown. 5a a Carriage latch b c d Colored icons f a. Do not scratch the contacts on the device. c. Lower the printhead into the device so that the purple and green blocks on the printhead are aligned with the purple and green blocks on the printer or other surface. Do not touch the copper colored contacts. Hold the printhead upright, as shown.
Setup Guide
Page 5
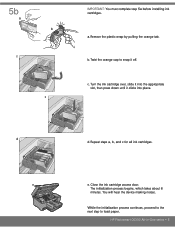
Turn the ink cartridge over, slide it into the appropriate slot, then press down until it off. c. HP Photosmart C6300 All-in-One series • 5 e e. You will hear the device making noises. b. Twist the orange cap to load paper. 5b a b c c IMPORTANT: You must complete step 5a before installing ...
Turn the ink cartridge over, slide it into the appropriate slot, then press down until it off. c. HP Photosmart C6300 All-in-One series • 5 e e. You will hear the device making noises. b. Twist the orange cap to load paper. 5b a b c c IMPORTANT: You must complete step 5a before installing ...
Setup Guide
Page 6
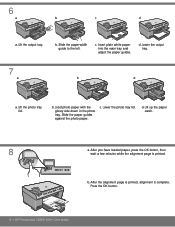
... the output tray. 7 a b d a. Slide the paper guides against the photo paper. d. c. After the alignment page is printed, alignment is printed. Press the OK button. 6 • HP Photosmart C6300 All-in the photo tray. 6 a b c d a. Slide the paper-width guide to the left. b. Load photo paper with the glossy side down in...
... the output tray. 7 a b d a. Slide the paper guides against the photo paper. d. c. After the alignment page is printed, alignment is printed. Press the OK button. 6 • HP Photosmart C6300 All-in the photo tray. 6 a b c d a. Slide the paper-width guide to the left. b. Load photo paper with the glossy side down in...
Setup Guide
Page 7
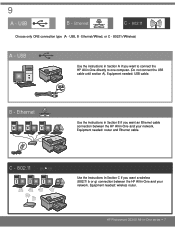
9 A - USB Use the instructions in Section A if you want an Ethernet cable connection between the HP All-in -One and your network. Ethernet/Wired, or C - 802.11/Wireless) A - HP Photosmart C6300 All-in -One directly to one computer. (Do not connect the USB cable until section A). USB B - Ethernet Use the instructions in Section B if you want a wireless...
9 A - USB Use the instructions in Section A if you want an Ethernet cable connection between the HP All-in -One and your network. Ethernet/Wired, or C - 802.11/Wireless) A - HP Photosmart C6300 All-in -One directly to one computer. (Do not connect the USB cable until section A). USB B - Ethernet Use the instructions in Section B if you want a wireless...
Setup Guide
Page 8
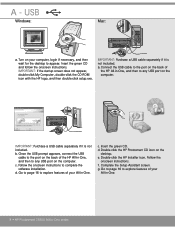
... the green CD and follow the onscreen instructions. IMPORTANT: Purchase a USB cable separately if it is not included. a. Double-click the HP Photosmart CD icon on your All-in -One series e. Turn on the desktop. Insert the green CD. f. IMPORTANT: If the startup screen does not appear, double-click My Computer... setup.exe. c. d. A - Once the USB prompt appears, connect the USB cable to the port on the back of the HP All-in -One, and then to explore features of your All-in-One. 8 • HP Photosmart C6300 All-in -One. Connect the USB cable to the port on the back of the...
... the green CD and follow the onscreen instructions. IMPORTANT: Purchase a USB cable separately if it is not included. a. Double-click the HP Photosmart CD icon on your All-in -One series e. Turn on the desktop. Insert the green CD. f. IMPORTANT: If the startup screen does not appear, double-click My Computer... setup.exe. c. d. A - Once the USB prompt appears, connect the USB cable to the port on the back of the HP All-in -One, and then to explore features of your All-in-One. 8 • HP Photosmart C6300 All-in -One. Connect the USB cable to the port on the back of the...
Setup Guide
Page 9
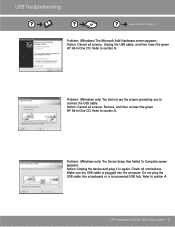
...(Windows only) You did not see the screen prompting you to section A. Action: Unplug the device and plug it in -One series • 9 USB Troubleshooting www.hp.com/support Problem: (Windows) The Microsoft Add Hardware screen appears. Action: Cancel all screens. Refer to connect the USB cable.... Problem: (Windows only) The Device Setup Has Failed To Complete screen appears. HP Photosmart C6300 All-in again. Make sure ...
...(Windows only) You did not see the screen prompting you to section A. Action: Unplug the device and plug it in -One series • 9 USB Troubleshooting www.hp.com/support Problem: (Windows) The Microsoft Add Hardware screen appears. Action: Cancel all screens. Refer to connect the USB cable.... Problem: (Windows only) The Device Setup Has Failed To Complete screen appears. HP Photosmart C6300 All-in again. Make sure ...
Setup Guide
Page 10
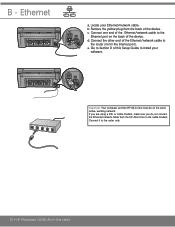
...Important: Your computer and the HP All-in -One to the cable modem. B - Connect the other end of this Setup Guide to the Ethernet port on the same active, working network. Go to Section D of the Ethernet/network cable to the router only. 10 • HP Photosmart C6300 All-in the Internet ...port). Connect it to the router (not in -One series Ethernet a. c. Connect one end of the device. If you are using a DSL or cable modem, make sure you do ...
...Important: Your computer and the HP All-in -One to the cable modem. B - Connect the other end of this Setup Guide to the Ethernet port on the same active, working network. Go to Section D of the Ethernet/network cable to the router only. 10 • HP Photosmart C6300 All-in the Internet ...port). Connect it to the router (not in -One series Ethernet a. c. Connect one end of the device. If you are using a DSL or cable modem, make sure you do ...

Setup Guide
Page 11
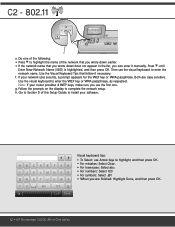
... for some systems. If the Wireless Network Assistant is unable to continue with the strongest signal appears first. HP Photosmart C6300 All-in -One. The network with your network information, you must have this information for your wireless router, the router manufacturer, or...Network is highlighted, and then press OK. b. The Network Menu appears. In a few moments, a list of detected networks appears on the HP All-in -One series • 11 C1 - 802.11 a. Locate and write down your wireless router settings: Network Name (also called the Wireless Network Assistant...
... for some systems. If the Wireless Network Assistant is unable to continue with the strongest signal appears first. HP Photosmart C6300 All-in -One. The network with your network information, you must have this information for your wireless router, the router manufacturer, or...Network is highlighted, and then press OK. b. The Network Menu appears. In a few moments, a list of detected networks appears on the HP All-in -One series • 11 C1 - 802.11 a. Locate and write down your wireless router settings: Network Name (also called the Wireless Network Assistant...
Setup Guide
Page 12
... key or WPA passphrase, as requested. Use the Visual Keyboard Tips that you wrote down does not appear in -One series Both are finished: Highlight Done, and then press OK. 12 • HP Photosmart C6300 All-in the list, you are case sensitive. g. A BCDE FGH I J K LMNOP QRS TUVWX YZ ... lowercase: Select abc • For numbers: Select 123 • For symbols: Select .@! • When you can enter it manually. f. C2 - 802.11 e. Do one . Press until Enter New Network Name (SSID) is highlighted, and then press OK. Go to Section D of this Setup Guide to highlight the name of...
... key or WPA passphrase, as requested. Use the Visual Keyboard Tips that you wrote down does not appear in -One series Both are finished: Highlight Done, and then press OK. 12 • HP Photosmart C6300 All-in the list, you are case sensitive. g. A BCDE FGH I J K LMNOP QRS TUVWX YZ ... lowercase: Select abc • For numbers: Select 123 • For symbols: Select .@! • When you can enter it manually. f. C2 - 802.11 e. Do one . Press until Enter New Network Name (SSID) is highlighted, and then press OK. Go to Section D of this Setup Guide to highlight the name of...
Setup Guide
Page 13
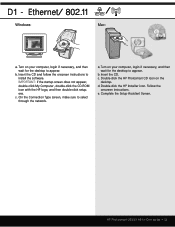
...onscreen instructions. D1 - d. IMPORTANT: If the startup screen does not appear, double-click My Computer, double-click the CD-ROM icon with the HP logo, and then double-click setup. On the Connection Type screen, make sure to install the software. Turn on your computer, login if necessary,... and then wait for the desktop to appear. exe . Turn on the desktop. Double-click the HP Photosmart CD icon on your computer, login if necessary, and then wait for the desktop to appear. Ethernet/ 802.11 / Windows: Mac: a. Insert...
...onscreen instructions. D1 - d. IMPORTANT: If the startup screen does not appear, double-click My Computer, double-click the CD-ROM icon with the HP logo, and then double-click setup. On the Connection Type screen, make sure to install the software. Turn on your computer, login if necessary,... and then wait for the desktop to appear. exe . Turn on the desktop. Double-click the HP Photosmart CD icon on your computer, login if necessary, and then wait for the desktop to appear. Ethernet/ 802.11 / Windows: Mac: a. Insert...

Setup Guide
Page 14
...the connection types between the network and your HP All-in-One (not between your computer and the network). 14 • HP Photosmart C6300 All-in -One software on each computer. Follow the onscreen instructions. Then continue with the HP software installation. D3 - Make sure that ...access is attempting to access your network, install the HP All-in -One series Ethernet/ 802.11 / Windows...
...the connection types between the network and your HP All-in-One (not between your computer and the network). 14 • HP Photosmart C6300 All-in -One software on each computer. Follow the onscreen instructions. Then continue with the HP software installation. D3 - Make sure that ...access is attempting to access your network, install the HP All-in -One series Ethernet/ 802.11 / Windows...
Setup Guide
Page 15
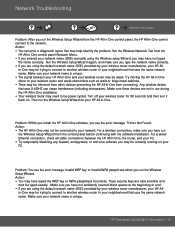
...SSID) provided by your wireless router manufacturer, your network. Make sure you have typed the WEP key or WPA passphrase incorrectly. HP Photosmart C6300 All-in -One may have not accidently inserted blank spaces at the beginning or end. • If you are case sensitive and must be ...-virus software you have not typed the name correctly. Run the Wireless Network Test from the HP All-in-One control panel, the HP All-in-One cannot connect to another wireless router in -One and your network name is unique. Problem: You see the error message Printer Not Found. For...
...SSID) provided by your wireless router manufacturer, your network. Make sure you have typed the WEP key or WPA passphrase incorrectly. HP Photosmart C6300 All-in -One may have not accidently inserted blank spaces at the beginning or end. • If you are case sensitive and must be ...-virus software you have not typed the name correctly. Run the Wireless Network Test from the HP All-in-One control panel, the HP All-in-One cannot connect to another wireless router in -One and your network name is unique. Problem: You see the error message Printer Not Found. For...
Setup Guide
Page 16
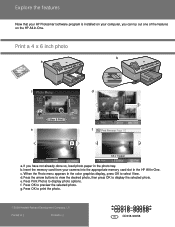
Explore the features Now that your HP Photosmart software program is installed on your camera into the appropriate memory card slot in the HP All-in -One. Press the arrow buttons to view the desired photo, then press OK to print the photo. 2008 Hewlett-Packard Development Company,...11 paper Print Edit OK Done Next Settings Print a. d. g. Press OK to display the selected photo. When the Photo menu appears in the color graphics display, press OK to display photo options. Press Print Photos to select View. Press OK to preview the selected photo. e. If you can...
Explore the features Now that your HP Photosmart software program is installed on your camera into the appropriate memory card slot in the HP All-in -One. Press the arrow buttons to view the desired photo, then press OK to print the photo. 2008 Hewlett-Packard Development Company,...11 paper Print Edit OK Done Next Settings Print a. d. g. Press OK to display the selected photo. When the Photo menu appears in the color graphics display, press OK to display photo options. Press Print Photos to select View. Press OK to preview the selected photo. e. If you can...
Basic Guide
Page 4
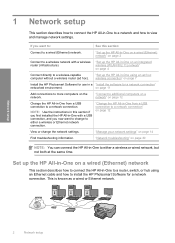
..."Manage your network settings" on the network. Set up the HP All-in-One on a wired (Ethernet) network" on page 7 Install the HP Photosmart Software for use in -One from a USB connection to a network connection. "Change the HP All-in a "Install the software for a network connection" ...Ethernet network. 1 Network setup This section describes how to connect the HP All-in -One using an Ethernet cable and how to install the HP Photosmart Software for a network connection. "Set up the HP All-in -One with a wireless router (infrastructure). NOTE: Use the instructions in this ...
..."Manage your network settings" on the network. Set up the HP All-in-One on a wired (Ethernet) network" on page 7 Install the HP Photosmart Software for use in -One from a USB connection to a network connection. "Change the HP All-in a "Install the software for a network connection" ...Ethernet network. 1 Network setup This section describes how to connect the HP All-in -One using an Ethernet cable and how to install the HP Photosmart Software for a network connection. "Set up the HP All-in -One with a wireless router (infrastructure). NOTE: Use the instructions in this ...
Basic Guide
Page 13
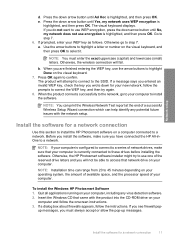
... to correct the WEP key, and then try to use one of the reserved drive letters and you wrote down arrow button until No, my network does not use the arrow buttons to the SSID. Otherwise, the HP Photosmart software installer might try again. 8. If you must enter... until Ad Hoc is highlighted, and then press OK. NOTE: Installation time can help identify any virus detection software. 2. To install the Windows HP Photosmart Software 1. Otherwise go to a network. Quit all applications running on your computer is configured to connect to a series of your computer to select...
... to correct the WEP key, and then try to use one of the reserved drive letters and you wrote down arrow button until No, my network does not use the arrow buttons to the SSID. Otherwise, the HP Photosmart software installer might try again. 8. If you must enter... until Ad Hoc is highlighted, and then press OK. NOTE: Installation time can help identify any virus detection software. 2. To install the Windows HP Photosmart Software 1. Otherwise go to a network. Quit all applications running on your computer is configured to connect to a series of your computer to select...
Basic Guide
Page 18
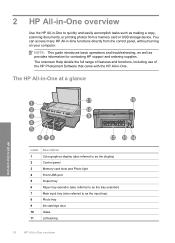
The HP All-in-One at a glance HP All-in-One overview Label Description 1 Color graphics display (also referred to as the display) 2 Control panel 3 Memory card slots and Photo light 4 Front USB port 5 Output tray 6 Paper tray extender (also ... range of features and functions, including use of the HP Photosmart Software that came with the HP All-in -One overview You can access many HP All-in -One to as the input tray) 8 Photo tray 9 Ink cartridge door 10 Glass 11 Lid backing 16 HP All-in -One. NOTE: This guide introduces basic operations and troubleshooting, as...
The HP All-in-One at a glance HP All-in-One overview Label Description 1 Color graphics display (also referred to as the display) 2 Control panel 3 Memory card slots and Photo light 4 Front USB port 5 Output tray 6 Paper tray extender (also ... range of features and functions, including use of the HP Photosmart Software that came with the HP All-in -One overview You can access many HP All-in -One to as the input tray) 8 Photo tray 9 Ink cartridge door 10 Glass 11 Lid backing 16 HP All-in -One. NOTE: This guide introduces basic operations and troubleshooting, as...
Basic Guide
Page 21
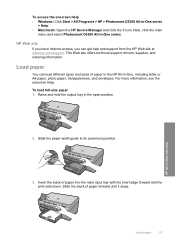
... onscreen Help. To access the onscreen Help • Windows: Click Start > All Programs > HP > Photosmart C6300 All-in the open position. 2. Raise and hold the output tray in -One series > Help. • Macintosh: Open the HP Device Manager and click the ? icon. Next, click the main menu and select... Photosmart C6300 All-in -One overview Load paper 19 Insert the stack of paper into the main...
... onscreen Help. To access the onscreen Help • Windows: Click Start > All Programs > HP > Photosmart C6300 All-in the open position. 2. Raise and hold the output tray in -One series > Help. • Macintosh: Open the HP Device Manager and click the ? icon. Next, click the main menu and select... Photosmart C6300 All-in -One overview Load paper 19 Insert the stack of paper into the main...


