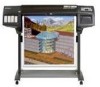
HP Printers - Supported Citrix Presentation Server environments
Page 12
...papers. Go to http://www.hp.com/go/upd for the single port bound to all autocreated printers or redirected printers. HP has tested the HP Universal Print PCL 5 driver, HP Universal Print PCL 6 driver, and the HP universal postscript emulation driver in a multi-user environment. Installation of the HP... driver included in the Windows OS HP Color printers with Edgeline Technology and supported driver versions Table 2: Minimum levels of the HP Universal Print Driver is supported by HP in Citrix and Terminal Server environments. ment PCL HP-supported drivers* Host-based CM8050/8060...
HP Printers - Supported Citrix Presentation Server environments
Page 13
...The Citrix UPD cannot be saved to color, no extra trays, no device-specific paper handling, etc. Paper size and orientation are the only client settings that utilize embedded operating systems because the Citrix UPD works in autocreated printers This is installed on a MetaFrame ...Currently, version 4.7 of Citrix MetaFrame 3.0 and older versions. For directly attached printers on the server and mapped for any HP PCL or Postscript client print driver for autocreated session printers, configured by communicating directly with embedded operating systems. The Citrix UPD has the...
HP Printers - Supported Citrix Presentation Server environments
Page 15
...paper trays and ink supplies. • Higher reliability and duty load. • More comprehensive testing in Citrix environments compared to meet the needs of Citrix users. HP recommends the use of Business Inkjets over consumer Deskjets whenever possible in this table are also supported. HP printer... stated in Citrix environments for the following Business Inkjet products for Citrix environments and offers a wide range of compatible products to consumer Deskjets. N/A HP Deskjet printers and supported driver versions HP recognizes the need for small inexpensive printing solutions for...
HP Printers - Supported Citrix Presentation Server environments
Page 23
... Version 1.0.0.19 and newer has the fix. When Citrix autocreates using an older HP driver, the process halts and any remaining printers fail to the latest driver available on the server. Paper size and orientation are the only client settings that are not read during autocreation This...and server performance degradation hpbmini.dll issue This issue occurs with at autocreation. The most recent version of the driver installed on hp.com Autocreation of HP printer fails with the 1.0.2.30 (or older) dll will not cause a spooler crash but can degrade performance of Citrix MetaFrame 3.0...
HP Printers - Supported Citrix Presentation Server environments
Page 24
...this white paper to be restored the next time the user logs in for direct-connect, non-networked environments. Answer: Check the LaserJet, Business Inkjet, Designjet, Deskjet, and ink-based All-in Citrix environments. Host-based printers rely upon the bulk of the following HP print ...drivers: BIJ1100, DJ450, CP1700, DJ9600, DJ9300, CP1160, the user logs in . Question: Is a certain HP print driver certified in Citrix...
HP Printers - Supported Citrix Presentation Server environments
Page 25
...client. The server must be at least ICA version 9.0. Answer: HP does not develop Microsoft Windows Server 2003 drivers for a printer and print driver is claimed by HP and provided by HP. check the LaserJet, Business Inkjet, Deskjet, and Ink-based All-in -One, mfp, or ...scanner connected to my client to scan to applications within my Citrix ICA session? Question: Where can I configure my Citrix server to map print drivers, use my All-in -One and Photosmart printer sections of this white paper...
DesignJet - ZEHRaster Plus
Page 2
... your workstation or on ZEH products, visit our website at www.zeh.com or contact our corporate office at 600 dpi and 300 dpi for color files in fast mode. Provides 22 Hershey fonts and 17 ZEH fonts for CGM files. Allows selection of large-format, high quality graphics... which can be downloaded via www.zeh.com/zplus. For more information on a network. Supports Windows NT 4.0 and UNIX systems. Supports paper widths of 24, 36, and 54 inches. Prints files to HP 750 printers at 300 dpi and 600 dpi. Prints files to CP Series and ColorPro CAD...
HP DesignJet 1000 Series Take-Up Reel UserÂ’s Guide - C6079-90001
Page 3
Contents Upgrading your Printer 4 Checking the Firmware Revision Number 4 Installing a New Firmware Module 5 Take-Up Reel Components 11 Installing the Take-Up Reel 13 Loading Paper on to the Take-Up Reel 21 Unloading Paper from the Take-Up Reel 29 Changing the Core Tube on the Take-Up Reel 32 Drying Time with the Take-Up Reel 36 Troubleshooting 38 Take-Up Reel Does Not Function 38 Paper Skewed on Take-Up Reel 38 Take-Up Reel Specifications 39 Regulatory Notices 41 Declaration of Conformity 43 3 HP DesignJet 1000 Series Take-Up Reel
HP DesignJet 1000 Series Take-Up Reel UserÂ’s Guide - C6079-90001
Page 5
...install it off at the front panel. 2 Looking at the rear of the printer, remove the paper path deflector from the antistatic bag, touch a grounded, unpainted metal surface to begin the installation. 1 If the printer is turned on, turn it . If you do this section. Please read the...Before you can skip this , push the two slots in the antistatic bag until you are easily damaged by small amounts of the printer. Now you . 2 1 5 HP DesignJet 1000 Series Take-Up Reel To do not need to install a new firmware module. Installing a New Firmware Module CAUTION This section ...
HP DesignJet 1000 Series Take-Up Reel UserÂ’s Guide - C6079-90001
Page 10
13 Re-install the paper path deflector on the left side of the printer. 2 1 14 Reconnect the power cord and the interface cable and switch on the power isolator switch at the back of the printer. 1 Power Isolator Switch Power Cord You have now finished installing the firmware module. HP DesignJet 1000 Series Take-Up Reel 10
HP DesignJet 1000 Series Take-Up Reel UserÂ’s Guide - C6079-90001
Page 11
Take-Up Reel Components These are the main components of the take-up reel sensor 8'' / 203mm Paper weight (different lengths) 8'' / 203mm Deflector supports Deflector rod 11 HP DesignJet 1000 Series Take-Up Reel Left-hand assembly Take-up reel spindle 3-inch core adaptors Paper guide Documentation, assembly tool, etc. +2++4''=/==3656510''4/0'9''/'m11/125m37m70m2mmmm +2++4''=/==3656510''4/0'9''/'m11/125m37m70m2mmmm Take-up core (different lengths) Right-hand assembly Take-up reel.
HP DesignJet 1000 Series Take-Up Reel UserÂ’s Guide - C6079-90001
Page 13
...six retaining clips from the paper-bin support. through the holes at the bottom. 13 HP DesignJet 1000 Series Take-Up Reel If you do not find any "TUR installed" option, you may need to Yes. If a roll of this option from No to upgrade your printer's firmware (see Chapter 3...TUR installed 1. Installing the Take-Up Reel 6. Using the front panel, select the Printer Setup menu, then "Device Setup", then "TUR installed", and change the value of paper is in use, remove it (see Upgrading your Printer, on page 4). 2. Carefully lever apart the capping strip assembly cross-brace assembly. ...
HP DesignJet 1000 Series Take-Up Reel UserÂ’s Guide - C6079-90001
Page 14
Do not use these (shorter) screws for the next step. 10. Release the clamp on the left-hand assembly by removing four screws. Do not remove the screw. 9. Remove the bin support from the take- Do not tighten them yet. Install 4 screws HP DesignJet 1000 Series Take-Up Reel 14 8. up reel kit loosely into the legs as shown below . Remove the six paper-bin arms. 2 1 11. Install the four (longer) screws from the legs assembly by loosening the screw shown below .
HP DesignJet 1000 Series Take-Up Reel UserÂ’s Guide - C6079-90001
Page 18
... 42'' + + / =1=03=6655'07'/4'9m'/'1'1/m1523m770m2mmmm + 12'' / 305mm HP DesignJet 1000 Series Take-Up Reel 18 Assemble the take -up reel spindle. Connect the power cord into the printer 28. Ensure the spindle lock is open. Remove the paper guide. 30. 26. Then put the paper by pushing firmly on the take -up reel core...
HP DesignJet 1000 Series Take-Up Reel UserÂ’s Guide - C6079-90001
Page 19
IMPORTANT: Close the spindle lock. Rest the deflector rod on top of the printer's cross brace. 34. The deflector support should now be touching the take -up reel assembly. 12'' / 305mm 32. Slide each of the deflector supports sideways ..., is fully inserted into the gap between the cross brace and the printer leg. A paper deflector, which consists of the support is supplied with the take -up reel kit. Fit the left and right supports on the two supports. 19 HP DesignJet 1000 Series Take-Up Reel 31. You must close the spindle lock...
HP DesignJet 1000 Series Take-Up Reel UserÂ’s Guide - C6079-90001
Page 21
.... Use the ↓ key to move the leading edge of the paper down until it has been properly installed (see preceding pages). HP Bright White Inkjet Paper is not recommended for use the ↑ key to move the paper back up. 21 HP DesignJet 1000 Series Take-Up Reel If you to No or Yes. Select... you already have a roll of the core tube. Make sure the paper passes in 150-ft and 300-ft rolls. s If you have a roll of paper in Chapter 3 of the deflector, as shown below. Continue with the centre of paper in the printer, go to step 1 below . 1 The front panel will offer ...
HP DesignJet 1000 Series Take-Up Reel UserÂ’s Guide - C6079-90001
Page 22
HP DesignJet 1000 Series Take-Up Reel 22 2 Ensure that the spindle lock is closed. 3 Move the adjustment levers on the left and right paper guides to the unlocked position.
HP DesignJet 1000 Series Take-Up Reel UserÂ’s Guide - C6079-90001
Page 23
4 The two paper guides and core must be slightly stiff on the spindle: you have to use both paper guides to the locked position. 23 HP DesignJet 1000 Series Take-Up Reel The paper guides may have adjusted the position of the core as shown below. Adjust the position of the core, pull the adjustment levers on both hands. 5 When you may be positioned on the take-up reel spindle so that the paper is in the center, between the paper guides.
HP DesignJet 1000 Series Take-Up Reel UserÂ’s Guide - C6079-90001
Page 24
if you need more paper out of the printer; HP DesignJet 1000 Series Take-Up Reel 24 Do not attempt to the position shown below. 6 Pull the paper taut to pull more paper, use the front panel.
HP DesignJet 1000 Series Take-Up Reel UserÂ’s Guide - C6079-90001
Page 25
NOTE: To avoid the paper skewing as it is wound onto the core tube, ensure the paper is straight when it is attached. 8 Press the ↓ key on the front panel to the core. Use three strips, one in the middle (first) and then one at least once around the core. Enough paper should be advanced so that will not tear the paper when it is removed later. Advance about this much paper 25 HP DesignJet 1000 Series Take-Up Reel NOTE: Use only tape that the paper can wrap at each side of sticky tape to attach the paper to advance the paper. 7 Use a small amount of the paper.