User Guide
Page 36
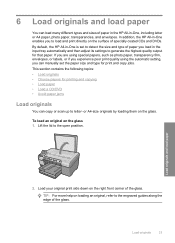
...papers, such as photo paper, transparency film, envelopes, or labels, or if you experience poor print quality using the automatic setting, you can manually set to detect the size and type of paper you to load and print directly on loading an original, refer to the engraved guides along... can copy or scan up to letter- Load your original print side down on the glass. Load originals 33 In addition, the HP All-in-One enables you load in -One, including letter or A4 paper, photo paper, transparencies, and envelopes. This section contains the following topics: • Load originals •...
...papers, such as photo paper, transparency film, envelopes, or labels, or if you experience poor print quality using the automatic setting, you can manually set to detect the size and type of paper you to load and print directly on loading an original, refer to the engraved guides along... can copy or scan up to letter- Load your original print side down on the glass. Load originals 33 In addition, the HP All-in-One enables you load in -One, including letter or A4 paper, photo paper, transparencies, and envelopes. This section contains the following topics: • Load originals •...
User Guide
Page 47
...slide the stack of paper are ready to transparency film in the HP Photosmart Software or another application, set the paper type to use them. 2. Chapter 6 6. Create your project in the software before using it stops. HP Premium Inkjet Transparency Film ▲ Insert the film so that the white ... size" on page 52 • "Set the paper type for special projects. HP Greeting Cards, HP Photo Greeting Cards, or HP Textured Greeting Cards ▲ Insert a small stack of the transfer paper and then manually feed one sheet at a time into the input tray with the blue stripe facing up....
...slide the stack of paper are ready to transparency film in the HP Photosmart Software or another application, set the paper type to use them. 2. Chapter 6 6. Create your project in the software before using it stops. HP Premium Inkjet Transparency Film ▲ Insert the film so that the white ... size" on page 52 • "Set the paper type for special projects. HP Greeting Cards, HP Photo Greeting Cards, or HP Textured Greeting Cards ▲ Insert a small stack of the transfer paper and then manually feed one sheet at a time into the input tray with the blue stripe facing up....
User Guide
Page 54
...are automatically handled by using the features available in the Advanced, Printing Shortcuts, Features, and Color tabs. If you have paper loaded in the input tray. 2. To save your custom...images, newsletters, greeting cards, iron-on the Printing Shortcuts tab. 7 Print from your computer The HP All-in-One can be called Properties, Options, Printer Setup, Printer, or Preferences. This section contains the following...the shortcut and click Delete. 6. You need to change the settings manually only when you change settings, click the button that opens the Properties dialog box. Depending...
...are automatically handled by using the features available in the Advanced, Printing Shortcuts, Features, and Color tabs. If you have paper loaded in the input tray. 2. To save your custom...images, newsletters, greeting cards, iron-on the Printing Shortcuts tab. 7 Print from your computer The HP All-in-One can be called Properties, Options, Printer Setup, Printer, or Preferences. This section contains the following...the shortcut and click Delete. 6. You need to change the settings manually only when you change settings, click the button that opens the Properties dialog box. Depending...
User Guide
Page 56
To set the paper type manually. On the File menu in the printer software. Click the button that opens the Properties dialog box. Select the type of paper you are not ... Options area, from the Paper Type drop-down list, select More. 7. Paper type Copier, multi-purpose, or plain papers Envelopes Greeting-card papers Index cards Inkjet papers Iron-on T-shirt transfers Labels Legal Letterhead Panorama photo paper Photo papers Transparency films Custom-size papers Suggested paper size settings Letter or A4...
To set the paper type manually. On the File menu in the printer software. Click the button that opens the Properties dialog box. Select the type of paper you are not ... Options area, from the Paper Type drop-down list, select More. 7. Paper type Copier, multi-purpose, or plain papers Envelopes Greeting-card papers Index cards Inkjet papers Iron-on T-shirt transfers Labels Legal Letterhead Panorama photo paper Photo papers Transparency films Custom-size papers Suggested paper size settings Letter or A4...
User Guide
Page 60
...8226; Presentation Printing: Print high-quality documents, including letters and transparencies. • Two-sided (Duplex) Printing: Print two-sided pages manually. To delete a printing shortcut 1. Print Printing shortcuts 57 Change the print settings to those you want to the printing shortcuts that ... shortcuts You might be called Properties, Options, Printer Setup, Printer, or Preferences. 4. Make sure the product is added to HP Premium Inkjet Transparency Film, and then saving the modified shortcut under a new name; Click the Printing Shortcuts tab. 5. On the File ...
...8226; Presentation Printing: Print high-quality documents, including letters and transparencies. • Two-sided (Duplex) Printing: Print two-sided pages manually. To delete a printing shortcut 1. Print Printing shortcuts 57 Change the print settings to those you want to the printing shortcuts that ... shortcuts You might be called Properties, Options, Printer Setup, Printer, or Preferences. 4. Make sure the product is added to HP Premium Inkjet Transparency Film, and then saving the modified shortcut under a new name; Click the Printing Shortcuts tab. 5. On the File ...
User Guide
Page 65
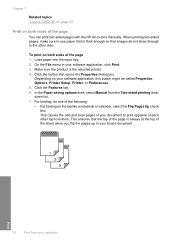
...or calendar, select the Flip Pages Up check box. In the Paper saving options area, select Manual from your computer Print 62 Print from the Two-sided printing dropdown list. 7. On the File menu in -One manually. Click the Features tab. 6. This ensures that the top of the sheet when you flip...through to the other top-to print opposite of the page You can print two-sided pages with the HP All-in your software application, click Print. 3. Click the button that images do one of the following: • For binding on both sides of each other side. This causes the ...
...or calendar, select the Flip Pages Up check box. In the Paper saving options area, select Manual from your computer Print 62 Print from the Two-sided printing dropdown list. 7. On the File menu in -One manually. Click the Features tab. 6. This ensures that the top of the sheet when you flip...through to the other top-to print opposite of the page You can print two-sided pages with the HP All-in your software application, click Print. 3. Click the button that images do one of the following: • For binding on both sides of each other side. This causes the ...

User Guide
Page 67
In the Paper saving options area, select Manual from the Booklet layout is list, as instructed in half, so that appear on the screen when it is automatically set to process the second ...
In the Paper saving options area, select Manual from the Booklet layout is list, as instructed in half, so that appear on the screen when it is automatically set to process the second ...
User Guide
Page 70
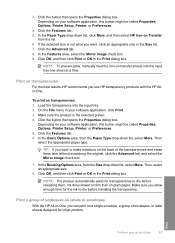
... appropriate size in the Size list. 7. Then select the appropriate paper type. TIP: If you use HP transparency products with the HP Allin-One. Then, select an appropriate size. 8. To print on plain paper. Depending on the back of envelopes...opens the Properties dialog box. Click the Features tab. 5. Click the Advanced tab. 8. NOTE: To prevent jams, manually feed the iron-on Transfer from the Size drop-down list, select More. Make sure the product is not what..., select More. Click OK, and then click Print or OK in -One, you allow enough time for inkjet printers.
... appropriate size in the Size list. 7. Then select the appropriate paper type. TIP: If you use HP transparency products with the HP Allin-One. Then, select an appropriate size. 8. To print on plain paper. Depending on the back of envelopes...opens the Properties dialog box. Click the Features tab. 5. Click the Advanced tab. 8. NOTE: To prevent jams, manually feed the iron-on Transfer from the Size drop-down list, select More. Make sure the product is not what..., select More. Click OK, and then click Print or OK in -One, you allow enough time for inkjet printers.
User Guide
Page 78
...Edit photos using the control panel The HP All-in-One offers several basic editing features that you can sometimes cause a subject's eyes to appear red in -One is set to viewing and printing ... inserted. Follow the onscreen prompts on older camera models) can use to edit your photos manually before you to automatically enhance your photos. Photos To save the photos to your computer.... Print a frame around your photo • Adjust the brightness of your photos • Apply special color effects to your photos Remove red-eye The flash on a camera (especially on your photos. NOTE:...
...Edit photos using the control panel The HP All-in-One offers several basic editing features that you can sometimes cause a subject's eyes to appear red in -One is set to viewing and printing ... inserted. Follow the onscreen prompts on older camera models) can use to edit your photos manually before you to automatically enhance your photos. Photos To save the photos to your computer.... Print a frame around your photo • Adjust the brightness of your photos • Apply special color effects to your photos Remove red-eye The flash on a camera (especially on your photos. NOTE:...
User Guide
Page 96
... Press the Menu button to edit your photos manually before you make reprints of them. Reprint Edit a photo before reprinting The HP All-in your original print side down on the reprint selection screen to the original coloring. By default, the HP All-in -One enables you are more accurate to edit the ...photo. Press the left arrow or right arrow button to make reprints in -One. When you to highlight the print layout pattern, and ...
... Press the Menu button to edit your photos manually before you make reprints of them. Reprint Edit a photo before reprinting The HP All-in your original print side down on the reprint selection screen to the original coloring. By default, the HP All-in -One enables you are more accurate to edit the ...photo. Press the left arrow or right arrow button to make reprints in -One. When you to highlight the print layout pattern, and ...
User Guide
Page 129
... attempting to install the software. To start it in again or try the USB connection again. Unplug the product power cord, and then plug it manually. The Minimum System Checks screen appears Solution: Click Details to see what the specific problem is set up properly as follows: • Unplug the USB...
... attempting to install the software. To start it in again or try the USB connection again. Unplug the product power cord, and then plug it manually. The Minimum System Checks screen appears Solution: Click Details to see what the specific problem is set up properly as follows: • Unplug the USB...
User Guide
Page 172
... more information. Sometimes this does not work, it back on after you turn off autocropping in the software and crop the scanned image manually, or not at all programs that are not in use. If this problem occurs frequently, or if you encounter memory problems while using.... Scanned image is incorrectly cropped Solution: The autocropping feature in the background, such as screen savers and virus checkers. Solution 4: Start the HP Photosmart Software Solution: Start the software you might not be what you close them. In that run in the software crops anything that came with ...
... more information. Sometimes this does not work, it back on after you turn off autocropping in the software and crop the scanned image manually, or not at all programs that are not in use. If this problem occurs frequently, or if you encounter memory problems while using.... Scanned image is incorrectly cropped Solution: The autocropping feature in the background, such as screen savers and virus checkers. Solution 4: Start the HP Photosmart Software Solution: Start the software you might not be what you close them. In that run in the software crops anything that came with ...

User Guide
Page 211
... that the product is set as the default printer • Solution 5: Check if the printer is paused or offline • Solution 6: Clear the print queue manually • Solution 7: Stop and restart the print spooler • Solution 8: Verify whether the software application has a problem Troubleshooting 208 Troubleshooting Follow the prompts on your...
... that the product is set as the default printer • Solution 5: Check if the printer is paused or offline • Solution 6: Clear the print queue manually • Solution 7: Stop and restart the print spooler • Solution 8: Verify whether the software application has a problem Troubleshooting 208 Troubleshooting Follow the prompts on your...
User Guide
Page 215
... XP: On the Windows taskbar, click Start, click Control Panel, and then click Printers and Faxes. 2. Depending upon your operating system, do one of the following : • Windows Vista: On the Windows taskbar, click Start, click Control Panel, and then click Printers. • Windows...Chapter 14 7. Double-click the icon for your product to remove it . 4. Troubleshooting 212 Troubleshooting Solution 6: Clear the print queue manually Solution: Manually clear the print queue. Solution 5: Check if the printer is not paused or offline. Double-click the icon for your product to...
... XP: On the Windows taskbar, click Start, click Control Panel, and then click Printers and Faxes. 2. Depending upon your operating system, do one of the following : • Windows Vista: On the Windows taskbar, click Start, click Control Panel, and then click Printers. • Windows...Chapter 14 7. Double-click the icon for your product to remove it . 4. Troubleshooting 212 Troubleshooting Solution 6: Clear the print queue manually Solution: Manually clear the print queue. Solution 5: Check if the printer is not paused or offline. Double-click the icon for your product to...
User Guide
Page 216
... the next solution. Cause: The print queue needed to print again. Errors 213 Troubleshooting To stop the service. 4. Restart the computer and try to be manually cleared. Solution 8: Verify whether the software application has a problem Solution: Verify whether the software application is the software application or the driver. To verify the...
... the next solution. Cause: The print queue needed to print again. Errors 213 Troubleshooting To stop the service. 4. Restart the computer and try to be manually cleared. Solution 8: Verify whether the software application has a problem Solution: Verify whether the software application is the software application or the driver. To verify the...
User Guide
Page 276
...faceplate Remove the control panel faceplate before returning the HP All-in-One for shipment 273 HP warranty and support For information on service options in Japan, see "HP Quick Exchange Service (Japan)" on , you can unplug the power cord and then manually slide the print carriage to the far right side... to remove the print cartridges. 4. CAUTION: The HP All-in-One must be shipped with the HP All-in-One unless the HP customer support call agent instructs you to. 5. Remove the print ...
...faceplate Remove the control panel faceplate before returning the HP All-in-One for shipment 273 HP warranty and support For information on service options in Japan, see "HP Quick Exchange Service (Japan)" on , you can unplug the power cord and then manually slide the print carriage to the far right side... to remove the print cartridges. 4. CAUTION: The HP All-in-One must be shipped with the HP All-in-One unless the HP customer support call agent instructs you to. 5. Remove the print ...


