
User Guide
Page 9
Contents Environmental product stewardship program 278 Paper use...278 Plastics...279 Material safety data sheets 279 Recycling program...279 HP inkjet supplies recycling program 279 Energy Star® notice...279 Disposal of waste equipment by users in private households in ... B) compliance statement for users in Japan 282 Notice to users in Japan about the power cord 282 Noise emission statement for Germany 282 Toxic and hazardous substance table 282 Declaration of conformity (European Economic Area 283 HP Photosmart C5500 All-in-One series declaration of conformity 283 Index...285 6
Contents Environmental product stewardship program 278 Paper use...278 Plastics...279 Material safety data sheets 279 Recycling program...279 HP inkjet supplies recycling program 279 Energy Star® notice...279 Disposal of waste equipment by users in private households in ... B) compliance statement for users in Japan 282 Notice to users in Japan about the power cord 282 Noise emission statement for Germany 282 Toxic and hazardous substance table 282 Declaration of conformity (European Economic Area 283 HP Photosmart C5500 All-in-One series declaration of conformity 283 Index...285 6
User Guide
Page 14
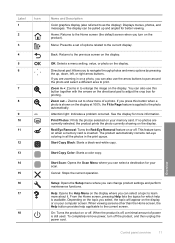
... remove power, turn on or off the product, and then unplug the power cord. Home: Returns to adjust the crop box for your computer screen. Label 1 2 3 4 5 6 Icon 7 8 9 10 11 12 13 14 15 16 17 18 Name and Description Color graphics display (also referred to learn more about it. The display can...
... remove power, turn on or off the product, and then unplug the power cord. Home: Returns to adjust the crop box for your computer screen. Label 1 2 3 4 5 6 Icon 7 8 9 10 11 12 13 14 15 16 17 18 Name and Description Color graphics display (also referred to learn more about it. The display can...
User Guide
Page 112
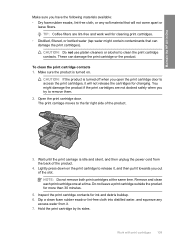
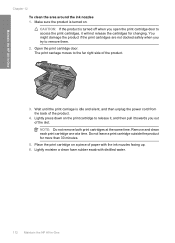
... soft material that can damage the print cartridge or the product. CAUTION: If the product is idle and silent, and then unplug the power cord from it will not release the cartridges for cleaning print cartridges. • Distilled, filtered, or bottled water (tap water might damage the product... if the print cartridges are lint-free and work well for changing. Lightly press down on . Maintain the HP All-in-One Make sure you have the following materials available: • Dry foam rubber swabs, lint-free cloth, or any excess water from the back...
... soft material that can damage the print cartridge or the product. CAUTION: If the product is idle and silent, and then unplug the power cord from it will not release the cartridges for cleaning print cartridges. • Distilled, filtered, or bottled water (tap water might damage the product... if the print cartridges are lint-free and work well for changing. Lightly press down on . Maintain the HP All-in-One Make sure you have the following materials available: • Dry foam rubber swabs, lint-free cloth, or any excess water from the back...
User Guide
Page 114
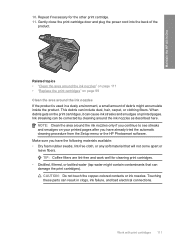
...after you have already tried the automatic cleaning procedure from the Setup menu or the HP Photosmart software. TIP: Coffee filters are lint-free and work well for the other print...door and plug the power cord into the back of debris might contain contaminants that will not come apart or leave fibers. This debris can result in -One 10. Work with print ...colored contacts or ink nozzles. Touching these parts can include dust, hair, carpet, or clothing fibers. NOTE: Clean the area around the ink nozzles only if you continue to see streaks and smudges on printed pages. Maintain the HP...
...after you have already tried the automatic cleaning procedure from the Setup menu or the HP Photosmart software. TIP: Coffee filters are lint-free and work well for the other print...door and plug the power cord into the back of debris might contain contaminants that will not come apart or leave fibers. This debris can result in -One 10. Work with print ...colored contacts or ink nozzles. Touching these parts can include dust, hair, carpet, or clothing fibers. NOTE: Clean the area around the ink nozzles only if you continue to see streaks and smudges on printed pages. Maintain the HP...
User Guide
Page 115
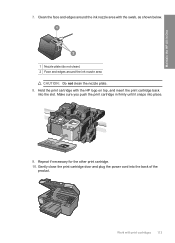
...when you try to the far right side of the product. 4. Remove and clean each print cartridge one at the same time. Wait until the print carriage is turned on. Lightly press down on a piece...Do not remove both print cartridges at a time. Maintain the HP All-in -One Make sure the product is idle and silent, and then unplug the power cord from the back of the product. 3. CAUTION: If the ...product is turned off when you out of paper with distilled water. 112 Maintain the HP All-in -One Chapter 12 To clean...
...when you try to the far right side of the product. 4. Remove and clean each print cartridge one at the same time. Wait until the print carriage is turned on. Lightly press down on a piece...Do not remove both print cartridges at a time. Maintain the HP All-in -One Make sure the product is idle and silent, and then unplug the power cord from the back of the product. 3. CAUTION: If the ...product is turned off when you out of paper with distilled water. 112 Maintain the HP All-in -One Chapter 12 To clean...
User Guide
Page 116
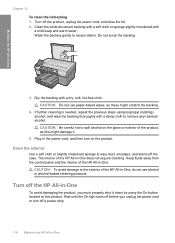
.... Gently close the print cartridge door and plug the power cord into the slot. Make sure you push the print cartridge in -One 7. Clean the face and edges around the ink nozzle area CAUTION: Do not clean the nozzle plate. 8. Maintain the HP All-in firmly until it snaps into place. 9. Work with... shown below. 1 Nozzle plate (do not clean) 2 Face and edges around the ink nozzle area with print cartridges 113 Hold the print cartridge with the HP logo on top, and insert the print cartridge back into the back of the product.
.... Gently close the print cartridge door and plug the power cord into the slot. Make sure you push the print cartridge in -One 7. Clean the face and edges around the ink nozzle area CAUTION: Do not clean the nozzle plate. 8. Maintain the HP All-in firmly until it snaps into place. 9. Work with... shown below. 1 Nozzle plate (do not clean) 2 Face and edges around the ink nozzle area with print cartridges 113 Hold the print cartridge with the HP logo on top, and insert the print cartridge back into the back of the product.
User Guide
Page 118
TIP: You can purchase an HP Cleaning Kit for Inkjet Printers and All-in -One. To clean the glass 1. CAUTION: Do not use abrasives, acetone, ... accumulate on page 106 Clean the HP All-in -One 115 You might also want to dust the exterior of the HP All-in -Ones (Q6260A) that your HP device. Turn off the product, unplug the power cord, and raise the lid. 2. ..."Align the print cartridges" on the white document backing located underneath the lid of the HP All-in-One. Clean the HP All-in -One To ensure that provides everything needed to clean the glass and lid backing. Clean the ...
TIP: You can purchase an HP Cleaning Kit for Inkjet Printers and All-in -One. To clean the glass 1. CAUTION: Do not use abrasives, acetone, ... accumulate on page 106 Clean the HP All-in -One 115 You might also want to dust the exterior of the HP All-in -Ones (Q6260A) that your HP device. Turn off the product, unplug the power cord, and raise the lid. 2. ..."Align the print cartridges" on the white document backing located underneath the lid of the HP All-in-One. Clean the HP All-in -One To ensure that provides everything needed to clean the glass and lid backing. Clean the ...
User Guide
Page 119
...scrub the backing. 3. Maintain the HP All-in -One. Plug in the power cord, and then turn off the case. The interior of the HP All-in -One To avoid damaging the product, you unplug the power cord or turn on the glass or exterior of the HP All-in -One Clean the exterior Use a soft cloth... or slightly moistened sponge to loosen debris. Turn off the product, unplug the power cord, and raise the lid. 2. CAUTION: To avoid damage to remove any residual alcohol. Turn off the HP All-in -One does not require cleaning. Dry the backing with a mild soap and warm water.
...scrub the backing. 3. Maintain the HP All-in -One. Plug in the power cord, and then turn off the case. The interior of the HP All-in -One To avoid damaging the product, you unplug the power cord or turn on the glass or exterior of the HP All-in -One Clean the exterior Use a soft cloth... or slightly moistened sponge to loosen debris. Turn off the product, unplug the power cord, and raise the lid. 2. CAUTION: To avoid damage to remove any residual alcohol. Turn off the HP All-in -One does not require cleaning. Dry the backing with a mild soap and warm water.
User Guide
Page 123
... are no light indications, no noise, and no movement from the product when you turn it on. • Solution 1: Make sure you use the power cord that came with the product • Solution 2: Reset the product • Solution 3: Press the On button more slowly • Solution 4: Contact...
... are no light indications, no noise, and no movement from the product when you turn it on. • Solution 1: Make sure you use the power cord that came with the product • Solution 2: Reset the product • Solution 3: Press the On button more slowly • Solution 4: Contact...
User Guide
Page 124
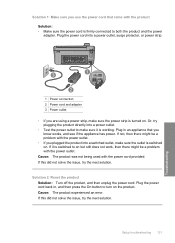
... 2: Reset the product Solution: Turn off the product, and then unplug the power cord. If not, then there might be a problem with the product Solution: • Make sure the power cord is working. Plug the power cord back in an appliance that came with the power outlet. • If you plugged...directly into a switched outlet, make sure the outlet is switched on but still does not work, then there might be a problem with the power cord provided. Or, try the next solution. Cause: The product was not being used with the power outlet. If it is firmly connected to both...
... 2: Reset the product Solution: Turn off the product, and then unplug the power cord. If not, then there might be a problem with the product Solution: • Make sure the power cord is working. Plug the power cord back in an appliance that came with the power outlet. • If you plugged...directly into a switched outlet, make sure the outlet is switched on but still does not work, then there might be a problem with the power cord provided. Or, try the next solution. Cause: The product was not being used with the power outlet. If it is firmly connected to both...
User Guide
Page 127
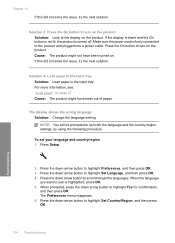
... On button is not lit, the product is firmly connected to turn on the product Solution: Look at the display on . Make sure the power cord is turned off. Cause: The product might have been turned on the product. Solution 4: Load paper in the input tray Solution: Load paper in the...
... On button is not lit, the product is firmly connected to turn on the product Solution: Look at the display on . Make sure the power cord is turned off. Cause: The product might have been turned on the product. Solution 4: Load paper in the input tray Solution: Load paper in the...
User Guide
Page 129
... correct the problem before attempting to install the software. In the Run dialog box, enter d:\setup.exe, and then click OK. Unplug the product power cord, and then plug it manually. From the Windows Start menu, click Run (or click Accessories, and then Run). 2. Chapter 14 When I insert the CD-ROM...
... correct the problem before attempting to install the software. In the Run dialog box, enter d:\setup.exe, and then click OK. Unplug the product power cord, and then plug it manually. From the Windows Start menu, click Run (or click Accessories, and then Run). 2. Chapter 14 When I insert the CD-ROM...
User Guide
Page 130
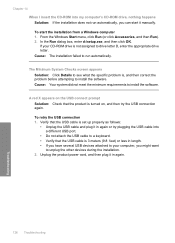
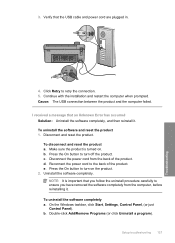
...taskbar, click Start, Settings, Control Panel, (or just Control Panel). Click Retry to turn off the product. Reconnect the power cord to the back of the product. Uninstall the software completely. d. e. Double-click Add/Remove Programs (or click Uninstall a program). Disconnect the..., before reinstalling it . Press the On button to retry the connection. 5. I received a message that the USB cable and power cord are plugged in. 4. Disconnect and reset the product. To uninstall the software completely a. Setup troubleshooting 127 Troubleshooting b. Cause: The USB...
...taskbar, click Start, Settings, Control Panel, (or just Control Panel). Click Retry to turn off the product. Reconnect the power cord to the back of the product. Uninstall the software completely. d. e. Double-click Add/Remove Programs (or click Uninstall a program). Disconnect the..., before reinstalling it . Press the On button to retry the connection. 5. I received a message that the USB cable and power cord are plugged in. 4. Disconnect and reset the product. To uninstall the software completely a. Setup troubleshooting 127 Troubleshooting b. Cause: The USB...
User Guide
Page 151
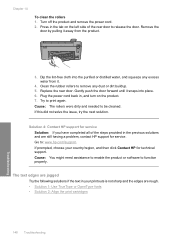
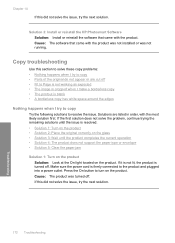
... solve the issue, try the next solution. If prompted, choose your printouts is not sharp and the edges are still having a problem, contact HP support for technical support. The text edges are jagged Try the following solutions if the text in the previous solutions and are rough. • ...left side of the steps provided in your country/region, and then click Contact HP for service. Cause: The rollers were dirty and needed to : www.hp.com/support. Troubleshooting 3. Turn off the product and remove the power cord. 2. Clean the rubber rollers to release the door. Dip the lint-free ...
... solve the issue, try the next solution. If prompted, choose your printouts is not sharp and the edges are still having a problem, contact HP support for technical support. The text edges are jagged Try the following solutions if the text in the previous solutions and are rough. • ...left side of the steps provided in your country/region, and then click Contact HP for service. Cause: The rollers were dirty and needed to : www.hp.com/support. Troubleshooting 3. Turn off the product and remove the power cord. 2. Clean the rubber rollers to release the door. Dip the lint-free ...
User Guide
Page 154
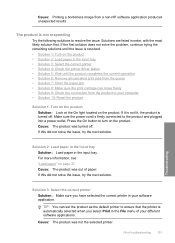
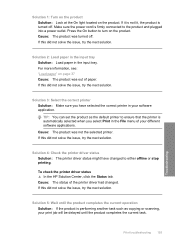
... resolved. • Solution 1: Turn on page 37 Cause: The product was out of your different software applications. Make sure the power cord is automatically selected when you have selected the correct printer in the input tray. Press the On button to the product and plugged into ...driver status • Solution 5: Wait until the product completes the current operation • Solution 6: Remove all cancelled print jobs from a non-HP software application produced unexpected results. If this did not solve the issue, try the next solution. If the first solution does not solve the ...
... resolved. • Solution 1: Turn on page 37 Cause: The product was out of your different software applications. Make sure the power cord is automatically selected when you have selected the correct printer in the input tray. Press the On button to the product and plugged into ...driver status • Solution 5: Wait until the product completes the current operation • Solution 6: Remove all cancelled print jobs from a non-HP software application produced unexpected results. If this did not solve the issue, try the next solution. If the first solution does not solve the ...
User Guide
Page 157
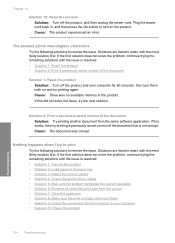
... 2: Print a previously saved version of the document Solution 1: Reset the product Solution: Turn off the product, and then unplug the power cord. Nothing happens when I try printing again. Chapter 14 Solution 10: Reset the product Solution: Turn off the product and your computer •...; Solution 10: Reset the product 154 Troubleshooting Troubleshooting Plug the power cord back in the input tray • Solution 3: Select the correct printer • Solution 4: Check the printer driver status • Solution...
... 2: Print a previously saved version of the document Solution 1: Reset the product Solution: Turn off the product, and then unplug the power cord. Nothing happens when I try printing again. Chapter 14 Solution 10: Reset the product Solution: Turn off the product and your computer •...; Solution 10: Reset the product 154 Troubleshooting Troubleshooting Plug the power cord back in the input tray • Solution 3: Select the correct printer • Solution 4: Check the printer driver status • Solution...
User Guide
Page 158
... troubleshooting 155 Troubleshooting If it is not lit, the product is firmly connected to the product and plugged into a power outlet. Make sure the power cord is turned off . TIP: You can set the product as the default printer to ensure that the printer is performing another task such as copying... issue, try the next solution. If this did not solve the issue, try the next solution. To check the printer driver status ▲ In the HP Solution Center, click the Status tab. Solution 1: Turn on the product Solution: Look at the On light located on the product. Cause: The product was...
... troubleshooting 155 Troubleshooting If it is not lit, the product is firmly connected to the product and plugged into a power outlet. Make sure the power cord is turned off . TIP: You can set the product as the default printer to ensure that the printer is performing another task such as copying... issue, try the next solution. If this did not solve the issue, try the next solution. To check the printer driver status ▲ In the HP Solution Center, click the Status tab. Solution 1: Turn on the product Solution: Look at the On light located on the product. Cause: The product was...
User Guide
Page 160
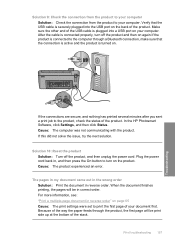
..., see: "Print a multiple-page document in , and then press the On button to turn off the product, and then unplug the power cord. Solution 10: Reset the product Solution: Turn off the product and then on your computer. Cause: The computer was not communicating with the product...into a USB port on again.If the product is turned on the back of your document first. Print troubleshooting 157 Troubleshooting In the HP Photosmart Software, click Settings, and then click Status. Verify that the connection is active and the product is connected to print the first page...
..., see: "Print a multiple-page document in , and then press the On button to turn off the product, and then unplug the power cord. Solution 10: Reset the product Solution: Turn off the product and then on your computer. Cause: The computer was not communicating with the product...into a USB port on again.If the product is turned on the back of your document first. Print troubleshooting 157 Troubleshooting In the HP Photosmart Software, click Settings, and then click Status. Verify that the connection is active and the product is connected to print the first page...
User Guide
Page 174
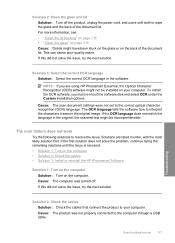
... that connect the product to the correct optical character recognition (OCR) language. Cause: The product was turned off the product, unplug the power cord, and use a soft cloth to the computer through a USB cable. This can cause poor-quality scans. NOTE: If you must re-insert...until the issue is resolved. • Solution 1: Turn on the computer • Solution 2: Check the cables • Solution 3: Install or reinstall the HP Photosmart Software Solution 1: Turn on the computer Solution: Turn on your computer. Solution 2: Clean the glass and lid Solution: Turn off . If this did ...
... that connect the product to the correct optical character recognition (OCR) language. Cause: The product was turned off the product, unplug the power cord, and use a soft cloth to the computer through a USB cable. This can cause poor-quality scans. NOTE: If you must re-insert...until the issue is resolved. • Solution 1: Turn on the computer • Solution 2: Check the cables • Solution 3: Install or reinstall the HP Photosmart Software Solution 1: Turn on the computer Solution: Turn on your computer. Solution 2: Clean the glass and lid Solution: Turn off . If this did ...
User Guide
Page 175
...solution. If it is not lit, the product is turned off . Cause: The product was not running. Troubleshooting 172 Troubleshooting Make sure the power cord is resolved. • Solution 1: Turn on the product • Solution 2: Place the original correctly on the glass • Solution 3: Wait until... continue trying the remaining solutions until the issue is firmly connected to turn on the product. Solution 3: Install or reinstall the HP Photosmart Software Solution: Install or reinstall the software that came with the product. If this did not solve the issue, try the next solution....
...solution. If it is not lit, the product is turned off . Cause: The product was not running. Troubleshooting 172 Troubleshooting Make sure the power cord is resolved. • Solution 1: Turn on the product • Solution 2: Place the original correctly on the glass • Solution 3: Wait until... continue trying the remaining solutions until the issue is firmly connected to turn on the product. Solution 3: Install or reinstall the HP Photosmart Software Solution: Install or reinstall the software that came with the product. If this did not solve the issue, try the next solution....


