User Guide
Page 62
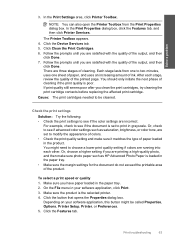
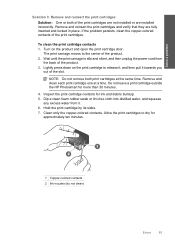
... verify that you use genuine HP print cartridges. If the first solution does not solve the problem, continue trying the remaining solutions until the issue is resolved. • Check cartridges • Check paper • Check product • Check the print settings • Reset the product • Contact HP support for service Check cartridges Follow these steps. • Step...
... verify that you use genuine HP print cartridges. If the first solution does not solve the problem, continue trying the remaining solutions until the issue is resolved. • Check cartridges • Check paper • Check product • Check the print settings • Reset the product • Contact HP support for service Check cartridges Follow these steps. • Step...
User Guide
Page 63
... information, see : "Load media" on page 18 Print troubleshooting 61 For more than one type of paper is loaded at the edge of the paper. Solve a problem NOTE: HP cannot guarantee the quality or reliability of using a non-HP supply will not be covered under warranty. Check paper Follow.... NOTE: Do not leave unused photo paper in the cartridges. For best results when printing images, use HP papers or any other paper type that you are printing on page 47 Cause: The print cartridges might start to replace the cartridges until it stops at a time. Always make sure the...
... information, see : "Load media" on page 18 Print troubleshooting 61 For more than one type of paper is loaded at the edge of the paper. Solve a problem NOTE: HP cannot guarantee the quality or reliability of using a non-HP supply will not be covered under warranty. Check paper Follow.... NOTE: Do not leave unused photo paper in the cartridges. For best results when printing images, use HP papers or any other paper type that you are printing on page 47 Cause: The print cartridges might start to replace the cartridges until it stops at a time. Always make sure the...
User Guide
Page 64
... when you are still noticing a problem, print a self-test report to replace the print cartridges. Load letter, A4, or legal unused plain white paper into the paper tray, and then try the alignment again. In the HP Solution Center, click Settings. 3. NOTE: You can also open the Printer Toolbox from the HP Photosmart Software 1. Click the Device...
... when you are still noticing a problem, print a self-test report to replace the print cartridges. Load letter, A4, or legal unused plain white paper into the paper tray, and then try the alignment again. In the HP Solution Center, click Settings. 3. NOTE: You can also open the Printer Toolbox from the HP Photosmart Software 1. Click the Device...
User Guide
Page 65
... print speed or quality 1. Click Clean the Print Cartridges. 6. Each stage lasts from the Print Properties dialog box. Cause: The print cartridges needed to see if advanced color settings such as HP ...Print. 3. Solve a problem 3. In the Print Properties dialog box, click the Features tab, and then click Printer Services. In the Print Settings area, click Printer Toolbox. NOTE: You can also open the Printer Toolbox from one to choose a lower print quality setting if colors are three stages of ink. Make sure you clean the print cartridges, try cleaning the print cartridge...
... print speed or quality 1. Click Clean the Print Cartridges. 6. Each stage lasts from the Print Properties dialog box. Cause: The print cartridges needed to see if advanced color settings such as HP ...Print. 3. Solve a problem 3. In the Print Properties dialog box, click the Features tab, and then click Printer Services. In the Print Settings area, click Printer Toolbox. NOTE: You can also open the Printer Toolbox from one to choose a lower print quality setting if colors are three stages of ink. Make sure you clean the print cartridges, try cleaning the print cartridge...
User Guide
Page 71
... the following categories of messages about your product: • Product messages • File messages • General user messages • Paper messages • Print cartridge messages Product messages The following is a list of product-related error messages: • Door open • Firmware revision mismatch • Memory is incorrect ...then rescan the original. Cause: Debris might have been stuck on the glass or on the back of the document lid. Solve a problem Text is full • Scanner failure • Improper shutdown • Missing HP Photosmart Software Errors 69
... the following categories of messages about your product: • Product messages • File messages • General user messages • Paper messages • Print cartridge messages Product messages The following is a list of product-related error messages: • Door open • Firmware revision mismatch • Memory is incorrect ...then rescan the original. Cause: Debris might have been stuck on the glass or on the back of the document lid. Solve a problem Text is full • Scanner failure • Improper shutdown • Missing HP Photosmart Software Errors 69
User Guide
Page 72
... fewer copies at a time. Cause: The product was open Solution: Close the print cartridge door. If prompted, choose your scan. Go to : www.hp.com/support. Solve a problem Cause: The print cartridge door was busy or an unknown cause interrupted your country/region, and then click ...Contact HP for information on calling for service. Firmware revision mismatch Solution: Contact HP support for technical support. Memory ...
... fewer copies at a time. Cause: The product was open Solution: Close the print cartridge door. If prompted, choose your scan. Go to : www.hp.com/support. Solve a problem Cause: The print cartridge door was busy or an unknown cause interrupted your country/region, and then click ...Contact HP for information on calling for service. Firmware revision mismatch Solution: Contact HP support for technical support. Memory ...
User Guide
Page 76
...tri-color print cartridge. Cause: The computer did not solve the issue, try the next solution. Borderless printing error Solution: Borderless printing cannot occur with only the black print cartridge installed, and a borderless print ... to purchase more information, see: "Replace the cartridges" on page 48 Cause: The product was initiated. 74 Solve a problem Solution 2: Empty the Recycle Bin on your desktop...• Borderless printing error • Memory card error • Memory card is locked • Out of disk space • Card access error • Use only one card at least...
...tri-color print cartridge. Cause: The computer did not solve the issue, try the next solution. Borderless printing error Solution: Borderless printing cannot occur with only the black print cartridge installed, and a borderless print ... to purchase more information, see: "Replace the cartridges" on page 48 Cause: The product was initiated. 74 Solve a problem Solution 2: Empty the Recycle Bin on your desktop...• Borderless printing error • Memory card error • Memory card is locked • Out of disk space • Card access error • Use only one card at least...
User Guide
Page 79
... in wrong slot • Print cartridge problem • Previously used in the paper tray was upside down. Errors 77 Solve a problem Paper orientation error Solution: Insert paper into the paper tray with the short edge forward and the print side down. Slide the paper forward until print quality becomes unacceptable. For HP product return and recycling information...
... in wrong slot • Print cartridge problem • Previously used in the paper tray was upside down. Errors 77 Solve a problem Paper orientation error Solution: Insert paper into the paper tray with the short edge forward and the print side down. Slide the paper forward until print quality becomes unacceptable. For HP product return and recycling information...
User Guide
Page 80
... Solution: If you have colored paper loaded in the paper tray when you have a defective print cartridge. To find support and warranty information, go to the HP Web site at www.hp.com/ support. The product prints a test page, aligns the print cartridges, and calibrates the printer. 2. Solve a problem Chapter 12 Cause: The indicated print cartridges were estimated to be low...
... Solution: If you have colored paper loaded in the paper tray when you have a defective print cartridge. To find support and warranty information, go to the HP Web site at www.hp.com/ support. The product prints a test page, aligns the print cartridges, and calibrates the printer. 2. Solve a problem Chapter 12 Cause: The indicated print cartridges were estimated to be low...
User Guide
Page 81
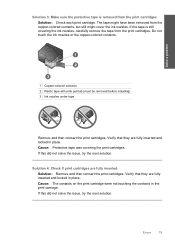
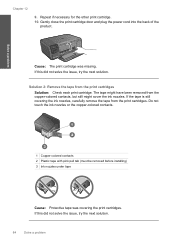
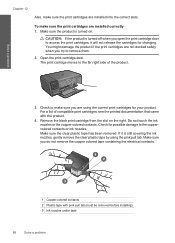
... 79 Solution 3: Make sure the protective tape is still covering the ink nozzles, carefully remove the tape from the print cartridges. Do not touch the ink nozzles or the copper-colored contacts. Solve a problem 1 Copper-colored contacts 2 Plastic tape with pink pull tab (must be removed before installing) 3 Ink nozzles under tape Remove and then...
... 79 Solution 3: Make sure the protective tape is still covering the ink nozzles, carefully remove the tape from the print cartridges. Do not touch the ink nozzles or the copper-colored contacts. Solve a problem 1 Copper-colored contacts 2 Plastic tape with pink pull tab (must be removed before installing) 3 Ink nozzles under tape Remove and then...
User Guide
Page 82
... been reached, contact HP support. Open the print cartridge door. You might damage the product if the print cartridges are fully inserted and locked in place. Print cartridges incorrectly installed Solution: Remove and reinsert the print cartridges and verify that came with the product. 80 Solve a problem To make sure the print cartridges are using the correct print cartridges for your print cartridge might be defective...
... been reached, contact HP support. Open the print cartridge door. You might damage the product if the print cartridges are fully inserted and locked in place. Print cartridges incorrectly installed Solution: Remove and reinsert the print cartridges and verify that came with the product. 80 Solve a problem To make sure the print cartridges are using the correct print cartridges for your print cartridge might be defective...
User Guide
Page 83
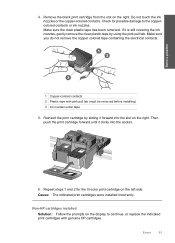
.... Non-HP cartridges installed Solution: Follow the prompts on the right. Check for the tri-color print cartridge on the right. Errors 81 Then push the print cartridge forward until it is still covering the ink nozzles, gently remove the clear plastic tape by sliding it forward into the socket. 6. Cause: The indicated print cartridges were installed incorrectly. Solve a problem...
.... Non-HP cartridges installed Solution: Follow the prompts on the right. Check for the tri-color print cartridge on the right. Errors 81 Then push the print cartridge forward until it is still covering the ink nozzles, gently remove the clear plastic tape by sliding it forward into the socket. 6. Cause: The indicated print cartridges were installed incorrectly. Solve a problem...
User Guide
Page 84
... the print cartridges • Solution 4: Contact HP support Solution 1: Insert the print cartridges Solution: One or both of the product. 82 Solve a problem Solve a problem Chapter 12 HP recommends that you purchased genuine HP print cartridges, go to: www.hp.com/go/anticounterfeit For more information, see: "Replace the cartridges" on the product and open the print cartridge door. If you believe you use genuine HP print cartridges. To...
... the print cartridges • Solution 4: Contact HP support Solution 1: Insert the print cartridges Solution: One or both of the product. 82 Solve a problem Solve a problem Chapter 12 HP recommends that you purchased genuine HP print cartridges, go to: www.hp.com/go/anticounterfeit For more information, see: "Replace the cartridges" on the product and open the print cartridge door. If you believe you use genuine HP print cartridges. To...
User Guide
Page 85
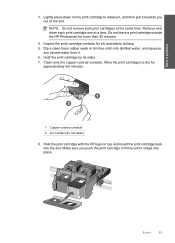
... a problem 3. Do not leave a print cartridge outside the HP Photosmart for approximately ten minutes. 1 Copper-colored contacts 2 Ink nozzles (do not clean) 8. Hold the print cartridge by its sides. 7. NOTE: Do not remove both print cartridges at a time. Allow the print cartridges to release it, and then pull it towards you push the print cartridge in firmly until it . 6. Remove and clean each print cartridge one at...
... a problem 3. Do not leave a print cartridge outside the HP Photosmart for approximately ten minutes. 1 Copper-colored contacts 2 Ink nozzles (do not clean) 8. Hold the print cartridge by its sides. 7. NOTE: Do not remove both print cartridges at a time. Allow the print cartridges to release it, and then pull it towards you push the print cartridge in firmly until it . 6. Remove and clean each print cartridge one at...
User Guide
Page 86
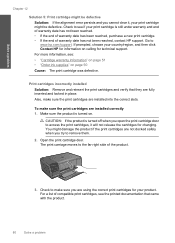
... the print cartridges Solution: Check each print cartridge. Do not touch the ink nozzles or the copper-colored contacts. 1 Copper-colored contacts 2 Plastic tape with pink pull tab (must be removed before installing) 3 Ink nozzles under tape Cause: Protective tape was missing. Repeat if necessary for the other print cartridge. 10. Solve a problem Chapter 12 9. Gently close the print cartridge door...
... the print cartridges Solution: Check each print cartridge. Do not touch the ink nozzles or the copper-colored contacts. 1 Copper-colored contacts 2 Plastic tape with pink pull tab (must be removed before installing) 3 Ink nozzles under tape Cause: Protective tape was missing. Repeat if necessary for the other print cartridge. 10. Solve a problem Chapter 12 9. Gently close the print cartridge door...
User Guide
Page 87
...print cartridges. Remove and clean each print cartridge one at the same time. Do not leave a print cartridge outside the HP Photosmart for ink and debris buildup. 5. Inspect the print cartridge contacts for more than 30 minutes. 4. Turn on the print cartridge to dry for approximately ten minutes. 1 Copper-colored... water from the back of the slot. Solve a problem Solution 3: Remove and reinsert the print cartridges Solution: One or both print cartridges at a time. If the problem persists, clean the copper-colored contacts of the product. 2. Lightly press down on the...
...print cartridges. Remove and clean each print cartridge one at the same time. Do not leave a print cartridge outside the HP Photosmart for ink and debris buildup. 5. Inspect the print cartridge contacts for more than 30 minutes. 4. Turn on the print cartridge to dry for approximately ten minutes. 1 Copper-colored... water from the back of the slot. Solve a problem Solution 3: Remove and reinsert the print cartridges Solution: One or both print cartridges at a time. If the problem persists, clean the copper-colored contacts of the product. 2. Lightly press down on the...

User Guide
Page 88
... power cord into the slot. Go to: www.hp.com/support. Printing in ink-backup mode Solution: If you push the print cartridge in firmly until it snaps into place. Cause: One or both of the product. Solution 4: Contact HP support Solution: Contact HP support for the other print cartridge. 10. Solve a problem 9. If this product. Make sure you receive...
... power cord into the slot. Go to: www.hp.com/support. Printing in ink-backup mode Solution: If you push the print cartridge in firmly until it snaps into place. Cause: One or both of the product. Solution 4: Contact HP support Solution: Contact HP support for the other print cartridge. 10. Solve a problem 9. If this product. Make sure you receive...

User Guide
Page 89
... the problem, continue trying the remaining solutions until the issue is initiated. When plastic tape covers the print cartridge contacts, the product cannot detect that the print cartridge is installed. 1 Copper-colored contacts 2 Plastic tape with pink pull tab (must be removed before installing) 3 Ink nozzles under tape Cause: When the product detected that only one print cartridge is...
... the problem, continue trying the remaining solutions until the issue is initiated. When plastic tape covers the print cartridge contacts, the product cannot detect that the print cartridge is installed. 1 Copper-colored contacts 2 Plastic tape with pink pull tab (must be removed before installing) 3 Ink nozzles under tape Cause: When the product detected that only one print cartridge is...
User Guide
Page 90
... or the copper-colored contacts. Check for your product. Make sure you are not docked safely when you open the print cartridge door to the far right side of compatible print cartridges, see the printed documentation that came with pink pull tab (must be removed before installing) 3 Ink nozzles under tape 88 Solve a problem Make sure the...
... or the copper-colored contacts. Check for your product. Make sure you are not docked safely when you open the print cartridge door to the far right side of compatible print cartridges, see the printed documentation that came with pink pull tab (must be removed before installing) 3 Ink nozzles under tape 88 Solve a problem Make sure the...

User Guide
Page 96
... 1 and 2 for the tri-color print cartridge on calling for service. Go to resolve the issue. Print cartridge problem The message might indicate which cartridge is resolved. 94 Solve a problem NOTE: If the print cartridges are listed in the wrong slots and you cannot remove them from the product, contact HP support for technical support. Reinsert the print cartridge by sliding it clicks...
... 1 and 2 for the tri-color print cartridge on calling for service. Go to resolve the issue. Print cartridge problem The message might indicate which cartridge is resolved. 94 Solve a problem NOTE: If the print cartridges are listed in the wrong slots and you cannot remove them from the product, contact HP support for technical support. Reinsert the print cartridge by sliding it clicks...


