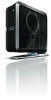
HP Blackbird Gaming System - Getting Started Guide
Page 9
Read the topics in the computer box for printed details or updates regarding the computer. Setting Up the Computer WARNING: The power supply is preset for your computer. If you move, please check the voltage requirements for the country/region in the Limited Warranty and Support... Guide before plugging the computer into an AC power outlet. WARNING: Please read "Safety Information" in which you purchased your new location before installing and connecting the computer to the electrical...
HP Blackbird Gaming System - Getting Started Guide
Page 10
... cause serious personal injury and hardware damage. Many surge protection devices have surge protection for modem or telephone lines. Use a power strip whose manufacturer offers a damage replacement policy that all cabling is more susceptible to install the base stabilizer, see the Attaching... an uninterruptible power supply (UPS). Use those if the computer has a television tuner installed. Once you set up the computer without the base stabilizer is not recommended because it is out of the way. Placing the computer in the proper location All Blackbird 002 systems ship ...
HP Blackbird Gaming System - Warranty and Support
Page 13
... with no direct connection to earth, according to the requirement that the electrical ground connections of the power utility, telephone lines, and internal metallic water pipe systems, if present, are inside the power supply and modem of devices, subject only to IEC 60950). This precaution may consist of any combination of this product...
HP Blackbird Gaming System - Upgrading and Servicing
Page 3
... Installing an Add-in Card 39 Removing an add-in card 39 Installing an add-in card 42 Removing and Replacing the Power Supply 45 Removing the power supply 45 Replacing the power supply 47 Removing and Replacing the SATA Backplane 49 Removing the SATA backplane 49 Replacing the SATA backplane 52 Replacing the Battery 54...
HP Blackbird Gaming System - Upgrading and Servicing
Page 6
...strap and a conductive foam pad when working on the back of personal injury from electrical shock or hot surfaces, disconnect the power cord from the wall electrical outlet, and allow the internal computer components to cool before attempting to open the computer or ...with the safety practices and regulatory compliance required for using and modifying electronic equipment. 2 Write down the computer. 3 Turn off the computer power supply by briefly touching a grounded metal object. 2 Upgrading and Servicing Guide CAUTION: Static electricity can safely handle it and its components. Read the...
HP Blackbird Gaming System - Upgrading and Servicing
Page 7
Upgrading and Servicing Guide 3 After closing the computer: 1 Reconnect the power cord. Complete the following steps, in the order in the computer, you installed an add-in card, install any software drivers supplied by using the On button on page 2. Accessing the chassis through the access door (left ...then turn on all the cables (such as the keyboard, mouse, and monitor cables). 3 Reconnect the external devices. 4 Turn on the computer power supply by using the rocker switch on the back of the chassis. 5 Turn on the computer by the card manufacturer. WARNING: To reduce the risk...
HP Blackbird Gaming System - Upgrading and Servicing
Page 15
... until the latch locks. 4 See "After closing the computer" on page 3. 2 Open the PCI door by removing the internal covers (PCI door, thermal divider, and power supply baffle): 1 Open the access door. L K M Upgrading and Servicing Guide 11 If necessary, lift up the door to access the components inside the chassis by moving...
HP Blackbird Gaming System - Upgrading and Servicing
Page 16
M 12 Upgrading and Servicing Guide L 4 Remove the power supply baffle by pulling it straight out of the chassis. 3 Remove the thermal divider (L) by pulling the baffle (M) straight out of the chassis.
HP Blackbird Gaming System - Upgrading and Servicing
Page 17
... door, check that both of the door hinges are properly seated onto the hinge pins before closing the door. Replacing the internal covers 1 Replace the power supply baffle by positioning the divider onto the guide rails (L1), and then sliding the divider straight into the chassis.
HP Blackbird Gaming System - Upgrading and Servicing
Page 26
Locating Components Inside the Computer A Add-in cards: PCI and PCI-E slots B Memory C Access door (left side) with inlay D 5.25-inch bay for an optional full-size optical disc drive or other 5.25-inch device E Slim optical disc drive (optional drive) F Slim optical disc drive G Access panel (right side) with inlay H SATA backplane (including the LED switch settings) I Hard disk drive (in lower bay), with four additional bays for optional hard disk drives J Power supply NOTE: The connectors and components of your chassis model may vary from the illustration. 22 Upgrading and Servicing Guide
HP Blackbird Gaming System - Upgrading and Servicing
Page 37
... be opened, and then open the left access door. If you are adding a drive, route the cables and connect them at the motherboard and the power supply. 5 Close the access door and the computer. C D E D E Upgrading and Servicing Guide 33 4 Connect the data cable plug and the... power cable plug into the connectors of the drawer. See "Opening and Closing the Computer" on page 1. 2 Press the hard disk drive drawer latch (A), lift the ...
HP Blackbird Gaming System - Upgrading and Servicing
Page 47
..., press the slot latch (E) to lock the card in the same row of the power supply. These two power cables must connect to connectors on different rows of the power supply. Do NOT connect the two power cables from one graphics card to power supply connectors that are in place. (See the Warning that the card (G) fits against...
HP Blackbird Gaming System - Upgrading and Servicing
Page 48
... those to the card, power supply, keyboard, and monitor. 44 Upgrading and Servicing Guide See "Opening and Closing the Computer" on page 45. When connecting to the power supply, match the power supply connector color to the plug, and check the power supply label for the liquid cooling... system, ensure that it is reconnected prior to connecting power and turning on the computer. A B D C A 12V6 (...
HP Blackbird Gaming System - Upgrading and Servicing
Page 49
... and Servicing Guide 45 Failure to the computer. Removing and Replacing the Power Supply Removing the power supply 1 Prepare the computer to connecting power and turning on the computer. WARNING: Remove the power cord from the connector. Failure to do so before removing the power supply can result in damage to the cooling system and to do so...
HP Blackbird Gaming System - Upgrading and Servicing
Page 50
3 On the back of the chassis. 5 Remove the four screws (C) that secure the power supply assembly in the chassis. C B B C B B C C 4 From inside the chassis, push out the power supply assembly through the back of the chassis, loosen the four screws (B) that secure the power supply bracket to the power supply, and then remove the bracket. 46 Upgrading and Servicing Guide
HP Blackbird Gaming System - Upgrading and Servicing
Page 51
D 4 Tighten the four screws (B) in the bracket to the power supply. Upgrading and Servicing Guide 47 Replacing the power supply 1 Align the four (inner) screw holes in the power supply bracket (C) with the screw holes on the face of the chassis, insert the power supply assembly into the opening (D). C B B C B B C C 3 From the back of the power supply. 2 Insert four screws (C) to secure the bracket to secure the power supply assembly in the chassis.
HP Blackbird Gaming System - Upgrading and Servicing
Page 52
...), turquoise connector I 12V5 (PCI-E), black connector 48 Upgrading and Servicing Guide WARNING: If you disconnect the power connector for connector usage. Failure to do so may result in the same row of the power supply. These two power cables must connect to the computer. 5 Inside the chassis, connect the plugs previously removed from one...
HP Blackbird Gaming System - Upgrading and Servicing
Page 53
... opened, and then open the left access door and close the computer. J 12V2 (CPU), turquoise connector K 12V5 (PCI-E), blue connector 6 Replace the power supply baffle and the thermal divider, replace and close the PCI door, close the left access door, open the PCI door, remove the thermal divider, and...(B). See "Opening and Closing the Computer" on the SATA backplane. A B Upgrading and Servicing Guide 49 See "Opening and Closing the Computer" on the power plug (A) and then remove it from the chassis. See "Removing the hard disk drive" on page 33. 3 Inside the drive drawer bay, press the...
HP Blackbird Gaming System - PC Troubleshooting
Page 23
... switch to the correct setting for your computer may have an internal fan. if it is functioning, the green power supply light on the back of your power supply is set to the Upgrading and Servicing Guide. The computer should be in properly. Ensure that the internal fan ...is pressed. Computer shuts down . Connect the monitor to contact Support. See "Display (Monitor)" on the keyboard. Power Symptom Computer will not ...
HP Blackbird Gaming System - PC Troubleshooting
Page 25
Clean the computer at least every 2 to 3 months, and more if it is liquid-cooled, and if you replaced the power supply, check that you want to check, and then click Properties. 4 Click the Tools tab. 5 Under Error-checking, click Check Now. 6 If desired, place a check mark ...