Setup Poster
Page 1
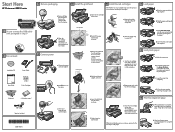
...it into the main tray and slide the paper guide against the photo paper. Hold the printhead upright, as shown. Press to turn on the printer or other surface. d. Printhead 4 X 6 photo paper* USB Cable* *May be included *CB981-90015* *CB981-90015* CB981-90015 c.... colored contacts. Raise the output tray. d. e. Open the ink cartridge access door. Remove the plastic wrap by pulling the orange tab. 6 Load paper a. Connect the power cord and adapter. Insert plain white paper into the appropriate slot, and then press down in step 9 2 Box contents HP Photosmart...
...it into the main tray and slide the paper guide against the photo paper. Hold the printhead upright, as shown. Press to turn on the printer or other surface. d. Printhead 4 X 6 photo paper* USB Cable* *May be included *CB981-90015* *CB981-90015* CB981-90015 c.... colored contacts. Raise the output tray. d. e. Open the ink cartridge access door. Remove the plastic wrap by pulling the orange tab. 6 Load paper a. Connect the power cord and adapter. Insert plain white paper into the appropriate slot, and then press down in step 9 2 Box contents HP Photosmart...
User Guide
Page 16
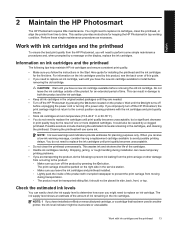
...ink cartridges used in another printer, the ink level indicator might need to replace ink cartridges, clean the printhead, or align the printer from moving during installation can...of the cartridges. • Handle ink cartridges carefully. English 2 Maintain the HP Photosmart The HP Photosmart requires little maintenance. This section provides instructions for an extended period of one or...need to perform some ink. Cleaning the printhead will need to install before unplugging the power cord or turning off before removing the old cartridge. NOTE: 1 If you have installed...
...ink cartridges used in another printer, the ink level indicator might need to replace ink cartridges, clean the printhead, or align the printer from moving during installation can...of the cartridges. • Handle ink cartridges carefully. English 2 Maintain the HP Photosmart The HP Photosmart requires little maintenance. This section provides instructions for an extended period of one or...need to perform some ink. Cleaning the printhead will need to install before unplugging the power cord or turning off before removing the old cartridge. NOTE: 1 If you have installed...

User Guide
Page 19
... installed, and the date each cartridge will expire. • Print quality pattern: displays five color blocks, representing each ink cartridge you unplug the power cord or turn off the HP Photosmart To avoid damaging the product, you need to show print quality problems after cleaning and aligning,... by using the On button located on several aspects of color indicate there are no print quality problems. When streaks are displayed or there are replacing. 8. Press the Setup button on cleaning the printhead and aligning the printer, see the onscreen Help. Chapter 2 7. To print ...
... installed, and the date each cartridge will expire. • Print quality pattern: displays five color blocks, representing each ink cartridge you unplug the power cord or turn off the HP Photosmart To avoid damaging the product, you need to show print quality problems after cleaning and aligning,... by using the On button located on several aspects of color indicate there are no print quality problems. When streaks are displayed or there are replacing. 8. Press the Setup button on cleaning the printhead and aligning the printer, see the onscreen Help. Chapter 2 7. To print ...
User Guide
Page 21
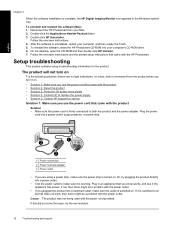
.... If not, then there might be a problem with the HP Photosmart. If this did not solve the issue, try plugging the product directly into a power outlet, surge protector, or power strip. 1 Power connection 2 Power cord and adapter 3 Power outlet • If you use the power cord that came with the power outlet. • If you turn on Try the following solutions...
.... If not, then there might be a problem with the HP Photosmart. If this did not solve the issue, try plugging the product directly into a power outlet, surge protector, or power strip. 1 Power connection 2 Power cord and adapter 3 Power outlet • If you use the power cord that came with the power outlet. • If you turn on Try the following solutions...


