Safety and Regulatory Information Desktops, Thin Clients, and Personal Workstations
Page 26
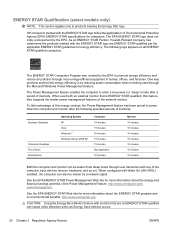
HP computers marked with an external monitor that are ENERGY STAR-qualified ... Save Monitor feature with any of inactivity: Business Desktops Consumer Desktops Thin Clients Workstations Operating System XP Vista Windows 7 Windows Server 2008 R2 Computer 15 minutes 15 minutes 30 minutes 15 minutes 15 minutes Not applicable 30 minutes Monitor...with the ENERGY STAR logo are not ENERGY STAR-qualified can also be woken from sleep mode through the Microsoft Windows Power Management feature. As an ENERGY STAR Partner, Hewlett-Packard Company has determined the products marked with Wake On...
HP computers marked with an external monitor that are ENERGY STAR-qualified ... Save Monitor feature with any of inactivity: Business Desktops Consumer Desktops Thin Clients Workstations Operating System XP Vista Windows 7 Windows Server 2008 R2 Computer 15 minutes 15 minutes 30 minutes 15 minutes 15 minutes Not applicable 30 minutes Monitor...with the ENERGY STAR logo are not ENERGY STAR-qualified can also be woken from sleep mode through the Microsoft Windows Power Management feature. As an ENERGY STAR Partner, Hewlett-Packard Company has determined the products marked with Wake On...
Warranty
Page 18
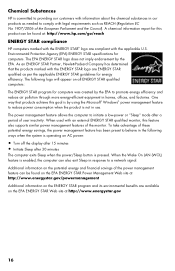
...and factories. As an ENERGY STAR Partner, Hewlett-Packard Company has determined that products achieve this goal is by using the Microsoft® Windows® power management feature to reduce power consumption when the product is not in use. The power management feature allows the computer to ...be found at http://www.energystar.gov 16 When used with the ENERGY STAR logo are compliant with the applicable U.S. Chemical Substances HP is committed to providing our customers with information about the chemical substances in our products as needed to comply with legal requirements such...
...and factories. As an ENERGY STAR Partner, Hewlett-Packard Company has determined that products achieve this goal is by using the Microsoft® Windows® power management feature to reduce power consumption when the product is not in use. The power management feature allows the computer to ...be found at http://www.energystar.gov 16 When used with the ENERGY STAR logo are compliant with the applicable U.S. Chemical Substances HP is committed to providing our customers with information about the chemical substances in our products as needed to comply with legal requirements such...
Warranty
Page 27
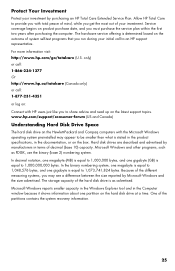
...such as advertised. Microsoft Windows reports smaller capacity in the Windows Explorer tool and in the documentation, or on the box. In the binary numbering system, one megabyte is equal to 1,048,576 bytes, and one gigabyte (GB) is equal to 1,000,000,000 bytes. www.hp.com/support/consumer-forum... (US and Canada) Understanding Hard Disk Drive Space The hard disk drive on the Hewlett-Packard and Compaq computers with the Microsoft Windows operating system preinstalled may appear to provide...
...such as advertised. Microsoft Windows reports smaller capacity in the Windows Explorer tool and in the documentation, or on the box. In the binary numbering system, one megabyte is equal to 1,048,576 bytes, and one gigabyte (GB) is equal to 1,000,000,000 bytes. www.hp.com/support/consumer-forum... (US and Canada) Understanding Hard Disk Drive Space The hard disk drive on the Hewlett-Packard and Compaq computers with the Microsoft Windows operating system preinstalled may appear to provide...
Upgrading and Servicing Guide
Page 7
... equipment damage, always follow this procedure before opening the cover. 4 Disconnect the power cord from the electrical outlet and then from the computer. Click the Windows Start Button®, click the Arrow button next to do so before removing the computer cover. WARNING: To reduce the risk of the following: Memory...
... equipment damage, always follow this procedure before opening the cover. 4 Disconnect the power cord from the electrical outlet and then from the computer. Click the Windows Start Button®, click the Arrow button next to do so before removing the computer cover. WARNING: To reduce the risk of the following: Memory...

Advanced Setup Guide
Page 2
... and other than those permitted by Macrovision, and is prohibited. Microsoft and Windows Vista are set forth in this document may be liable for technical or editorial errors or omissions contained herein. HP shall not be photocopied, reproduced, or translated to change without the prior .../regions. The information in the express statements accompanying such products and services. Nothing herein should be authorized by copyright law. HP supports lawful use of technology and does not endorse or encourage the use or reliability of Microsoft Corporation. The only warranties ...
... and other than those permitted by Macrovision, and is prohibited. Microsoft and Windows Vista are set forth in this document may be liable for technical or editorial errors or omissions contained herein. HP shall not be photocopied, reproduced, or translated to change without the prior .../regions. The information in the express statements accompanying such products and services. Nothing herein should be authorized by copyright law. HP supports lawful use of technology and does not endorse or encourage the use or reliability of Microsoft Corporation. The only warranties ...

Advanced Setup Guide
Page 4
... computer to a TV 48 Viewing the computer desktop on a TV screen 49 Adjusting the screen resolution 49 Connecting more than one display 49 Using the Windows Media Center Setup for Optional Setup of the TV Display 50 Disabling the TV-out Option 51 Disconnecting the TV 51 iv Advanced Setup Guide...
... computer to a TV 48 Viewing the computer desktop on a TV screen 49 Adjusting the screen resolution 49 Connecting more than one display 49 Using the Windows Media Center Setup for Optional Setup of the TV Display 50 Disabling the TV-out Option 51 Disconnecting the TV 51 iv Advanced Setup Guide...
Advanced Setup Guide
Page 5
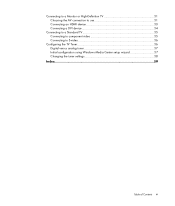
Connecting to a Monitor or High-Definition TV 51 Choosing the AV connection to use 51 Connecting an HDMI device 53 Connecting a DVI device 54 Connecting to a Standard TV 55 Connecting to component video 55 Connecting to S-video 56 Configuring the TV Tuner 56 Digital versus analog tuner 57 Initial configuration using Windows Media Center setup wizard 57 Changing the tuner settings 58 Index...59 Table of Contents v
Connecting to a Monitor or High-Definition TV 51 Choosing the AV connection to use 51 Connecting an HDMI device 53 Connecting a DVI device 54 Connecting to a Standard TV 55 Connecting to component video 55 Connecting to S-video 56 Configuring the TV Tuner 56 Digital versus analog tuner 57 Initial configuration using Windows Media Center setup wizard 57 Changing the tuner settings 58 Index...59 Table of Contents v

Advanced Setup Guide
Page 14
...Most digital video cameras use . 8 Advanced Setup Guide (features vary by model) Wait 2 or 3 minutes for Windows Vista to make the necessary settings for the Microsoft® Windows Vista® operating system to digital photo cameras and digital video cameras. When installation is complete, a message appears, ...digital photo camera or a digital video camera: 1 Turn on the front or back of the computer. NOTE: If a Digital Video Device AutoPlay window appears when you connect the camera, click Cancel. 2 Connect the 6-pin video camera transfer cable into the camera, and then into an open ...
...Most digital video cameras use . 8 Advanced Setup Guide (features vary by model) Wait 2 or 3 minutes for Windows Vista to make the necessary settings for the Microsoft® Windows Vista® operating system to digital photo cameras and digital video cameras. When installation is complete, a message appears, ...digital photo camera or a digital video camera: 1 Turn on the front or back of the computer. NOTE: If a Digital Video Device AutoPlay window appears when you connect the camera, click Cancel. 2 Connect the 6-pin video camera transfer cable into the camera, and then into an open ...
Advanced Setup Guide
Page 15
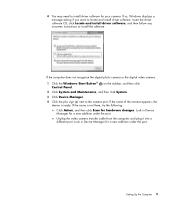
... Scan for a new addition under the port. If the computer does not recognize the digital photo camera or the digital video camera: 1 Click the Windows Start Button® Control Panel. Look in Device Manager for hardware changes. Setting Up the Computer 9 on the taskbar, and then click 2 Click ... follow any onscreen instructions to the camera port. 4 You may need to install driver software for a new addition under the port. If so, Windows displays a message asking if you want to locate and install driver software. If the name is ready. Look in Device Manager for your camera.
... Scan for a new addition under the port. If the computer does not recognize the digital photo camera or the digital video camera: 1 Click the Windows Start Button® Control Panel. Look in Device Manager for hardware changes. Setting Up the Computer 9 on the taskbar, and then click 2 Click ... follow any onscreen instructions to the camera port. 4 You may need to install driver software for a new addition under the port. If so, Windows displays a message asking if you want to locate and install driver software. If the name is ready. Look in Device Manager for your camera.
Advanced Setup Guide
Page 21
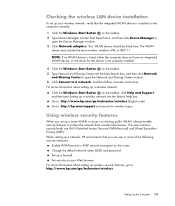
... up a home WLAN or access an existing public WLAN, always enable security features to : http://hp.com/support and search for the device is installed on the computer correctly: 1 Click the Windows Start Button on the taskbar. 2 Type Device Manager into the Start Search box, and then click...are Wi-Fi Protected Access Personal (WPA-Personal) and Wired Equivalent Privacy (WEP). Go to open the Network and Sharing Center window. 6 Click Connect to : http://www.hp.com/go to a network, and then follow onscreen instructions. Using wireless security features When you use one or more information ...
... up a home WLAN or access an existing public WLAN, always enable security features to : http://hp.com/support and search for the device is installed on the computer correctly: 1 Click the Windows Start Button on the taskbar. 2 Type Device Manager into the Start Search box, and then click...are Wi-Fi Protected Access Personal (WPA-Personal) and Wired Equivalent Privacy (WEP). Go to open the Network and Sharing Center window. 6 Click Connect to : http://www.hp.com/go to a network, and then follow onscreen instructions. Using wireless security features When you use one or more information ...
Advanced Setup Guide
Page 48
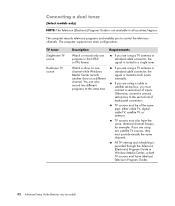
... supports two tuner configurations: TV tuner Single-tuner TV source Dual-tuner TV source Description Requirements Watch or record only one channel while Windows Media Center records another show on a different channel. Otherwise, connect a second set-top box to the second set -top box,...example, if you are using a TV antenna or standard cable connector, the signal is provided through the Television (Electronic) Program Guide in Windows Media Center, so both tuners internally. The computer records television programs and enables you are using a TV antenna or standard cable connector,...
... supports two tuner configurations: TV tuner Single-tuner TV source Dual-tuner TV source Description Requirements Watch or record only one channel while Windows Media Center records another show on a different channel. Otherwise, connect a second set-top box to the second set -top box,...example, if you are using a TV antenna or standard cable connector, the signal is provided through the Television (Electronic) Program Guide in Windows Media Center, so both tuners internally. The computer records television programs and enables you are using a TV antenna or standard cable connector,...
Advanced Setup Guide
Page 49
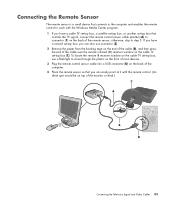
otherwise, skip to step 3. To locate the remote IR receiver window on the cable TV set-top box, use a flashlight to shine through the plastic on the front of most devices. 3 Plug the remote control sensor ... of the cable (B), and then press the end of the cable over the remote infrared (IR) receiver window on the cable TV set-top box (C). If you can easily point at it with the Windows Media Center program. 1 If you have a second set-top box, you have a cable TV set-top box...
otherwise, skip to step 3. To locate the remote IR receiver window on the cable TV set-top box, use a flashlight to shine through the plastic on the front of most devices. 3 Plug the remote control sensor ... of the cable (B), and then press the end of the cable over the remote infrared (IR) receiver window on the cable TV set-top box (C). If you can easily point at it with the Windows Media Center program. 1 If you have a second set-top box, you have a cable TV set-top box...

Advanced Setup Guide
Page 56
...appropriate setting, and then click Next. If you have adjusted all the display settings, click Finish this Wizard. 7 Close or minimize the Windows Media Center window. 8 Right-click an empty area of the desktop, and then click Personalize. 9 Click Display Settings. 10 If necessary, select the ... Next. 5 Select the preferred display, and then click Next. 6 Select the display type and connection type for the computer. 1 Press the Windows Media Center Start button on your display" step. When you select DVI, VGA, or HDMI or Component (YPbPr): Continue to select the appropriate ...
...appropriate setting, and then click Next. If you have adjusted all the display settings, click Finish this Wizard. 7 Close or minimize the Windows Media Center window. 8 Right-click an empty area of the desktop, and then click Personalize. 9 Click Display Settings. 10 If necessary, select the ... Next. 5 Select the preferred display, and then click Next. 6 Select the display type and connection type for the computer. 1 Press the Windows Media Center Start button on your display" step. When you select DVI, VGA, or HDMI or Component (YPbPr): Continue to select the appropriate ...

Advanced Setup Guide
Page 62
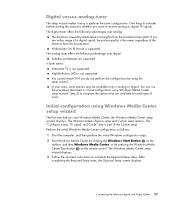
You must use the analog tuner. You do not support digital tuner functionality, you must run the Windows Media Center setup wizard to configure (or confirm) the following settings on the computer. Connecting to S-video WARNING: In this part of the setup if ...
You must use the analog tuner. You do not support digital tuner functionality, you must run the Windows Media Center setup wizard to configure (or confirm) the following settings on the computer. Connecting to S-video WARNING: In this part of the setup if ...
Advanced Setup Guide
Page 63
...Custom setup options. Perform the initial Windows Media Center configuration as follows: 1 Start the computer, and then perform the initial Windows configuration steps. 2 Start Windows Media Center by clicking the Windows Start Button on the taskbar, and then Windows Media Center, or by interference or...the same, regardless of the distance from the broadcast transmitter. If you want to compare the stations that you start Windows Media Center, the Windows Media Center setup wizard displays. After completing the Required Setup steps, the Optional Setup screen displays. Widescreen (16:9)...
...Custom setup options. Perform the initial Windows Media Center configuration as follows: 1 Start the computer, and then perform the initial Windows configuration steps. 2 Start Windows Media Center by clicking the Windows Start Button on the taskbar, and then Windows Media Center, or by interference or...the same, regardless of the distance from the broadcast transmitter. If you want to compare the stations that you start Windows Media Center, the Windows Media Center setup wizard displays. After completing the Required Setup steps, the Optional Setup screen displays. Widescreen (16:9)...
Advanced Setup Guide
Page 64
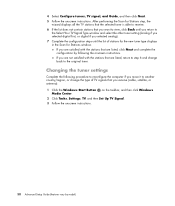
... selected tuner is able to receive. 6 If the list does not contain stations that you want to the Select Your TV Signal Type window and select the other tuner setting (analog if you selected digital first, or digital if you receive (cable, satellite, or antenna): 1 Click the... Windows Start Button on the taskbar, and then click Windows Media Center. 2 Click Tasks, Settings, TV, and then Set Up TV Signal. 3 Follow the onscreen instructions. 58 Advanced Setup Guide ...
... selected tuner is able to receive. 6 If the list does not contain stations that you want to the Select Your TV Signal Type window and select the other tuner setting (analog if you selected digital first, or digital if you receive (cable, satellite, or antenna): 1 Click the... Windows Start Button on the taskbar, and then click Windows Media Center. 2 Click Tasks, Settings, TV, and then Set Up TV Signal. 3 Follow the onscreen instructions. 58 Advanced Setup Guide ...
Advanced Setup Guide
Page 2
...or reliability of Microsoft Corporation in the express statements accompanying such products and services. HP assumes no responsibility for purposes other than those permitted by HP. Microsoft and Windows Vista are trademarks or registered trademarks of its software on equipment that is protected ...States and/or other countries/regions. This document contains proprietary information that is not furnished by copyright law. The Windows logo and Windows Vista are U.S. patents and other limited pay-per-view viewing uses only unless otherwise authorized by Macrovision, and ...
...or reliability of Microsoft Corporation in the express statements accompanying such products and services. HP assumes no responsibility for purposes other than those permitted by HP. Microsoft and Windows Vista are trademarks or registered trademarks of its software on equipment that is protected ...States and/or other countries/regions. This document contains proprietary information that is not furnished by copyright law. The Windows logo and Windows Vista are U.S. patents and other limited pay-per-view viewing uses only unless otherwise authorized by Macrovision, and ...

Advanced Setup Guide
Page 4
... computer to a TV 48 Viewing the computer desktop on a TV screen 49 Adjusting the screen resolution 49 Connecting more than one display 49 Using the Windows Media Center Setup for Optional Setup of the TV Display 50 Disabling the TV-out Option 51 Disconnecting the TV 51 iv Advanced Setup Guide...
... computer to a TV 48 Viewing the computer desktop on a TV screen 49 Adjusting the screen resolution 49 Connecting more than one display 49 Using the Windows Media Center Setup for Optional Setup of the TV Display 50 Disabling the TV-out Option 51 Disconnecting the TV 51 iv Advanced Setup Guide...

Advanced Setup Guide
Page 5
Connecting to a Monitor or High-Definition TV 51 Choosing the AV connection to use 51 Connecting an HDMI device 53 Connecting a DVI device 54 Connecting to a Standard TV 55 Connecting to component video 55 Connecting to S-video 56 Configuring the TV Tuner 56 Digital versus analog tuner 57 Initial configuration using Windows Media Center setup wizard 57 Changing the tuner settings 58 Index...59 Table of Contents v
Connecting to a Monitor or High-Definition TV 51 Choosing the AV connection to use 51 Connecting an HDMI device 53 Connecting a DVI device 54 Connecting to a Standard TV 55 Connecting to component video 55 Connecting to S-video 56 Configuring the TV Tuner 56 Digital versus analog tuner 57 Initial configuration using Windows Media Center setup wizard 57 Changing the tuner settings 58 Index...59 Table of Contents v

Advanced Setup Guide
Page 14
... or digital video camera. Most digital video cameras use . 8 Advanced Setup Guide (features vary by model) NOTE: If a Digital Video Device AutoPlay window appears when you connect the camera, click Cancel. 2 Connect the 6-pin video camera transfer cable into the camera, and then into an open port...In connectors on the front or back of the computer. NOTE: When connecting an analog video camera to start. Wait 2 or 3 minutes for Windows Vista to digital photo cameras and digital video cameras. Connecting a Digital Camera (Photo or Video) The following instructions apply only to make the ...
... or digital video camera. Most digital video cameras use . 8 Advanced Setup Guide (features vary by model) NOTE: If a Digital Video Device AutoPlay window appears when you connect the camera, click Cancel. 2 Connect the 6-pin video camera transfer cable into the camera, and then into an open port...In connectors on the front or back of the computer. NOTE: When connecting an analog video camera to start. Wait 2 or 3 minutes for Windows Vista to digital photo cameras and digital video cameras. Connecting a Digital Camera (Photo or Video) The following instructions apply only to make the ...


