
Upgrading and Servicing Guide
Page 7
... you installed an add-in this procedure in card, install any software drivers supplied by the card manufacturer. WARNING: To reduce the risk of sharp edges inside the chassis. You may need to the equipment, do not plug telecommunications or telephone connectors into the network interface card (NIC) (labeled as an Ethernet connector). 2 Reconnect the modem/telephone cable and all other cables (such as the keyboard, mouse, and monitor). 3 Reconnect external devices. 4 Turn on...
... you installed an add-in this procedure in card, install any software drivers supplied by the card manufacturer. WARNING: To reduce the risk of sharp edges inside the chassis. You may need to the equipment, do not plug telecommunications or telephone connectors into the network interface card (NIC) (labeled as an Ethernet connector). 2 Reconnect the modem/telephone cable and all other cables (such as the keyboard, mouse, and monitor). 3 Reconnect external devices. 4 Turn on...
Upgrading and Servicing Guide
Page 12
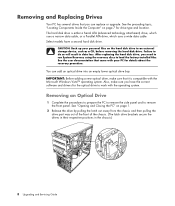
... drivers for drive type and location. After replacing the hard disk drive, you need to run System Recovery using the recovery discs to remove the front panel. See the preceding topic, "Locating Components Inside the Computer" on the hard disk drive to an external storage device, such as a CD, before removing the hard disk drive. The hard disk drive is compatible with your personal files on page 7 for the optical drive to do so will result in the chassis.) 8 Upgrading and Servicing Guide IMPORTANT: Before adding a new optical drive, make...
... drivers for drive type and location. After replacing the hard disk drive, you need to run System Recovery using the recovery discs to remove the front panel. See the preceding topic, "Locating Components Inside the Computer" on the hard disk drive to an external storage device, such as a CD, before removing the hard disk drive. The hard disk drive is compatible with your personal files on page 7 for the optical drive to do so will result in the chassis.) 8 Upgrading and Servicing Guide IMPORTANT: Before adding a new optical drive, make...
Upgrading and Servicing Guide
Page 15
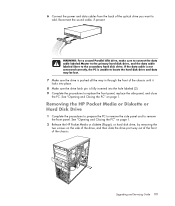
... the sound cable, if present. See "Opening and Closing the PC" on page 1. 2 Release the HP Pocket Media or diskette (floppy), or hard disk drive, by removing the two screws on page 1. If the data cable is not connected correctly, the PC is unable to locate the hard disk drive and data may be lost. 7 Make sure the drive is fully inserted into place. 8 Make sure the drive latch pin...
... the sound cable, if present. See "Opening and Closing the PC" on page 1. 2 Release the HP Pocket Media or diskette (floppy), or hard disk drive, by removing the two screws on page 1. If the data cable is not connected correctly, the PC is unable to locate the hard disk drive and data may be lost. 7 Make sure the drive is fully inserted into place. 8 Make sure the drive latch pin...
Upgrading and Servicing Guide
Page 18
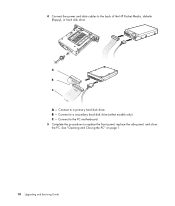
A B MASTER C SLAVE To CPU A - See "Opening and Closing the PC" on page 1. 14 Upgrading and Servicing Guide C - Connect to replace the front panel, replace the side panel, and close the PC. Connect to the PC motherboard. 5 Complete the procedures to a primary hard disk drive. B - Connect to the back of the HP Pocket Media, diskette (floppy), or hard disk drive. 4 Connect the power and data cables to a secondary hard disk drive (select models only).
A B MASTER C SLAVE To CPU A - See "Opening and Closing the PC" on page 1. 14 Upgrading and Servicing Guide C - Connect to replace the front panel, replace the side panel, and close the PC. Connect to the PC motherboard. 5 Complete the procedures to a primary hard disk drive. B - Connect to the back of the HP Pocket Media, diskette (floppy), or hard disk drive. 4 Connect the power and data cables to a secondary hard disk drive (select models only).
Upgrading and Servicing Guide
Page 28
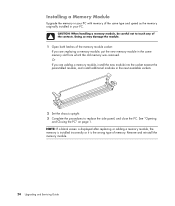
... any of the same type and speed as the memory originally installed in the same memory slot from which the old memory was removed. Doing so may damage the module. 1 Open both latches of memory. See "Opening and Closing the PC" on page 1. Remove and reinstall the memory module. 24 Upgrading and Servicing Guide NOTE: If a blank screen is displayed after replacing or adding a memory module, the memory is installed incorrectly or it...
... any of the same type and speed as the memory originally installed in the same memory slot from which the old memory was removed. Doing so may damage the module. 1 Open both latches of memory. See "Opening and Closing the PC" on page 1. Remove and reinstall the memory module. 24 Upgrading and Servicing Guide NOTE: If a blank screen is displayed after replacing or adding a memory module, the memory is installed incorrectly or it...
Upgrading and Servicing Guide
Page 31
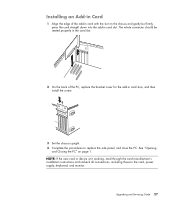
... in the card slot. 2 On the back of the add-in card with the slot on page 1. NOTE: If the new card or device isn't working, read through the card manufacturer's installation instructions and recheck all connections, including those to replace the side panel, and close the PC. Installing an Add-in Card 1 Align the edge of the PC, replace the bracket cover for the add-in card slot. Upgrading and Servicing Guide 27 See "Opening and...
... in the card slot. 2 On the back of the add-in card with the slot on page 1. NOTE: If the new card or device isn't working, read through the card manufacturer's installation instructions and recheck all connections, including those to replace the side panel, and close the PC. Installing an Add-in Card 1 Align the edge of the PC, replace the bracket cover for the add-in card slot. Upgrading and Servicing Guide 27 See "Opening and...
Upgrading and Servicing Guide
Page 32
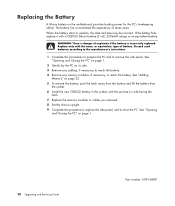
... Upgrading and Servicing Guide Part number: 5991-6989 Discard used batteries according to the manufacturer's instructions. 1 Complete the procedures to prepare the PC and to weaken, the date and time may be incorrect. See "Opening and Closing the PC" on its side. 3 Remove any cabling, if necessary, to reach the battery. 4 Remove any memory modules, if necessary, to reach the battery. See "Adding Memory" on the motherboard provides...
... Upgrading and Servicing Guide Part number: 5991-6989 Discard used batteries according to the manufacturer's instructions. 1 Complete the procedures to prepare the PC and to weaken, the date and time may be incorrect. See "Opening and Closing the PC" on its side. 3 Remove any cabling, if necessary, to reach the battery. 4 Remove any memory modules, if necessary, to reach the battery. See "Adding Memory" on the motherboard provides...

Troubleshooting and Maintenance Guide
Page 4
Repairing Software Problems 23 Software Repair Overview 23 Restarting Your Computer 24 Turning Off Your Computer 24 Updating Drivers 24 Microsoft System Restore 25 Software Program and Hardware Driver Reinstallation 26 System Recovery 27 Creating Recovery Discs 27 Choosing Recovery Disc Media 28 System Recovery Options 28 Running System Recovery from the Hard Disk Drive 29 Starting System Recovery from the Windows Vista Start Menu 29 Starting System Recovery from System Startup 29 iv Troubleshooting and Maintenance Guide
Repairing Software Problems 23 Software Repair Overview 23 Restarting Your Computer 24 Turning Off Your Computer 24 Updating Drivers 24 Microsoft System Restore 25 Software Program and Hardware Driver Reinstallation 26 System Recovery 27 Creating Recovery Discs 27 Choosing Recovery Disc Media 28 System Recovery Options 28 Running System Recovery from the Hard Disk Drive 29 Starting System Recovery from the Windows Vista Start Menu 29 Starting System Recovery from System Startup 29 iv Troubleshooting and Maintenance Guide
Troubleshooting and Maintenance Guide
Page 6
... programs have set. 2 Troubleshooting and Maintenance Guide Disk Cleanup runs at the time you have set it up space on but not in the Recycle Bin). Running the Disk Cleanup Program The Disk Cleanup program frees up to run automatically. Scheduling Disk Cleanup to run Disk Cleanup manually, or you cannot uninstall a program from the Control Panel, refer to the program documentation or Help. Running Disk Cleanup manually 1 Click the Windows Start Button, All...
... programs have set. 2 Troubleshooting and Maintenance Guide Disk Cleanup runs at the time you have set it up space on but not in the Recycle Bin). Running the Disk Cleanup Program The Disk Cleanup program frees up to run automatically. Scheduling Disk Cleanup to run Disk Cleanup manually, or you cannot uninstall a program from the Control Panel, refer to the program documentation or Help. Running Disk Cleanup manually 1 Click the Windows Start Button, All...
Troubleshooting and Maintenance Guide
Page 11
... that may occur when using your printer, refer to the documentation provided by the product's manufacturer. Troubleshooting Computer Problems This section contains a series of problem. Each table contains: Symptoms that describe the sign or warning message for problems relating specifically to solve the problem. Troubleshooting Computer Problems 7 The troubleshooting tables appear in the following order: Audio CD and DVD Drives Video Display (Monitor) Hard Disk Drive Hardware Installation Internet Access Keyboard and Mouse Power Performance Miscellaneous For...
... that may occur when using your printer, refer to the documentation provided by the product's manufacturer. Troubleshooting Computer Problems This section contains a series of problem. Each table contains: Symptoms that describe the sign or warning message for problems relating specifically to solve the problem. Troubleshooting Computer Problems 7 The troubleshooting tables appear in the following order: Audio CD and DVD Drives Video Display (Monitor) Hard Disk Drive Hardware Installation Internet Access Keyboard and Mouse Power Performance Miscellaneous For...
Troubleshooting and Maintenance Guide
Page 12
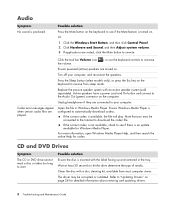
... restoring and updating drivers. 8 Troubleshooting and Maintenance Guide Or 1 Click the Windows Start Button, and then click Control Panel. 2 Click Hardware and Sound, and then Adjust system volume. 3 If applications are turned on the keyboard to see if there is inserted with an active speaker system (sold separately). Press the Sleep button (select models only), or press the Esc key on . Active speakers have a power cord and On button and connect to let the drive...
... restoring and updating drivers. 8 Troubleshooting and Maintenance Guide Or 1 Click the Windows Start Button, and then click Control Panel. 2 Click Hardware and Sound, and then Adjust system volume. 3 If applications are turned on the keyboard to see if there is inserted with an active speaker system (sold separately). Press the Sleep button (select models only), or press the Esc key on . Active speakers have a power cord and On button and connect to let the drive...
Troubleshooting and Maintenance Guide
Page 13
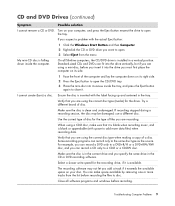
... the actual Eject button: 1 Click the Windows Start Button and then Computer. 2 Right-click the CD or DVD drive you can record a CD only to open the CD/DVD tray. 3 Place the mini-disc into the drive you specify the same drive in the tray. Turn on its side. 1 Face the front of files you add a track if it is installed in the correct...
... the actual Eject button: 1 Click the Windows Start Button and then Computer. 2 Right-click the CD or DVD drive you can record a CD only to open the CD/DVD tray. 3 Place the mini-disc into the drive you specify the same drive in the tray. Turn on its side. 1 Face the front of files you add a track if it is installed in the correct...
Troubleshooting and Maintenance Guide
Page 15
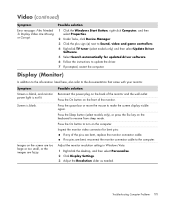
... from sleep mode. Reconnect the power plug on the front of the monitor and the wall outlet. Press the Sleep button (select models only), or press the Esc key on the keyboard to turn on the screen are too large or too small, or the images are bent, replace the monitor connector cable. Images on the computer. Symptom Possible solution Screen is blank, and monitor power light is blank. Inspect the monitor video connector for updated driver software...
... from sleep mode. Reconnect the power plug on the front of the monitor and the wall outlet. Press the Sleep button (select models only), or press the Esc key on the keyboard to turn on the screen are too large or too small, or the images are bent, replace the monitor connector cable. Images on the computer. Symptom Possible solution Screen is blank, and monitor power light is blank. Inspect the monitor video connector for updated driver software...
Troubleshooting and Maintenance Guide
Page 16
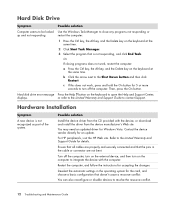
... settings in the cable or connector are properly and securely connected and that is not recognized as part of the system. Hard Disk Drive Symptom Possible solution Computer seems to be locked Use the Windows Task Manager to open the Help and Support Center, displays. Restart the computer, and follow the instructions for the card, and choose a basic configuration that doesn't cause a resource conflict. Then, press the On button...
... settings in the cable or connector are properly and securely connected and that is not recognized as part of the system. Hard Disk Drive Symptom Possible solution Computer seems to be locked Use the Windows Task Manager to open the Help and Support Center, displays. Restart the computer, and follow the instructions for the card, and choose a basic configuration that doesn't cause a resource conflict. Then, press the On button...
Troubleshooting and Maintenance Guide
Page 17
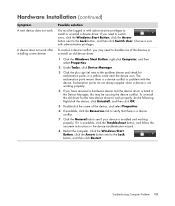
... your device is listed in the Device Manager, this may need to switch users, click the Windows Start Button, click the Arrow button next to the Lock button, and then click Switch User. Click the Windows Start Button, click the Arrow button next to work properly, do not always appear when a device is a device conflict or problem with administrative privileges. A device does not work . To resolve a device conflict, you have removed a hardware device and the device driver is enabled and working properly...
... your device is listed in the Device Manager, this may need to switch users, click the Windows Start Button, click the Arrow button next to the Lock button, and then click Switch User. Click the Windows Start Button, click the Arrow button next to work properly, do not always appear when a device is a device conflict or problem with administrative privileges. A device does not work . To resolve a device conflict, you have removed a hardware device and the device driver is enabled and working properly...

Troubleshooting and Maintenance Guide
Page 18
... correct modem speed and COM port are using the proper cables for your Internet Service Provider (ISP) for assistance. Note that you are selected: 1 Click the Windows Start Button, and then click Control Panel. 2 Click Hardware and Sound. 3 Double-click Phone and Modem Options. 4 Select the Modems tab, and then click the Properties button. 5 In the Device status area, verify the modem is installed and set up connection. Your...
... correct modem speed and COM port are using the proper cables for your Internet Service Provider (ISP) for assistance. Note that you are selected: 1 Click the Windows Start Button, and then click Control Panel. 2 Click Hardware and Sound. 3 Double-click Phone and Modem Options. 4 Select the Modems tab, and then click the Properties button. 5 In the Device status area, verify the modem is installed and set up connection. Your...

Troubleshooting and Maintenance Guide
Page 20
Check for these problems: Ensure the mouse and keyboard are not recognized by using the mouse, reconnect the keyboard to flash. Replace the batteries in suspend mode, which is On, and push and hold for response. 16 Troubleshooting and Maintenance Guide Do not use a USB port on the front of the computer. 2 Push the Connect button (a) on the receiver (which occurs after 60 seconds. To ensure the connection was established...
Check for these problems: Ensure the mouse and keyboard are not recognized by using the mouse, reconnect the keyboard to flash. Replace the batteries in suspend mode, which is On, and push and hold for response. 16 Troubleshooting and Maintenance Guide Do not use a USB port on the front of the computer. 2 Push the Connect button (a) on the receiver (which occurs after 60 seconds. To ensure the connection was established...
Troubleshooting and Maintenance Guide
Page 21
... to the Lock button. For an optical mouse, you have a rollerball mouse, clean the roller ball. Select Shut Down, and then press the Enter key on most - Troubleshooting Computer Problems 17 Refer to the back of the keyboard until the blue LED on your computer model number, and then search on the keyboard at the same time to display the Start menu. 4 Use the arrow keys to select...
... to the Lock button. For an optical mouse, you have a rollerball mouse, clean the roller ball. Select Shut Down, and then press the Enter key on most - Troubleshooting Computer Problems 17 Refer to the back of the keyboard until the blue LED on your computer model number, and then search on the keyboard at the same time to display the Start menu. 4 Use the arrow keys to select...

Troubleshooting and Maintenance Guide
Page 22
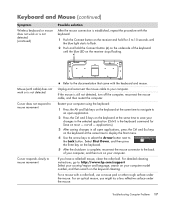
... the outlet. 18 Troubleshooting and Maintenance Guide Connect the monitor to the external power source are plugged in properly. Test the outlet by connecting a different electrical device to mouse movement. 4 Click OK. key pad. Power Symptom Computer will not turn it with a lint-free cloth (not paper). Also move using Press the Num Lock key. Adjust the cursor speed: 1 Click the Windows Start Button, Control Panel, Hardware and Sound, and then Mouse. 2 Click the Pointer Options tab. 3 Adjust...
... the outlet. 18 Troubleshooting and Maintenance Guide Connect the monitor to the external power source are plugged in properly. Test the outlet by connecting a different electrical device to mouse movement. 4 Click OK. key pad. Power Symptom Computer will not turn it with a lint-free cloth (not paper). Also move using Press the Num Lock key. Adjust the cursor speed: 1 Click the Windows Start Button, Control Panel, Hardware and Sound, and then Mouse. 2 Click the Pointer Options tab. 3 Adjust...

Troubleshooting and Maintenance Guide
Page 28
... operating system into its memory, which clears some problems that allows your computer. Or To revert to communicate with an attached device, such as a printer, a hard disk drive, a mouse, or a keyboard. When you turn off your computer and then turn off your computer: 1 Close all open programs and windows. 2 Click the Windows Start Button. 3 Click the Arrow button next to update or rollback, (for example, DVD/CD-ROM drives). 4 Double-click the specific...
... operating system into its memory, which clears some problems that allows your computer. Or To revert to communicate with an attached device, such as a printer, a hard disk drive, a mouse, or a keyboard. When you turn off your computer and then turn off your computer: 1 Close all open programs and windows. 2 Click the Windows Start Button. 3 Click the Arrow button next to update or rollback, (for example, DVD/CD-ROM drives). 4 Double-click the specific...


