
End User License Agreement
Page 2
... with /for your HP Product, whether in such recovery solution shall be used for in this limitation or it is effective unless terminated or rejected. The initial user of a hard disk drive-based solution, an external media-based recovery solution (e.g. f. a. PROPRIETARY RIGHTS. ...upgrading, you fail to the original Software Product provided by HP unless HP provides other terms along with any product identification, copyright notices or proprietary restrictions from the Software Product. 6. You shall not remove any term or condition of a conflict between such terms,...
... with /for your HP Product, whether in such recovery solution shall be used for in this limitation or it is effective unless terminated or rejected. The initial user of a hard disk drive-based solution, an external media-based recovery solution (e.g. f. a. PROPRIETARY RIGHTS. ...upgrading, you fail to the original Software Product provided by HP unless HP provides other terms along with any product identification, copyright notices or proprietary restrictions from the Software Product. 6. You shall not remove any term or condition of a conflict between such terms,...
Warranty
Page 7
... OF THE DATA STORED ON YOUR HARD DRIVE OR OTHER STORAGE DEVICES AS A PRECAUTION AGAINST POSSIBLE FAILURES, ALTERATION, OR LOSS OF THE DATA. HP IS NOT RESPONSIBLE FOR THE RESTORATION OR REINSTALLATION OF ANY PROGRAMS OR DATA OTHER THAN SOFTWARE INSTALLED BY HP WHEN THE PRODUCT IS MANUFACTURED. No...WARRANTY AGREEMENT BETWEEN YOU AND HP REGARDING THE HP HARDWARE PRODUCT YOU HAVE PURCHASED OR LEASED. HP IS NOT RESPONSIBLE FOR DAMAGE TO OR LOSS OF ANY PROGRAMS, DATA, OR REMOVABLE STORAGE MEDIA. UNITS SENT IN FOR SERVICE MAY HAVE THE DATA ERASED FROM THE HARD DRIVE AND THE PROGRAMS RESTORED ...
... OF THE DATA STORED ON YOUR HARD DRIVE OR OTHER STORAGE DEVICES AS A PRECAUTION AGAINST POSSIBLE FAILURES, ALTERATION, OR LOSS OF THE DATA. HP IS NOT RESPONSIBLE FOR THE RESTORATION OR REINSTALLATION OF ANY PROGRAMS OR DATA OTHER THAN SOFTWARE INSTALLED BY HP WHEN THE PRODUCT IS MANUFACTURED. No...WARRANTY AGREEMENT BETWEEN YOU AND HP REGARDING THE HP HARDWARE PRODUCT YOU HAVE PURCHASED OR LEASED. HP IS NOT RESPONSIBLE FOR DAMAGE TO OR LOSS OF ANY PROGRAMS, DATA, OR REMOVABLE STORAGE MEDIA. UNITS SENT IN FOR SERVICE MAY HAVE THE DATA ERASED FROM THE HARD DRIVE AND THE PROGRAMS RESTORED ...
Limited Warranty and Support Guide (Refurbished Desktops)
Page 3
...SENT IN FOR SERVICE MAY HAVE THE DATA ERASED FROM THE HARD DRIVE AND THE PROGRAMS RESTORED TO THEIR ORIGINAL STATE. INCLUDING REPRESENTATIONS MADE IN HP SALES LITERATURE OR ADVICE GIVEN TO YOU BY HP OR AN AGENT OR EMPLOYEE OF HP - HP will, at its discretion, repair or replace any product ...MAKE PERIODIC BACKUP COPIES OF THE DATA STORED ON YOUR HARD DRIVE OR OTHER STORAGE DEVICES AS A PRECAUTION AGAINST POSSIBLE FAILURES, ALTERATION, OR LOSS OF THE DATA. HP IS NOT RESPONSIBLE FOR DAMAGE TO OR LOSS OF ANY PROGRAMS, DATA, OR REMOVABLE STORAGE MEDIA. EXCEPT AS INDICATED ABOVE, IN NO EVENT ...
...SENT IN FOR SERVICE MAY HAVE THE DATA ERASED FROM THE HARD DRIVE AND THE PROGRAMS RESTORED TO THEIR ORIGINAL STATE. INCLUDING REPRESENTATIONS MADE IN HP SALES LITERATURE OR ADVICE GIVEN TO YOU BY HP OR AN AGENT OR EMPLOYEE OF HP - HP will, at its discretion, repair or replace any product ...MAKE PERIODIC BACKUP COPIES OF THE DATA STORED ON YOUR HARD DRIVE OR OTHER STORAGE DEVICES AS A PRECAUTION AGAINST POSSIBLE FAILURES, ALTERATION, OR LOSS OF THE DATA. HP IS NOT RESPONSIBLE FOR DAMAGE TO OR LOSS OF ANY PROGRAMS, DATA, OR REMOVABLE STORAGE MEDIA. EXCEPT AS INDICATED ABOVE, IN NO EVENT ...

Getting Started Guide
Page 116
...horizontal position, insert the drive with the HP Media Drive inserted in the bay or connected to a USB port on the computer. it also can be easily inserted and removed from the computer is turned off, the drive automatically turns off the computer. Connecting the Drive Your HP Media Drive is designed to work ...computers have a special horizontal or vertical drive bay that connects to as an external drive that is plugged into the bay; This is in or when the USB power from the hard disk drive bay without turning off . When the USB cable for the drive is not plugged in sleep mode ...
...horizontal position, insert the drive with the HP Media Drive inserted in the bay or connected to a USB port on the computer. it also can be easily inserted and removed from the computer is turned off, the drive automatically turns off the computer. Connecting the Drive Your HP Media Drive is designed to work ...computers have a special horizontal or vertical drive bay that connects to as an external drive that is plugged into the bay; This is in or when the USB power from the hard disk drive bay without turning off . When the USB cable for the drive is not plugged in sleep mode ...
Getting Started Guide
Page 118
... USB port on the taskbar. 2 Click Computer. 3 Select the drive under Hard Disk Drives or Devices with Removable Storage. HP recommends renaming a drive if you plug the drive into an USB 2.0 connector or insert it into an HP Media Drive bay, the operating system automatically assigns a letter to the HP Media Drive documentation for more than one USB connector. Refer to...
... USB port on the taskbar. 2 Click Computer. 3 Select the drive under Hard Disk Drives or Devices with Removable Storage. HP recommends renaming a drive if you plug the drive into an USB 2.0 connector or insert it into an HP Media Drive bay, the operating system automatically assigns a letter to the HP Media Drive documentation for more than one USB connector. Refer to...
Getting Started Guide
Page 119
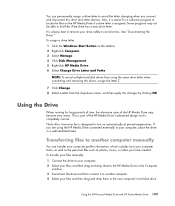
...able to avoid the letter changing when you are using the same drive letter when connecting and removing the drives, assign the letter Z. 7 Click Change. 8 Select a letter from using the HP Media Drive connected externally to your drive safely to turn on the taskbar. 2 Right-click Computer. 3... Disk Management. 5 Right-click HP Media Drive. 6 Select Change Drive Letter and Paths. To assign a drive letter: 1 Click the Windows Start Button on automatically at pre-set temperatures. The built-in a well-ventilated area. NOTE: To avoid multiple hard disk drives from the drop-down menu,...
...able to avoid the letter changing when you are using the same drive letter when connecting and removing the drives, assign the letter Z. 7 Click Change. 8 Select a letter from using the HP Media Drive connected externally to your drive safely to turn on the taskbar. 2 Right-click Computer. 3... Disk Management. 5 Right-click HP Media Drive. 6 Select Change Drive Letter and Paths. To assign a drive letter: 1 Click the Windows Start Button on automatically at pre-set temperatures. The built-in a well-ventilated area. NOTE: To avoid multiple hard disk drives from the drop-down menu,...

Getting Started Guide
Page 178
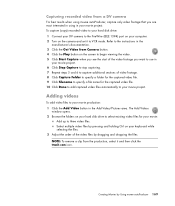
... camera mode) by using a compatible digital video (DV) camera. Refer to the instructions in camera mode enables you are automatically added to your computer hard disk drive. To remove the file from your movie project. Capturing live video from a DV camera Capturing live video in the manufacturer's documentation. 3 Click the Get Video from...
... camera mode) by using a compatible digital video (DV) camera. Refer to the instructions in camera mode enables you are automatically added to your computer hard disk drive. To remove the file from your movie project. Capturing live video from a DV camera Capturing live video in the manufacturer's documentation. 3 Click the Get Video from...
Getting Started Guide
Page 179
... you are most interested in using muvee autoProducer, capture only video footage that you want to use in the Add Video/Pictures area. NOTE: To remove a clip from the production, select it to three video files. Adding videos To add video files to the FireWire (IEEE 1394) port on the... and set it and then click the trash can icon. Creating Movies by dragging and dropping the files. To capture (copy) recorded video to your hard disk drive: 1 Connect your DV camera to your computer. 2 Turn on your movie production: 1 Click the Add Video button in your movie project. 6 Click Stop...
... you are most interested in using muvee autoProducer, capture only video footage that you want to use in the Add Video/Pictures area. NOTE: To remove a clip from the production, select it to three video files. Adding videos To add video files to the FireWire (IEEE 1394) port on the... and set it and then click the trash can icon. Creating Movies by dragging and dropping the files. To capture (copy) recorded video to your hard disk drive: 1 Connect your DV camera to your computer. 2 Turn on your movie production: 1 Click the Add Video button in your movie project. 6 Click Stop...
Getting Started Guide
Page 181
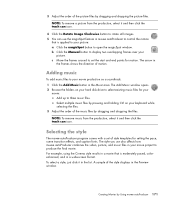
... Add Music window opens. 2 Browse the folders on your movie production as a soundtrack: 1 Click the Add Music button in a wide-screen format. NOTE: To remove a picture from the production, select it in your movie: Add up to your picture. Select multiple music files by dragging and dropping the files. Adding...a Click the magicSpot button to your keyboard while selecting the files. 3 Adjust the order of the music files by pressing and holding Ctrl on your hard disk drive to produce the final movie. 3 Adjust the order of the picture files by Using muvee autoProducer 171
... Add Music window opens. 2 Browse the folders on your movie production as a soundtrack: 1 Click the Add Music button in a wide-screen format. NOTE: To remove a picture from the production, select it in your movie: Add up to your picture. Select multiple music files by dragging and dropping the files. Adding...a Click the magicSpot button to your keyboard while selecting the files. 3 Adjust the order of the music files by pressing and holding Ctrl on your hard disk drive to produce the final movie. 3 Adjust the order of the picture files by Using muvee autoProducer 171
Getting Started Guide
Page 185
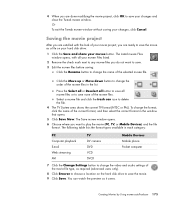
...movie project After you are ready to save the movie as a file on the hard disk drive to save the movie. 9 Click Save. Press the Select all or Deselect all button to save all your muvee Files listed. 2 Remove the check mark next to any muvee files you are satisfied with all muvee... Select a muvee file and click the trash can watch the preview as required (advanced users only). 8 Click Browse to choose a location on your hard disk drive: 1 Click the Save and share your changes and close the Tweak muvee window. The following table lists the format types available in the list. Click...
...movie project After you are ready to save the movie as a file on the hard disk drive to save the movie. 9 Click Save. Press the Select all or Deselect all button to save all your muvee Files listed. 2 Remove the check mark next to any muvee files you are satisfied with all muvee... Select a muvee file and click the trash can watch the preview as required (advanced users only). 8 Click Browse to choose a location on your hard disk drive: 1 Click the Save and share your changes and close the Tweak muvee window. The following table lists the format types available in the list. Click...
Limited Warranty and Support Guide
Page 3
... lease payments (less interest) instead of HP. BEFORE RETURNING ANY UNIT FOR SERVICE, BE SURE TO BACK UP DATA AND REMOVE ANY CONFIDENTIAL, PROPRIETARY, OR PERSONAL INFORMATION. UNITS SENT IN FOR SERVICE MAY HAVE THE DATA ERASED FROM THE HARD DRIVE AND THE PROGRAMS RESTORED TO THEIR ORIGINAL ...BACKUP COPIES OF THE DATA STORED ON YOUR HARD DRIVE OR OTHER STORAGE DEVICES AS A PRECAUTION AGAINST POSSIBLE FAILURES, ALTERATION, OR LOSS OF THE DATA. Limitation of HP. HP IS NOT RESPONSIBLE FOR DAMAGE TO OR LOSS OF ANY PROGRAMS, DATA, OR REMOVABLE STORAGE MEDIA. Exclusive Remedy TO THE EXTENT...
... lease payments (less interest) instead of HP. BEFORE RETURNING ANY UNIT FOR SERVICE, BE SURE TO BACK UP DATA AND REMOVE ANY CONFIDENTIAL, PROPRIETARY, OR PERSONAL INFORMATION. UNITS SENT IN FOR SERVICE MAY HAVE THE DATA ERASED FROM THE HARD DRIVE AND THE PROGRAMS RESTORED TO THEIR ORIGINAL ...BACKUP COPIES OF THE DATA STORED ON YOUR HARD DRIVE OR OTHER STORAGE DEVICES AS A PRECAUTION AGAINST POSSIBLE FAILURES, ALTERATION, OR LOSS OF THE DATA. Limitation of HP. HP IS NOT RESPONSIBLE FOR DAMAGE TO OR LOSS OF ANY PROGRAMS, DATA, OR REMOVABLE STORAGE MEDIA. Exclusive Remedy TO THE EXTENT...
PC Troubleshooting and Maintenance Guide
Page 3
Table of Contents Maintenance 1 Creating Data Backup Discs 1 Creating System Recovery Discs 1 Removing Unused Programs 1 Running the Disk Cleanup Program 2 Running Disk Cleanup manually 2 Scheduling Disk Cleanup to run automatically 2 Running the Disk Defragmenter Program 3 Checking for Hard Disk Drive Errors 4 Understanding Hard Disk Drive Space 4 Recommended Maintenance Schedule 5 Troubleshooting Computer Problems 7 Audio ...8 CD and DVD...
Table of Contents Maintenance 1 Creating Data Backup Discs 1 Creating System Recovery Discs 1 Removing Unused Programs 1 Running the Disk Cleanup Program 2 Running Disk Cleanup manually 2 Scheduling Disk Cleanup to run automatically 2 Running the Disk Defragmenter Program 3 Checking for Hard Disk Drive Errors 4 Understanding Hard Disk Drive Space 4 Recommended Maintenance Schedule 5 Troubleshooting Computer Problems 7 Audio ...8 CD and DVD...

PC Troubleshooting and Maintenance Guide
Page 5
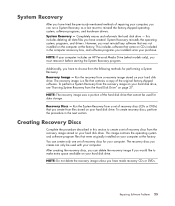
Before creating recovery discs, read "System Recovery" on your hard disk drive with your computer, you can restore it is a one-...This verification feature compares the data on page 25, and then create the discs as described in the future. Removing Unused Programs 1 Click the Windows Start Button®, and then click Control Panel. 2 Click Uninstall a ...program. Creating System Recovery Discs This is an exact copy. If you want to remove, and click Uninstall. 4 Follow the onscreen instructions. When writing data to a backup disc, you should use the...
Before creating recovery discs, read "System Recovery" on your hard disk drive with your computer, you can restore it is a one-...This verification feature compares the data on page 25, and then create the discs as described in the future. Removing Unused Programs 1 Click the Windows Start Button®, and then click Control Panel. 2 Click Uninstall a ...program. Creating System Recovery Discs This is an exact copy. If you want to remove, and click Uninstall. 4 Follow the onscreen instructions. When writing data to a backup disc, you should use the...
PC Troubleshooting and Maintenance Guide
Page 6
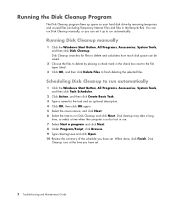
... disk space can set . 2 Troubleshooting and Maintenance Guide Disk cleanup may take a long time, so select a time when the computer is on your hard disk drive by placing a check mark in the check box next to the file types listed. 3 Click OK, and then click Delete Files to finish deleting the... selected files. You can run Disk Cleanup manually, or you can be saved. 2 Choose the files to delete by removing temporary and unused files (including...
... disk space can set . 2 Troubleshooting and Maintenance Guide Disk cleanup may take a long time, so select a time when the computer is on your hard disk drive by placing a check mark in the check box next to the file types listed. 3 Click OK, and then click Delete Files to finish deleting the... selected files. You can run Disk Cleanup manually, or you can be saved. 2 Choose the files to delete by removing temporary and unused files (including...
PC Troubleshooting and Maintenance Guide
Page 22
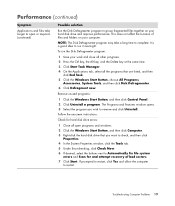
...be in the Recycle Bin) from your hard disk drive: 1 Click the Windows Start Button, All Programs, Accessories, System Tools, and then click Disk Cleanup. 2 Select the drive on your computer may have an internal fan. When drive activity stops, remove the disk and press the spacebar. Before...longer use, and files in an exceedingly hot environment. Power (continued) Symptom Computer will not turn off . Possible solution Incompatible memory (RAM) may not have been installed. Ensure computer air vents are multiple users logged in . Battery life is incorrect. Note that you ...
...be in the Recycle Bin) from your hard disk drive: 1 Click the Windows Start Button, All Programs, Accessories, System Tools, and then click Disk Cleanup. 2 Select the drive on your computer may have an internal fan. When drive activity stops, remove the disk and press the spacebar. Before...longer use, and files in an exceedingly hot environment. Power (continued) Symptom Computer will not turn off . Possible solution Incompatible memory (RAM) may not have been installed. Ensure computer air vents are multiple users logged in . Battery life is incorrect. Note that you ...
PC Troubleshooting and Maintenance Guide
Page 23
...tab, select all open or respond. (continued) Possible solution Run the Disk Defragmenter program to group fragmented files together on your hard disk drive and improve performance. Follow the onscreen instructions. Performance (continued) Symptom Applications and files take a long time to complete. Troubleshooting ..., select the buttons next to restart. To run it overnight. This does not affect the location of bad sectors. 7 Click Start. Remove unused programs: 1 Click the Windows Start Button, and then click Control Panel. 2 Click Uninstall a program. If prompted to restart, ...
...tab, select all open or respond. (continued) Possible solution Run the Disk Defragmenter program to group fragmented files together on your hard disk drive and improve performance. Follow the onscreen instructions. Performance (continued) Symptom Applications and files take a long time to complete. Troubleshooting ..., select the buttons next to restart. To run it overnight. This does not affect the location of bad sectors. 7 Click Start. Remove unused programs: 1 Click the Windows Start Button, and then click Control Panel. 2 Click Uninstall a program. If prompted to restart, ...
PC Troubleshooting and Maintenance Guide
Page 29
... from the Hard Disk Drive" on your hard disk drive. NOTE: The recovery image uses a portion of the hard disk drive that cannot be used for your computer. Creating Recovery Discs Complete the procedure described in the computer accessory box, and software programs you must remove it before ... from the following methods for performing a System Recovery: Recovery Image - Completely erases and reformats the hard disk drive - NOTE: If your computer includes an HP Personal Media Drive (select models only), you have made recovery CDs or DVDs. Run the System Recovery from files stored...
... from the Hard Disk Drive" on your hard disk drive. NOTE: The recovery image uses a portion of the hard disk drive that cannot be used for your computer. Creating Recovery Discs Complete the procedure described in the computer accessory box, and software programs you must remove it before ... from the following methods for performing a System Recovery: Recovery Image - Completely erases and reformats the hard disk drive - NOTE: If your computer includes an HP Personal Media Drive (select models only), you have made recovery CDs or DVDs. Run the System Recovery from files stored...
Upgrading and Servicing Guide
Page 8
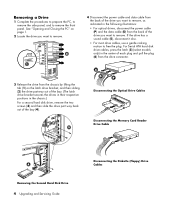
... only) in the chassis.) For a second hard disk drive, remove the two screws (3) and then slide the drive part way back out of the drive you want to remove. Disconnecting the Optical Drive Cables Disconnecting the Memory Card Reader Drive Cable Removing the Second Hard Disk Drive 4 Upgrading and Servicing Guide Disconnecting the Diskette (Floppy) Drive Cables See "Opening and Closing the...
... only) in the chassis.) For a second hard disk drive, remove the two screws (3) and then slide the drive part way back out of the drive you want to remove. Disconnecting the Optical Drive Cables Disconnecting the Memory Card Reader Drive Cable Removing the Second Hard Disk Drive 4 Upgrading and Servicing Guide Disconnecting the Diskette (Floppy) Drive Cables See "Opening and Closing the...
Upgrading and Servicing Guide
Page 9
... each side). You need these screws to break the blank plate out of the drive bay. 6 If you must remove the blank plate from the illustration. For a second hard disk drive, skip this step and go to step 5. 5 Slide the drive part way into the blank plate slot (C) and rotate the screwdriver to install the...
... each side). You need these screws to break the blank plate out of the drive bay. 6 If you must remove the blank plate from the illustration. For a second hard disk drive, skip this step and go to step 5. 5 Slide the drive part way into the blank plate slot (C) and rotate the screwdriver to install the...

Upgrading and Servicing Guide
Page 11
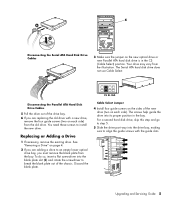
Connecting the Parallel ATA Hard Disk Drive Cables A - Connect to remove the side panel. Removing a Memory Module 1 Complete the procedures to prepare the PC and to primary hard drive B - Upgrading and Servicing Guide 7 If the data cable is not connected correctly, the PC will ...RAM), which type and speed of the way, if necessary. Connect to the secondary hard disk drive. Connect to PC motherboard WARNING: For a second Parallel ATA drive, make sure to connect the data cable end labeled Master (A) to the primary hard disk drive, and the connector labeled Slave (B) to second hard drive...
Connecting the Parallel ATA Hard Disk Drive Cables A - Connect to remove the side panel. Removing a Memory Module 1 Complete the procedures to prepare the PC and to primary hard drive B - Upgrading and Servicing Guide 7 If the data cable is not connected correctly, the PC will ...RAM), which type and speed of the way, if necessary. Connect to the secondary hard disk drive. Connect to PC motherboard WARNING: For a second Parallel ATA drive, make sure to connect the data cable end labeled Master (A) to the primary hard disk drive, and the connector labeled Slave (B) to second hard drive...


