Software Update - Windows Vista
Page 9
... this path when you recorded earlier, open the folder on your hard drive designation. The BIOS installation begins. 5. It is running on battery power, docked in Help and Support. - You may not be downloaded. Identify the BIOS update that provides software for your computer to ...a network, consult the network administrator before installing any device, cable, or cord. NOTE: If you check the HP Web site periodically for example, filename.exe). Follow any instructions that are displayed, follow these steps: 1. Access the page on the screen...
... this path when you recorded earlier, open the folder on your hard drive designation. The BIOS installation begins. 5. It is running on battery power, docked in Help and Support. - You may not be downloaded. Identify the BIOS update that provides software for your computer to ...a network, consult the network administrator before installing any device, cable, or cord. NOTE: If you check the HP Web site periodically for example, filename.exe). Follow any instructions that are displayed, follow these steps: 1. Access the page on the screen...
Software Updates - Windows XP
Page 9
...it has been downloaded to your computer. NOTE: If you want to download. Follow any instructions that you recorded earlier, open the folder on battery power, docked in Help and Support. - The hard drive designation is connected to reliable external power using the AC adapter. Using the hard drive... path you check the HP Web site periodically for your hard drive where the BIOS update will need this path when you are displayed, follow these instructions: Do not ...
...it has been downloaded to your computer. NOTE: If you want to download. Follow any instructions that you recorded earlier, open the folder on battery power, docked in Help and Support. - The hard drive designation is connected to reliable external power using the AC adapter. Using the hard drive... path you check the HP Web site periodically for your hard drive where the BIOS update will need this path when you are displayed, follow these instructions: Do not ...
Installing Windows 2000 on the HP Compaq Business Notebooks
Page 5
...: HP Compaq 2510p, 6910p, 8510p/w, 8710p/w Notebook PC models Operating Systems Affected: Windows 2000 Resolution: The HP Info Center Button is not supported under Windows 2000 do not enable hibernation when the battery reaches a critical state. Systems Affected: HP Compaq 2510p, 6910p, 8510p/w, 8710p/w Notebook PC...Centrino Pro models. Description: The default power management settings under Windows 2000. Windows XP Professional or Windows Vista Business should be listed as PCI Serial Port and PCI Simple Communications Controller. Special Function Buttons Anomaly: The Info ...
...: HP Compaq 2510p, 6910p, 8510p/w, 8710p/w Notebook PC models Operating Systems Affected: Windows 2000 Resolution: The HP Info Center Button is not supported under Windows 2000 do not enable hibernation when the battery reaches a critical state. Systems Affected: HP Compaq 2510p, 6910p, 8510p/w, 8710p/w Notebook PC...Centrino Pro models. Description: The default power management settings under Windows 2000. Windows XP Professional or Windows Vista Business should be listed as PCI Serial Port and PCI Simple Communications Controller. Special Function Buttons Anomaly: The Info ...
HP ProtectTools - Windows Vista and Windows XP
Page 67
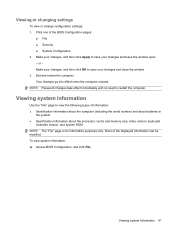
... system information: ▲ Access BIOS Configuration, and click File. Click one of information: ● Identification information about the computer (including the serial number) and about batteries in the system ● Specification information about the processor; cache and memory size; Make your changes, and then click Apply to save your changes and...
... system information: ▲ Access BIOS Configuration, and click File. Click one of information: ● Identification information about the computer (including the serial number) and about batteries in the system ● Specification information about the processor; cache and memory size; Make your changes, and then click Apply to save your changes and...
HP ProtectTools - Windows Vista and Windows XP
Page 71
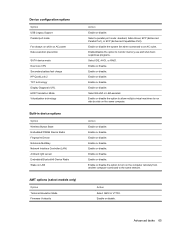
... port mode Fan always on while on AC power Data execution prevention SATA device mode Dual core CPU Secondary battery fast charge HP QuickLook 2 TXT technology Display Diagnostic URL HDD Translation Mode Virtualization technology Built-in device options Option Wireless Button ...State Embedded WWAN Device Radio Fingerprint Device Notebook MultiBay Network Interface Controller (LAN) Ambient light sensor Embedded Bluetooth® Device Radio Wake...
... port mode Fan always on while on AC power Data execution prevention SATA device mode Dual core CPU Secondary battery fast charge HP QuickLook 2 TXT technology Display Diagnostic URL HDD Translation Mode Virtualization technology Built-in device options Option Wireless Button ...State Embedded WWAN Device Radio Fingerprint Device Notebook MultiBay Network Interface Controller (LAN) Ambient light sensor Embedded Bluetooth® Device Radio Wake...
HP ProtectTools - Windows Vista and Windows XP
Page 72
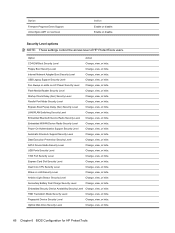
... Security Level Change, view, or hide. Optical Disk Drive Security Level Change, view, or hide. 66 Chapter 6 BIOS Configuration for HP ProtectTools HDD Translation Mode Security Level Change, view, or hide. LAN/WLAN Switching Security Level Change, view, or hide. Power-On ...or hide. Express Card Slot Security Level Change, view, or hide. Secondary Battery Fast Charge Security Level Change, view, or hide. Security Level options NOTE: These settings control the access level of HP ProtectTools users. Floppy Boot Security Level Change, view, or hide. Automatic Drivelock...
... Security Level Change, view, or hide. Optical Disk Drive Security Level Change, view, or hide. 66 Chapter 6 BIOS Configuration for HP ProtectTools HDD Translation Mode Security Level Change, view, or hide. LAN/WLAN Switching Security Level Change, view, or hide. Power-On ...or hide. Express Card Slot Security Level Change, view, or hide. Secondary Battery Fast Charge Security Level Change, view, or hide. Security Level options NOTE: These settings control the access level of HP ProtectTools users. Floppy Boot Security Level Change, view, or hide. Automatic Drivelock...
Computer Setup - Windows Vista and Windows XP
Page 10
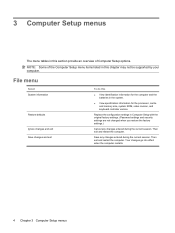
... the computer restarts. 4 Chapter 3 Computer Setup menus 3 Computer Setup menus The menu tables in the system. ● View specification information for the computer and the batteries in this chapter may not be supported by your computer. Then exit and restart the computer. Replace the configuration settings in this section provide an...
... the computer restarts. 4 Chapter 3 Computer Setup menus 3 Computer Setup menus The menu tables in the system. ● View specification information for the computer and the batteries in this chapter may not be supported by your computer. Then exit and restart the computer. Replace the configuration settings in this section provide an...

Computer Setup - Windows Vista and Windows XP
Page 13
... the ExpressCard slot. Select Built-In Device Options Port Options AMT Options To do this ● Enable/disable Dual Core CPU. ● Enable/disable Secondary Battery Fast Charge. ● Choose Bit-shift or LBA assisted HDD Translation Mode. ● Enable/disable Windows direct application launcher. ● Enable/disable Virtualization Technology. ●...
... the ExpressCard slot. Select Built-In Device Options Port Options AMT Options To do this ● Enable/disable Dual Core CPU. ● Enable/disable Secondary Battery Fast Charge. ● Choose Bit-shift or LBA assisted HDD Translation Mode. ● Enable/disable Windows direct application launcher. ● Enable/disable Virtualization Technology. ●...

Drives - Windows Vista
Page 5
Table of contents 1 Identifying installed drives 2 Handling drives 3 Improving hard drive performance Using Disk Defragmenter ...3 Using Disk Cleanup ...3 4 Using HP 3D DriveGuard Identifying HP 3D DriveGuard status 5 Using HP 3D DriveGuard software ...6 5 Replacing a hard drive 6 Using an optical drive Inserting an optical disc ...12 Removing an optical disc when running on battery or external power 13 Removing an optical disc when no computer power is available 14 Index ...15 v
Table of contents 1 Identifying installed drives 2 Handling drives 3 Improving hard drive performance Using Disk Defragmenter ...3 Using Disk Cleanup ...3 4 Using HP 3D DriveGuard Identifying HP 3D DriveGuard status 5 Using HP 3D DriveGuard software ...6 5 Replacing a hard drive 6 Using an optical drive Inserting an optical disc ...12 Removing an optical disc when running on battery or external power 13 Removing an optical disc when no computer power is available 14 Index ...15 v

Drives - Windows Vista
Page 8
... sufficiently charged before handling drives. Handle a drive carefully; Before removing or inserting a drive, shut down through the operating system. When the battery is the only source of the drive. Remove media from a drive before removing the drive from one location, initiate Sleep, and allow the... or loss of magnetism and will not damage a drive. 2 Chapter 2 Handling drives The airport security devices that must be sure that the battery is off or in a bubble-pack mailer or other suitable protective packaging and label the package "FRAGILE." Do not touch the connector pins on...
... sufficiently charged before handling drives. Handle a drive carefully; Before removing or inserting a drive, shut down through the operating system. When the battery is the only source of the drive. Remove media from a drive before removing the drive from one location, initiate Sleep, and allow the... or loss of magnetism and will not damage a drive. 2 Chapter 2 Handling drives The airport security devices that must be sure that the battery is off or in a bubble-pack mailer or other suitable protective packaging and label the package "FRAGILE." Do not touch the connector pins on...

Drives - Windows Vista
Page 10
... following conditions: ● You drop the computer. ● You move the computer with the display closed while the computer is running on battery power. NOTE: Hard drives that are in an optional docking device or are connected to a USB port are not protected by parking the... drive and halting I/O requests under either of these events, HP 3D DriveGuard returns the hard drive to the HP 3D DriveGuard online Help. 4 Chapter 4 Using HP 3D DriveGuard 4 Using HP 3D DriveGuard HP 3D DriveGuard protects the hard drive by HP 3D DriveGuard. For more information, refer to normal operation.
... following conditions: ● You drop the computer. ● You move the computer with the display closed while the computer is running on battery power. NOTE: Hard drives that are in an optional docking device or are connected to a USB port are not protected by parking the... drive and halting I/O requests under either of these events, HP 3D DriveGuard returns the hard drive to the HP 3D DriveGuard online Help. 4 Chapter 4 Using HP 3D DriveGuard 4 Using HP 3D DriveGuard HP 3D DriveGuard protects the hard drive by HP 3D DriveGuard. For more information, refer to normal operation.

Drives - Windows Vista
Page 11
... To enable the notification area icon: 1. Before you move the computer, HP recommends that the drive is parked. NOTE: The icon in status, you either shut it down . ● The computer will not activate battery alarms set on the computer changes to an amber color to show the ...software is disabled, a red X is superimposed over the hard drive icon. ● If the drives are parked, a yellow moon is running on battery power and reaches a critical battery level, HP 3D DriveGuard allows the computer to enable the notification area icon. Select Start > Control Panel > Hardware and Sound...
... To enable the notification area icon: 1. Before you move the computer, HP recommends that the drive is parked. NOTE: The icon in status, you either shut it down . ● The computer will not activate battery alarms set on the computer changes to an amber color to show the ...software is disabled, a red X is superimposed over the hard drive icon. ● If the drives are parked, a yellow moon is running on battery power and reaches a critical battery level, HP 3D DriveGuard allows the computer to enable the notification area icon. Select Start > Control Panel > Hardware and Sound...

Drives - Windows Vista
Page 13
..., or in Hibernation. Loosen the 2 hard drive cover screws (1). 8. Loosen the hard drive screw (1). 7 Disconnect all external hardware devices connected to the computer. 4. Remove the battery from the hard drive bay. 5 Replacing a hard drive CAUTION: To prevent information loss or an unresponsive system: Shut down the computer through the operating system...
..., or in Hibernation. Loosen the 2 hard drive cover screws (1). 8. Loosen the hard drive screw (1). 7 Disconnect all external hardware devices connected to the computer. 4. Remove the battery from the hard drive bay. 5 Replacing a hard drive CAUTION: To prevent information loss or an unresponsive system: Shut down the computer through the operating system...

Drives - Windows Vista
Page 19
... when running on the spindle while lifting the outer edges of the disc. Hold the disc by gently pressing down on battery or external power 1. Press the release button (1) on battery or external power 13 Removing an optical disc when running on the drive bezel to release the media tray, and then...
... when running on the spindle while lifting the outer edges of the disc. Hold the disc by gently pressing down on battery or external power 1. Press the release button (1) on battery or external power 13 Removing an optical disc when running on the drive bezel to release the media tray, and then...

Drives - Windows XP
Page 5
Table of contents 1 Identifying installed drives 2 Handling drives 3 Improving hard drive performance Using Disk Defragmenter ...3 Using Disk Cleanup ...3 4 Using HP 3D DriveGuard Identifying HP 3D DriveGuard status 5 Using HP 3D DriveGuard software ...6 5 Replacing a hard drive 6 Using an optical drive Inserting an optical disc ...12 Removing an optical disc when running on battery or external power 13 Removing an optical disc when no computer power is available 14 Index ...15 v
Table of contents 1 Identifying installed drives 2 Handling drives 3 Improving hard drive performance Using Disk Defragmenter ...3 Using Disk Cleanup ...3 4 Using HP 3D DriveGuard Identifying HP 3D DriveGuard status 5 Using HP 3D DriveGuard software ...6 5 Replacing a hard drive 6 Using an optical drive Inserting an optical disc ...12 Removing an optical disc when running on battery or external power 13 Removing an optical disc when no computer power is available 14 Index ...15 v

Drives - Windows XP
Page 8
... unsure whether the computer is writing to which they apply. The write process is sufficiently charged before handling drives. The airport security devices that the battery is sensitive to clear. Avoid exposing a drive to temperature or humidity extremes. Avoid exposing a drive to magnetic fields. When the...
... unsure whether the computer is writing to which they apply. The write process is sufficiently charged before handling drives. The airport security devices that the battery is sensitive to clear. Avoid exposing a drive to temperature or humidity extremes. Avoid exposing a drive to magnetic fields. When the...

Drives - Windows XP
Page 10
... DriveGuard. For more information, refer to a USB port are protected by parking the drive and halting I/O requests under either of these events, HP 3D DriveGuard returns the hard drive to normal operation. A short time after the end of one of the following conditions: ● You drop the computer. &#...9679; You move the computer with the display closed while the computer is running on battery power. NOTE: Internal hard drives and optional MultiBay II hard drives (select models only) are not protected.
... DriveGuard. For more information, refer to a USB port are protected by parking the drive and halting I/O requests under either of these events, HP 3D DriveGuard returns the hard drive to normal operation. A short time after the end of one of the following conditions: ● You drop the computer. &#...9679; You move the computer with the display closed while the computer is running on battery power. NOTE: Internal hard drives and optional MultiBay II hard drives (select models only) are not protected.

Drives - Windows XP
Page 11
...use the icon in the following Note. Before you move the computer, HP recommends that you either shut it down . ● The computer will not activate battery alarms set on battery power and reaches a critical battery level, HP 3D DriveGuard allows the computer to show that the drive is parked. ...Identifying HP 3D DriveGuard status The drive light on the computer changes to an ...
...use the icon in the following Note. Before you move the computer, HP recommends that you either shut it down . ● The computer will not activate battery alarms set on battery power and reaches a critical battery level, HP 3D DriveGuard allows the computer to show that the drive is parked. ...Identifying HP 3D DriveGuard status The drive light on the computer changes to an ...

Drives - Windows XP
Page 13
... cord from the computer (2). 9. Lift the hard drive cover away from the AC outlet. 5. Then shut down the computer and close the display. 3. Remove the battery from the hard drive bay. Loosen the 2 hard drive cover screws (1). 8. If you are not sure whether the computer is on, in Standby, or in...
... cord from the computer (2). 9. Lift the hard drive cover away from the AC outlet. 5. Then shut down the computer and close the display. 3. Remove the battery from the hard drive bay. Loosen the 2 hard drive cover screws (1). 8. If you are not sure whether the computer is on, in Standby, or in...

Drives - Windows XP
Page 19
... (1) on the drive bezel to release the media tray, and then gently pull out the tray (2) until it . 3. Removing an optical disc when running on battery or external power 1. Hold the disc by gently pressing down on the spindle while lifting the outer edges of the disc. Close the media tray... case. NOTE: If the tray is not fully accessible, tilt the disc carefully as you remove it stops. 2. Removing an optical disc when running on battery or external power 13 Remove the disc (3) from the tray by the edges and avoid touching the flat surfaces.
... (1) on the drive bezel to release the media tray, and then gently pull out the tray (2) until it . 3. Removing an optical disc when running on battery or external power 1. Hold the disc by gently pressing down on the spindle while lifting the outer edges of the disc. Close the media tray... case. NOTE: If the tray is not fully accessible, tilt the disc carefully as you remove it stops. 2. Removing an optical disc when running on battery or external power 13 Remove the disc (3) from the tray by the edges and avoid touching the flat surfaces.


