User Guide
Page 2
... by the terms of your sole remedy is subject to the refund policy of the HP End User License Agreement (EULA). HP shall not be construed as constituting an additional warranty. Nothing herein should be liable for HP products and services are common to be available on your local point of Microsoft Corporation...
... by the terms of your sole remedy is subject to the refund policy of the HP End User License Agreement (EULA). HP shall not be construed as constituting an additional warranty. Nothing herein should be liable for HP products and services are common to be available on your local point of Microsoft Corporation...
User Guide
Page 3
Table of contents 1 The basics ...1 Lock and unlock the screen ...1 2 Using the Home screen ...2 3 Using apps and widgets ...3 Using the on-screen keyboard ...3 Using the calendar ...3 Using the clock ...4 Downloading apps ...4 Uninstalling apps ...4 4 Using the cameras ...5 Taking your own photo ...5 Recording a video ...5 Taking a screenshot ...5 Viewing photos or videos ...5 Printing ...5 5 Connecting to networks ...7 Connect to a wireless network ...7 Connect to a Windows computer (select models only 7 6 Using Settings ...8 WIRELESS & NETWORKS ...8 DEVICE ...8 PERSONAL ...8 ACCOUNTS ...9 ...
Table of contents 1 The basics ...1 Lock and unlock the screen ...1 2 Using the Home screen ...2 3 Using apps and widgets ...3 Using the on-screen keyboard ...3 Using the calendar ...3 Using the clock ...4 Downloading apps ...4 Uninstalling apps ...4 4 Using the cameras ...5 Taking your own photo ...5 Recording a video ...5 Taking a screenshot ...5 Viewing photos or videos ...5 Printing ...5 5 Connecting to networks ...7 Connect to a wireless network ...7 Connect to a Windows computer (select models only 7 6 Using Settings ...8 WIRELESS & NETWORKS ...8 DEVICE ...8 PERSONAL ...8 ACCOUNTS ...9 ...
User Guide
Page 5
After charging the battery, press and hold the power button until the Compaq logo is displayed. 2. Lock and unlock the screen Lock-Press the power button. Follow the on the screen, press the power button briefly to display the image, and then press and hold the power button up to external power, and then charge the battery for the first time, connect it to 5 seconds until the Compaq logo is displayed. Lock and unlock the screen 1 The first time you turn on the tablet, then place your finger on the tablet, you will see the printed Quick Start guide included in the box ...
After charging the battery, press and hold the power button until the Compaq logo is displayed. 2. Lock and unlock the screen Lock-Press the power button. Follow the on the screen, press the power button briefly to display the image, and then press and hold the power button up to external power, and then charge the battery for the first time, connect it to 5 seconds until the Compaq logo is displayed. Lock and unlock the screen 1 The first time you turn on the tablet, then place your finger on the tablet, you will see the printed Quick Start guide included in the box ...
User Guide
Page 6
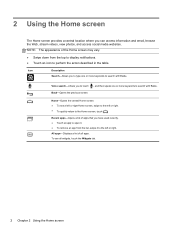
Voice search-Allows you to type one or more keywords to search with Baidu. Icon Description Search-Allows you to touch , and then speak one or more keywords to search with Baidu. Recent apps-Opens a list of apps that you can access information and email, browse the Web, stream videos, view photos, and access social media websites. All apps-Displays a list of the Home screen may vary. ● Swipe down from the list, swipe it . ● To remove an app from the top to display notifications. ● Touch an icon to perform the action described in the table. To see a left or ...
Voice search-Allows you to type one or more keywords to search with Baidu. Icon Description Search-Allows you to touch , and then speak one or more keywords to search with Baidu. Recent apps-Opens a list of apps that you can access information and email, browse the Web, stream videos, view photos, and access social media websites. All apps-Displays a list of the Home screen may vary. ● Swipe down from the list, swipe it . ● To remove an app from the top to display notifications. ● Touch an icon to perform the action described in the table. To see a left or ...
User Guide
Page 7
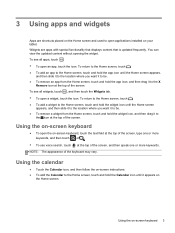
Using the calendar ● Touch the Calendar icon, and then follow the on-screen instructions. ● To add the Calendar to the Home screen, touch and hold the Calendar icon until it to the X Remove icon at the top of the screen. Using the on the Home screen. To see all apps, touch . ● To open a widget, touch the icon. To see all widgets, touch , and then touch the Widgets tab. ● To open an app, touch the icon. NOTE: The appearance of the screen, and then speak one or more keywords. 3 Using apps and widgets Apps are apps with special functionality that ...
Using the calendar ● Touch the Calendar icon, and then follow the on-screen instructions. ● To add the Calendar to the Home screen, touch and hold the Calendar icon until it to the X Remove icon at the top of the screen. Using the on the Home screen. To see all apps, touch . ● To open a widget, touch the icon. To see all widgets, touch , and then touch the Widgets tab. ● To open an app, touch the icon. NOTE: The appearance of the screen, and then speak one or more keywords. 3 Using apps and widgets Apps are apps with special functionality that ...
User Guide
Page 8
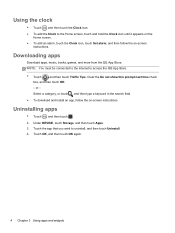
Uninstalling apps 1. Touch the app that you want to access the QQ App Store. ● Touch , and then touch Traffic Tips. Downloading apps Download apps, music, books, games, and more from the QQ App Store. Under DEVICE, touch Storage, and then touch Apps. 3. NOTE: You must be connected to the Internet to uninstall, and then touch Uninstall. 4. Select a category, or touch , and then type a keyword in the search field. ● To download and install an app, follow the on -screen instructions. Using the clock ● Touch , and then touch the Clock icon. ● To ...
Uninstalling apps 1. Touch the app that you want to access the QQ App Store. ● Touch , and then touch Traffic Tips. Downloading apps Download apps, music, books, games, and more from the QQ App Store. Under DEVICE, touch Storage, and then touch Apps. 3. NOTE: You must be connected to the Internet to uninstall, and then touch Uninstall. 4. Select a category, or touch , and then type a keyword in the search field. ● To download and install an app, follow the on -screen instructions. Using the clock ● Touch , and then touch the Clock icon. ● To ...
User Guide
Page 9
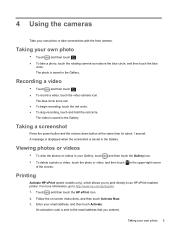
... activation code is saved in the Gallery. The video is sent to the email address that you to print directly to http://www.hp.com/go to an HP ePrint-enabled printer. Follow the on-screen instructions, and then touch Activate Now. 3. Enter your own photo 5 Taking your email ...Activate. 4 Using the cameras Take your own photo ● Touch , and then touch . ● To take screenshots with the front camera. Printing Activate HP ePrint (select models only), which allows you entered. Viewing photos or videos ● To view the photos or videos in your Gallery, touch , and then...
... activation code is saved in the Gallery. The video is sent to the email address that you to print directly to http://www.hp.com/go to an HP ePrint-enabled printer. Follow the on-screen instructions, and then touch Activate Now. 3. Enter your own photo 5 Taking your email ...Activate. 4 Using the cameras Take your own photo ● Touch , and then touch . ● To take screenshots with the front camera. Printing Activate HP ePrint (select models only), which allows you entered. Viewing photos or videos ● To view the photos or videos in your Gallery, touch , and then...
User Guide
Page 10
Touch , and then touch the HP ePrint icon. 5. 4. Enter the activation code, and then touch Activate. 6 Chapter 4 Using the cameras
Touch , and then touch the HP ePrint icon. 5. 4. Enter the activation code, and then touch Activate. 6 Chapter 4 Using the cameras
User Guide
Page 11
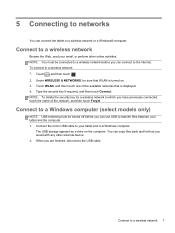
To connect to a wireless network 7 Type the security key if required, and then touch Connect. The USB storage appears as you would with any other online activities. Connect to a wireless network: 1. Connect the micro USB cable to your tablet and the computer. 1. NOTE: You must be connected to a Windows computer (select models only) NOTE: USB tethering must be sure that is turned on the computer. Touch WLAN, and then touch one of the network, and then touch Forget. You can copy files back and forth as a drive on . 3. 5 Connecting to networks You can connect the tablet to...
To connect to a wireless network 7 Type the security key if required, and then touch Connect. The USB storage appears as you would with any other online activities. Connect to a wireless network: 1. Connect the micro USB cable to your tablet and the computer. 1. NOTE: You must be connected to a Windows computer (select models only) NOTE: USB tethering must be sure that is turned on the computer. Touch WLAN, and then touch one of the network, and then touch Forget. You can copy files back and forth as a drive on . 3. 5 Connecting to networks You can connect the tablet to...

User Guide
Page 12
6 Using Settings Use Settings for PERSONAL DATA and SYSTEM UPGRADE. 8 Chapter 6 Using Settings WIRELESS & NETWORKS ● WLAN-Enable or disable WLAN, and connect to networks, setting preferences, and finding information about your tablet. ● Touch , and then touch . - or - ● Swipe down from the top, and then touch . DEVICE ● Sound-Select Volumes, Default notification, and enable or disable Touch sounds and Screen lock sound. ● Display-Select Brightness, Wallpaper, Sleep, and Font size. ● Storage-View available space in tablet memory and SD™ card ...
6 Using Settings Use Settings for PERSONAL DATA and SYSTEM UPGRADE. 8 Chapter 6 Using Settings WIRELESS & NETWORKS ● WLAN-Enable or disable WLAN, and connect to networks, setting preferences, and finding information about your tablet. ● Touch , and then touch . - or - ● Swipe down from the top, and then touch . DEVICE ● Sound-Select Volumes, Default notification, and enable or disable Touch sounds and Screen lock sound. ● Display-Select Brightness, Wallpaper, Sleep, and Font size. ● Storage-View available space in tablet memory and SD™ card ...
User Guide
Page 13
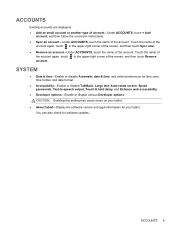
Touch the name of the account again, touch in the upper-right corner of the screen, and then touch Sync now. ● Remove an account-Under ACCOUNTS, touch the name of the account. ACCOUNTS 9 ACCOUNTS Existing accounts are displayed. ● Add an email account or another type of account-Under ACCOUNTS, touch + Add account, and then follow the on your tablet. ● About tablet-Display the software version and legal information for your tablet. Touch the name of the account again, touch in the upper-right corner of the account. You can also check for time zone, time format, and ...
Touch the name of the account again, touch in the upper-right corner of the screen, and then touch Sync now. ● Remove an account-Under ACCOUNTS, touch the name of the account. ACCOUNTS 9 ACCOUNTS Existing accounts are displayed. ● Add an email account or another type of account-Under ACCOUNTS, touch + Add account, and then follow the on your tablet. ● About tablet-Display the software version and legal information for your tablet. Touch the name of the account again, touch in the upper-right corner of the account. You can also check for time zone, time format, and ...
User Guide
Page 14
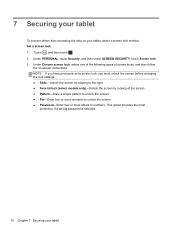
Under Choose screen lock, select one of the following types of screen locks, and then follow the on your tablet, select a screen lock method. Touch , and then touch . 2. Under PERSONAL, touch Security, and then under SCREEN SECURITY, touch Screen lock. 3. NOTE: If you have previously set a screen lock, you must unlock the screen before changing the lock settings. ● Slide-Unlock the screen by swiping to the right. ● Face Unlock (select models only)-Unlock the screen by looking at the screen. ● Pattern-Draw a simple pattern to unlock the screen. ● Pin-Enter four or...
Under Choose screen lock, select one of the following types of screen locks, and then follow the on your tablet, select a screen lock method. Touch , and then touch . 2. Under PERSONAL, touch Security, and then under SCREEN SECURITY, touch Screen lock. 3. NOTE: If you have previously set a screen lock, you must unlock the screen before changing the lock settings. ● Slide-Unlock the screen by swiping to the right. ● Face Unlock (select models only)-Unlock the screen by looking at the screen. ● Pattern-Draw a simple pattern to unlock the screen. ● Pin-Enter four or...
User Guide
Page 15
... latest versions of existing applications that you update your data Updating apps, widgets, and the operating system HP recommends that you want to update the operating system manually, go to http://www.hp.com/support. Under PERSONAL, touch Back up and recovering your apps, widgets, and the operating system ...reset all settings and delete all data on a regular basis to run the latest technology available. The QQ App store displays the number of HP and third-party apps and widgets. If you can resolve issues and bring new features and options to your tablet to the latest versions. ...
... latest versions of existing applications that you update your data Updating apps, widgets, and the operating system HP recommends that you want to update the operating system manually, go to http://www.hp.com/support. Under PERSONAL, touch Back up and recovering your apps, widgets, and the operating system ...reset all settings and delete all data on a regular basis to run the latest technology available. The QQ App store displays the number of HP and third-party apps and widgets. If you can resolve issues and bring new features and options to your tablet to the latest versions. ...
User Guide
Page 16
.... Limited Warranty The warranty is located in the document folder of the tablet box. Contents ● Online chat with an HP technician. ● Email support. ● Find telephone numbers. ● Locate HP service center locations. ● Important regulatory notices. ● Important regulatory notices. ● Warranty information about this table. Product Notices The...
.... Limited Warranty The warranty is located in the document folder of the tablet box. Contents ● Online chat with an HP technician. ● Email support. ● Find telephone numbers. ● Locate HP service center locations. ● Important regulatory notices. ● Important regulatory notices. ● Warranty information about this table. Product Notices The...
User Guide
Page 17
Index A accounts 8 all apps icon 2 apps 3 B back icon 2 backup and recovery 11 battery 8 C calendar 3 camera 5 clock 3 computer 7 D date & time 8 display 8 download 3 F Face Unlock 10 factory data reset 11 H home icon 2 I icons 2 L language 8 N network 7 P password 10 photos 5 PIN 10 printing 5 Product Notices 12 Q Quick Start 12 R recent apps icon 2 S screen lock 10 screenshot 5 search icon 2 settings 8 sound 8 storage 8 V voice search icon 2 W warranty 12 widgets 3 Windows 7 WLAN 7 Index 13
Index A accounts 8 all apps icon 2 apps 3 B back icon 2 backup and recovery 11 battery 8 C calendar 3 camera 5 clock 3 computer 7 D date & time 8 display 8 download 3 F Face Unlock 10 factory data reset 11 H home icon 2 I icons 2 L language 8 N network 7 P password 10 photos 5 PIN 10 printing 5 Product Notices 12 Q Quick Start 12 R recent apps icon 2 S screen lock 10 screenshot 5 search icon 2 settings 8 sound 8 storage 8 V voice search icon 2 W warranty 12 widgets 3 Windows 7 WLAN 7 Index 13
