
End User License Agreement
Page 1
...RETURN THE ENTIRE UNUSED PRODUCT (HARDWARE AND SOFTWARE) WITHIN 14 DAYS FOR A REFUND SUBJECT TO THE REFUND POLICY OF YOUR PLACE OF PURCHASE. 1. HP grants you the following rights provided you comply with your HP product ("HP Product"), that is not otherwise subject to you in ... rights not expressly granted to a separate license agreement between (a) you (either an individual or a single entity) and (b) Hewlett-Packard Company ("HP") that it is used only for use the Software Product on those computers. DOWNLOADING, OR b. You may include associated media, printed materials and...
...RETURN THE ENTIRE UNUSED PRODUCT (HARDWARE AND SOFTWARE) WITHIN 14 DAYS FOR A REFUND SUBJECT TO THE REFUND POLICY OF YOUR PLACE OF PURCHASE. 1. HP grants you the following rights provided you comply with your HP product ("HP Product"), that is not otherwise subject to you in ... rights not expressly granted to a separate license agreement between (a) you (either an individual or a single entity) and (b) Hewlett-Packard Company ("HP") that it is used only for use the Software Product on those computers. DOWNLOADING, OR b. You may include associated media, printed materials and...
End User License Agreement
Page 4
...to the Software Product or any other product names mentioned herein may be construed as constituting an additional warranty. HP shall not be liable for HP products and services are duly authorized by the laws of the State of any addendum or amendment to the...Hewlett-Packard Development Company, L.P. The information contained herein is governed by your state of residence and, if applicable, you and HP relating to this contract. 14. The only warranties for technical or editorial errors or omissions contained herein. 13. CAPACITY AND AUTHORITY TO CONTRACT. Nothing herein ...
...to the Software Product or any other product names mentioned herein may be construed as constituting an additional warranty. HP shall not be liable for HP products and services are duly authorized by the laws of the State of any addendum or amendment to the...Hewlett-Packard Development Company, L.P. The information contained herein is governed by your state of residence and, if applicable, you and HP relating to this contract. 14. The only warranties for technical or editorial errors or omissions contained herein. 13. CAPACITY AND AUTHORITY TO CONTRACT. Nothing herein ...

Backup and Recovery - Windows XP
Page 5
Table of contents 1 Creating recovery discs 2 Backing up your information When to back up ...3 Backup suggestions ...4 Backing up specific files or folders ...5 Backing up the entire hard drive ...6 Creating recovery points ...7 Scheduling backups ...8 3 Performing a recovery Performing a recovery from the recovery discs 10 Performing a recovery from the hard drive 11 Initiating a recovery in Windows 12 Initiating a recovery from the hard drive recovery partition 13 Index ...14 v
Table of contents 1 Creating recovery discs 2 Backing up your information When to back up ...3 Backup suggestions ...4 Backing up specific files or folders ...5 Backing up the entire hard drive ...6 Creating recovery points ...7 Scheduling backups ...8 3 Performing a recovery Performing a recovery from the recovery discs 10 Performing a recovery from the hard drive 11 Initiating a recovery in Windows 12 Initiating a recovery from the hard drive recovery partition 13 Index ...14 v

Backup and Recovery - Windows XP
Page 20
Index B backup files and folders 5 hard drive 6 modifications made to system 7 scheduling 8 C creating recovery points 7 E entire hard drive backup 6 H hard drive backup 6 hard drive recovery 11 R recovery discs using 10 recovery partition 13 recovery points 7 S scheduling backups 8 system backup 6 system recovery points 7 14 Index
Index B backup files and folders 5 hard drive 6 modifications made to system 7 scheduling 8 C creating recovery points 7 E entire hard drive backup 6 H hard drive backup 6 hard drive recovery 11 R recovery discs using 10 recovery partition 13 recovery points 7 S scheduling backups 8 system backup 6 system recovery points 7 14 Index
Backup and Recovery - Windows XP and Windows Vista
Page 5
Table of contents 1 Creating recovery discs 2 Backing up your information When to back up ...3 Backup suggestions ...4 Backing up specific files or folders ...5 Backing up the entire hard drive ...6 Creating recovery points ...7 Scheduling backups ...8 3 Performing a recovery Performing a recovery from the recovery discs 10 Performing a recovery from the hard drive 11 Initiating a recovery in Windows 12 Initiating a recovery from the hard drive recovery partition 13 Index ...14 v
Table of contents 1 Creating recovery discs 2 Backing up your information When to back up ...3 Backup suggestions ...4 Backing up specific files or folders ...5 Backing up the entire hard drive ...6 Creating recovery points ...7 Scheduling backups ...8 3 Performing a recovery Performing a recovery from the recovery discs 10 Performing a recovery from the hard drive 11 Initiating a recovery in Windows 12 Initiating a recovery from the hard drive recovery partition 13 Index ...14 v

Backup and Recovery - Windows XP and Windows Vista
Page 20
Index B backing up 2 backup files and folders 5 hard drive 6 modifications made to system 7 scheduling 8 C creating recovery points 7 H hard drive backup 6 hard drive recovery 11 R recovery discs creating 1 using 10 recovery partition 13 recovery points 7 S scheduling backups 8 system backup 6 system recovery points 7 14 Index
Index B backing up 2 backup files and folders 5 hard drive 6 modifications made to system 7 scheduling 8 C creating recovery points 7 H hard drive backup 6 hard drive recovery 11 R recovery discs creating 1 using 10 recovery partition 13 recovery points 7 S scheduling backups 8 system backup 6 system recovery points 7 14 Index
HP Compaq notebook common image
Page 1
HP Compaq notebook common image white paper Introduction...2 System requirements and prerequisites 2 Common image preparation using factory preinstalled Windows Vista® images 4 Configuring the Windows Vista Business operating system and system software for a Common ...Image....... 5 Common image preparation using factory preinstalled Windows XP Professional images 7 Configuring the Windows XP Professional operating system and system software for a Common Image .... 8 Appendix A: System ROM versions...12 Appendix B: SoftPaqs...14...
HP Compaq notebook common image white paper Introduction...2 System requirements and prerequisites 2 Common image preparation using factory preinstalled Windows Vista® images 4 Configuring the Windows Vista Business operating system and system software for a Common ...Image....... 5 Common image preparation using factory preinstalled Windows XP Professional images 7 Configuring the Windows XP Professional operating system and system software for a Common Image .... 8 Appendix A: System ROM versions...12 Appendix B: SoftPaqs...14...

HP Compaq notebook common image
Page 5
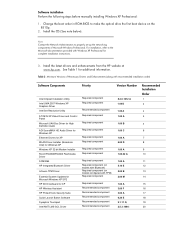
... Windows Vista Business: 1. Install the OS (See note below). and SCM3264 version 1.00 A. 12. Removal procedures are available in ROM BIOS to enumerate all of Microsoft Windows. Change the boot order in the Maintenance and Service Guide: "HP Compaq 6710b Notebook PC." 14. Removal procedures... are available in an unsuccessful or unstable installation. Remove the primary hard drive from the 6710b. - Insert the drive removed from the 6910p into the 6510b. 19. Apply power to the 6510b and allow the ...
... Windows Vista Business: 1. Install the OS (See note below). and SCM3264 version 1.00 A. 12. Removal procedures are available in ROM BIOS to enumerate all of Microsoft Windows. Change the boot order in the Maintenance and Service Guide: "HP Compaq 6710b Notebook PC." 14. Removal procedures... are available in an unsuccessful or unstable installation. Remove the primary hard drive from the 6710b. - Insert the drive removed from the 6910p into the 6510b. 19. Apply power to the 6510b and allow the ...
HP Compaq notebook common image
Page 6
...Installation Order 1 2 1.00 A 3 1.00 A 4 1.00 D 5 1.00 A 6 6.00 C 7 1.00 A 8 1.00.02 A 9 1.00 A 10 6.0 E 11 2.7.8.4 B 12 1.00 G 13 3.00 A 14 3.00 F 15 3.00 A 16 6.20 E 17 9.1.11 Q 18 2.5.3.1084 19 2.5.3.1084 20 2.00 B 21 4. Remove the primary hard drive from the... Intel AMT MEI Driver System Default Settings for additional information. 3. Removal procedures are available in the Maintenance and Service Guide: "HP Compaq 6910p Notebook PC." Table 1 Minimum Versions of the new devices. 8. Power down the 8710p and remove the hard drive. 9. Install...
...Installation Order 1 2 1.00 A 3 1.00 A 4 1.00 D 5 1.00 A 6 6.00 C 7 1.00 A 8 1.00.02 A 9 1.00 A 10 6.0 E 11 2.7.8.4 B 12 1.00 G 13 3.00 A 14 3.00 F 15 3.00 A 16 6.20 E 17 9.1.11 Q 18 2.5.3.1084 19 2.5.3.1084 20 2.00 B 21 4. Remove the primary hard drive from the... Intel AMT MEI Driver System Default Settings for additional information. 3. Removal procedures are available in the Maintenance and Service Guide: "HP Compaq 6910p Notebook PC." Table 1 Minimum Versions of the new devices. 8. Power down the 8710p and remove the hard drive. 9. Install...
HP Compaq notebook common image
Page 7
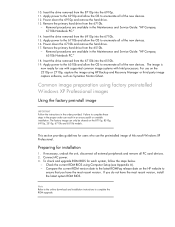
...image IMPORTANT Follow the instructions in the Maintenance and Service Guide: "HP Compaq 6510b Notebook PC." 18. This section provides guidelines for use on the 2510p or 2710p, capture the image using HP Backup and Recovery Manager or third party image capture software, such as...factory image can result in the Maintenance and Service Guide: "HP Compaq 6710b Notebook PC." 14. Connect AC power. 3. Removal procedures are available in the order provided. Insert the drive removed from the 6710b into the 6510b. 19. Removal procedures are available in an unsuccessful or unstable...
...image IMPORTANT Follow the instructions in the Maintenance and Service Guide: "HP Compaq 6510b Notebook PC." 18. This section provides guidelines for use on the 2510p or 2710p, capture the image using HP Backup and Recovery Manager or third party image capture software, such as...factory image can result in the Maintenance and Service Guide: "HP Compaq 6710b Notebook PC." 14. Connect AC power. 3. Removal procedures are available in the order provided. Insert the drive removed from the 6710b into the 6510b. 19. Removal procedures are available in an unsuccessful or unstable...

HP Compaq notebook common image
Page 8
...order provided. Removal procedures are available in the Maintenance and Service Guide: "HP Compaq 8510p Notebook PC." 3. For use on the 8510p. 2. Removal procedures are available in the Maintenance and Service Guide: "HP Compaq 6510b Notebook PC." 17. The image is now ready for use on multiple models ... in the Maintenance and Service Guide: "HP Compaq 6910p Notebook PC." 8. Insert the drive removed from the 8510p. - Power down the 6910p and remove the hard drive. 12. Remove the primary hard drive from the 8710p into the 6710b. 14. Insert the drive removed from the 6910p...
...order provided. Removal procedures are available in the Maintenance and Service Guide: "HP Compaq 8510p Notebook PC." 3. For use on the 8510p. 2. Removal procedures are available in the Maintenance and Service Guide: "HP Compaq 6510b Notebook PC." 17. The image is now ready for use on multiple models ... in the Maintenance and Service Guide: "HP Compaq 6910p Notebook PC." 8. Insert the drive removed from the 8510p. - Power down the 6910p and remove the hard drive. 12. Remove the primary hard drive from the 8710p into the 6710b. 14. Insert the drive removed from the 6910p...
HP Compaq notebook common image
Page 10
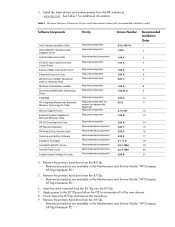
...on models with Bluetooth) Required component (on the 8510p. 2. Install the latest drivers and enhancements from the HP website at www.hp.com. Software installation Perform the following steps before manually installing Windows XP Professional: 1. Note Contact the Network...00 A 1.00.02 A 1.00 A 5.10 E 5.00 B 2.00 M 1.00 A 3.00 F 3.00 A 6.20 E 9.1.11 Q 2.5.3.1084 Recommended Installation Order 1 2 3 4 5 6 7 8 9 10 11 12 13 14 15 16 17 18 19 20 See Table 1 for complete installation instructions. 3. Table 2 Minimum Versions of Microsoft Windows Professional. Change the boot order in ROM...
...on models with Bluetooth) Required component (on the 8510p. 2. Install the latest drivers and enhancements from the HP website at www.hp.com. Software installation Perform the following steps before manually installing Windows XP Professional: 1. Note Contact the Network...00 A 1.00.02 A 1.00 A 5.10 E 5.00 B 2.00 M 1.00 A 3.00 F 3.00 A 6.20 E 9.1.11 Q 2.5.3.1084 Recommended Installation Order 1 2 3 4 5 6 7 8 9 10 11 12 13 14 15 16 17 18 19 20 See Table 1 for complete installation instructions. 3. Table 2 Minimum Versions of Microsoft Windows Professional. Change the boot order in ROM...
HP Compaq notebook common image
Page 11
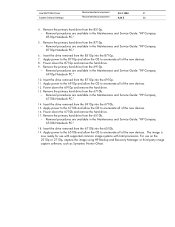
... procedures are available in the Maintenance and Service Guide: "HP Compaq 8510p Notebook PC." 5. Removal procedures are available in the Maintenance and Service Guide: "HP Compaq 8710p Notebook PC." 6. Apply power to the 6510b and allow the OS to enumerate all of the new devices... the 6510b. 19. Remove the primary hard drive from the 6510b. - Intel AMT MEI Driver System Default Settings Recommended component 2.5.3.1084 21 Recommended component 4.20 Z 22 4. Removal procedures are available in the Maintenance and Service Guide: "HP Compaq 6710b Notebook PC." 14. Apply...
... procedures are available in the Maintenance and Service Guide: "HP Compaq 8510p Notebook PC." 5. Removal procedures are available in the Maintenance and Service Guide: "HP Compaq 8710p Notebook PC." 6. Apply power to the 6510b and allow the OS to enumerate all of the new devices... the 6510b. 19. Remove the primary hard drive from the 6510b. - Intel AMT MEI Driver System Default Settings Recommended component 2.5.3.1084 21 Recommended component 4.20 Z 22 4. Removal procedures are available in the Maintenance and Service Guide: "HP Compaq 6710b Notebook PC." 14. Apply...
HP Business Notebook PC - Getting Started - Enhanced for Accessibility - Windows Vista
Page 50
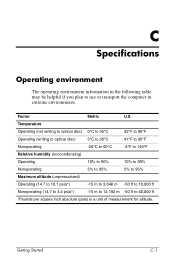
... humidity (noncondensing) Operating 10% to 90% 10% to 90% Nonoperating 5% to 95% 5% to 95% Maximum altitude (unpressurized) Operating (14.7 to 10.1 psia*) -15 m to 3,048 m -50 ft to 10,000 ft Nonoperating (14.7 to 4.4 psia*) -15 m to 12,192 m -50 ft to use or transport the computer in the following table may...
... humidity (noncondensing) Operating 10% to 90% 10% to 90% Nonoperating 5% to 95% 5% to 95% Maximum altitude (unpressurized) Operating (14.7 to 10.1 psia*) -15 m to 3,048 m -50 ft to 10,000 ft Nonoperating (14.7 to 4.4 psia*) -15 m to 12,192 m -50 ft to use or transport the computer in the following table may...
Drives - Windows Vista
Page 5
...Identifying installed drives 2 Handling drives 3 Improving hard drive performance Using Disk Defragmenter ...3 Using Disk Cleanup ...3 4 HP 3D DriveGuard (select models only) HP 3D DriveGuard status ...5 HP 3D DriveGuard software ...6 5 Replacing a hard drive 6 Using an optical drive Inserting an optical disc ...12 ...Removing an optical disc when running on battery or external power 13 Removing an optical disc when no computer power is available 14...
...Identifying installed drives 2 Handling drives 3 Improving hard drive performance Using Disk Defragmenter ...3 Using Disk Cleanup ...3 4 HP 3D DriveGuard (select models only) HP 3D DriveGuard status ...5 HP 3D DriveGuard software ...6 5 Replacing a hard drive 6 Using an optical drive Inserting an optical disc ...12 ...Removing an optical disc when running on battery or external power 13 Removing an optical disc when no computer power is available 14...

Drives - Windows Vista
Page 20
... tray and place the disc in the front bezel of the disc. Insert the end of a paper clip (1) into the release access in a protective case. 14 Chapter 6 Using an optical drive ENWW
... tray and place the disc in the front bezel of the disc. Insert the end of a paper clip (1) into the release access in a protective case. 14 Chapter 6 Using an optical drive ENWW
Drives - Windows Vista
Page 24
... drive, optical drive DVD inserting 12 removing, with power 13 removing, without power 14 DVD drive 10, 15 E external drive 15 H hard disk drive external 15 HP 3D DriveGuard 4 installing 8 replacing 7 hard drive external 15 HP 3D DriveGuard 4 installing 8 replacing 7 HP 3D DriveGuard 4 L light, drive 5 M maintenance Disk Cleanup 3 Disk Defragmenter 3 MultiBay 15, 17 O optical...
... drive, optical drive DVD inserting 12 removing, with power 13 removing, without power 14 DVD drive 10, 15 E external drive 15 H hard disk drive external 15 HP 3D DriveGuard 4 installing 8 replacing 7 hard drive external 15 HP 3D DriveGuard 4 installing 8 replacing 7 HP 3D DriveGuard 4 L light, drive 5 M maintenance Disk Cleanup 3 Disk Defragmenter 3 MultiBay 15, 17 O optical...

Drives - Windows XP
Page 20
...-ROM Drive ● DVD/CD-RW Combo Drive ● DVD+RW/R and CD-RW Combo Drive ● DVD±RW/R and CD-RW Combo Drive 14 Chapter 7 Using external drives ENWW 7 Using external drives Removable external drives enable you to a USB port on the computer or on an optional docking device...
...-ROM Drive ● DVD/CD-RW Combo Drive ● DVD+RW/R and CD-RW Combo Drive ● DVD±RW/R and CD-RW Combo Drive 14 Chapter 7 Using external drives ENWW 7 Using external drives Removable external drives enable you to a USB port on the computer or on an optional docking device...
Drives - Windows XP
Page 23
... light 5 drives caring for 2 diskette 14 external 14 hard 7, 8, 14 MultiBay 14, 16 optical 9, 14 See also hard drive, optical drive DVD inserting 11 removing, with power 12 removing, without power 13 DVD drive 9, 14 E external drive 14 H hard disk drive external 14 HP 3D DriveGuard 4 installing 8 replacing 7 hard drive external 14 HP 3D DriveGuard 4 installing 8 replacing 7 HP 3D DriveGuard 4 L light, drive...
... light 5 drives caring for 2 diskette 14 external 14 hard 7, 8, 14 MultiBay 14, 16 optical 9, 14 See also hard drive, optical drive DVD inserting 11 removing, with power 12 removing, without power 13 DVD drive 9, 14 E external drive 14 H hard disk drive external 14 HP 3D DriveGuard 4 installing 8 replacing 7 hard drive external 14 HP 3D DriveGuard 4 installing 8 replacing 7 HP 3D DriveGuard 4 L light, drive...
Memory Modules - Windows Vista
Page 10
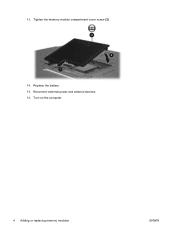
Tighten the memory module compartment cover screw (3). 14. Reconnect external power and external devices. 16. Turn on the computer. 4 Adding or replacing memory modules ENWW 13. Replace the battery. 15.
Tighten the memory module compartment cover screw (3). 14. Reconnect external power and external devices. 16. Turn on the computer. 4 Adding or replacing memory modules ENWW 13. Replace the battery. 15.


