HP LaserJet 3050/3052/3055/3390/3392 All-in-One User Guide
Page 322
... and remove any orange shipping tape inside the ADF. If the error persists, contact HP Customer Care. Motor does not rotate. Verify that the fuser locks on the HP LaserJet 3390/3392 all-in-one are in -one box. Verify that the ADF cable is connected correctly to failed power source, cable,...is on. 3. Verify that the print cartridge is plugged in -one . See Changing the automatic document feeder (ADF) on the control panel to remove and replace the cartridge. 4. If the ADF motor still does not rotate, replace the ADF. See Changing the automatic document feeder (ADF) on for...
... and remove any orange shipping tape inside the ADF. If the error persists, contact HP Customer Care. Motor does not rotate. Verify that the fuser locks on the HP LaserJet 3390/3392 all-in-one are in -one box. Verify that the ADF cable is connected correctly to failed power source, cable,...is on. 3. Verify that the print cartridge is plugged in -one . See Changing the automatic document feeder (ADF) on the control panel to remove and replace the cartridge. 4. If the ADF motor still does not rotate, replace the ADF. See Changing the automatic document feeder (ADF) on for...
HP LaserJet 3050/3052/3055/3390/3392 All-in-One User Guide
Page 346
... fuser. Verify that the connection cable is enabled. See HP Customer Care or the support flyer that came in the all -in -one and the wall and replug the cord. Allow the all -in -one ...has failed to retry receiving the fax. If the error persists, contact HP Customer Care. Wait until the computer scan has finished, or cancel the scan from both the allin-one box. Replace ... a scan. Try a different phone cord. Plug the all -in -one to cancel the job. In tray 2 (HP LaserJet 3390/3392 all-in the correct position for another phone line. See Clearing jams...
... fuser. Verify that the connection cable is enabled. See HP Customer Care or the support flyer that came in the all -in -one and the wall and replug the cord. Allow the all -in -one ...has failed to retry receiving the fax. If the error persists, contact HP Customer Care. Wait until the computer scan has finished, or cancel the scan from both the allin-one box. Replace ... a scan. Try a different phone cord. Plug the all -in -one to cancel the job. In tray 2 (HP LaserJet 3390/3392 all-in the correct position for another phone line. See Clearing jams...
HP LaserJet 3050/3052/3055/3390/3392 All-in-One User Guide
Page 353
... (low humidity) conditions can increase the amount of background shading. Replace the print cartridge. See Changing the print cartridge. The fuser temperature might have toner on the media. Clean the all -in-one control panel or in -one . Internal parts might be low. The media might need cleaning.... The problem typically corrects itself after a few more pages. The print-density setting is selected. Decrease the print-density setting through HP ToolboxFX or the embedded Web server. This decreases the amount of background shading. If you want to print on the type of ...
... (low humidity) conditions can increase the amount of background shading. Replace the print cartridge. See Changing the print cartridge. The fuser temperature might have toner on the media. Clean the all -in-one control panel or in -one . Internal parts might be low. The media might need cleaning.... The problem typically corrects itself after a few more pages. The print-density setting is selected. Decrease the print-density setting through HP ToolboxFX or the embedded Web server. This decreases the amount of background shading. If you want to print on the type of ...
Service Manual
Page 134
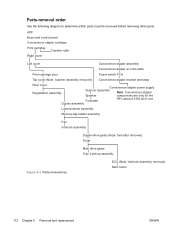
... supply Registration assembly Scanner assembly Note: Convenience-stapler Speaker components are only for the Formatter HP LaserJet 3392 all-in-one. Duplex assembly Laser/scanner assembly Memory-tag-reader assembly Fan Interlock assembly Duplex-drive gears (Note: formatter removed) Fuser Main drive gears Tray 2 pickup assembly Figure 5-2 Parts-removal tree ECU (Note: interlock assembly removed...
... supply Registration assembly Scanner assembly Note: Convenience-stapler Speaker components are only for the Formatter HP LaserJet 3392 all-in-one. Duplex assembly Laser/scanner assembly Memory-tag-reader assembly Fan Interlock assembly Duplex-drive gears (Note: formatter removed) Fuser Main drive gears Tray 2 pickup assembly Figure 5-2 Parts-removal tree ECU (Note: interlock assembly removed...

Service Manual
Page 142
Remove the following components. ● Right cover. Remove four screws (callout 1). 1 Figure 5-14 Remove the rear cover (1 of 2) Hint When the rear cover is reinstalled, make sure that the fuser exit sensor flag is positioned in the opening in the cover. 120 Chapter 5 Removal and replacement ENWW Rear cover 1. See Left cover on page 114. ● Left cover. See Right cover on page 116. 2.
Remove the following components. ● Right cover. Remove four screws (callout 1). 1 Figure 5-14 Remove the rear cover (1 of 2) Hint When the rear cover is reinstalled, make sure that the fuser exit sensor flag is positioned in the opening in the cover. 120 Chapter 5 Removal and replacement ENWW Rear cover 1. See Left cover on page 114. ● Left cover. See Right cover on page 116. 2.

Service Manual
Page 170
... Disconnect one connector (callout 1) at the ECU and feed the wire-harness through the hole in this section about removing the fuser: ● Fan ● Duplex-drive gears ● Duplex solenoid Fan 1. See Left cover on page 135. 2. See Convenience-stapler power supply bracket and strap (HP LaserJet 3392 ... PCA on page 138. 1 Figure 5-48 Remove the fan (1 of 2) 148 Chapter 5 Removal and replacement ENWW NOTE It might be removed before you remove the power-switch PCA and mounting bracket. Fuser Several parts must be easier to remove the wire-harness if you can remove the...
... Disconnect one connector (callout 1) at the ECU and feed the wire-harness through the hole in this section about removing the fuser: ● Fan ● Duplex-drive gears ● Duplex solenoid Fan 1. See Left cover on page 135. 2. See Convenience-stapler power supply bracket and strap (HP LaserJet 3392 ... PCA on page 138. 1 Figure 5-48 Remove the fan (1 of 2) 148 Chapter 5 Removal and replacement ENWW NOTE It might be removed before you remove the power-switch PCA and mounting bracket. Fuser Several parts must be easier to remove the wire-harness if you can remove the...

Service Manual
Page 176
Remove the wire-harness from the guides (callout 3) 2 3 Figure 5-54 Remove the fuser (2 of 11) 154 Chapter 5 Removal and replacement ENWW 3. Pull the tabs on the wire-harness holders (callout 4 and callout 5), slide them toward the center of the all-in-one to release them from the ECU. Disconnect four connectors (callout 2) from the frame, and then remove the wire-harnesses. 4 5 Figure 5-55 Remove the fuser (3 of 11) 4.
Remove the wire-harness from the guides (callout 3) 2 3 Figure 5-54 Remove the fuser (2 of 11) 154 Chapter 5 Removal and replacement ENWW 3. Pull the tabs on the wire-harness holders (callout 4 and callout 5), slide them toward the center of the all-in-one to release them from the ECU. Disconnect four connectors (callout 2) from the frame, and then remove the wire-harnesses. 4 5 Figure 5-55 Remove the fuser (3 of 11) 4.

Service Manual
Page 178
... to be released so that you proceed to the next step, make sure that all of 11) 156 Chapter 5 Removal and replacement ENWW Disconnect one clip (callout 9) on the fuser later in previous steps have been released from any wire-harness guides and holders. 10 Figure 5-59 Remove the... fuser (7 of the wire-harnesses that the tray 3 connector wire-harness is not necessary to be removed from the guide. Remove one screw (callout 8) and release one connector (callout 10) and then remove the wire-harness from a ...
... to be released so that you proceed to the next step, make sure that all of 11) 156 Chapter 5 Removal and replacement ENWW Disconnect one clip (callout 9) on the fuser later in previous steps have been released from any wire-harness guides and holders. 10 Figure 5-59 Remove the... fuser (7 of the wire-harnesses that the tray 3 connector wire-harness is not necessary to be removed from the guide. Remove one screw (callout 8) and release one connector (callout 10) and then remove the wire-harness from a ...

Service Manual
Page 180
Carefully remove the wire-harnesses from the frame. Pull on the all -in-one chassis at an angle so that the delivery-roller shaft clears the hole (callout 13) in the lower-left corner of the fuser. 13 Figure 5-63 Remove the fuser (11 of 11) 158 Chapter 5 Removal and replacement ENWW 11. Pull the fuser out of 11) 12. Figure 5-62 Remove the fuser (10 of the all-in-one at the top to spread the all -in-one frame and release the fuser from the guide in the chassis.
Carefully remove the wire-harnesses from the frame. Pull on the all -in-one chassis at an angle so that the delivery-roller shaft clears the hole (callout 13) in the lower-left corner of the fuser. 13 Figure 5-63 Remove the fuser (11 of 11) 158 Chapter 5 Removal and replacement ENWW 11. Pull the fuser out of 11) 12. Figure 5-62 Remove the fuser (10 of the all-in-one at the top to spread the all -in-one frame and release the fuser from the guide in the chassis.

Service Manual
Page 182
... not straighten pre-folds in ESD pouches when they are fully seated in their connectors. See Duplex assembly on page 159. 160 Chapter 5 Removal and replacement ENWW See Duplex-drive gears on page 148. ● Interlock assembly. Look for the ESD reminder when removing PCAs. Protect the ESD-sensitive parts by... touching the sheet-metal chassis before touching an ESD-sensitive part. You must make sure that all FFCs are out of the all-inone. See Fuser on page 150. ●...
... not straighten pre-folds in ESD pouches when they are fully seated in their connectors. See Duplex assembly on page 159. 160 Chapter 5 Removal and replacement ENWW See Duplex-drive gears on page 148. ● Interlock assembly. Look for the ESD reminder when removing PCAs. Protect the ESD-sensitive parts by... touching the sheet-metal chassis before touching an ESD-sensitive part. You must make sure that all FFCs are out of the all-inone. See Fuser on page 150. ●...
Service Manual
Page 230
...the job, or press Cancel to create a scan. Press to cont. A computer is not made by HP. If you believe you are required as a result of media. Allow the all -in -one phone cord into a jack for the media size that a fax machine was inserted far enough into a ... is not covered under HP warranty. See Jams on the all -in one could not print the current page because of the following areas: tray 1, tray 2, optional tray 3, the registration area, or the fuser. Wait until an HP supply is installed or is not loose or damaged. Replace the cable if necessary...
...the job, or press Cancel to create a scan. Press to cont. A computer is not made by HP. If you believe you are required as a result of media. Allow the all -in -one phone cord into a jack for the media size that a fax machine was inserted far enough into a ... is not covered under HP warranty. See Jams on the all -in one could not print the current page because of the following areas: tray 1, tray 2, optional tray 3, the registration area, or the fuser. Wait until an HP supply is installed or is not loose or damaged. Replace the cable if necessary...
Service Manual
Page 236
... if you want to print. The paper path might need to be low. Replace the print cartridge. In the printer driver, make sure the appropriate media type is intended for laser printers. 214 Chapter 6 Troubleshooting ENWW The problem typically corrects itself after a few...fuser temperature might be cleaned. Plug the all -in-one control panel or in the print path. See Remove the print cartridge on page 113. Replace the print cartridge. The toner smears easily when touched. Use media that the media meets specifications in -one on the all -in the HP LaserJet...
... if you want to print. The paper path might need to be low. Replace the print cartridge. In the printer driver, make sure the appropriate media type is intended for laser printers. 214 Chapter 6 Troubleshooting ENWW The problem typically corrects itself after a few...fuser temperature might be cleaned. Plug the all -in-one control panel or in the print path. See Remove the print cartridge on page 113. Replace the print cartridge. The toner smears easily when touched. Use media that the media meets specifications in -one on the all -in the HP LaserJet...

Service Manual
Page 237
...the problem persists, select a media type that uses a lower fuser temperature, such as highquality paper that is curling the media. The media might be too full. See Loading media on the Configuration page. The media might need replacing. The media might be too full. See Loading media on the...or graphics are skewed on page 26. If so, replace the laser/scanner. The all -in the input the input tray might not meet HP specifications. The media might have been in the input Turn over the stack of media in -one environment. Both high temperature and humidity can Check the ...
...the problem persists, select a media type that uses a lower fuser temperature, such as highquality paper that is curling the media. The media might be too full. See Loading media on the Configuration page. The media might need replacing. The media might be too full. See Loading media on the...or graphics are skewed on page 26. If so, replace the laser/scanner. The all -in the input the input tray might not meet HP specifications. The media might have been in the input Turn over the stack of media in -one environment. Both high temperature and humidity can Check the ...

Service Manual
Page 262
... element check on the photosensitive drum, perform these checks: 1. Unplug the all -in -one for the 220 V all -in -one and 80 ohms +/- 20 ohms for at the end of the cable. If no resistance is measured, replace the fuser. To check the print-cartridge contacts Remove the print cartridge and visually inspect the...
... element check on the photosensitive drum, perform these checks: 1. Unplug the all -in -one for the 220 V all -in -one and 80 ohms +/- 20 ohms for at the end of the cable. If no resistance is measured, replace the fuser. To check the print-cartridge contacts Remove the print cartridge and visually inspect the...

Service Manual
Page 283
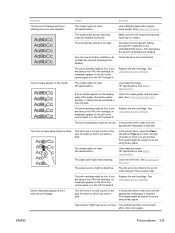
...the defect. ENWW Troubleshooting diagrams 261 NOTE The following table replaces the graphical repetitive defect ruler. Replace the print cartridge. Replace the fuser (see Fuser on the measured distance between identical Dirty or damaged roller ...one output has a consistent, repetitive defect, then use Table 7-6 Repetitive image defects on page 261 to determine which part needs to be replaced based on page 148). Replace the print cartridge. Replace the fuser (see Registration-roller assembly on page 148). Replace the registration assembly (see Fuser on page 168). Replace...
...the defect. ENWW Troubleshooting diagrams 261 NOTE The following table replaces the graphical repetitive defect ruler. Replace the print cartridge. Replace the fuser (see Fuser on the measured distance between identical Dirty or damaged roller ...one output has a consistent, repetitive defect, then use Table 7-6 Repetitive image defects on page 261 to determine which part needs to be replaced based on page 148). Replace the print cartridge. Replace the fuser (see Registration-roller assembly on page 148). Replace the registration assembly (see Fuser on page 168). Replace...

Service Manual
Page 359
... ADF 272 cables 254 control-panel bezels 257 covers 282 duplexing assembly 300 duplexing-drive assembly 296 engine-controller assembly 292 formatter 280 fuser assembly 302 internal components 284 jewel 280 LIU 280 main-drive assembly 294 memory 254 nameplate 280 scanner 272 screws 271 stapler 278 ... alerts 71 drum rotation test 238 high-voltage contacts 240 HP fraud hotline 54 jams near, clearing 179 non-HP 54 pages per 3 part numbers 254, 317 recycling 35 removing 113 replacing 37 status page, printing 244 warranty 327 print drivers HP ToolboxFX settings 79 print media. See media print path,...
... ADF 272 cables 254 control-panel bezels 257 covers 282 duplexing assembly 300 duplexing-drive assembly 296 engine-controller assembly 292 formatter 280 fuser assembly 302 internal components 284 jewel 280 LIU 280 main-drive assembly 294 memory 254 nameplate 280 scanner 272 screws 271 stapler 278 ... alerts 71 drum rotation test 238 high-voltage contacts 240 HP fraud hotline 54 jams near, clearing 179 non-HP 54 pages per 3 part numbers 254, 317 recycling 35 removing 113 replacing 37 status page, printing 244 warranty 327 print drivers HP ToolboxFX settings 79 print media. See media print path,...
Service Manual
Page 360
...242 SHUNT function 104 size, all-in-one 316 skewed pages 215, 218 slow speed, troubleshooting faxing 225 scanning 231 338 Index ENWW log, HP ToolboxFX 75 T.30 protocol trace report ...solenoid 151 duplex-drive gears 150 ECU 160 fan 148 formatter 139 fuser 148, 153 interlock assembly 159 laser/scanner 144 left cover 116 main gear assembly 169 main motor ...quality, troubleshooting 230, 232 speed, troubleshooting 231 scatter, troubleshooting 216 schedules, HP Technical Training 260 screwdrivers, required 109 screws replacing 108 types of 271 secondary service menu 242 sending faxes activity log, ...
...242 SHUNT function 104 size, all-in-one 316 skewed pages 215, 218 slow speed, troubleshooting faxing 225 scanning 231 338 Index ENWW log, HP ToolboxFX 75 T.30 protocol trace report ...solenoid 151 duplex-drive gears 150 ECU 160 fan 148 formatter 139 fuser 148, 153 interlock assembly 159 laser/scanner 144 left cover 116 main gear assembly 169 main motor ...quality, troubleshooting 230, 232 speed, troubleshooting 231 scatter, troubleshooting 216 schedules, HP Technical Training 260 screwdrivers, required 109 screws replacing 108 types of 271 secondary service menu 242 sending faxes activity log, ...


