Start Here
Page 5
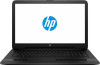
Select Drivers & Downloads, and then follow the on-screen instructions. 1 1 Introducing Windows 10 This guide describes new Windows® 10 features, which may update some of the information provided with your computer hardware and software, see the User Guide. These new features include the following: ● Enhanced Start menu ● Shut down from the Start menu ● Improved search options ● Enhanced backup and recovery information For details about your computer. Go to http://www.hp.com/ support, and select your country.
Select Drivers & Downloads, and then follow the on-screen instructions. 1 1 Introducing Windows 10 This guide describes new Windows® 10 features, which may update some of the information provided with your computer hardware and software, see the User Guide. These new features include the following: ● Enhanced Start menu ● Shut down from the Start menu ● Improved search options ● Enhanced backup and recovery information For details about your computer. Go to http://www.hp.com/ support, and select your country.
Start Here
Page 7
... replaced. See the Worldwide Telephone Numbers booklet included with a detachable keyboard, connect the keyboard to reinstall the original operating system in cases where the hard drive is disabled by default. From the Start menu, select File Explorer, and then select This PC. ● If your computer model. ● Use HP Recovery Manager to create system restore points and create backups of the Recovery partition and the Windows partition. This step creates a backup of the HP Recovery partition on page 4. ● Use Windows...
... replaced. See the Worldwide Telephone Numbers booklet included with a detachable keyboard, connect the keyboard to reinstall the original operating system in cases where the hard drive is disabled by default. From the Start menu, select File Explorer, and then select This PC. ● If your computer model. ● Use HP Recovery Manager to create system restore points and create backups of the Recovery partition and the Windows partition. This step creates a backup of the HP Recovery partition on page 4. ● Use Windows...
Start Here
Page 8
.... HP Recovery media can also be used to perform system recovery if the hard drive becomes corrupted. If you use an external optical drive, it must have finished creating all of the recovery DVDs. System recovery reinstalls the original operating system and software programs that were installed at the factory and then configures the settings for the media that the computer is disabled by default. Handle these steps. 1. The next time you start HP Recovery Manager, you...
.... HP Recovery media can also be used to perform system recovery if the hard drive becomes corrupted. If you use an external optical drive, it must have finished creating all of the recovery DVDs. System recovery reinstalls the original operating system and software programs that were installed at the factory and then configures the settings for the media that the computer is disabled by default. Handle these steps. 1. The next time you start HP Recovery Manager, you...
Start Here
Page 9
... the on-screen instructions. ● If you want to remove the recovery partition to reclaim hard drive space, HP Recovery Manager offers the Remove Recovery Partition option. Choose the method that was installed at the factory. If you have not already created recovery media, see Creating HP Recovery media (select products only) on page 3. ● To use the Factory Reset option of HP Recovery media or if the HP Recovery media does not work, you obtained from HP, or by using HP Recovery Manager on page 5. Restore and recovery There are...
... the on-screen instructions. ● If you want to remove the recovery partition to reclaim hard drive space, HP Recovery Manager offers the Remove Recovery Partition option. Choose the method that was installed at the factory. If you have not already created recovery media, see Creating HP Recovery media (select products only) on page 3. ● To use the Factory Reset option of HP Recovery media or if the HP Recovery media does not work, you obtained from HP, or by using HP Recovery Manager on page 5. Restore and recovery There are...
Start Here
Page 10
Using HP Recovery media, you can be used if your computer display when you press the power button. Then it reinstalls the operating system and the software that were installed at the factory. To start the recovery process. ● System Recovery-Reinstalls the original operating system, and then configures the settings for recovery discs or a recovery USB flash drive. Select Recovery Manager, and then follow the on -screen instructions. This method can choose from the HP Recovery partition: IMPORTANT: For a tablet with...
Using HP Recovery media, you can be used if your computer display when you press the power button. Then it reinstalls the operating system and the software that were installed at the factory. To start the recovery process. ● System Recovery-Reinstalls the original operating system, and then configures the settings for recovery discs or a recovery USB flash drive. Select Recovery Manager, and then follow the on -screen instructions. This method can choose from the HP Recovery partition: IMPORTANT: For a tablet with...
Start Here
Page 11
... computer boot order, which you want to remove the HP Recovery partition: 1. Access BIOS: For computers or tablets with a detachable keyboard, connect the keyboard to perform System Recovery or create HP recovery media from which is only available on products that support this function. Removing the HP Recovery partition (select products only) HP Recovery Manager software allows you to remove the HP Recovery partition to an optical drive or a USB flash drive. Follow these steps. 1. For tablets without keyboards: ▲ Turn on page 3. see Creating HP Recovery media...
... computer boot order, which you want to remove the HP Recovery partition: 1. Access BIOS: For computers or tablets with a detachable keyboard, connect the keyboard to perform System Recovery or create HP recovery media from which is only available on products that support this function. Removing the HP Recovery partition (select products only) HP Recovery Manager software allows you to remove the HP Recovery partition to an optical drive or a USB flash drive. Follow these steps. 1. For tablets without keyboards: ▲ Turn on page 3. see Creating HP Recovery media...
17-x099 Models: 17-x100 - 17-x199 - Maintenance and Service Guide
Page 6
... Service Provider parts 37 Component replacement procedures ...37 Display subcomponents (bezel, webcam, panel 37 Bottom cover ...41 Hard drive ...43 WLAN module ...46 RTC battery ...48 Memory module ...49 Solid-state drive ...51 Solid-state drive holder and board 52 Optical drive connector ...54 TouchPad click board ...55 USB board ...56 Speakers ...57 Fan/heat sink assembly ...58 System board ...66 Display assembly ...69 Power button board ...78 Power connector ...79 Cable locations ...80 Top cover/keyboard ...81 7 Using Setup Utility (BIOS) in Windows 10 ...83 Starting Setup Utility (BIOS...
... Service Provider parts 37 Component replacement procedures ...37 Display subcomponents (bezel, webcam, panel 37 Bottom cover ...41 Hard drive ...43 WLAN module ...46 RTC battery ...48 Memory module ...49 Solid-state drive ...51 Solid-state drive holder and board 52 Optical drive connector ...54 TouchPad click board ...55 USB board ...56 Speakers ...57 Fan/heat sink assembly ...58 System board ...66 Display assembly ...69 Power button board ...78 Power connector ...79 Cable locations ...80 Top cover/keyboard ...81 7 Using Setup Utility (BIOS) in Windows 10 ...83 Starting Setup Utility (BIOS...
17-x099 Models: 17-x100 - 17-x199 - Maintenance and Service Guide
Page 18
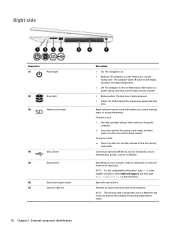
... computer is off power to store, manage, share, or access information. To remove a card: ▲ Press in the search box. To insert a card: 1. Hold the card label-side up, with connectors facing the computer. 2. The computer shuts off or in the Sleep state, a powersaving state. Opens the optical drive. Right side Component (1) Power light (2) Drive light (3) Memory card reader (4) USB 2.0 port (5) Optical drive (6) Optical drive eject button (7) Security cable slot 10 Chapter 2 External component identification...
... computer is off power to store, manage, share, or access information. To remove a card: ▲ Press in the search box. To insert a card: 1. Hold the card label-side up, with connectors facing the computer. 2. The computer shuts off or in the Sleep state, a powersaving state. Opens the optical drive. Right side Component (1) Power light (2) Drive light (3) Memory card reader (4) USB 2.0 port (5) Optical drive (6) Optical drive eject button (7) Security cable slot 10 Chapter 2 External component identification...
17-x099 Models: 17-x100 - 17-x199 - Maintenance and Service Guide
Page 19
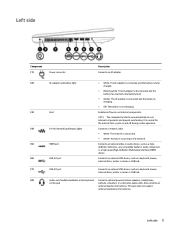
...fan to cool internal components and prevent overheating. Left side 11 This jack does not support optional standalone microphones. Also connects an optional headset microphone. NOTE: The computer fan starts up automatically to cycle on the network. (5) HDMI port Connects an optional video or audio device, such as a highdefinition television, any compatible digital or audio component, or a high-speed High-Definition Multimedia Interface (HDMI) device. (6) USB 3.0 port Connects an optional USB device, such as a keyboard, mouse, external drive, printer, scanner or USB hub. (7) USB...
...fan to cool internal components and prevent overheating. Left side 11 This jack does not support optional standalone microphones. Also connects an optional headset microphone. NOTE: The computer fan starts up automatically to cycle on the network. (5) HDMI port Connects an optional video or audio device, such as a highdefinition television, any compatible digital or audio component, or a high-speed High-Definition Multimedia Interface (HDMI) device. (6) USB 3.0 port Connects an optional USB device, such as a keyboard, mouse, external drive, printer, scanner or USB hub. (7) USB...
17-x099 Models: 17-x100 - 17-x199 - Maintenance and Service Guide
Page 24
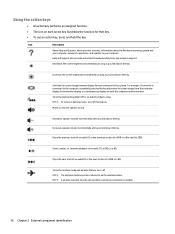
... Support also provides automated troubleshooting tools and access to your computer. For example, if a monitor is connected to a simultaneous display on both the computer and the monitor. Decreases speaker volume incrementally while you hold down the key. NOTE: A wireless network must be set up before a wireless connection is also referred to the system. Turns the keyboard backlight off . Mutes or restores speaker sound. Using the action keys ● An action key...
... Support also provides automated troubleshooting tools and access to your computer. For example, if a monitor is connected to a simultaneous display on both the computer and the monitor. Decreases speaker volume incrementally while you hold down the key. NOTE: A wireless network must be set up before a wireless connection is also referred to the system. Turns the keyboard backlight off . Mutes or restores speaker sound. Using the action keys ● An action key...
17-x099 Models: 17-x100 - 17-x199 - Maintenance and Service Guide
Page 26
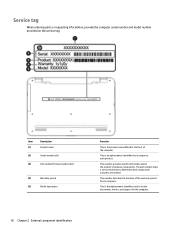
... model number provided on the service tag. This number provides specific information about the product's hardware components. This is an alphanumeric identifier that is unique to determine what components and parts are needed. This is the product name affixed to locate documents, drivers, and support for the computer. Item (1) (2) (3) Description Product name Serial number (s/n) Part number/Product number (p/n) (4) Warranty period (5) Model description Function This is the alphanumeric identifier used...
... model number provided on the service tag. This number provides specific information about the product's hardware components. This is an alphanumeric identifier that is unique to determine what components and parts are needed. This is the product name affixed to locate documents, drivers, and support for the computer. Item (1) (2) (3) Description Product name Serial number (s/n) Part number/Product number (p/n) (4) Warranty period (5) Model description Function This is the alphanumeric identifier used...
17-x099 Models: 17-x100 - 17-x199 - Maintenance and Service Guide
Page 41
..., including model, serial number, product key, and length of each screw size and location during removal and replacement. NOTE: HP continually improves and changes product parts. This chapter provides removal and replacement procedures for Customer Self-Repair parts. Installing a part not supported by the Customer Self-Repair program may void your computer. Component replacement procedures 33 5 Removal and replacement procedures for Customer Self-Repair parts CAUTION: The Customer Self-Repair program is supported in all locations.
..., including model, serial number, product key, and length of each screw size and location during removal and replacement. NOTE: HP continually improves and changes product parts. This chapter provides removal and replacement procedures for Customer Self-Repair parts. Installing a part not supported by the Customer Self-Repair program may void your computer. Component replacement procedures 33 5 Removal and replacement procedures for Customer Self-Repair parts CAUTION: The Customer Self-Repair program is supported in all locations.
17-x099 Models: 17-x100 - 17-x199 - Maintenance and Service Guide
Page 45
... warranty. To remove the remaining display subcomponents, you remove the entire display assembly from the computer. See Display assembly on -screen instructions. Component replacement procedures NOTE: Details about removing the display assembly in this chapter should only be removed, replaced, or loosened when servicing Authorized Service Provider only parts. Accessing these parts can remove the display bezel, webcam/microphone module, and display panel while the display assembly is still attached to http://partsurfer.hp.com, select...
... warranty. To remove the remaining display subcomponents, you remove the entire display assembly from the computer. See Display assembly on -screen instructions. Component replacement procedures NOTE: Details about removing the display assembly in this chapter should only be removed, replaced, or loosened when servicing Authorized Service Provider only parts. Accessing these parts can remove the display bezel, webcam/microphone module, and display panel while the display assembly is still attached to http://partsurfer.hp.com, select...
17-x099 Models: 17-x100 - 17-x199 - Maintenance and Service Guide
Page 92
... on-screen instructions. Make a note of the path to your hard drive. Type file in Windows 10 NOTE: If your computer is connected to install the update. Identify the most recent BIOS update and compare it has been downloaded to the location on your hard drive where the BIOS update is downloaded. During the download and installation, follow these steps: a. Follow the on the screen after it to reliable external power using the AC adapter. Using the hard drive...
... on-screen instructions. Make a note of the path to your hard drive. Type file in Windows 10 NOTE: If your computer is connected to install the update. Identify the most recent BIOS update and compare it has been downloaded to the location on your hard drive where the BIOS update is downloaded. During the download and installation, follow these steps: a. Follow the on the screen after it to reliable external power using the AC adapter. Using the hard drive...

17-x099 Models: 17-x100 - 17-x199 - Maintenance and Service Guide
Page 95
... on-screen instructions. ● If you want to reclaim hard drive space, HP Recovery Manager offers the Remove Recovery Partition option. If you have not already created recovery media, see Creating HP Recovery media (select products only) on page 85. ● To use the Factory Reset option of HP Recovery media. If you have replaced the hard drive, you get started app. ● If you need to original factory content, you can obtain recovery media for your system from support. You can use the Factory Reset option (select...
... on-screen instructions. ● If you want to reclaim hard drive space, HP Recovery Manager offers the Remove Recovery Partition option. If you have not already created recovery media, see Creating HP Recovery media (select products only) on page 85. ● To use the Factory Reset option of HP Recovery media. If you have replaced the hard drive, you get started app. ● If you need to original factory content, you can obtain recovery media for your system from support. You can use the Factory Reset option (select...
17-x099 Models: 17-x100 - 17-x199 - Maintenance and Service Guide
Page 97
...: The Remove Recovery Partition option is the order of devices listed in BIOS where the computer looks for boot options. Follow the on products that support this function. For tablets without keyboards: ▲ Turn on or restart the tablet, and then quickly hold down the volume down the Windows button; Restore and recovery 89 then select f9. 3. Access BIOS: For computers or tablets with a detachable keyboard, connect the keyboard to the keyboard dock before you remove the Recovery partition, create HP Recovery media...
...: The Remove Recovery Partition option is the order of devices listed in BIOS where the computer looks for boot options. Follow the on products that support this function. For tablets without keyboards: ▲ Turn on or restart the tablet, and then quickly hold down the volume down the Windows button; Restore and recovery 89 then select f9. 3. Access BIOS: For computers or tablets with a detachable keyboard, connect the keyboard to the keyboard dock before you remove the Recovery partition, create HP Recovery media...
17-x099 Models: 17-x100 - 17-x199 - Maintenance and Service Guide
Page 102
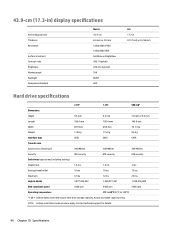
... apply. Actual accessible capacity is less. 43.9-cm (17.3-in) display specifications Active diagonal size Thickness Resolution Surface treatment Contrast ratio Brightness Viewing angle Backlight Companion standard Metric 43.9-cm 6.0 mm or 4.0 mm 1920x1080 (FHD) 1920x1080 (HD) AntiGlare or BrightView 300:1 (typical) 220 nits (typical) SVA WLED eDP U.S. 17.3-in 0.157 inch or 0.236 inch Hard drive specifications 2-TB* 1-TB...
... apply. Actual accessible capacity is less. 43.9-cm (17.3-in) display specifications Active diagonal size Thickness Resolution Surface treatment Contrast ratio Brightness Viewing angle Backlight Companion standard Metric 43.9-cm 6.0 mm or 4.0 mm 1920x1080 (FHD) 1920x1080 (HD) AntiGlare or BrightView 300:1 (typical) 220 nits (typical) SVA WLED eDP U.S. 17.3-in 0.157 inch or 0.236 inch Hard drive specifications 2-TB* 1-TB...
17-x099 Models: 17-x100 - 17-x199 - Maintenance and Service Guide
Page 111
...headphone)/audio-in (microphone) jack, identifying 11 B backups 85 battery illustrated 23 removing 34 battery cover, identifying 17 battery lock, identifying 17 battery release latch 17 BIOS determining version 83 downloading an update 84 starting the Setup Utility 83 updating 83 boot order changing 89 bottom cover illustrated 23 removing 41 buttons left TouchPad 12 optical drive eject 10 power 14 right TouchPad 12 C cable locations removing 80 cables illustrated 28 cables, service considerations 29 caps lock light, identifying 13 chipset, product description 1, 5 components bottom 17 display...
...headphone)/audio-in (microphone) jack, identifying 11 B backups 85 battery illustrated 23 removing 34 battery cover, identifying 17 battery lock, identifying 17 battery release latch 17 BIOS determining version 83 downloading an update 84 starting the Setup Utility 83 updating 83 boot order changing 89 bottom cover illustrated 23 removing 41 buttons left TouchPad 12 optical drive eject 10 power 14 right TouchPad 12 C cable locations removing 80 cables illustrated 28 cables, service considerations 29 caps lock light, identifying 13 chipset, product description 1, 5 components bottom 17 display...
17-x099 Models: 17-x100 - 17-x199 - Maintenance and Service Guide
Page 112
... 3, 7 external media cards 4, 7 graphics 1, 5 hard drive 2, 6 keyboard 4, 8 memory module 2, 6 microphone 3, 7 operating system 5, 8 optical drive 3, 7 pointing device 4, 8 ports 4, 7 power requirements 4, 8 processor 1, 5 product name 1, 5 security 4, 8 serviceability 5, 8 video 3, 7 wireless 3, 7 product name 1, 5 R recover options 87 recovery discs 86, 88 HP Recovery Manager 87 media 88 starting 88 supported discs 86 system 87 USB flash drive 88 using HP Recovery media 86 recovery media creating 85 creating using HP Recovery Manager 86 recovery partition removing 89 removal/replacement...
... 3, 7 external media cards 4, 7 graphics 1, 5 hard drive 2, 6 keyboard 4, 8 memory module 2, 6 microphone 3, 7 operating system 5, 8 optical drive 3, 7 pointing device 4, 8 ports 4, 7 power requirements 4, 8 processor 1, 5 product name 1, 5 security 4, 8 serviceability 5, 8 video 3, 7 wireless 3, 7 product name 1, 5 R recover options 87 recovery discs 86, 88 HP Recovery Manager 87 media 88 starting 88 supported discs 86 system 87 USB flash drive 88 using HP Recovery media 86 recovery media creating 85 creating using HP Recovery Manager 86 recovery partition removing 89 removal/replacement...
17-x099 Models: 17-x100 - 17-x199 - Maintenance and Service Guide
Page 113
... 70 TouchPad buttons 12 TouchPad board illustrated 21 TouchPad click board removing 55 spare part number 55 TouchPad zone, identifying 12 transporting guidelines 31 U USB 2.0 port, identifying 10, 11 USB 3.0 port, identifying 11 USB board removing 56 spare part number 21 V vents, identifying 11 video, product description 3, 7 W webcam identifying 9 illustrated 25 webcam cable removing 77 webcam light, identifying 9 webcam/microphone cable removing 39, 73 webcam/microphone module removing 38, 72 Windows system restore point 85, 86 Windows key, identifying 15 Windows tools using 86 wireless...
... 70 TouchPad buttons 12 TouchPad board illustrated 21 TouchPad click board removing 55 spare part number 55 TouchPad zone, identifying 12 transporting guidelines 31 U USB 2.0 port, identifying 10, 11 USB 3.0 port, identifying 11 USB board removing 56 spare part number 21 V vents, identifying 11 video, product description 3, 7 W webcam identifying 9 illustrated 25 webcam cable removing 77 webcam light, identifying 9 webcam/microphone cable removing 39, 73 webcam/microphone module removing 38, 72 Windows system restore point 85, 86 Windows key, identifying 15 Windows tools using 86 wireless...


