HP Mini User Guide - Windows XP
Page 7
...Internet 40 Audio ...41 Connecting external audio devices 41 Checking your audio functions 41 Video ...43 Connecting an external monitor or projector 43 Webcam ...44 6 Security Protecting the computer ...45 Using passwords ...45 Passwords set in Windows 46 Passwords set in Setup Utility 46 Administrator password 47 Managing an administrator password 47 Entering an administrator password 47 Power-on password 47 Managing a power-on password 48 Entering a power-on password 48 Using antivirus software ...49 Using firewall software ...50 Installing critical updates ...51 7 Digital cards...
...Internet 40 Audio ...41 Connecting external audio devices 41 Checking your audio functions 41 Video ...43 Connecting an external monitor or projector 43 Webcam ...44 6 Security Protecting the computer ...45 Using passwords ...45 Passwords set in Windows 46 Passwords set in Setup Utility 46 Administrator password 47 Managing an administrator password 47 Entering an administrator password 47 Power-on password 47 Managing a power-on password 48 Entering a power-on password 48 Using antivirus software ...49 Using firewall software ...50 Installing critical updates ...51 7 Digital cards...
HP Mini User Guide - Windows XP
Page 8
...62 11 Memory modules 12 Updating software Updating the BIOS ...68 Determining the BIOS version 68 Downloading a BIOS update 68 Updating programs and drivers ...70 13 Changing Instant Web Settings Disabling and Enabling Instant Web 71 14 Setup Utility Starting Setup Utility ...72 Using Setup Utility ...72 Changing the language of Setup Utility 72 Navigating and selecting in Setup Utility 72 Displaying system information 73 Restoring default settings in Setup Utility 73 Exiting Setup Utility ...73 Setup Utility menus ...74 Main menu ...74 Security menu ...74 System Configuration menu 74...
...62 11 Memory modules 12 Updating software Updating the BIOS ...68 Determining the BIOS version 68 Downloading a BIOS update 68 Updating programs and drivers ...70 13 Changing Instant Web Settings Disabling and Enabling Instant Web 71 14 Setup Utility Starting Setup Utility ...72 Using Setup Utility ...72 Changing the language of Setup Utility 72 Navigating and selecting in Setup Utility 72 Displaying system information 73 Restoring default settings in Setup Utility 73 Exiting Setup Utility ...73 Setup Utility menus ...74 Main menu ...74 Security menu ...74 System Configuration menu 74...
HP Mini User Guide - Windows XP
Page 19
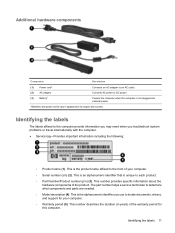
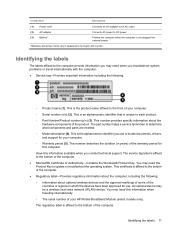
... the labels The labels affixed to determine what components and parts are needed. ◦ Model description (4). Additional hardware components Component Description (1) Power cord* Connects an AC adapter to an AC outlet. (2) AC adapter Converts AC power to DC power. (3) Battery* Powers the computer when the computer is not plugged into external power. *Batteries and power cords vary in years) of the warranty period for your computer. ◦ Serial number (s/n) (2).
... the labels The labels affixed to determine what components and parts are needed. ◦ Model description (4). Additional hardware components Component Description (1) Power cord* Connects an AC adapter to an AC outlet. (2) AC adapter Converts AC power to DC power. (3) Battery* Powers the computer when the computer is not plugged into external power. *Batteries and power cords vary in years) of the warranty period for your computer. ◦ Serial number (s/n) (2).
HP Mini User Guide - Windows XP
Page 25
... on external AC power supplied through Windows before removing the battery. To increase display brightness, use only the battery provided with the computer, a replacement battery provided by HP, or a compatible battery purchased from HP. To reduce potential safety issues, use the fn+f4 hotkey or reconnect the AC adapter. Computer battery life varies, depending on power management settings, programs running time remaining on a flat surface. Select Start > Control Panel > Performance and Maintenance > Power Options > Power Meter...
... on external AC power supplied through Windows before removing the battery. To increase display brightness, use only the battery provided with the computer, a replacement battery provided by HP, or a compatible battery purchased from HP. To reduce potential safety issues, use the fn+f4 hotkey or reconnect the AC adapter. Computer battery life varies, depending on power management settings, programs running time remaining on a flat surface. Select Start > Control Panel > Performance and Maintenance > Power Options > Power Meter...
HP Mini User Guide - Windows XP
Page 39
... other devices are available in many varieties, both software and hardware. Select your network is displayed. Type the code, and then click Connect to the WLAN, follow these steps: 1. Alternatively, you will not be able to use a combination of sophisticated encryption protocols is a security code. By closing the network. Connecting to a WLAN To connect to complete the connection. If the wireless light is not broadcast, you can set...
... other devices are available in many varieties, both software and hardware. Select your network is displayed. Type the code, and then click Connect to the WLAN, follow these steps: 1. Alternatively, you will not be able to use a combination of sophisticated encryption protocols is a security code. By closing the network. Connecting to a WLAN To connect to complete the connection. If the wireless light is not broadcast, you can set...

HP Mini User Guide - Windows XP
Page 53
... to record each password you send your computer for service, remove all password settings. Because most passwords are not displayed as they are designed to your information. CAUTION: To prevent being mishandled or stolen. Several types of risks. Passwords can be set , changed, or deleted, it in the non-Windows Setup Utility preinstalled on password ● Firewall software ● Windows updates Unauthorized access to Setup Utility, BIOS settings, and other Administrator password system identification...
... to record each password you send your computer for service, remove all password settings. Because most passwords are not displayed as they are designed to your information. CAUTION: To prevent being mishandled or stolen. Several types of risks. Passwords can be set , changed, or deleted, it in the non-Windows Setup Utility preinstalled on password ● Firewall software ● Windows updates Unauthorized access to Setup Utility, BIOS settings, and other Administrator password system identification...
HP Mini User Guide - Windows XP
Page 59
... critical updates from the Microsoft Web site and through the updates link in Help and Support. Use the update link at Start > All Programs > Windows Update. ● Run Windows Update at regular intervals, such as once a month. ● Obtain updates to the operating system and other Microsoft programs, as they are installed on the computer, observe these guidelines: ● Run Windows Update as soon as you set up...
... critical updates from the Microsoft Web site and through the updates link in Help and Support. Use the update link at Start > All Programs > Windows Update. ● Run Windows Update at regular intervals, such as once a month. ● Obtain updates to the operating system and other Microsoft programs, as they are installed on the computer, observe these guidelines: ● Run Windows Update as soon as you set up...
HP Mini User Guide - Windows XP
Page 66
... following video transmission types, with examples of information loss, save your information by the fn+f2 hotkey: ● LCD (device display) ● External VGA (most external monitors) Decreasing screen brightness Press fn+f3 to the external monitor port on both the computer and the monitor. Initiating QuickLock Press fn+f6 to Help and Support. 58 Chapter 9 Pointing devices and keyboard For instructions, refer to initiate the QuickLock security feature. The factory setting for critical battery...
... following video transmission types, with examples of information loss, save your information by the fn+f2 hotkey: ● LCD (device display) ● External VGA (most external monitors) Decreasing screen brightness Press fn+f3 to the external monitor port on both the computer and the monitor. Initiating QuickLock Press fn+f6 to Help and Support. 58 Chapter 9 Pointing devices and keyboard For instructions, refer to initiate the QuickLock security feature. The factory setting for critical battery...
HP Mini User Guide - Windows XP
Page 81
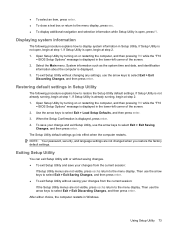
... step 2. 1. Use the arrow keys to restore the Setup Utility default settings. Then use the arrow keys to select Exit > Exit Discarding Changes, and then press enter. If Setup Utility is displayed in the lower-left corner of the screen. 2. Open Setup Utility by turning on or restarting the computer, and then pressing f10 while the "F10 = BIOS Setup Options" message is not open, begin at step 2. 1. Select the Main menu. Restoring default settings in the...
... step 2. 1. Use the arrow keys to restore the Setup Utility default settings. Then use the arrow keys to select Exit > Exit Discarding Changes, and then press enter. If Setup Utility is displayed in the lower-left corner of the screen. 2. Open Setup Utility by turning on or restarting the computer, and then pressing f10 while the "F10 = BIOS Setup Options" message is not open, begin at step 2. 1. Select the Main menu. Restoring default settings in the...

HP Mini User Guide - Windows XP
Page 84
...critical battery level 20 D Diagnostics menu 75 digital card inserting 52 removing 53 stopping 53 Digital Media Slot, identifying 7 diskette drive 61 display image, switching 58 screen brightness hotkeys 58 display switch, identifying 9 displaying system information 73 drive light, identifying 6 drive media 13 drives diskette 61 external 61 hard 61 optical 61 drives, boot order 74 DVD drive 61 E earbuds 8, 38 encryption 31 entering a power-on password 48 entering an administrator password 47 exiting Setup Utility 73 external audio devices, connecting 41 external drive 61 external monitor port...
...critical battery level 20 D Diagnostics menu 75 digital card inserting 52 removing 53 stopping 53 Digital Media Slot, identifying 7 diskette drive 61 display image, switching 58 screen brightness hotkeys 58 display switch, identifying 9 displaying system information 73 drive light, identifying 6 drive media 13 drives diskette 61 external 61 hard 61 optical 61 drives, boot order 74 DVD drive 61 E earbuds 8, 38 encryption 31 entering a power-on password 48 entering an administrator password 47 exiting Setup Utility 73 external audio devices, connecting 41 external drive 61 external monitor port...
HP Mini User Guide - Windows XP
Page 85
... sound 59 switching screen image 58 using 57 HP Mobile Broadband Module 33 HP Mobile Broadband, disabled 33 hubs 54 I icons network status 27 wireless 27 Instant Web 1 Instant-On Software (IOS) 1 internal display switch, identifying 9 internal microphone, identifying 9, 38 Internet connection setup 30 J jacks audio-in (microphone) 8, 38 audio-out (headphone) 8, 38 RJ-45 (network) 7 K keyboard hotkeys, identifying 56 keys fn 5 function 5 Windows applications 5 Windows logo 5 L labels Microsoft Certificate of Authenticity 12 regulatory 12 service tag 11 language support 74 latches, battery...
... sound 59 switching screen image 58 using 57 HP Mobile Broadband Module 33 HP Mobile Broadband, disabled 33 hubs 54 I icons network status 27 wireless 27 Instant Web 1 Instant-On Software (IOS) 1 internal display switch, identifying 9 internal microphone, identifying 9, 38 Internet connection setup 30 J jacks audio-in (microphone) 8, 38 audio-out (headphone) 8, 38 RJ-45 (network) 7 K keyboard hotkeys, identifying 56 keys fn 5 function 5 Windows applications 5 Windows logo 5 L labels Microsoft Certificate of Authenticity 12 regulatory 12 service tag 11 language support 74 latches, battery...
HP Mini User Guide - Windows XP
Page 86
... HP Mobile Broadband Module serial number 12 regulatory label 12 wireless 12 release latches battery 9, 18 restoring default settings 73 right TouchPad button, identifying 4 RJ-45 (network) jack, identifying 7 S screen brightness hotkeys 58 screen image, switching 58 security cable slot, identifying 7 Security menu 74 security, cable slot 7 security, wireless 30 selecting in Setup Utility 72 serial number, computer 11 service tag 11 setup of WLAN 30 Setup Utility, passwords set in 46 setup, computer 3 shut down 24 SIM inserting 33 removing 34 software installing 40 multimedia 40 Windows...
... HP Mobile Broadband Module serial number 12 regulatory label 12 wireless 12 release latches battery 9, 18 restoring default settings 73 right TouchPad button, identifying 4 RJ-45 (network) jack, identifying 7 S screen brightness hotkeys 58 screen image, switching 58 security cable slot, identifying 7 Security menu 74 security, cable slot 7 security, wireless 30 selecting in Setup Utility 72 serial number, computer 11 service tag 11 setup of WLAN 30 Setup Utility, passwords set in 46 setup, computer 3 shut down 24 SIM inserting 33 removing 34 software installing 40 multimedia 40 Windows...
Mini User Guide - Windows 7
Page 7
...functions 42 Video ...43 Connecting an external monitor or projector 43 Webcam ...44 6 Security Protecting the computer ...45 Using passwords ...45 Setting passwords in Windows 46 Setting passwords in Setup Utility 46 Administrator password 47 Managing an administrator password 47 Entering an administrator password 47 Power-on password 47 Managing a power-on password 48 Entering a power-on password 48 Using antivirus software ...49 Using firewall software ...50 Installing critical updates ...51 7 Digital cards Inserting a digital card ...52 Removing a digital card ...53 8 USB devices...
...functions 42 Video ...43 Connecting an external monitor or projector 43 Webcam ...44 6 Security Protecting the computer ...45 Using passwords ...45 Setting passwords in Windows 46 Setting passwords in Setup Utility 46 Administrator password 47 Managing an administrator password 47 Entering an administrator password 47 Power-on password 47 Managing a power-on password 48 Entering a power-on password 48 Using antivirus software ...49 Using firewall software ...50 Installing critical updates ...51 7 Digital cards Inserting a digital card ...52 Removing a digital card ...53 8 USB devices...
Mini User Guide - Windows 7
Page 8
......56 Using hotkeys ...56 Initiating Sleep 57 Switching the screen image 58 Decreasing screen brightness 58 Increasing screen brightness 58 Initiating QuickLock 58 Muting speaker sound 59 Decreasing speaker sound 59 Increasing speaker sound 59 10 Drives Identifying installed drives ...60 Handling drives ...60 Using external drives ...61 Using optional external devices 62 11 Memory modules 12 Updating software Updating the BIOS ...68 Determining the BIOS version 68 Downloading a BIOS update 68 Updating programs and drivers ...70 13 Changing Instant Web settings Disabling and enabling...
......56 Using hotkeys ...56 Initiating Sleep 57 Switching the screen image 58 Decreasing screen brightness 58 Increasing screen brightness 58 Initiating QuickLock 58 Muting speaker sound 59 Decreasing speaker sound 59 Increasing speaker sound 59 10 Drives Identifying installed drives ...60 Handling drives ...60 Using external drives ...61 Using optional external devices 62 11 Memory modules 12 Updating software Updating the BIOS ...68 Determining the BIOS version 68 Downloading a BIOS update 68 Updating programs and drivers ...70 13 Changing Instant Web settings Disabling and enabling...
Mini User Guide - Windows 7
Page 21
...; Serial number (s/n) (2). Have this computer. You may need this information when traveling internationally. ◦ The serial number of the countries or regions in which the devices have been approved for this information available when you use . Component Description (1) Power cord* Connects an AC adapter to an AC outlet. (2) AC adapter Converts AC power to update or troubleshoot the operating system. This is not plugged into external power. *Batteries and power cords...
...; Serial number (s/n) (2). Have this computer. You may need this information when traveling internationally. ◦ The serial number of the countries or regions in which the devices have been approved for this information available when you use . Component Description (1) Power cord* Connects an AC adapter to an AC outlet. (2) AC adapter Converts AC power to update or troubleshoot the operating system. This is not plugged into external power. *Batteries and power cords...

Mini User Guide - Windows 7
Page 55
... support (Norton Internet Security) ● Critical security updates NOTE: Security solutions are set in Windows or in the non-Windows Setup Utility preinstalled on the computer. Because most passwords are not displayed as deterrents, but they are designed to your computer for service, remove all password settings. Several types of passwords can be set , changed, or deleted, it in this chapter to secure your personal settings and data from Microsoft Unauthorized access to a Windows user account User password Using passwords A password...
... support (Norton Internet Security) ● Critical security updates NOTE: Security solutions are set in Windows or in the non-Windows Setup Utility preinstalled on the computer. Because most passwords are not displayed as deterrents, but they are designed to your computer for service, remove all password settings. Several types of passwords can be set , changed, or deleted, it in this chapter to secure your personal settings and data from Microsoft Unauthorized access to a Windows user account User password Using passwords A password...

Mini User Guide - Windows 7
Page 68
... display devices connected to the external monitor port on before you must set the fn+f1 hotkey to initiate Hibernation instead of devices that use a VGA cable (purchased separately) to connect an external display, such as a monitor or projector, to the system. The fn+f2 hotkey can be changed . Hold down the hotkey to the hard drive. NOTE: Before you can use QuickLock, you can set a Windows user password or a Windows administrator password. For instructions, refer to increase the brightness...
... display devices connected to the external monitor port on before you must set the fn+f1 hotkey to initiate Hibernation instead of devices that use a VGA cable (purchased separately) to connect an external display, such as a monitor or projector, to the system. The fn+f2 hotkey can be changed . Hold down the hotkey to the hard drive. NOTE: Before you can use QuickLock, you can set a Windows user password or a Windows administrator password. For instructions, refer to increase the brightness...
Mini User Guide - Windows 7
Page 78
... Start > Help and Support, and then select the software and drivers update. 2. Do not insert, remove, connect, or disconnect any device, cable, or cord. Identify the BIOS update that provides software for your computer. Make a note of the path to the location on the screen to identify your selection to an optional power source. You will need to download. 3. To exit Setup Utility, use the arrow keys to your hard drive where the BIOS update is displayed...
... Start > Help and Support, and then select the software and drivers update. 2. Do not insert, remove, connect, or disconnect any device, cable, or cord. Identify the BIOS update that provides software for your computer. Make a note of the path to the location on the screen to identify your selection to an optional power source. You will need to download. 3. To exit Setup Utility, use the arrow keys to your hard drive where the BIOS update is displayed...
Mini User Guide - Windows 7
Page 86
... battery level 19 D Diagnostics menu 75 digital card inserting 52 removing 53 Digital Media Slot, identifying 7 diskette drive 61 display image, switching 58 screen brightness hotkeys 58 display switch, identifying 8 displaying system information 73 drive light, identifying 6 drive media 12 drives diskette 61 external 61 hard 61 optical 61 drives, boot order 74 DVD drive 61 E earbuds 8, 39 encryption 31 entering a power-on password 48 entering an administrator password 47 exiting Setup Utility 73 external audio devices, connecting 42 external drive 61 external monitor port 43 external monitor...
... battery level 19 D Diagnostics menu 75 digital card inserting 52 removing 53 Digital Media Slot, identifying 7 diskette drive 61 display image, switching 58 screen brightness hotkeys 58 display switch, identifying 8 displaying system information 73 drive light, identifying 6 drive media 12 drives diskette 61 external 61 hard 61 optical 61 drives, boot order 74 DVD drive 61 E earbuds 8, 39 encryption 31 entering a power-on password 48 entering an administrator password 47 exiting Setup Utility 73 external audio devices, connecting 42 external drive 61 external monitor port 43 external monitor...
Mini User Guide - Windows 7
Page 87
... screen brightness 58 increasing speaker volume 59 initiating QuickLock 58 initiating Sleep 57 muting speaker sound 59 switching screen image 58 using 57 HP Connection Manager software 28 HP Mobile Broadband Module 33 HP Mobile Broadband, disabled 33 hubs 54 I icons Connection Manager 27 network 27 wired network 27 wireless 27 Instant Web disabling 71 enabling 71 Setup Utility 74 internal display switch, identifying 8 internal microphone, identifying 9, 39 Internet connection setup 30 J jacks audio-in (microphone) 8, 39 audio-out (headphone) 8, 39 RJ-45 (network) 7 K keyboard hotkeys...
... screen brightness 58 increasing speaker volume 59 initiating QuickLock 58 initiating Sleep 57 muting speaker sound 59 switching screen image 58 using 57 HP Connection Manager software 28 HP Mobile Broadband Module 33 HP Mobile Broadband, disabled 33 hubs 54 I icons Connection Manager 27 network 27 wired network 27 wireless 27 Instant Web disabling 71 enabling 71 Setup Utility 74 internal display switch, identifying 8 internal microphone, identifying 9, 39 Internet connection setup 30 J jacks audio-in (microphone) 8, 39 audio-out (headphone) 8, 39 RJ-45 (network) 7 K keyboard hotkeys...


