Quick Setup Guide - Windows 8
Page 5
... and other intellectual property rights. Product notice This guide describes features that is prohibited. Microsoft and Windows are trademarks of our products for HP products and services are common to : North America: Hewlett-Packard, MS POD, 11311 Chinden Blvd., Boise, ID 83714, USA Europe..., Middle East, Africa: Hewlett-Packard, POD, Via G. The information contained herein is subject to change without notice. HP supports lawful use of technology and does not endorse or encourage the use of Microsoft Corporation in this copyright protection technology must be ...
... and other intellectual property rights. Product notice This guide describes features that is prohibited. Microsoft and Windows are trademarks of our products for HP products and services are common to : North America: Hewlett-Packard, MS POD, 11311 Chinden Blvd., Boise, ID 83714, USA Europe..., Middle East, Africa: Hewlett-Packard, POD, Via G. The information contained herein is subject to change without notice. HP supports lawful use of technology and does not endorse or encourage the use of Microsoft Corporation in this copyright protection technology must be ...
Quick Setup Guide - Windows 8
Page 7
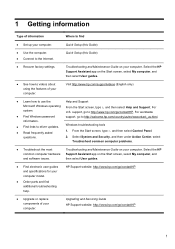
...select My computer, and then select User guides. ● See how-to videos about using the features of your computer. Visit http://www.hp.com/supportvideos (English only) ● Learn how to driver updates. ● Read frequently asked questions. From the Start screen, type h, ... Support Microsoft Windows operating system. Quick Setup (this Guide) ● Use the computer. ● Connect to the Internet. Select the HP Support Assistant app on your computer. 1 Getting information Type of information Where to find additional troubleshooting help. Select System and Security, and ...
...select My computer, and then select User guides. ● See how-to videos about using the features of your computer. Visit http://www.hp.com/supportvideos (English only) ● Learn how to driver updates. ● Read frequently asked questions. From the Start screen, type h, ... Support Microsoft Windows operating system. Quick Setup (this Guide) ● Use the computer. ● Connect to the Internet. Select the HP Support Assistant app on your computer. 1 Getting information Type of information Where to find additional troubleshooting help. Select System and Security, and ...
Quick Setup Guide - Windows 8
Page 8
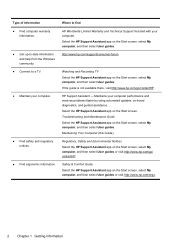
...; Get up-to-date information and help from the Windows community. ● Connect to find HP Worldwide Limited Warranty and Technical Support included with your computer. Select the HP Support Assistant app on the Start screen, select My computer, and then select User guides. Maintains...; Find safety and regulatory notices. ● Find ergonomic information. Maintaining Your Computer (this Guide) Regulatory, Safety and Environmental Notices Select the HP Support Assistant app on the Start screen, select My computer, and then select User guides. Where to a TV. ● Maintain your ...
...; Get up-to-date information and help from the Windows community. ● Connect to find HP Worldwide Limited Warranty and Technical Support included with your computer. Select the HP Support Assistant app on the Start screen, select My computer, and then select User guides. Maintains...; Find safety and regulatory notices. ● Find ergonomic information. Maintaining Your Computer (this Guide) Regulatory, Safety and Environmental Notices Select the HP Support Assistant app on the Start screen, select My computer, and then select User guides. Where to a TV. ● Maintain your ...
Quick Setup Guide - Windows 8
Page 9
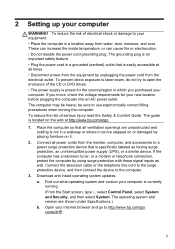
... or a similar device. a. To reduce the risk of serious injury read the Safety & Comfort Guide. The guide is easily accessible at http://www.hp.com/ergo. 1. If you move, check the voltage requirements for the country/region in a walkway or where it . 2. Open your computer WARNING! ...The operating system and version are unobstructed and cabling is specifically labeled as well. 2 Setting up your internet browser and go to http://www.hp.com/go/ contactHP. 3 The grounding plug is an important safety feature. • Plug the power cord in a grounded (earthed) outlet ...
... or a similar device. a. To reduce the risk of serious injury read the Safety & Comfort Guide. The guide is easily accessible at http://www.hp.com/ergo. 1. If you move, check the voltage requirements for the country/region in a walkway or where it . 2. Open your computer WARNING! ...The operating system and version are unobstructed and cabling is specifically labeled as well. 2 Setting up your internet browser and go to http://www.hp.com/go/ contactHP. 3 The grounding plug is an important safety feature. • Plug the power cord in a grounded (earthed) outlet ...
Quick Setup Guide - Windows 8
Page 10
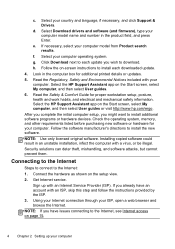
...: 1. Connect the hardware as shown on the Start screen, select My computer, and then select User guides. 6. Get Internet service. Select the HP Support Assistant app on the setup view. 2. Select the HP Support Assistant app on the Start screen, select My computer, and then select User guides or visit http://www....hp.com/ergo. If you might want to each downloaded update. 4. NOTE: Use only licensed original software. Select Download drivers and software (and firmware), type your ...
...: 1. Connect the hardware as shown on the Start screen, select My computer, and then select User guides. 6. Get Internet service. Select the HP Support Assistant app on the setup view. 2. Select the HP Support Assistant app on the Start screen, select My computer, and then select User guides or visit http://www....hp.com/ergo. If you might want to each downloaded update. 4. NOTE: Use only licensed original software. Select Download drivers and software (and firmware), type your ...
Quick Setup Guide - Windows 8
Page 11
...connector. To experience the full capability of the task bar. 3 Setting up additional features Using Beats Audio™ (select models only) Your HP TouchSmart PC features audio connectors (headphone and Audio Out) that you connect analog speakers to the computer if you ever need to do is ...are optimized for the monitor (see the following steps). To view the Beats user interface, from the Start screen, type b, and then select HP Beats Audio. If you may need to adjust some settings to adjust the resolution setting for Beats Audio™ headphones and external audio systems ...
...connector. To experience the full capability of the task bar. 3 Setting up additional features Using Beats Audio™ (select models only) Your HP TouchSmart PC features audio connectors (headphone and Audio Out) that you connect analog speakers to the computer if you ever need to do is ...are optimized for the monitor (see the following steps). To view the Beats user interface, from the Start screen, type b, and then select HP Beats Audio. If you may need to adjust some settings to adjust the resolution setting for Beats Audio™ headphones and external audio systems ...
Quick Setup Guide - Windows 8
Page 12
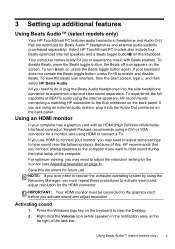
3. It may display a green circle with step 5. 5. Select OK to view the Desktop. The Sound window opens. 4. If the Default Device is not one of graphics card. Select Set Default. 7. Adjusting resolution To adjust resolution, follow the steps under "Other graphic cards." 6 Chapter 3 Setting up additional features Press the Windows logo key on the Playback tab, select it . If one of these devices, continue with a checkmark in it : ● NVIDIA High Definition Audio (select models only) ● ATI High Definition Audio (select models only) If neither of the following, then ...
3. It may display a green circle with step 5. 5. Select OK to view the Desktop. The Sound window opens. 4. If the Default Device is not one of graphics card. Select Set Default. 7. Adjusting resolution To adjust resolution, follow the steps under "Other graphic cards." 6 Chapter 3 Setting up additional features Press the Windows logo key on the Playback tab, select it . If one of these devices, continue with a checkmark in it : ● NVIDIA High Definition Audio (select models only) ● ATI High Definition Audio (select models only) If neither of the following, then ...
Quick Setup Guide - Windows 8
Page 13
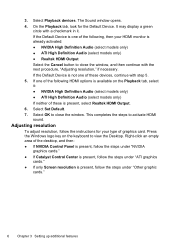
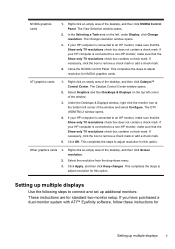
... sure that the Show only TV resolutions check box does not contain a check mark. Close the NVIDIA Control Panel. If your HP computer is connected to an HP monitor, make sure that the Show only TV resolutions check box does not contain a check mark. Select the resolution from the ...and then click NVIDIA Control Panel. If necessary, click the box to connect and set up multiple displays 7 This completes the steps to a non-HP monitor, make sure that the Show only TV resolutions check box contains a check mark. Setting up multiple displays Use the following steps to remove a...
... sure that the Show only TV resolutions check box does not contain a check mark. Close the NVIDIA Control Panel. If your HP computer is connected to an HP monitor, make sure that the Show only TV resolutions check box does not contain a check mark. Select the resolution from the ...and then click NVIDIA Control Panel. If necessary, click the box to connect and set up multiple displays 7 This completes the steps to a non-HP monitor, make sure that the Show only TV resolutions check box contains a check mark. Setting up multiple displays Use the following steps to remove a...
Quick Setup Guide - Windows 8
Page 14
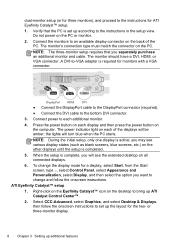
The monitor's connection type must match the connector on the computer. NOTE: The three-monitor setup requires that the PC is active; Connect power to the bottom DVI connector. 3. The power indicator light on each of the PC. Press the power button on each additional monitor. 4. To change and follow the onscreen instructions. or three-monitor display. 8 Chapter 3 Setting up ATI Catalyst Control Center™. 2. Do not power on the back of the displays will turn blue when the PC starts. NOTE: During the initial setup, only one display is set up according to ...
The monitor's connection type must match the connector on the computer. NOTE: The three-monitor setup requires that the PC is active; Connect power to the bottom DVI connector. 3. The power indicator light on each of the PC. Press the power button on each additional monitor. 4. To change and follow the onscreen instructions. or three-monitor display. 8 Chapter 3 Setting up ATI Catalyst Control Center™. 2. Do not power on the back of the displays will turn blue when the PC starts. NOTE: During the initial setup, only one display is set up according to ...

Quick Setup Guide - Windows 8
Page 15
... the computer cool. Cleaning procedures 9 Vacuum between the keys of dust and debris, and clean it about once every three months. ● Visit http://www.hp.com/go/contactHP for example, the Ethernet and USB connectors). Turn the mouse upside down, and rotate the ball-cover ring counterclockwise to avoid removing...
... the computer cool. Cleaning procedures 9 Vacuum between the keys of dust and debris, and clean it about once every three months. ● Visit http://www.hp.com/go/contactHP for example, the Ethernet and USB connectors). Turn the mouse upside down, and rotate the ball-cover ring counterclockwise to avoid removing...

Quick Setup Guide - Windows 8
Page 16
Computer does not start . Restart the computer. 1. Press the Ctrl+Alt+Delete keys on page 12. Or, press and hold the Power button on the computer for additional troubleshooting options, see Getting information on page 1. Computer will not turn it . 10 Chapter 5 Troubleshooting if it was possible or not to start up Windows. See Display (monitor) on the keyboard simultaneously. 2. For more information or for 5 or more seconds to turn off the computer, and then press the Power button to restart the computer. 3. Either the hard disk drive or the system board may need to be properly ...
Computer does not start . Restart the computer. 1. Press the Ctrl+Alt+Delete keys on page 12. Or, press and hold the Power button on the computer for additional troubleshooting options, see Getting information on page 1. Computer will not turn it . 10 Chapter 5 Troubleshooting if it was possible or not to start up Windows. See Display (monitor) on the keyboard simultaneously. 2. For more information or for 5 or more seconds to turn off the computer, and then press the Power button to restart the computer. 3. Either the hard disk drive or the system board may need to be properly ...
Quick Setup Guide - Windows 8
Page 17
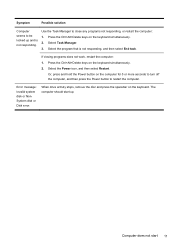
Select Task Manager. 3. The computer should start 11 Select the program that is not responding. Or, press and hold the Power button on the keyboard simultaneously. 2. Press the Ctrl+Alt+Delete keys on the computer for 5 or more seconds to turn off the computer, and then press the Power button to restart the computer. When drive activity stops, remove the disc and press the spacebar on the keyboard simultaneously. 2. Error message: Invalid system disk or NonSystem disk or Disk error. Use the Task Manager to close any programs not responding, or restart the computer: 1....
Select Task Manager. 3. The computer should start 11 Select the program that is not responding. Or, press and hold the Power button on the keyboard simultaneously. 2. Press the Ctrl+Alt+Delete keys on the computer for 5 or more seconds to turn off the computer, and then press the Power button to restart the computer. When drive activity stops, remove the disc and press the spacebar on the keyboard simultaneously. 2. Error message: Invalid system disk or NonSystem disk or Disk error. Use the Task Manager to close any programs not responding, or restart the computer: 1....
Quick Setup Guide - Windows 8
Page 18
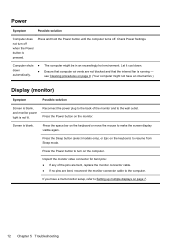
Computer shuts ● down . Press the Sleep button (select models only), or Esc on page 7. 12 Chapter 5 Troubleshooting The computer might not have a multi-monitor setup, refer to Setting up multiple displays on the keyboard, to the wall outlet. Ensure that computer air vents are bent, reconnect the monitor connector cable to the computer. Screen is running - If you have an internal fan.) Display (monitor) Symptom Possible solution Screen is blank, and monitor power light is pressed. Inspect the monitor video connector for bent pins: ● If any of the ...
Computer shuts ● down . Press the Sleep button (select models only), or Esc on page 7. 12 Chapter 5 Troubleshooting The computer might not have a multi-monitor setup, refer to Setting up multiple displays on the keyboard, to the wall outlet. Ensure that computer air vents are bent, reconnect the monitor connector cable to the computer. Screen is running - If you have an internal fan.) Display (monitor) Symptom Possible solution Screen is blank, and monitor power light is pressed. Inspect the monitor video connector for bent pins: ● If any of the ...
Quick Setup Guide - Windows 8
Page 19
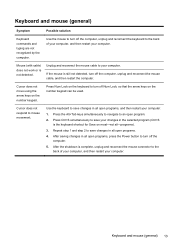
After the shutdown is still not detected, turn off the computer, unplug and reconnect the keyboard to the back of your computer, and then restart your computer. Cursor does not move using the arrow keys on most-not all open program. 2. Press Num Lock on the number keypad can be used. Unplug and reconnect the mouse cable to an open programs, press the Power button to turn off Num Lock, so that the arrow keys on the keyboard to the back of your computer, and then restart your changes in all -programs). 3. After saving changes in the selected program (...
After the shutdown is still not detected, turn off the computer, unplug and reconnect the keyboard to the back of your computer, and then restart your computer. Cursor does not move using the arrow keys on most-not all open program. 2. Press Num Lock on the number keypad can be used. Unplug and reconnect the mouse cable to an open programs, press the Power button to turn off Num Lock, so that the arrow keys on the keyboard to the back of your computer, and then restart your changes in all -programs). 3. After saving changes in the selected program (...
Quick Setup Guide - Windows 8
Page 20
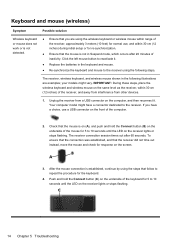
The receiver connection session times out after 20 minutes of inactivity. A Off Connect On B 3. Click the left mouse button to reactivate it. ● Replace the batteries in the keyboard and mouse. ● Re-synchronize the keyboard and mouse to repeat the procedure for normal use a USB connector on the front of the receiver, and away from interference from a USB connector on the computer, and then reconnect it. IMPORTANT: During these steps, place the wireless keyboard and wireless mouse on the same level as the receiver, within range of the receiver, approximately 3 ...
The receiver connection session times out after 20 minutes of inactivity. A Off Connect On B 3. Click the left mouse button to reactivate it. ● Replace the batteries in the keyboard and mouse. ● Re-synchronize the keyboard and mouse to repeat the procedure for normal use a USB connector on the front of the receiver, and away from interference from a USB connector on the computer, and then reconnect it. IMPORTANT: During these steps, place the wireless keyboard and wireless mouse on the same level as the receiver, within range of the receiver, approximately 3 ...
Quick Setup Guide - Windows 8
Page 21
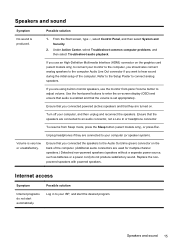
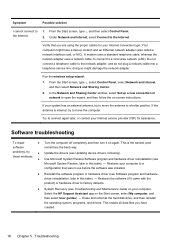
If you connected the speakers to an audio connector, not a Line In or headphone connector. Replace the nonpowered speakers with powered speakers. Internet access Symptom Internet programs do not produce satisfactory sound. Use the front-panel buttons to enter the on-screen display (OSD) and ensure that audio is set appropriately. Ensure that the volume is enabled and that the speakers are connected to the Audio Out (lime green) connector on the back of the computer. To resume from Sleep mode, press the Sleep button (select models only), or press Esc. Ensure that you...
If you connected the speakers to an audio connector, not a Line In or headphone connector. Replace the nonpowered speakers with powered speakers. Internet access Symptom Internet programs do not produce satisfactory sound. Use the front-panel buttons to enter the on-screen display (OSD) and ensure that audio is set appropriately. Ensure that the volume is enabled and that the speakers are connected to the Audio Out (lime green) connector on the back of the computer. To resume from Sleep mode, press the Sleep button (select models only), or press Esc. Ensure that you...
Quick Setup Guide - Windows 8
Page 22
... connect a telephone cable to a local area network (LAN). Try to a configuration that you have a dial-up a new connection or network to the Internet. 1. Select the HP Support Assistant app on your system has an external antenna, try to move the computer.
... connect a telephone cable to a local area network (LAN). Try to a configuration that you have a dial-up a new connection or network to the Internet. 1. Select the HP Support Assistant app on your system has an external antenna, try to move the computer.
Quick Setup Guide - Windows 8
Page 23
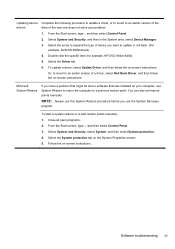
... in the System area, select Device Manager. 3. You can also set restore points manually. Close all open programs. 2. Double-click the specific item (for example, HP DVD Writer 640b). 5. Select the Driver tab. 6. Microsoft System Restore If you have a problem that might be due to software that was installed on your...
... in the System area, select Device Manager. 3. You can also set restore points manually. Close all open programs. 2. Double-click the specific item (for example, HP DVD Writer 640b). 5. Select the Driver tab. 6. Microsoft System Restore If you have a problem that might be due to software that was installed on your...

Quick Setup Guide - Windows 8
Page 24
If prompted, click Yes to allow the program to reinstall it. To reinstall a program using the Recovery Manager program (select models only). From the Start screen, type r, and then select Recovery Manager. 2. Do not skip this last step. Check to install, select Next, and follow the on CDs or DVDs included in the Recovery Manager: 1. Close all software programs and folders. 2. Before you uninstall a program, be sure that it (for example, discs or the Internet). Or check to be sure that came on -screen instructions. 4. Select the program you can reinstall them by ...
If prompted, click Yes to allow the program to reinstall it. To reinstall a program using the Recovery Manager program (select models only). From the Start screen, type r, and then select Recovery Manager. 2. Do not skip this last step. Check to install, select Next, and follow the on CDs or DVDs included in the Recovery Manager: 1. Close all software programs and folders. 2. Before you uninstall a program, be sure that it (for example, discs or the Internet). Or check to be sure that came on -screen instructions. 4. Select the program you can reinstall them by ...
Quick Setup Guide - Windows 8
Page 25
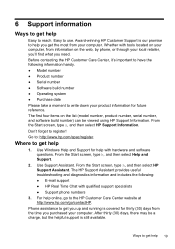
..., but the helpful support is covered for help you need. 6 Support information Ways to get help 1. Don't forget to : http://www.hp.com/apac/register. Go to register! Easy to get you up and running is still available. Where to get the most from information on ...30) days from the time you purchased your local retailer, you'll find what you get help Easy to write down your computer. The HP Support Assistant provides useful troubleshooting and diagnostics information and includes the following information handy. ● Model number ● Product number ● Serial...
..., but the helpful support is covered for help you need. 6 Support information Ways to get help 1. Don't forget to : http://www.hp.com/apac/register. Go to register! Easy to get you up and running is still available. Where to get the most from information on ...30) days from the time you purchased your local retailer, you'll find what you get help Easy to write down your computer. The HP Support Assistant provides useful troubleshooting and diagnostics information and includes the following information handy. ● Model number ● Product number ● Serial...