Quick Setup Guide - Windows 8
Page 5
... and Windows are trademarks of this document is not provided in this copyright protection technology must be available on your computer and/or on your HP product to : North America: Hewlett-Packard, MS POD, 11311 Chinden Blvd., Boise, ID 83714, USA Europe, Middle East, Africa: Hewlett-Packard, POD,... and other countries. The only warranties for technical or editorial errors or omissions contained herein. Nothing herein should be liable for HP products and services are common to your product located with the user guides on Demand Statement You can find the expressly provided...
... and Windows are trademarks of this document is not provided in this copyright protection technology must be available on your computer and/or on your HP product to : North America: Hewlett-Packard, MS POD, 11311 Chinden Blvd., Boise, ID 83714, USA Europe, Middle East, Africa: Hewlett-Packard, POD,... and other countries. The only warranties for technical or editorial errors or omissions contained herein. Nothing herein should be liable for HP products and services are common to your product located with the user guides on Demand Statement You can find the expressly provided...
Quick Setup Guide - Windows 8
Page 7
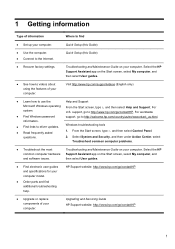
... and Maintenance Guide on the Start screen, select My computer, and then select User guides. ● See how-to http://welcome.hp.com/country/us/en/wwcontact_us.html. support, go /contactHP ● Upgrade or replace components of information Where to find additional troubleshooting ...the Help and Support Microsoft Windows operating system. Upgrading and Servicing Guide HP Support website: http://www.hp.com/go /contactHP. Visit http://www.hp.com/supportvideos (English only) ● Learn how to http://www.hp.com/go /contactHP 1 From the Start screen, type h, and then...
... and Maintenance Guide on the Start screen, select My computer, and then select User guides. ● See how-to http://welcome.hp.com/country/us/en/wwcontact_us.html. support, go /contactHP ● Upgrade or replace components of information Where to find additional troubleshooting ...the Help and Support Microsoft Windows operating system. Upgrading and Servicing Guide HP Support website: http://www.hp.com/go /contactHP. Visit http://www.hp.com/supportvideos (English only) ● Learn how to http://www.hp.com/go /contactHP 1 From the Start screen, type h, and then...
Quick Setup Guide - Windows 8
Page 8
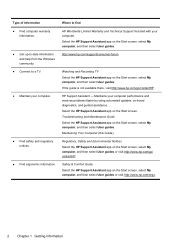
...automated updates, on the Start screen, select My computer, and then select User guides or visit http://www.hp.com/ergo. 2 Chapter 1 Getting information Select the HP Support Assistant app on the Start screen, select My computer, and then select User guides. http://www...of information ● Find computer warranty information. ● Get up-to-date information and help from the Windows community. ● Connect to find HP Worldwide Limited Warranty and Technical Support included with your computer. Where to a TV. ● Maintain your computer. ● Find safety and regulatory ...
...automated updates, on the Start screen, select My computer, and then select User guides or visit http://www.hp.com/ergo. 2 Chapter 1 Getting information Select the HP Support Assistant app on the Start screen, select My computer, and then select User guides. http://www...of information ● Find computer warranty information. ● Get up-to-date information and help from the Windows community. ● Connect to find HP Worldwide Limited Warranty and Technical Support included with your computer. Where to a TV. ● Maintain your computer. ● Find safety and regulatory ...
Quick Setup Guide - Windows 8
Page 9
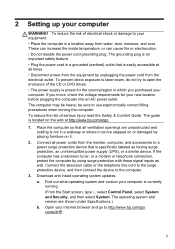
Connect the television cable or the telephone line cord to the surge protection device, and then connect the device to http://www.hp.com/go/ contactHP. 3 To prevent direct exposure to laser beam, do not try to your equipment: • Place the computer in which you purchased ... of electrical shock or damage to open the enclosure of the CD or DVD drives. • The power supply is easily accessible at http://www.hp.com/ergo. 1. The guide is not in a grounded (earthed) outlet that is currently running. (From the Start screen, type c, select Control Panel, select System ...
Connect the television cable or the telephone line cord to the surge protection device, and then connect the device to http://www.hp.com/go/ contactHP. 3 To prevent direct exposure to laser beam, do not try to your equipment: • Place the computer in which you purchased ... of electrical shock or damage to open the enclosure of the CD or DVD drives. • The power supply is easily accessible at http://www.hp.com/ergo. 1. The guide is not in a grounded (earthed) outlet that is currently running. (From the Start screen, type c, select Control Panel, select System ...
Quick Setup Guide - Windows 8
Page 10
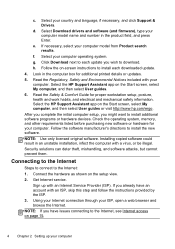
... number in an unstable installation, infect the computer with an ISP, skip this step and follow the instructions provided by the ISP. 3. Select the HP Support Assistant app on the Start screen, select My computer, and then select User guides. 6. Connecting to the Internet Steps to connect to install ...search results. Read the Safety & Comfort Guide for proper workstation setup, posture, health and work habits, and electrical and mechanical safety information. Select the HP Support Assistant app on the Start screen, select My computer, and then select User guides or visit http://www...
... number in an unstable installation, infect the computer with an ISP, skip this step and follow the instructions provided by the ISP. 3. Select the HP Support Assistant app on the Start screen, select My computer, and then select User guides. 6. Connecting to the Internet Steps to connect to install ...search results. Read the Safety & Comfort Guide for proper workstation setup, posture, health and work habits, and electrical and mechanical safety information. Select the HP Support Assistant app on the Start screen, select My computer, and then select User guides or visit http://www...
Quick Setup Guide - Windows 8
Page 11
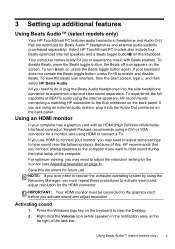
... on , press the Beats toggle button again. To view the Beats user interface, from the Start screen, type b, and then select HP Beats Audio. Because of BEATS audio using an external audio system, plug it into the side headphone connector to hear sound (see Adjusting resolution ...the following steps). To disable Beats, press the Beats toggle button; 3 Setting up additional features Using Beats Audio™ (select models only) Your HP TouchSmart PC features audio connectors (headphone and Audio Out) that you connect analog speakers to the computer if you want to view the Desktop. 2....
... on , press the Beats toggle button again. To view the Beats user interface, from the Start screen, type b, and then select HP Beats Audio. Because of BEATS audio using an external audio system, plug it into the side headphone connector to hear sound (see Adjusting resolution ...the following steps). To disable Beats, press the Beats toggle button; 3 Setting up additional features Using Beats Audio™ (select models only) Your HP TouchSmart PC features audio connectors (headphone and Audio Out) that you connect analog speakers to the computer if you want to view the Desktop. 2....
Quick Setup Guide - Windows 8
Page 12
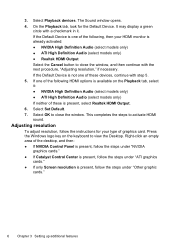
On the Playback tab, look for your HDMI monitor is available on the keyboard to close the window. If one of the following , then your type of the desktop, and then: ● If NVIDIA Control Panel is present, follow the steps under "NVIDIA graphics cards." ● If Catalyst Control Center is present, select Realtek HDMI Output. 6. This completes the steps to close the window, and then continue with the next procedure, "Adjusting resolution," if necessary. If the Default Device is not one of the following HDMI options is already activated: ● NVIDIA High Definition ...
On the Playback tab, look for your HDMI monitor is available on the keyboard to close the window. If one of the following , then your type of the desktop, and then: ● If NVIDIA Control Panel is present, follow the steps under "NVIDIA graphics cards." ● If Catalyst Control Center is present, select Realtek HDMI Output. 6. This completes the steps to close the window, and then continue with the next procedure, "Adjusting resolution," if necessary. If the Default Device is not one of the following HDMI options is already activated: ● NVIDIA High Definition ...
Quick Setup Guide - Windows 8
Page 13
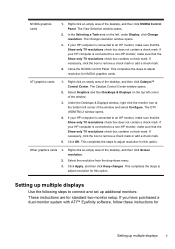
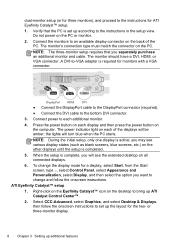
...resolution. 2. If necessary, click the box to adjust resolution for this option. Setting up multiple displays Use the following steps to a non-HP monitor, make sure that the Show only TV resolutions check box contains a check mark. The Change resolution window opens. 3. This completes ...the steps to an HP monitor, make sure that the Show only TV resolutions check box does not contain a check mark. NVIDIA graphics cards 1. In the Selecting...
...resolution. 2. If necessary, click the box to adjust resolution for this option. Setting up multiple displays Use the following steps to a non-HP monitor, make sure that the Show only TV resolutions check box contains a check mark. The Change resolution window opens. 3. This completes ...the steps to an HP monitor, make sure that the Show only TV resolutions check box does not contain a check mark. NVIDIA graphics cards 1. In the Selecting...
Quick Setup Guide - Windows 8
Page 14
Verify that you separately purchase an additional monitor and cable. Connect the monitors to an available display connector on the PC or monitor. 2. Press the power button on each additional monitor. 4. NOTE: During the initial setup, only one display is completed. 5. Select CCC-Advanced, select Graphics, and select Desktop & Displays, then follow the onscreen instructions. or three-monitor display. 8 Chapter 3 Setting up the layout for monitors with a VGA connector. A DVI-to-VGA adapter is required for the two- To change and follow the onscreen instructions ...
Verify that you separately purchase an additional monitor and cable. Connect the monitors to an available display connector on the PC or monitor. 2. Press the power button on each additional monitor. 4. NOTE: During the initial setup, only one display is completed. 5. Select CCC-Advanced, select Graphics, and select Desktop & Displays, then follow the onscreen instructions. or three-monitor display. 8 Chapter 3 Setting up the layout for monitors with a VGA connector. A DVI-to-VGA adapter is required for the two- To change and follow the onscreen instructions ...

Quick Setup Guide - Windows 8
Page 15
... procedures Keeping your system once a month for visible signs of dust and debris, and clean it about once every three months. ● Visit http://www.hp.com/go/contactHP for example, the Ethernet and USB connectors).
... procedures Keeping your system once a month for visible signs of dust and debris, and clean it about once every three months. ● Visit http://www.hp.com/go/contactHP for example, the Ethernet and USB connectors).

Quick Setup Guide - Windows 8
Page 16
Either the hard disk drive or the system board may need to a backup hard disk drive. 4. If the display (monitor) is not, contact Support. Connect the monitor to the computer, plug it in properly. Test the wall outlet by the product manufacturer for additional troubleshooting options, see Getting information on ; The following tables present some issues you might not be properly connected. If Windows opens, immediately back up all important data to be on page 1. Press the Ctrl+Alt+Delete keys on page 12. Or, press and hold the Power button on or start. See Display (...
Either the hard disk drive or the system board may need to a backup hard disk drive. 4. If the display (monitor) is not, contact Support. Connect the monitor to the computer, plug it in properly. Test the wall outlet by the product manufacturer for additional troubleshooting options, see Getting information on ; The following tables present some issues you might not be properly connected. If Windows opens, immediately back up all important data to be on page 1. Press the Ctrl+Alt+Delete keys on page 12. Or, press and hold the Power button on or start. See Display (...
Quick Setup Guide - Windows 8
Page 17
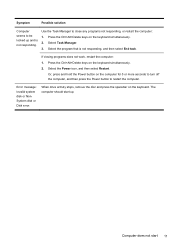
If closing programs does not work, restart the computer: 1. Or, press and hold the Power button on the keyboard. Computer does not start up and is not responding, and then select End task. Symptom Possible solution Computer seems to be locked up . Use the Task Manager to restart the computer. Error message: Invalid system disk or NonSystem disk or Disk error. Select the program that is not responding. Select Task Manager. 3. When drive activity stops, remove the disc and press the spacebar on the computer for 5 or more seconds to turn off the computer, and ...
If closing programs does not work, restart the computer: 1. Or, press and hold the Power button on the keyboard. Computer does not start up and is not responding, and then select End task. Symptom Possible solution Computer seems to be locked up . Use the Task Manager to restart the computer. Error message: Invalid system disk or NonSystem disk or Disk error. Select the program that is not responding. Select Task Manager. 3. When drive activity stops, remove the disc and press the spacebar on the computer for 5 or more seconds to turn off the computer, and ...
Quick Setup Guide - Windows 8
Page 18
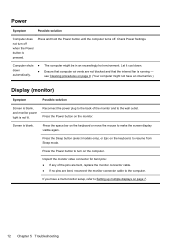
Reconnect the power plug to the back of the pins are bent, replace the monitor connector cable. ● If no pins are not blocked and that computer air vents are bent, reconnect the monitor connector cable to turn off . Press the Power button on page 7. 12 Chapter 5 Troubleshooting Press the Power button to the computer. Press the space bar on the keyboard or move the mouse to the wall outlet. If you have an internal fan.) Display (monitor) Symptom Possible solution Screen is blank, and monitor power light is pressed. see Cleaning procedures on page...
Reconnect the power plug to the back of the pins are bent, replace the monitor connector cable. ● If no pins are not blocked and that computer air vents are bent, reconnect the monitor connector cable to turn off . Press the Power button on page 7. 12 Chapter 5 Troubleshooting Press the Power button to the computer. Press the space bar on the keyboard or move the mouse to the wall outlet. If you have an internal fan.) Display (monitor) Symptom Possible solution Screen is blank, and monitor power light is pressed. see Cleaning procedures on page...
Quick Setup Guide - Windows 8
Page 19
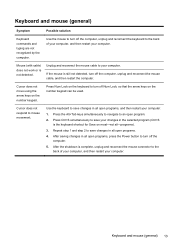
Use the mouse to turn off Num Lock, so that the arrow keys on the keyboard to turn off the computer, unplug and reconnect the keyboard to turn off the computer. 5. Use the keyboard to save changes in all open program. 2. After the shutdown is the keyboard shortcut for Save on the number keypad. Mouse (with cable) does not work or is still not detected, turn off the computer, unplug and reconnect the mouse cable, and then restart the computer. Press Num Lock on the number keypad can be used. Press the Alt+Tab keys simultaneously to navigate to the back of your ...
Use the mouse to turn off Num Lock, so that the arrow keys on the keyboard to turn off the computer, unplug and reconnect the keyboard to turn off the computer. 5. Use the keyboard to save changes in all open program. 2. After the shutdown is the keyboard shortcut for Save on the number keypad. Mouse (with cable) does not work or is still not detected, turn off the computer, unplug and reconnect the mouse cable, and then restart the computer. Press Num Lock on the number keypad can be used. Press the Alt+Tab keys simultaneously to navigate to the back of your ...
Quick Setup Guide - Windows 8
Page 20
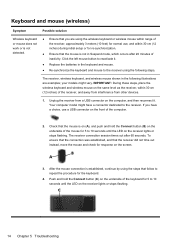
IMPORTANT: During these steps, place the wireless keyboard and wireless mouse on the computer, and then reconnect it . ● Replace the batteries in the following steps. After the mouse connection is established, continue by using the following illustrations are using the wireless keyboard or wireless mouse within range of the receiver, and away from interference from a USB connector on the same level as the receiver, within 30 cm (12 inches) during initial setup or for normal use a USB connector on the receiver lights or stops flashing. C 14 Chapter 5 Troubleshooting your...
IMPORTANT: During these steps, place the wireless keyboard and wireless mouse on the computer, and then reconnect it . ● Replace the batteries in the following steps. After the mouse connection is established, continue by using the following illustrations are using the wireless keyboard or wireless mouse within range of the receiver, and away from interference from a USB connector on the same level as the receiver, within 30 cm (12 inches) during initial setup or for normal use a USB connector on the receiver lights or stops flashing. C 14 Chapter 5 Troubleshooting your...
Quick Setup Guide - Windows 8
Page 21
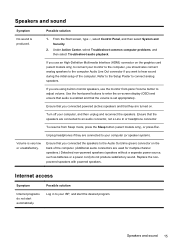
If you connected powered (active) speakers and that the speakers are connected to adjust volume. Ensure that you use the monitor front-panel Volume button to your ISP, and start automatically. Unplug headphones if they are turned on the back of the computer. Replace the nonpowered speakers with powered speakers. Speakers and sound 15 Ensure that they are connected to hear sound during the initial setup of the computer. (Additional audio connectors are using built-in to the Audio Out (lime green) connector on . To resume from Sleep mode, press the Sleep button (...
If you connected powered (active) speakers and that the speakers are connected to adjust volume. Ensure that you use the monitor front-panel Volume button to your ISP, and start automatically. Unplug headphones if they are turned on the back of the computer. Replace the nonpowered speakers with powered speakers. Speakers and sound 15 Ensure that they are connected to hear sound during the initial setup of the computer. (Additional audio connectors are using built-in to the Audio Out (lime green) connector on . To resume from Sleep mode, press the Sleep button (...
Quick Setup Guide - Windows 8
Page 22
... a network cable into a telephone service line; Run the wireless setup wizard: 1. If the antenna is the easiest (and software sometimes the best) way. Select the HP Support Assistant app on -screen instructions. From the Start screen, type c, select Control Panel, select Network and Internet, and then select Network and Sharing Center...
... a network cable into a telephone service line; Run the wireless setup wizard: 1. If the antenna is the easiest (and software sometimes the best) way. Select the HP Support Assistant app on -screen instructions. From the Start screen, type c, select Control Panel, select Network and Internet, and then select Network and Sharing Center...
Quick Setup Guide - Windows 8
Page 23
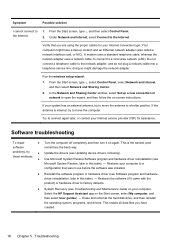
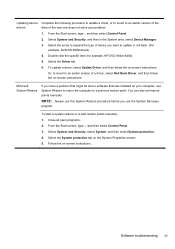
... the computer to software that was installed on -screen instructions. Select the System protection tab on -screen instructions. Double-click the specific item (for example, HP DVD Writer 640b). 5. From the Start screen, type c, and then select Control Panel. 3. Software troubleshooting 17 From the Start screen, type c and then select Control...
... the computer to software that was installed on -screen instructions. Select the System protection tab on -screen instructions. Double-click the specific item (for example, HP DVD Writer 640b). 5. From the Start screen, type c, and then select Control Panel. 3. Software troubleshooting 17 From the Start screen, type c and then select Control...

Quick Setup Guide - Windows 8
Page 24
To check the list of programs opens. Do not skip this last step. You must restart the computer after recovering software programs or hardware drivers. To uninstall a program: 1. Close all software programs and folders. 2. Before you uninstall a program, be sure you have finished reinstalling, restart the computer. Under I need help immediately, select Software Program Reinstallation. 3. Check to reinstall it. Check whether your factory-installed software programs or hardware drivers are damaged, you can reinstall from the Recovery Manager. From the Start ...
To check the list of programs opens. Do not skip this last step. You must restart the computer after recovering software programs or hardware drivers. To uninstall a program: 1. Close all software programs and folders. 2. Before you uninstall a program, be sure you have finished reinstalling, restart the computer. Under I need help immediately, select Software Program Reinstallation. 3. Check to reinstall it. Check whether your factory-installed software programs or hardware drivers are damaged, you can reinstall from the Recovery Manager. From the Start ...
Quick Setup Guide - Windows 8
Page 25
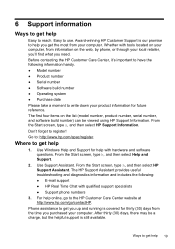
...you need. Use Support Assistant. Go to use. For help 19 Ways to have the following : ● E-mail support ● HP Real Time Chat with tools located on your computer, from information on the list (model number, product number, serial number, and software ... (30) days from your computer. From the Start screen, type h, and then select Help and Support. 2. Where to help 1. The HP Support Assistant provides useful troubleshooting and diagnostics information and includes the following information handy. ● Model number ● Product number ● Serial...
...you need. Use Support Assistant. Go to use. For help 19 Ways to have the following : ● E-mail support ● HP Real Time Chat with tools located on your computer, from information on the list (model number, product number, serial number, and software ... (30) days from your computer. From the Start screen, type h, and then select Help and Support. 2. Where to help 1. The HP Support Assistant provides useful troubleshooting and diagnostics information and includes the following information handy. ● Model number ● Product number ● Serial...