
English Manual
Page 1
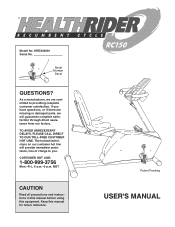
... USER'S MANUAL If you have questions, or if there are committed to you. MST CAUTION Read all precautions and instructions in this manual before using this manual for future reference. Serial Number Decal QUESTIONS? TO AVOID UNNECESSARY DELAYS, PLEASE CALL DIRECT TO OUR TOLL-FREE CUSTOMER HOT LINE. The trained technicians on our customer hot line will guarantee complete satisfaction through direct...
... USER'S MANUAL If you have questions, or if there are committed to you. MST CAUTION Read all precautions and instructions in this manual before using this manual for future reference. Serial Number Decal QUESTIONS? TO AVOID UNNECESSARY DELAYS, PLEASE CALL DIRECT TO OUR TOLL-FREE CUSTOMER HOT LINE. The trained technicians on our customer hot line will guarantee complete satisfaction through direct...
English Manual
Page 2
¨ TABLE OF CONTENTS IMPORTANT PRECAUTIONS 3 BEFORE YOU BEGIN 4 ASSEMBLY 5 HOW TO OPERATE THE RECUMBENT CYCLE 9 MAINTENANCE AND TROUBLE-SHOOTING 12 EXERCISE GUIDELINES 13 PART LIST 14 EXPLODED DRAWING 15 HOW TO ORDER REPLACEMENT PARTS Back Cover LIMITED WARRANTY Back Cover 2
¨ TABLE OF CONTENTS IMPORTANT PRECAUTIONS 3 BEFORE YOU BEGIN 4 ASSEMBLY 5 HOW TO OPERATE THE RECUMBENT CYCLE 9 MAINTENANCE AND TROUBLE-SHOOTING 12 EXERCISE GUIDELINES 13 PART LIST 14 EXPLODED DRAWING 15 HOW TO ORDER REPLACEMENT PARTS Back Cover LIMITED WARRANTY Back Cover 2
English Manual
Page 3
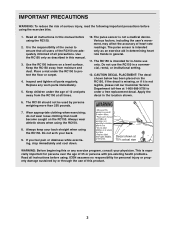
... RC150 should not be used by or through the use the RC150 in -home use only. It is especially important for in a commercial, rental, or institutional setting. 12. Various factors, including the user's movement, may affect the accuracy of the owner to order a free replacement decal. The RC150 is intended only as described in the location shown. 6. Do not use of all instructions before using the exercise bike...
... RC150 should not be used by or through the use the RC150 in -home use only. It is especially important for in a commercial, rental, or institutional setting. 12. Various factors, including the user's movement, may affect the accuracy of the owner to order a free replacement decal. The RC150 is intended only as described in the location shown. 6. Do not use of all instructions before using the exercise bike...
English Manual
Page 4
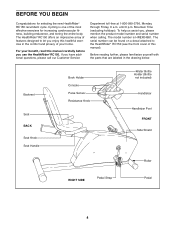
... this manual carefully before you , please mention the product model number and serial number when calling. Backrest Seat BACK Seat Knob Seat Handle Book Holder Console Pulse Sensor Resistance Knob Water Bottle Holder (Bottle not included) Handlebar Handlebar Post FRONT Side Shield Roller RIGHT SIDE Pedal Strap Pedal 4 To help us assist you use the HealthRider¨ RC150. The serial number can be found on a decal attached to the HealthRider¨ RC150 (see the front cover of...
... this manual carefully before you , please mention the product model number and serial number when calling. Backrest Seat BACK Seat Knob Seat Handle Book Holder Console Pulse Sensor Resistance Knob Water Bottle Holder (Bottle not included) Handlebar Handlebar Post FRONT Side Shield Roller RIGHT SIDE Pedal Strap Pedal 4 To help us assist you use the HealthRider¨ RC150. The serial number can be found on a decal attached to the HealthRider¨ RC150 (see the front cover of...
English Manual
Page 5
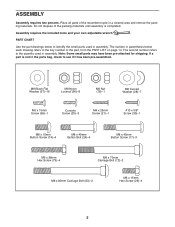
...-attached for shipping. If a part is completed. The second number refers to the key number of the part, from the PART LIST on page 14. ASSEMBLY Assembly requires two persons. The number in assembly. Do not dispose of the recumbent cycle in assembly. Place all parts of the packing materials until assembly is not in the parts bag, check to identify the small parts used in a cleared area and remove...
...-attached for shipping. If a part is completed. The second number refers to the key number of the part, from the PART LIST on page 14. ASSEMBLY Assembly requires two persons. The number in assembly. Do not dispose of the recumbent cycle in assembly. Place all parts of the packing materials until assembly is not in the parts bag, check to identify the small parts used in a cleared area and remove...
English Manual
Page 6
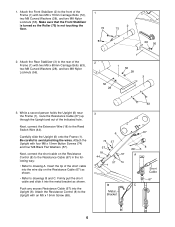
... a second person holds the Upright (6) near the Frame (1), route the Resistance Cable (67) up through the Upright and out of the short cable into the Upright (6). Next, connect the short cable on the Resistance Cable (67) as shown. Next, connect the Extension Wire (18) to avoid pinching the wires. Attach the Resistance Control (8) to the rear of the Frame (1) with two M8 x 80mm Carriage Bolts (63), two M8 Curved...
... a second person holds the Upright (6) near the Frame (1), route the Resistance Cable (67) up through the Upright and out of the short cable into the Upright (6). Next, connect the short cable on the Resistance Cable (67) as shown. Next, connect the Extension Wire (18) to avoid pinching the wires. Attach the Resistance Control (8) to the rear of the Frame (1) with two M8 x 80mm Carriage Bolts (63), two M8 Curved...
English Manual
Page 7
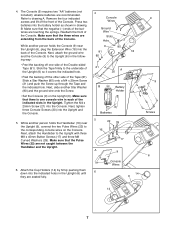
... the Screw. ¥ Set the Console (9) on the Console. Tighten the M4 x 25mm Screw (21) into the Upright and the Console. 5. While another person holds the Handlebar (16) near the Upright (6), plug the Extension Wire (18) into the indicated holes in the Upright (6) until they are not caught between the Handlebar and the Upright. 6. Press two batteries into the battery holder as shown in the Upright. Next, attach...
... the Screw. ¥ Set the Console (9) on the Console. Tighten the M4 x 25mm Screw (21) into the Upright and the Console. 5. While another person holds the Handlebar (16) near the Upright (6), plug the Extension Wire (18) into the indicated holes in the Upright (6) until they are not caught between the Handlebar and the Upright. 6. Press two batteries into the battery holder as shown in the Upright. Next, attach...
English Manual
Page 8
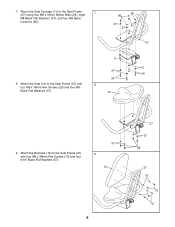
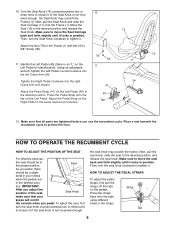
Attach the Seat (12) to the Seat Frame 7 (27) using four M8 x 40mm Button Bolts (24), eight M8 Black Flat Washers (57), and four M8 Nylon Locknuts (56). 56 56 57 57 57 27 11 57 57 24 24 8. 7. Attach the Seat Carriage (11) to the Seat Frame (27) with four M6 x 38mm Hex Screws (73) and four 5/16Ó Black Flat Washers (57). 57 9 13 8 27 57 29 27 57 73 57 73 Attach the Backrest (13) to the Seat Frame (27) with four M6 x 16mm Hex Screws (29) and four M8 Black Flat Washers (57). 8 12 9.
Attach the Seat (12) to the Seat Frame 7 (27) using four M8 x 40mm Button Bolts (24), eight M8 Black Flat Washers (57), and four M8 Nylon Locknuts (56). 56 56 57 57 57 27 11 57 57 24 24 8. 7. Attach the Seat Carriage (11) to the Seat Frame (27) with four M6 x 38mm Hex Screws (73) and four 5/16Ó Black Flat Washers (57). 57 9 13 8 27 57 29 27 57 73 57 73 Attach the Backrest (13) to the Seat Frame (27) with four M6 x 16mm Hex Screws (29) and four M8 Black Flat Washers (57). 8 12 9.
English Manual
Page 9
... left Crank Arm (34). Make sure that your knees when the pedals are tightened before you pedal. Attach the Nut (78) to the desired position, and release the seat knob. Seat As you pedal, there should be a slight bend in your knees will not hit the console when you use the recumbent cycle. To adjust the seat, first turn the seat knob counterclockwise two or three turns to move the Seat...
... left Crank Arm (34). Make sure that your knees when the pedals are tightened before you pedal. Attach the Nut (78) to the desired position, and release the seat knob. Seat As you pedal, there should be a slight bend in your knees will not hit the console when you use the recumbent cycle. To adjust the seat, first turn the seat knob counterclockwise two or three turns to move the Seat...
English Manual
Page 10
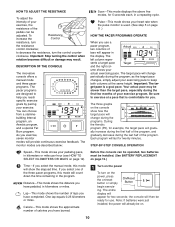
... On/Reset Button begin exercis- The monitor modes are designed to exercise at the same height. Before the console can be operated, two batteries must be on page 12). HOW TO ADJUST THE RESISTANCE To adjust the intensity of your exercise, the resistance of the pedals can be slower than the target pace, especially during the first few months of your exercise program. Important: Stop turning the control...
... On/Reset Button begin exercis- The monitor modes are designed to exercise at the same height. Before the console can be operated, two batteries must be on page 12). HOW TO ADJUST THE RESISTANCE To adjust the intensity of your exercise, the resistance of the pedals can be slower than the target pace, especially during the first few months of your exercise program. Important: Stop turning the control...
English Manual
Page 11
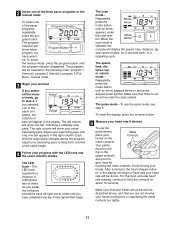
... pace changes during the program, adjust your exercising pace to flash and your workout If you select- The speed, time, distance, lap, or calorie modeÑ Repeatedly press the mode button until the program indicator disappears. Avoid moving your fin- For the most accurate heart rate reading, continue to step 4. Adjust your Contacts hands on /reset button. 5 Measure your heart rate if desired To use the pulse mode, see step 5. To select the manual mode, press the program button until...
... pace changes during the program, adjust your exercising pace to flash and your workout If you select- The speed, time, distance, lap, or calorie modeÑ Repeatedly press the mode button until the program indicator disappears. Avoid moving your fin- For the most accurate heart rate reading, continue to step 4. Adjust your Contacts hands on /reset button. 5 Measure your heart rate if desired To use the pulse mode, see step 5. To select the manual mode, press the program button until...
English Manual
Page 12
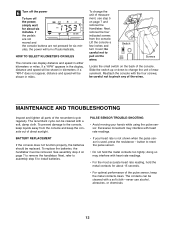
... the display, distance and speed will be careful not to pull on page 7 to pinch any of the pulse sensor, keep the console out of the console. PULSE SENSOR TROUBLE-SHOOTING ¥ Avoid moving your heart rate is not shown when the pulse sensor is used, press the resistance Ð button to the console, keep liquids away from the console. 6 Turn off the power To turn off automatically. If a ÒKPHÓ appears in miles. BATTERY REPLACEMENT...
... the display, distance and speed will be careful not to pull on page 7 to pinch any of the pulse sensor, keep the console out of the console. PULSE SENSOR TROUBLE-SHOOTING ¥ Avoid moving your heart rate is not shown when the pulse sensor is used, press the resistance Ð button to the console, keep liquids away from the console. 6 Turn off the power To turn off automatically. If a ÒKPHÓ appears in miles. BATTERY REPLACEMENT...
English Manual
Page 13
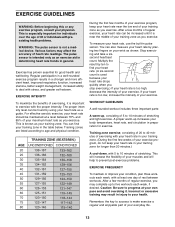
... will help to five workouts each week, with at your training zone for good health and well-being. Remember, the key to exercise with preexisting health problems. WARNING: The pulse sensor is used because your heart rate as you exercise. EXERCISE INTENSITY To maximize the benefits of your exercise program, keep your heart rate in the table below. To measure your exercise. You can find your heart rate. (A six-second count...
... will help to five workouts each week, with at your training zone for good health and well-being. Remember, the key to exercise with preexisting health problems. WARNING: The pulse sensor is used because your heart rate as you exercise. EXERCISE INTENSITY To maximize the benefits of your exercise program, keep your heart rate in the table below. To measure your exercise. You can find your heart rate. (A six-second count...
English Manual
Page 14
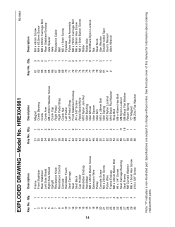
... Pedal Strap Front Stabilizer Endcap #4 x 3/8Ó Screw Reed Switch/Wire M10 Nylon Jam Nut Idler Bushing Idler Wheel Idler Spacer Idler Arm M10 x 26mm Bolt Idler Spring M10 Nylon Locknut M10 Black Flat Washer Stop Bolt M8 x 45mm Hex Bolt M8 Nylon Locknut M8 Black Flat Washer Return Spring ÒCÓ Magnet M8 Zinc Flat Washer R0199A Key No. See the back cover...
... Pedal Strap Front Stabilizer Endcap #4 x 3/8Ó Screw Reed Switch/Wire M10 Nylon Jam Nut Idler Bushing Idler Wheel Idler Spacer Idler Arm M10 x 26mm Bolt Idler Spring M10 Nylon Locknut M10 Black Flat Washer Stop Bolt M8 x 45mm Hex Bolt M8 Nylon Locknut M8 Black Flat Washer Return Spring ÒCÓ Magnet M8 Zinc Flat Washer R0199A Key No. See the back cover...
English Manual
Page 16
... of ICON Health & Fitness, Inc. HOW TO ORDER REPLACEMENT PARTS To order replacement parts, simply call our Customer Service Department toll-free at ICON's option, the product through Friday, 6 a.m. LIMITED WARRANTY ICON Health & Fitness, Inc. (ICON), warrants this warranty is authorized by an ICON authorized service center, products used as store display models. Accordingly, the above limitation may not apply to freight damage, abuse, misuse, improper or abnormal usage or repairs not provided by ICON. HealthRider...
... of ICON Health & Fitness, Inc. HOW TO ORDER REPLACEMENT PARTS To order replacement parts, simply call our Customer Service Department toll-free at ICON's option, the product through Friday, 6 a.m. LIMITED WARRANTY ICON Health & Fitness, Inc. (ICON), warrants this warranty is authorized by an ICON authorized service center, products used as store display models. Accordingly, the above limitation may not apply to freight damage, abuse, misuse, improper or abnormal usage or repairs not provided by ICON. HealthRider...

