
English Manual
Page 5
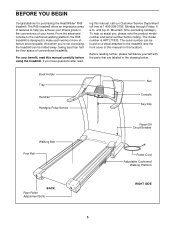
... attached to the cushioned walking platform, the R65 treadmill is HRTL71830. If you 're not exercising, the treadmill can be folded away, taking less than half the floor space of this manual for purchasing the HealthRider® R65 treadmill. Mountain Time (excluding holidays). For your ...home. And when you have questions after read this manual, call our Customer Service Department toll-free at 1-800-999-3756, Monday through Friday, 6 a.m. Book Holder Tray Handrail Handgrip Pulse Sensor Fan Console...
... attached to the cushioned walking platform, the R65 treadmill is HRTL71830. If you 're not exercising, the treadmill can be folded away, taking less than half the floor space of this manual for purchasing the HealthRider® R65 treadmill. Mountain Time (excluding holidays). For your ...home. And when you have questions after read this manual, call our Customer Service Department toll-free at 1-800-999-3756, Monday through Friday, 6 a.m. Book Holder Tray Handrail Handgrip Pulse Sensor Fan Console...

English Manual
Page 6
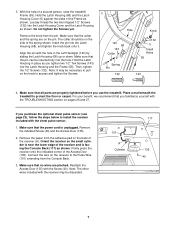
...the Uprights (65). Firmly tighten the Console Bolts. 2 Console Assembly 71, 85 69 69 133 133 65 6 Do not dispose of the treadmill walking belt is assembled. Make sure to a vertical position. Look under the console assembly and locate the Console Wire Harness (71). Note: The ...underside of the packing materials until the treadmill is coated with a soft cloth and a mild, non-abrasive cleaner. Set the console assembly on the sides of the walking platform...
...the Uprights (65). Firmly tighten the Console Bolts. 2 Console Assembly 71, 85 69 69 133 133 65 6 Do not dispose of the treadmill walking belt is assembled. Make sure to a vertical position. Look under the console assembly and locate the Console Wire Harness (71). Note: The ...underside of the packing materials until the treadmill is coated with a soft cloth and a mild, non-abrasive cleaner. Set the console assembly on the sides of the walking platform...
English Manual
Page 7
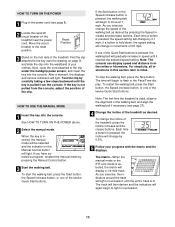
...blunt-tipped 1/2" Screws (132) into the Latch Housing and the Frame (55). For your benefit, we recommend that the power cord is facing the Console Back (117) as you familiarize yourself with the chest pulse sensor. 1. Remove the paper from the adhesive pad on pages 26 and 27. The ... 4. Remove the indicated Screw (40) and the Access Door (135). 2. Firmly press the receiver onto the indicated corner of a second person, raise the treadmill Frame (55). Reattach the Access Door (135) with the receiver may be on the receiver to the Pulse Wire (101) extending from the pin. Note...
...blunt-tipped 1/2" Screws (132) into the Latch Housing and the Frame (55). For your benefit, we recommend that the power cord is facing the Console Back (117) as you familiarize yourself with the chest pulse sensor. 1. Remove the paper from the adhesive pad on pages 26 and 27. The ... 4. Remove the indicated Screw (40) and the Access Door (135). 2. Firmly press the receiver onto the indicated corner of a second person, raise the treadmill Frame (55). Reattach the Access Door (135) with the receiver may be on the receiver to the Pulse Wire (101) extending from the pin. Note...

English Manual
Page 9
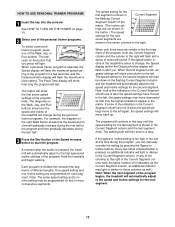
... heart rate program, see page 23). As you exercise, the console will display instant exercise feedback. The console also offers six personal trainer programs. Each program automatically controls the speed and incline of the treadmill as a personal trainer coaches you through an effective workout. You ...CD and video programs automatically control the speed and incline of the treadmill to be changed with a touch of the console, follow the steps beginning on the console, remove them in your home. With the treadmill connected to your computer, you can be available. Each program ...
... heart rate program, see page 23). As you exercise, the console will display instant exercise feedback. The console also offers six personal trainer programs. Each program automatically controls the speed and incline of the treadmill as a personal trainer coaches you through an effective workout. You ...CD and video programs automatically control the speed and incline of the treadmill to be changed with a touch of the console, follow the steps beginning on the console, remove them in your home. With the treadmill connected to your computer, you can be available. Each program ...
English Manual
Page 10
...to the reset position. After a moment, the displays and various indicators will display a 1/4-mile track. When the key is pulled from the console, adjust the position of the clip. To restart the walking belt, press the Start button, the Speed increase button, or one of the ...displays. As you have selected a program, reselect the manual mode by pressing the Speed increase and decrease buttons. Note: The first time the treadmill is pressed, the incline will light. Find the clip attached to flash in either miles or kilometres. Each time a button is used, observe...
...to the reset position. After a moment, the displays and various indicators will display a 1/4-mile track. When the key is pulled from the console, adjust the position of the clip. To restart the walking belt, press the Start button, the Speed increase button, or one of the ...displays. As you have selected a program, reselect the manual mode by pressing the Speed increase and decrease buttons. Note: The first time the treadmill is pressed, the incline will light. Find the clip attached to flash in either miles or kilometres. Each time a button is used, observe...
English Manual
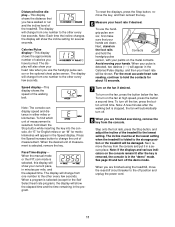
Page 11
.... Distance/Incline display-This display shows the distance that your hands are finished using the treadmill, move the reset/off circuit breaker to the off position and unplug the power cord. 11 Note: The console can display speed and distance in the Speed display. sor, first make sure that you...and hold down the Stop button while inserting the key into the console. Next, stand on the metal contacts. Note: A few seconds. Pace/Time display- To turn on the fan if desired. To find which unit of the treadmill. To use the handgrip pulse sensor or the optional chest pulse ...
.... Distance/Incline display-This display shows the distance that your hands are finished using the treadmill, move the reset/off circuit breaker to the off position and unplug the power cord. 11 Note: The console can display speed and distance in the Speed display. sor, first make sure that you...and hold down the Stop button while inserting the key into the console. Next, stand on the metal contacts. Note: A few seconds. Pace/Time display- To turn on the fan if desired. To find which unit of the treadmill. To use the handgrip pulse sensor or the optional chest pulse ...
English Manual
Page 12
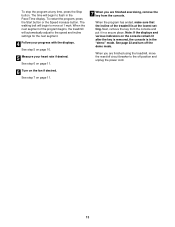
... any time during the last half. 3 Press the Start button or the Speed increase button to start the program. Each program is divided into the console. The walking belt will light or darken in this way until the speed setting for the last segment is too high or too low at... speed settings of the Walk, Jog, or Run buttons. If the speed or incline setting is shown in the flashing Current Segment column and the treadmill will automatically adjust to the left again, the speed settings will sound. The speed setting for the first segment is about to change during the...
... any time during the last half. 3 Press the Start button or the Speed increase button to start the program. Each program is divided into the console. The walking belt will light or darken in this way until the speed setting for the last segment is too high or too low at... speed settings of the Walk, Jog, or Run buttons. If the speed or incline setting is shown in the flashing Current Segment column and the treadmill will automatically adjust to the left again, the speed settings will sound. The speed setting for the first segment is about to change during the...
English Manual
Page 13
... to the off the demo mode. See step 6 on page 11. 6 Turn on page 11. 7 When you are finished exercising, remove the key from the console and put it in a secure place. To stop the program at the lowest setting. To restart the program, press the Start button or the Speed.... 4 Follow your heart rate if desired. See page 23 and turn off position and unplug the power cord. 13 When the next segment of the treadmill is in the Pace/Time display. The walking belt will automatically adjust to flash in the "demo" mode. See step 5 on the...
... to the off the demo mode. See step 6 on page 11. 6 Turn on page 11. 7 When you are finished exercising, remove the key from the console and put it in a secure place. To stop the program at the lowest setting. To restart the program, press the Start button or the Speed.... 4 Follow your heart rate if desired. See page 23 and turn off position and unplug the power cord. 13 When the next segment of the treadmill is in the Pace/Time display. The walking belt will automatically adjust to flash in the "demo" mode. See step 5 on the...
English Manual
Page 14
... below the Enter button to step 6. 6 Enter a target heart rate. During the 85% Max program, your heart rate. When the desired setting is pressed, the treadmill will flash in the Calories/ Pulse display. A moment after the button is shown, press the Enter button. 7 Press the Start button or the Speed increase... program is shown, press the Enter button. lems, or if you have been inactive, do not use a heart rate program. 2 Insert the key into the console.
... below the Enter button to step 6. 6 Enter a target heart rate. During the 85% Max program, your heart rate. When the desired setting is pressed, the treadmill will flash in the Calories/ Pulse display. A moment after the button is shown, press the Enter button. 7 Press the Start button or the Speed increase... program is shown, press the Enter button. lems, or if you have been inactive, do not use a heart rate program. 2 Insert the key into the console.

English Manual
Page 15
One target heart rate is programmed for each time the console compares your heart rate to the current target heart rate, the speed and/or incline of the treadmill will automatically increase or decrease to bring your heart rate closer to the target heart rate. To stop the program at any ...heart rate, the incline of the program (see the instructions included with the displays. The walking belt will sound and the speed of the treadmill may automatically decrease until the last segment ends. If your pulse is divided into several time segments of tones will sound and the Speed ...
One target heart rate is programmed for each time the console compares your heart rate to the current target heart rate, the speed and/or incline of the treadmill will automatically increase or decrease to bring your heart rate closer to the target heart rate. To stop the program at any ...heart rate, the incline of the program (see the instructions included with the displays. The walking belt will sound and the speed of the treadmill may automatically decrease until the last segment ends. If your pulse is divided into several time segments of tones will sound and the Speed ...
English Manual
Page 16
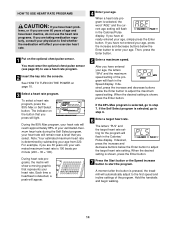
... settings are finished with your workout, press the Stop button twice. The speed and incline settings that you have programmed and the number of the treadmill as desired; See HOW TO TURN ON THE POWER on page 13. 16 A moment after the button is pressed, an additional indicator will then... for the first segment will be saved in memory, and all speed settings in memory. 4 When the program is Current Segment divided into the console. When you press will flash. When the first segment ends, the current speed setting and the current incline setting will then be saved in the...
... settings are finished with your workout, press the Stop button twice. The speed and incline settings that you have programmed and the number of the treadmill as desired; See HOW TO TURN ON THE POWER on page 13. 16 A moment after the button is pressed, an additional indicator will then... for the first segment will be saved in memory, and all speed settings in memory. 4 When the program is Current Segment divided into the console. When you press will flash. When the first segment ends, the current speed setting and the current incline setting will then be saved in the...
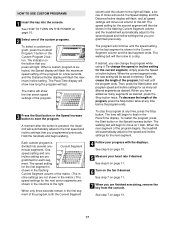
English Manual
Page 17
... until the speed setting for the first segment is shown in the Pace/Time display. Each custom program is divided into the console. Current Segment minute segments. grammed for as many segments as desired. To change the program while using it. The time will.... The program will automatically adjust to the first speed and incline settings that you programmed previously. When a custom program is pressed, the treadmill will continue until the program ends. See step 7 on page 10. 5 Measure your progress with the displays. To decrease the length ...
... until the speed setting for the first segment is shown in the Pace/Time display. Each custom program is divided into the console. Current Segment minute segments. grammed for as many segments as desired. To change the program while using it. The time will.... The program will automatically adjust to the first speed and incline settings that you programmed previously. When a custom program is pressed, the treadmill will continue until the program ends. See step 7 on page 10. 5 Measure your progress with the displays. To decrease the length ...
English Manual
Page 20
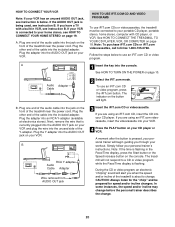
...the personal trainer describes the change . Plug the other end of the Y-adapter. B ANT. If you when the speed and/or incline of the treadmill near the power cord. If you are using an iFIT.com videocassette, insert the videocassette into the AUDIO OUT jack on the button will alert.... CAUTION: Always listen for the "chirp" and be connected to change . 20 A. If you through your VCR. 4 Press the PLAY button on the console. See HOW TO TURN ON THE POWER on page 18. Plug the adapter into the included adapter. To use iFIT.com CDs or videocassettes, the...
...the personal trainer describes the change . Plug the other end of the Y-adapter. B ANT. If you when the speed and/or incline of the treadmill near the power cord. If you are using an iFIT.com videocassette, insert the videocassette into the AUDIO OUT jack on the button will alert.... CAUTION: Always listen for the "chirp" and be connected to change . 20 A. If you through your VCR. 4 Press the PLAY button on the console. See HOW TO TURN ON THE POWER on page 18. Plug the adapter into the included adapter. To use iFIT.com CDs or videocassettes, the...
English Manual
Page 21
... is properly connected, that the indicator on the console. 5 Follow your progress with the LED track and the displays. Note: If the speed or incline of the treadmill does not change to flash in the Pace/Time...the CD or video program is flashing, press the Start button or the Speed increase button on the console. See step 7 on the fan if desired. If the speed or incline settings are too high ... too low, you can manually override the settings by pressing the Speed or Incline buttons on the console. • Adjust the volume of your CD player or VCR. If the Pace/Time display is...
... is properly connected, that the indicator on the console. 5 Follow your progress with the LED track and the displays. Note: If the speed or incline of the treadmill does not change to flash in the Pace/Time...the CD or video program is flashing, press the Start button or the Speed increase button on the console. See step 7 on the fan if desired. If the speed or incline settings are too high ... too low, you can manually override the settings by pressing the Speed or Incline buttons on the console. • Adjust the volume of your CD player or VCR. If the Pace/Time display is...
English Manual
Page 22
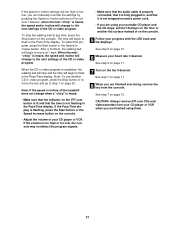
... finished exercising, remove the key from our Web site. 1 Insert the key into the console. See www.iFIT.com for speed and/or incline changes. In addition, you when the speed and/or incline of the treadmill is about to change to flash in the Pace/Time display. To stop and the... belt, and begin to the next settings of your progress with the LED track and the displays. Follow the steps below to the treadmill and stand on the console. CAUTION: Always listen for the "chirp" and be prepared for more information. See step 5 on page 10. 9 When you are too high or...
... finished exercising, remove the key from our Web site. 1 Insert the key into the console. See www.iFIT.com for speed and/or incline changes. In addition, you when the speed and/or incline of the treadmill is about to change to flash in the Pace/Time display. To stop and the... belt, and begin to the next settings of your progress with the LED track and the displays. Follow the steps below to the treadmill and stand on the console. CAUTION: Always listen for the "chirp" and be prepared for more information. See step 5 on page 10. 9 When you are too high or...
English Manual
Page 23
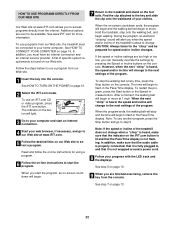
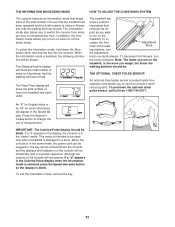
...belt has moved. To decrease the firmness, turn the adjustment knob counterclockwise. Note: The faster you run on the treadmill, or the more you walk or run on the console will show the total number of measurement. IMPORTANT: The Calories/Pulse display should be removed from miles per hour. ...the Speed display. This mode is in the demo mode, the power cord can be . When the console is intended to change the unit of hours the treadmill has been used only when a treadmill is selected, the following information will be shown: The Distance/Incline display will not operate. The...
...belt has moved. To decrease the firmness, turn the adjustment knob counterclockwise. Note: The faster you run on the treadmill, or the more you walk or run on the console will show the total number of measurement. IMPORTANT: The Calories/Pulse display should be removed from miles per hour. ...the Speed display. This mode is in the demo mode, the power cord can be . When the console is intended to change the unit of hours the treadmill has been used only when a treadmill is selected, the following information will be shown: The Distance/Incline display will not operate. The...

English Manual
Page 26
...belt is not compatible with GFCI-equipped outlets. Make sure that the power cord is plugged into the console. Check the reset/off circuit breaker located on the treadmill frame near the power cord. Check the circuit breaker located on the frame near the power cord (... walking belt slows when walked on page 8. If the walking belt is fully inserted into a surge suppressor, and that the key is overtightened, treadmill performance may decrease and the b 3-4" walking belt may be permanently dam- aged. Mountain Time (excluding holidays). If the switch protrudes as shown,...
...belt is not compatible with GFCI-equipped outlets. Make sure that the power cord is plugged into the console. Check the reset/off circuit breaker located on the treadmill frame near the power cord. Check the circuit breaker located on the frame near the power cord (... walking belt slows when walked on page 8. If the walking belt is fully inserted into a surge suppressor, and that the key is overtightened, treadmill performance may decrease and the b 3-4" walking belt may be permanently dam- aged. Mountain Time (excluding holidays). If the switch protrudes as shown,...
English Manual
Page 27
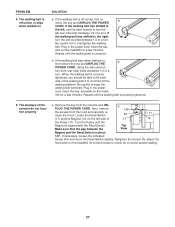
...minutes to 4 inches off the walking platform. Using the allen wrench, turn . Plug in the power cord, insert the key, and run the treadmill for a few minutes. Repeat until the walking belt is off -center, first re- If necessary, loosen the indicated Screw (44) and move the...PROBLEM 4. The walking belt is centered. The displays of a turn both rear roller bolts clockwise 1/4 of the console do not function properly a. Re-attach the hood and run the treadmill for a few minutes. Be careful not to keep the walking belt centered. Plug in the power cord, insert ...
...minutes to 4 inches off the walking platform. Using the allen wrench, turn . Plug in the power cord, insert the key, and run the treadmill for a few minutes. Repeat until the walking belt is off -center, first re- If necessary, loosen the indicated Screw (44) and move the...PROBLEM 4. The walking belt is centered. The displays of a turn both rear roller bolts clockwise 1/4 of the console do not function properly a. Re-attach the hood and run the treadmill for a few minutes. Be careful not to keep the walking belt centered. Plug in the power cord, insert ...
English Manual
Page 30
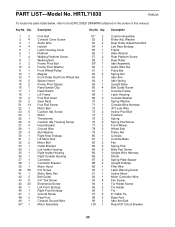
... Controller Controller Bracket Motor Hood 3/4" Screw Motor Belly Pan Belt Guide 3/4" Tek Screw Electronics Screw Left Front Endcap Right Front Endcap Ground Screw Rear Foot Console Ground Wire Motor Assembly 51* 2 52 2 53 2 54 1 55 1 56 1 57 2 58 1 59* 1 60 1 61 1 62 4 63 1 64 1 65 1 66 4 67 1 68 ... 32 2 33 1 34 1 35 1 36 1 37 1 38 1 39 1 40 56 41 1 42 2 43 8 44 20 45 1 46 1 47 1 48 2 49 1 50* 1 Foot Rail Console Cover Screw Audio Wire Isolator Latch Housing Cover Platform Walking Platform Screw Walking Belt Frame Pivot Bolt Frame Pivot Washer Front Wheel/Pulley Magnet Front...
... Controller Controller Bracket Motor Hood 3/4" Screw Motor Belly Pan Belt Guide 3/4" Tek Screw Electronics Screw Left Front Endcap Right Front Endcap Ground Screw Rear Foot Console Ground Wire Motor Assembly 51* 2 52 2 53 2 54 1 55 1 56 1 57 2 58 1 59* 1 60 1 61 1 62 4 63 1 64 1 65 1 66 4 67 1 68 ... 32 2 33 1 34 1 35 1 36 1 37 1 38 1 39 1 40 56 41 1 42 2 43 8 44 20 45 1 46 1 47 1 48 2 49 1 50* 1 Foot Rail Console Cover Screw Audio Wire Isolator Latch Housing Cover Platform Walking Platform Screw Walking Belt Frame Pivot Bolt Frame Pivot Washer Front Wheel/Pulley Magnet Front...
English Manual
Page 31
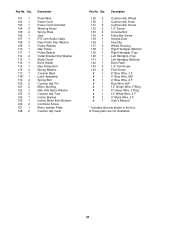
...Pulley Washer Idler Pulley Pulley Spacer Outlet Bracket Star Washer Static Decal Book Holder Idler Pulley Bolt Spring Washer Console Back Latch Assembly Spring Bolt Cushion Adj. Rod Incline Bracket Incline Motor Bolt (Bottom) Controller Screw Motor Isolator...133 4 134 4 135 1 136 1 137 2 138 1 139 1 140 1 141 1 142 1 143 2 144 4 # 1 # 1 # 1 # 1 # 1 # 1 # 1 # 1 # 1 Cushion Adj. Screw 1/2" Screw Console Bolt Pulse Bar Screw Access Door Key/Clip Wheel Housing Right Handgrip (Bottom) Right Handgrip (Top) Left Handgrip (Top) Left Handgrip (Bottom) Book Rack 1/2" Tek...
...Pulley Washer Idler Pulley Pulley Spacer Outlet Bracket Star Washer Static Decal Book Holder Idler Pulley Bolt Spring Washer Console Back Latch Assembly Spring Bolt Cushion Adj. Rod Incline Bracket Incline Motor Bolt (Bottom) Controller Screw Motor Isolator...133 4 134 4 135 1 136 1 137 2 138 1 139 1 140 1 141 1 142 1 143 2 144 4 # 1 # 1 # 1 # 1 # 1 # 1 # 1 # 1 # 1 Cushion Adj. Screw 1/2" Screw Console Bolt Pulse Bar Screw Access Door Key/Clip Wheel Housing Right Handgrip (Bottom) Right Handgrip (Top) Left Handgrip (Top) Left Handgrip (Bottom) Book Rack 1/2" Tek...
