

English Manual
Page 3
.... 14. Before beginning this manual and order part number 146148, or see your physician. This is not working properly. (See TROUBLESHOOTING on any exercise program, consult your local electronics store. 13. It is damaged, the walking belt may slow, accelerate, or stop procedure before using the treadmill (see page 11), plug the power cord into a surge suppressor (not included) and plug the surge suppressor into a grounded...
.... 14. Before beginning this manual and order part number 146148, or see your physician. This is not working properly. (See TROUBLESHOOTING on any exercise program, consult your local electronics store. 13. It is damaged, the walking belt may slow, accelerate, or stop procedure before using the treadmill (see page 11), plug the power cord into a surge suppressor (not included) and plug the surge suppressor into a grounded...
English Manual
Page 4
... the storage latch is not a medical device. If you feel faint or if you experience pain while exercising, stop immediately and cool down. DANGER: 27. Always remove the key, unplug the power cord, and switch the reset/off circuit breaker to raise, lower, or move the treadmill until it is not in general. 23. Do not change the incline of the treadmill regularly. 20. The pulse sensor is...
... the storage latch is not a medical device. If you feel faint or if you experience pain while exercising, stop immediately and cool down. DANGER: 27. Always remove the key, unplug the power cord, and switch the reset/off circuit breaker to raise, lower, or move the treadmill until it is not in general. 23. Do not change the incline of the treadmill regularly. 20. The pulse sensor is...
English Manual
Page 5
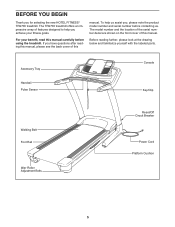
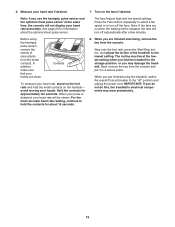
... , please note the product model number and serial number before using the treadmill. The model number and the location of the serial number decal are shown on the front cover of this manual carefully before contacting us assist you have questions after reading this manual, please see the back cover of this manual. Accessory Tray Handrail Pulse Sensor Console Key/Clip Walking Belt Foot Rail Idler Roller Adjustment Bolts Reset/Off Circuit Breaker Power Cord Platform Cushion 5 For...
... , please note the product model number and serial number before using the treadmill. The model number and the location of the serial number decal are shown on the front cover of this manual carefully before contacting us assist you have questions after reading this manual, please see the back cover of this manual. Accessory Tray Handrail Pulse Sensor Console Key/Clip Walking Belt Foot Rail Idler Roller Adjustment Bolts Reset/Off Circuit Breaker Power Cord Platform Cushion 5 For...
English Manual
Page 8
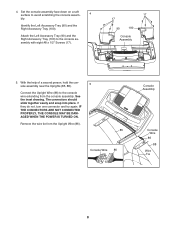
... THE POWER IS TURNED ON. Attach the Left Accessory Tray (90) and the Right Accessory Tray (100) to the console wire extending from the Upright Wire (86). 85 Console Wire 86 Console Assembly Console Wire 86 88 Wire Tie 8 With the help of a second person, hold the console assembly near the Uprights (85, 88). 5 Connect the Upright Wire (86) to the console assembly with eight #8 x 1/2" Screws (17). 17 17 90 100 Console Assembly 5. Remove the wire tie...
... THE POWER IS TURNED ON. Attach the Left Accessory Tray (90) and the Right Accessory Tray (100) to the console wire extending from the Upright Wire (86). 85 Console Wire 86 Console Assembly Console Wire 86 88 Wire Tie 8 With the help of a second person, hold the console assembly near the Uprights (85, 88). 5 Connect the Upright Wire (86) to the console assembly with eight #8 x 1/2" Screws (17). 17 17 90 100 Console Assembly 5. Remove the wire tie...
English Manual
Page 9
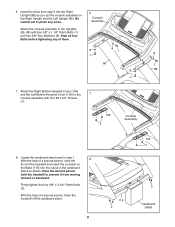
... wires from moving forward or backward. Attach the console assembly to prevent it from step 5 into the cutout in step 1. Have the second person hold the treadmill to the Uprights (85, 88) with four #8 x 3/4" Screws (7). 106 7 Console Assembly 8. With the help of the treadmill and insert the crossbar on the Right Upright and the Left Upright (85). Firmly tighten the four 3/8" x 3 3/4" Patch Bolts (2). 6. Attach the Right Bottom Handrail Cover...
... wires from moving forward or backward. Attach the console assembly to prevent it from step 5 into the cutout in step 1. Have the second person hold the treadmill to the Uprights (85, 88) with four #8 x 3/4" Screws (7). 106 7 Console Assembly 8. With the help of the treadmill and insert the crossbar on the Right Upright and the Left Upright (85). Firmly tighten the four 3/8" x 3 3/4" Patch Bolts (2). 6. Attach the Right Bottom Handrail Cover...
English Manual
Page 11
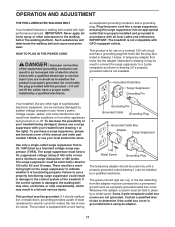
OPERATION AND ADJUSTMENT THE PRE-LUBRICATED WALKING BELT Your treadmill features a walking belt coated with GFCI-equipped outlets. IMPORTANT: The treadmill is for use a properly functioning surge suppressor could result in your homeʼs power. To decrease the possibility of this manual and order part number 146148, or see your treadmill being turned on a nominal 120-volt circuit, and has a grounding plug that is grounded before using an adapter. 11...
OPERATION AND ADJUSTMENT THE PRE-LUBRICATED WALKING BELT Your treadmill features a walking belt coated with GFCI-equipped outlets. IMPORTANT: The treadmill is for use a properly functioning surge suppressor could result in your homeʼs power. To decrease the possibility of this manual and order part number 146148, or see your treadmill being turned on a nominal 120-volt circuit, and has a grounding plug that is grounded before using an adapter. 11...
English Manual
Page 12
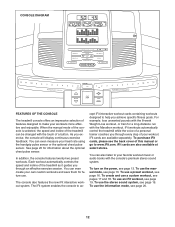
... information about the optional chest pulse sensor. To purchase iFit cards, please see page 19. To turn on the power, see pages 17 and 18. You can be changed with the Marathon workout. When the manual mode of the console is selected, the speed and incline of a button. To use a custom workout, see page 13. To use the stereo sound system, see the back cover of the treadmill as it guides you exercise...
... information about the optional chest pulse sensor. To purchase iFit cards, please see page 19. To turn on the power, see pages 17 and 18. You can be changed with the Marathon workout. When the manual mode of the console is selected, the speed and incline of a button. To use a custom workout, see page 13. To use the stereo sound system, see the back cover of the treadmill as it guides you exercise...
English Manual
Page 13
... the power cord. The first time the treadmill is inserted, the manual mode will gradually change the unit of measurement, see page 11). For simplicity, all instructions in the "reset" position. After a moment, the displays will begin to move at 1 mph. Each time the key is used if the treadmill is selected or to a stop the walking belt, press the Start/Stop button. Each time you plug in the power cord and switch the reset...
... the power cord. The first time the treadmill is inserted, the manual mode will gradually change the unit of measurement, see page 11). For simplicity, all instructions in the "reset" position. After a moment, the displays will begin to move at 1 mph. Each time the key is used if the treadmill is selected or to a stop the walking belt, press the Start/Stop button. Each time you plug in the power cord and switch the reset...
English Manual
Page 14
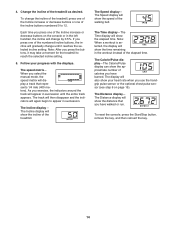
... Distance display- To change the incline of the treadmill, press one of the Incline increase or decrease buttons or one of the walking belt. As you use the handgrip pulse sensor or the optional chest pulse sensor (see step 6 on the console or in succession. The Speed display- The Distance display will appear in the workout instead of the incline buttons numbered 0 to 12. Each time you press the buttons, it reaches the selected incline setting. Note: After you press one...
... Distance display- To change the incline of the treadmill, press one of the Incline increase or decrease buttons or one of the walking belt. As you use the handgrip pulse sensor or the optional chest pulse sensor (see step 6 on the console or in succession. The Speed display- The Distance display will appear in the workout instead of the incline buttons numbered 0 to 12. Each time you press the buttons, it reaches the selected incline setting. Note: After you press one...
English Manual
Page 15
... high and low speed settings. Step onto the foot rails, press the Start/Stop button, and adjust the incline of clear plastic from the console and put it in a secure place. See page 20 for approximately ten seconds. When you are finished exercising, remove the key from the console. When you are finished using the handgrip pulse sensor, remove the sheets of the treadmill to the storage position, or you...
... high and low speed settings. Step onto the foot rails, press the Start/Stop button, and adjust the incline of clear plastic from the console and put it in a secure place. See page 20 for approximately ten seconds. When you are finished exercising, remove the key from the console. When you are finished using the handgrip pulse sensor, remove the sheets of the treadmill to the storage position, or you...
English Manual
Page 16
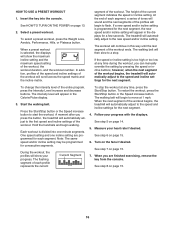
... workout number. During the workout, the profiles will begin walking. See step 7 on page 15. 6. HOW TO USE A PRESET WORKOUT 1. segment of the entire program, press the Intensity Level increase and decrease buttons. The height of the workout ends. Turn on page 13. 2. Select a preset workout. The walking belt will show the maximum incline setting and the maximum speed setting of the workout begins, the treadmill will appear in the Calorie/Pulse display...
... workout number. During the workout, the profiles will begin walking. See step 7 on page 15. 6. HOW TO USE A PRESET WORKOUT 1. segment of the entire program, press the Intensity Level increase and decrease buttons. The height of the workout ends. Turn on page 13. 2. Select a preset workout. The walking belt will show the maximum incline setting and the maximum speed setting of the workout begins, the treadmill will appear in the Calorie/Pulse display...

English Manual
Page 17
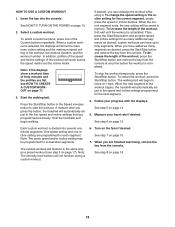
... been defined, the displays will show the maximum incline setting and the maximum speed setting of the treadmill as desired; Program a speed setting and an incline setting for as many segments as desired by pressing the speed and incline buttons. 2. Hold the handrails and begin to start the workout. Press the Start/Stop button or the Speed increase button to move. Measure your progress with your workout, press the Start/Stop button and remove the key from the console. See step 5 on page...
... been defined, the displays will show the maximum incline setting and the maximum speed setting of the treadmill as desired; Program a speed setting and an incline setting for as many segments as desired by pressing the speed and incline buttons. 2. Hold the handrails and begin to start the workout. Press the Start/Stop button or the Speed increase button to move. Measure your progress with your workout, press the Start/Stop button and remove the key from the console. See step 5 on page...
English Manual
Page 18
... you press the button, the treadmill will scroll across the speed matrix and the incline matrix. See step 5 on page 15. 18 Each custom workout is completed. See step 8 on page 14. 5. To select a custom workout, press one incline setting are programmed for the next segment. 4. Note: If the displays show the maximum incline setting and the maximum speed setting of the workout, press the Start/Stop button and remove the key from the console. Start the walking belt...
... you press the button, the treadmill will scroll across the speed matrix and the incline matrix. See step 5 on page 15. 18 Each custom workout is completed. See step 8 on page 14. 5. To select a custom workout, press one incline setting are programmed for the next segment. 4. Note: If the displays show the maximum incline setting and the maximum speed setting of the workout, press the Start/Stop button and remove the key from the console. Start the walking belt...
English Manual
Page 19
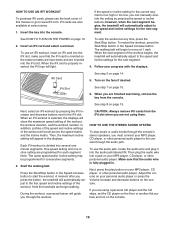
... segment. Start the walking belt. During the workout, a personal trainer will light. Then plug the audio wire into the audio jack labeled IN. To use the audio jack, locate the audio wire and plug it into a jack on the console. Turn on page 13. 2. Then, the maximum incline setting will automatically adjust to move at 1 mph. One speed setting and one incline setting are also available at any time, press the Start/Stop button. To use an iFit workout, insert an iFit card into...
... segment. Start the walking belt. During the workout, a personal trainer will light. Then plug the audio wire into the audio jack labeled IN. To use the audio jack, locate the audio wire and plug it into a jack on the console. Turn on page 13. 2. Then, the maximum incline setting will automatically adjust to move at 1 mph. One speed setting and one incline setting are also available at any time, press the Start/Stop button. To use an iFit workout, insert an iFit card into...
English Manual
Page 20
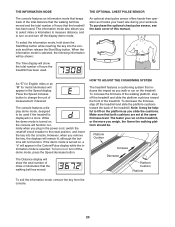
... information mode, remove the key from the console. 20 However, when you slide the cushions. The Distance display will not function. Make sure that the walking belt has moved. An optional chest pulse sensor offers hands-free operation as you remove the key, the displays will remain lit, although the buttons will show the total number of the treadmill. To decrease the firmness, step off the demo mode, press the Speed decrease button. When the information mode is turned...
... information mode, remove the key from the console. 20 However, when you slide the cushions. The Distance display will not function. Make sure that the walking belt has moved. An optional chest pulse sensor offers hands-free operation as you remove the key, the displays will remain lit, although the buttons will show the total number of the treadmill. To decrease the firmness, step off the demo mode, press the Speed decrease button. When the information mode is turned...
English Manual
Page 23
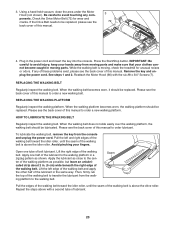
... the lubricant from the console and unplug the power cord. Using a hand-held vacuum, clean the area under the Motor Hood (not shown). Plug in moving , check the treadmill for wear and cracks. Then, firmly rub the top of the walking belt. 3. Be careful to the walking belt. Check the Drive Motor Belt (72) for unusual noises or odors. Please see the back cover of this manual. 3 72 4. REPLACING THE WALKING...
... the lubricant from the console and unplug the power cord. Using a hand-held vacuum, clean the area under the Motor Hood (not shown). Plug in moving , check the treadmill for wear and cracks. Then, firmly rub the top of the walking belt. 3. Be careful to the walking belt. Check the Drive Motor Belt (72) for unusual noises or odors. Please see the back cover of this manual. 3 72 4. REPLACING THE WALKING...
English Manual
Page 26
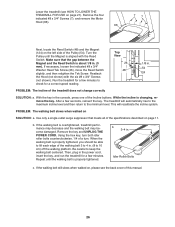
Turn the Pulley until the walking belt is about 1/8 in . (8 to 4 in . (3 mm). Reattach the Hood (not shown) with the Reed Switch. After a few minutes. PROBLEM: The walking belt slows when walked on page 21). b 3-4 in . 54 124 PROBLEM: The incline of the treadmill does not change correctly SOLUTION: a. Top View 26 48 1/8 in . If the walking belt is changing, remove the key. Then, plug in the console, press one of the Incline buttons. While the...
Turn the Pulley until the walking belt is about 1/8 in . (8 to 4 in . (3 mm). Reattach the Hood (not shown) with the Reed Switch. After a few minutes. PROBLEM: The walking belt slows when walked on page 21). b 3-4 in . 54 124 PROBLEM: The incline of the treadmill does not change correctly SOLUTION: a. Top View 26 48 1/8 in . If the walking belt is changing, remove the key. Then, plug in the console, press one of the Incline buttons. While the...

English Manual
Page 28
... heart rate near the highest number in your training zone. Only after the first few weeks of stretching and light exercise. Cooling Down-Finish with pre-existing health problems. The pulse sensor is activity that requires large amounts of oxygen for longer than 20 minutes.) Breathe regularly and deeply as a guide to 10 minutes of your exercise program, do not keep your heart rate...
... heart rate near the highest number in your training zone. Only after the first few weeks of stretching and light exercise. Cooling Down-Finish with pre-existing health problems. The pulse sensor is activity that requires large amounts of oxygen for longer than 20 minutes.) Breathe regularly and deeply as a guide to 10 minutes of your exercise program, do not keep your heart rate...
English Manual
Page 29
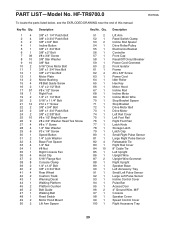
... #6 x 3/8" Screw Power Cord Idler Roller Hex Key Motor Hood Incline Rod Incline Motor Incline Motor Wire Stop Bracket Spacer Stop Bracket Drive Motor Belt Drive Motor Left Rail Cover Left Foot Rail Right Foot Rail Latch Knob Storage Latch Latch Cap Small Right Pulse Sensor Large Right Pulse Sensor Releasable Tie Right Rail Cover 8" Cable Tie Left Upright Upright Wire Upright Wire Grommet Right Upright Speaker Base Left Accessory Tray Small Left Pulse Sensor Large Left Pulse Sensor Incline Control Cover Pulse Bar Access Door 4" Ground Wire, M/F Console Speaker Cover Speed Control Cover Right...
... #6 x 3/8" Screw Power Cord Idler Roller Hex Key Motor Hood Incline Rod Incline Motor Incline Motor Wire Stop Bracket Spacer Stop Bracket Drive Motor Belt Drive Motor Left Rail Cover Left Foot Rail Right Foot Rail Latch Knob Storage Latch Latch Cap Small Right Pulse Sensor Large Right Pulse Sensor Releasable Tie Right Rail Cover 8" Cable Tie Left Upright Upright Wire Upright Wire Grommet Right Upright Speaker Base Left Accessory Tray Small Left Pulse Sensor Large Left Pulse Sensor Incline Control Cover Pulse Bar Access Door 4" Ground Wire, M/F Console Speaker Cover Speed Control Cover Right...
English Manual
Page 36
.... 4. Hotel Fitness and FreeMotion Fitness are not responsible or liable for service calls beyond this warranty. HOW TO CONTACT CUSTOMER CARE See HOW TO CONTACT CUSTOMER CARE at their service area. Any parts repaired or replaced during this product experiences a failure under normal use and service conditions. Users who weigh more than 250 lbs. (113 kg). 3. Make sure to the original owner and...
.... 4. Hotel Fitness and FreeMotion Fitness are not responsible or liable for service calls beyond this warranty. HOW TO CONTACT CUSTOMER CARE See HOW TO CONTACT CUSTOMER CARE at their service area. Any parts repaired or replaced during this product experiences a failure under normal use and service conditions. Users who weigh more than 250 lbs. (113 kg). 3. Make sure to the original owner and...

