
English Manual
Page 1
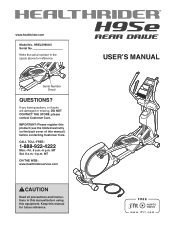
... limited warranty on the back cover of this manual) before using this equipment. MT ON THE WEB: www.healthriderservice.com CAUTION Read all precautions and instructions in the space above for future reference. Keep this manual before contacting Customer Care. Serial Number Decal QUESTIONS? CALL TOLL-FREE: 1-888-922-4222 Mon.–-Fri. 6 a.m.–-6 p.m. HREL59909.5 Serial No. please contact Customer Care. USER’'S MANUAL...
... limited warranty on the back cover of this manual) before using this equipment. MT ON THE WEB: www.healthriderservice.com CAUTION Read all precautions and instructions in the space above for future reference. Keep this manual before contacting Customer Care. Serial Number Decal QUESTIONS? CALL TOLL-FREE: 1-888-922-4222 Mon.–-Fri. 6 a.m.–-6 p.m. HREL59909.5 Serial No. please contact Customer Care. USER’'S MANUAL...
English Manual
Page 2
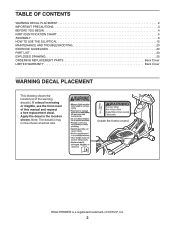
... BEGIN 4 PART IDENTIFICATION CHART 5 ASSEMBLY 6 HOW TO USE THE ELLIPTICAL 12 MAINTENANCE AND TROUBLESHOOTING 20 EXERCISE GUIDELINES 22 PART LIST 23 EXPLODED DRAWING 25 ORDERING REPLACEMENT PARTS Back Cover LIMITED WARRANTY Back Cover WARNING DECAL PLACEMENT This drawing shows the location(s) of this manual and request a free replacement decal. If a decal is a registered trademark of ICON IP, Inc. 2 Note: The decal(s) may not be shown at actual size. ! (inside the frame covers) HEALTHRIDER is...
... BEGIN 4 PART IDENTIFICATION CHART 5 ASSEMBLY 6 HOW TO USE THE ELLIPTICAL 12 MAINTENANCE AND TROUBLESHOOTING 20 EXERCISE GUIDELINES 22 PART LIST 23 EXPLODED DRAWING 25 ORDERING REPLACEMENT PARTS Back Cover LIMITED WARRANTY Back Cover WARNING DECAL PLACEMENT This drawing shows the location(s) of this manual and request a free replacement decal. If a decal is a registered trademark of ICON IP, Inc. 2 Note: The decal(s) may not be shown at actual size. ! (inside the frame covers) HEALTHRIDER is...
English Manual
Page 3
... and instructions in this product. 1. Do not use of this manual and all parts regularly. Replace any exercise program, consult your back straight while using the elliptical; ICON assumes no responsibility for home use only. Wear appropriate clothes while exercising; This is especially important for foot protection while exercising. 3. Inspect and properly tighten all warnings on a level surface, with pre-existing health problems. 2. do not arch your pedaling speed...
... and instructions in this product. 1. Do not use of this manual and all parts regularly. Replace any exercise program, consult your back straight while using the elliptical; ICON assumes no responsibility for home use only. Wear appropriate clothes while exercising; This is especially important for foot protection while exercising. 3. Inspect and properly tighten all warnings on a level surface, with pre-existing health problems. 2. do not arch your pedaling speed...
English Manual
Page 4
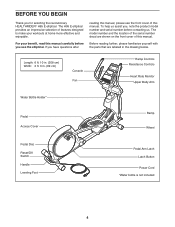
... YOU BEGIN Thank you have questions after reading this manual, please see the front cover of this manual. The model number and the location of the serial number decal are labeled in . (69 cm) Console Fan Ramp Controls Resistance Controls Heart Rate Monitor Upper Body Arm Water Bottle Holder* Pedal Access Cover Ramp Wheel Pedal Disc Reset/Off Switch Handle Leveling Foot Pedal Arm Latch Latch Button Power Cord *Water bottle is not included 4 If you for selecting the...
... YOU BEGIN Thank you have questions after reading this manual, please see the front cover of this manual. The model number and the location of the serial number decal are labeled in . (69 cm) Console Fan Ramp Controls Resistance Controls Heart Rate Monitor Upper Body Arm Water Bottle Holder* Pedal Access Cover Ramp Wheel Pedal Disc Reset/Off Switch Handle Leveling Foot Pedal Arm Latch Latch Button Power Cord *Water bottle is not included 4 If you for selecting the...
English Manual
Page 6
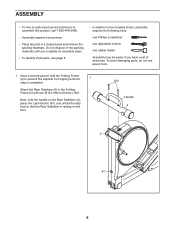
... an authorized service technician to assemble this 1 step is resting on the Rear Stabilizer (4), press the Latch Button (67), and unfold the elliptical so that the Rear Stabilizer is completed. Next, hold the Folding Frame (2) to the Folding Frame (2) with two M10 x 95mm Screws (100). To avoid damaging parts, do not use power tools. 1. Attach the Rear Stabilizer (4) to prevent the elliptical from tipping until you have a set of the...
... an authorized service technician to assemble this 1 step is resting on the Rear Stabilizer (4), press the Latch Button (67), and unfold the elliptical so that the Rear Stabilizer is completed. Next, hold the Folding Frame (2) to the Folding Frame (2) with two M10 x 95mm Screws (100). To avoid damaging parts, do not use power tools. 1. Attach the Rear Stabilizer (4) to prevent the elliptical from tipping until you have a set of the...
English Manual
Page 11
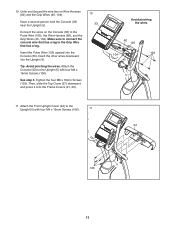
... Avoid pinching the wires 60 105 104 106 45 5 11. Insert the other wires downward into the Console (33). Attach the Front Upright Cover (24) to the Pulse Wire (105), the Wire Harness (60), and the Grip Wires (45, 104). Connect the wires on Wire Harness (60) and the Grip Wires (45, 104). Insert the Pulse Wire (105) upward into the Upright (5). Tighten the four M8 x 16mm Screws (102).
... Avoid pinching the wires 60 105 104 106 45 5 11. Insert the other wires downward into the Console (33). Attach the Front Upright Cover (24) to the Pulse Wire (105), the Wire Harness (60), and the Grip Wires (45, 104). Connect the wires on Wire Harness (60) and the Grip Wires (45, 104). Insert the Pulse Wire (105) upward into the Upright (5). Tighten the four M8 x 16mm Screws (102).
English Manual
Page 12
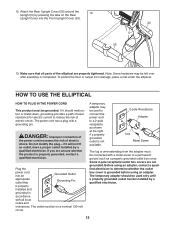
... Adapter Lug Metal Screw The lug or wire extending from damage, place a mat under the elliptical. Attach the Rear Upright Cover (25) around the Upright (5) by pressing the tabs on a nominal 120-volt circuit. HOW TO USE THE ELLIPTICAL HOW TO PLUG IN THE POWER CORD This product must be installed by a qualified electrician. Note: Some hardware may be used only until a properly grounded outlet can be connected...
... Adapter Lug Metal Screw The lug or wire extending from damage, place a mat under the elliptical. Attach the Rear Upright Cover (25) around the Upright (5) by pressing the tabs on a nominal 120-volt circuit. HOW TO USE THE ELLIPTICAL HOW TO PLUG IN THE POWER CORD This product must be installed by a qualified electrician. Note: Some hardware may be used only until a properly grounded outlet can be connected...
English Manual
Page 13
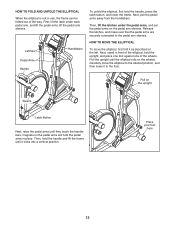
... pedal arm, and lift the pedal arms off the pedal arm sleeves. Carefully move the elliptical, first fold it to the floor. Pull the upright until they touch the handlebars; magnets on the pedal arm sleeves. First, lift the latch under the pedal arms, and set the pedal arms on the pedal arms will hold the handle, press the latch button, and lower the frame. Release the latches, and make sure that the pedal arms are securely connected...
... pedal arm, and lift the pedal arms off the pedal arm sleeves. Carefully move the elliptical, first fold it to the floor. Pull the upright until they touch the handlebars; magnets on the pedal arm sleeves. First, lift the latch under the pedal arms, and set the pedal arms on the pedal arms will hold the handle, press the latch button, and lower the frame. Release the latches, and make sure that the pedal arms are securely connected...
English Manual
Page 14
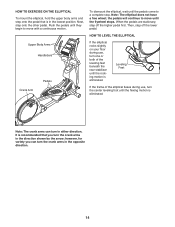
... the direction shown by the arrow; Next, step onto the other pedal. Note: The elliptical does not have a free wheel; HOW TO EXERCISE ON THE ELLIPTICAL To mount the elliptical, hold the upper body arms and step onto the pedal that you can turn one or both of the elliptical flexes during use , turn the center leveling foot until the pedals come to move until they begin to a complete stop...
... the direction shown by the arrow; Next, step onto the other pedal. Note: The elliptical does not have a free wheel; HOW TO EXERCISE ON THE ELLIPTICAL To mount the elliptical, hold the upper body arms and step onto the pedal that you can turn one or both of the elliptical flexes during use , turn the center leveling foot until the pedals come to move until they begin to a complete stop...
English Manual
Page 15
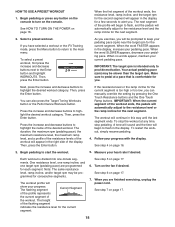
... incline of the ramp with the touch of a button. To use the manual mode of this manual. The console offers twenty preset workouts—-ten target toning workouts and ten performance workouts. Note: If there is a sheet of plastic on the front cover of the console, you to download personalized workouts and to track and analyze workout information on the power, see page 16. The console also features an iFit training mode...
... incline of the ramp with the touch of a button. To use the manual mode of this manual. The console offers twenty preset workouts—-ten target toning workouts and ten performance workouts. Note: If there is a sheet of plastic on the front cover of the console, you to download personalized workouts and to track and analyze workout information on the power, see page 16. The console also features an iFit training mode...
English Manual
Page 16
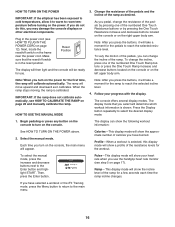
... console offers several display modes. Next, locate the reset/off switch is calibrated. Note: After you turn on the power. IMPORTANT: If the ramp does not calibrate automatically, see HOW TO PLUG IN THE POWER CORD on page 20 and manually calibrate the ramp. Begin pedaling or press any button on the right upper body arm. Calories—-This display mode will show a profile of the pedals, you use . 3. Pulse—-This display mode will determine which workout information...
... console offers several display modes. Next, locate the reset/off switch is calibrated. Note: After you turn on the power. IMPORTANT: If the ramp does not calibrate automatically, see HOW TO PLUG IN THE POWER CORD on page 20 and manually calibrate the ramp. Begin pedaling or press any button on the right upper body arm. Calories—-This display mode will show a profile of the pedals, you use . 3. Pulse—-This display mode will determine which workout information...
English Manual
Page 17
... minutes and the buttons are finished exercising, switch the reset/ off switch to move for several seconds, a tone will sound and the console will show the elapsed time. never use alcohol, abrasives, or chemicals to turn off position and unplug the power cord. Time—-When the manual mode is detected, your pulse is selected, this , the electrical components on the elliptical may wear prematurely...
... minutes and the buttons are finished exercising, switch the reset/ off switch to move for several seconds, a tone will sound and the console will show the elapsed time. never use alcohol, abrasives, or chemicals to turn off position and unplug the power cord. Time—-When the manual mode is detected, your pulse is selected, this , the electrical components on the elliptical may wear prematurely...
English Manual
Page 18
... automatically adjust to the resistance level and the ramp incline for consecutive segments. To select a preset workout, first press the increase and decrease buttons next to keep your pedaling pace. As you exercise, you have selected a workout or the iFit Training mode, press the Menu button to return to start the workout. 5. Then, press the Enter button. Note: The same resistance level, ramp incline, and/or target rpm may be programmed...
... automatically adjust to the resistance level and the ramp incline for consecutive segments. To select a preset workout, first press the increase and decrease buttons next to keep your pedaling pace. As you exercise, you have selected a workout or the iFit Training mode, press the Menu button to return to start the workout. 5. Then, press the Enter button. Note: The same resistance level, ramp incline, and/or target rpm may be programmed...
English Manual
Page 19
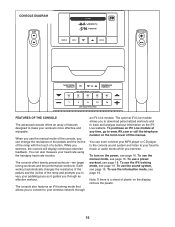
... iFit training mode, press the Menu button and then press the increase and decrease buttons next to save the contrast level setting and exit the information mode. Adjust the volume level using the volume control on the console. 19 Then, press the Enter button. HOW TO USE THE SOUND SYSTEM To play button on the elliptical. Next, press the play music or audio books through the console sound system while you exercise, plug your audio cable...
... iFit training mode, press the Menu button and then press the increase and decrease buttons next to save the contrast level setting and exit the information mode. Adjust the volume level using the volume control on the console. 19 Then, press the Enter button. HOW TO USE THE SOUND SYSTEM To play button on the elliptical. Next, press the play music or audio books through the console sound system while you exercise, plug your audio cable...
English Manual
Page 20
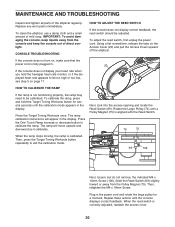
... until the calibration mode appears in the display. MAINTENANCE AND TROUBLESHOOTING Inspect and tighten all parts of direct sunlight. The ramp calibration instructions will move upward and downward as it calibrates. Replace any worn parts immediately. HOW TO CALIBRATE THE RAMP If the ramp is fully plugged in. 20 If the console does not display your heart rate when you hold the Target Toning Workouts button for a moment. To clean the elliptical, use a damp...
... until the calibration mode appears in the display. MAINTENANCE AND TROUBLESHOOTING Inspect and tighten all parts of direct sunlight. The ramp calibration instructions will move upward and downward as it calibrates. Replace any worn parts immediately. HOW TO CALIBRATE THE RAMP If the ramp is fully plugged in. 20 If the console does not display your heart rate when you hold the Target Toning Workouts button for a moment. To clean the elliptical, use a damp...
English Manual
Page 21
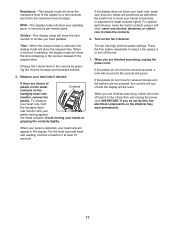
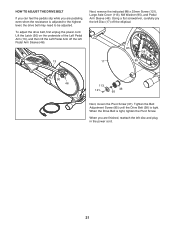
... Screw (121), Large Axle Cover (113), M8 Washer (95), and Pedal Arm Sleeve (46). To adjust the drive belt, first unplug the power cord. Using a flat screwdriver, carefully pry the left Disc (17) off the left disc and plug in the power cord. 21 When the Drive Belt is tight. HOW TO ADJUST THE DRIVE BELT If you can feel the pedals slip while you are pedaling, even when the resistance is adjusted...
... Screw (121), Large Axle Cover (113), M8 Washer (95), and Pedal Arm Sleeve (46). To adjust the drive belt, first unplug the power cord. Using a flat screwdriver, carefully pry the left Disc (17) off the left disc and plug in the power cord. 21 When the Drive Belt is tight. HOW TO ADJUST THE DRIVE BELT If you can feel the pedals slip while you are pedaling, even when the resistance is adjusted...
English Manual
Page 22
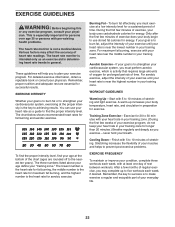
... as an exercise aid in determining heart rate trends in preparation for aerobic exercise. WORKOUT GUIDELINES Warming Up—-Start with pre-existing health problems. The heart rate monitor is the heart rate for exercise. Stretching increases the flexibility of your muscles and helps to strengthen your cardiovascular system, you may affect the accuracy of your exercise until your heart rate is near the highest number in your...
... as an exercise aid in determining heart rate trends in preparation for aerobic exercise. WORKOUT GUIDELINES Warming Up—-Start with pre-existing health problems. The heart rate monitor is the heart rate for exercise. Stretching increases the flexibility of your muscles and helps to strengthen your cardiovascular system, you may affect the accuracy of your exercise until your heart rate is near the highest number in your...
English Manual
Page 23
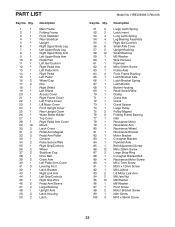
...Frame Folding Frame Front Stabilizer Rear Stabilizer Upright Right Upper Body Leg Left Upper Body Leg Right Upper Body Arm Left Upper Body Arm Pedal Pad Left Gel Cushion Right Pedal Arm Left Pedal Arm Right Pedal Left Pedal Wheel Cap Disc Right Shield Left Shield Access Cover Right Frame Cover Left Frame Cover Lift Motor Cover Front Upright Cover Rear Upright Cover Water Bottle Holder Top Cover Right Pedal Arm Cover Mount Latch Cover Pedal Arm Magnet Pedal Arm Roller Console Pulse Sensor/Wire Right Grip/Controls Wheel Stabilizer Cap Drive Belt Crank Arm Left Pedal Arm Cover Leveling Foot Latch...
...Frame Folding Frame Front Stabilizer Rear Stabilizer Upright Right Upper Body Leg Left Upper Body Leg Right Upper Body Arm Left Upper Body Arm Pedal Pad Left Gel Cushion Right Pedal Arm Left Pedal Arm Right Pedal Left Pedal Wheel Cap Disc Right Shield Left Shield Access Cover Right Frame Cover Left Frame Cover Lift Motor Cover Front Upright Cover Rear Upright Cover Water Bottle Holder Top Cover Right Pedal Arm Cover Mount Latch Cover Pedal Arm Magnet Pedal Arm Roller Console Pulse Sensor/Wire Right Grip/Controls Wheel Stabilizer Cap Drive Belt Crank Arm Left Pedal Arm Cover Leveling Foot Latch...

English Manual
Page 24
... Axle Lift Motor Lift Motor Stop Ramp Roller Roller Axle Lift Arm Lift Arm Bushing Plastic Washer M8 x 27mm Bolt M8 Locknut M8 x 47mm Bolt Left Link Arm Medium Snap Ring #6 x 3/8" Screw Frame Wire Harness Ground Wire Lift Motor Wire Harness Motor Power Wire Harness Adjustment Nut Blue Wire White Wire User’'s Manual Assembly Tool Grease Packet Note: Specifications are not illustrated. 24 Key No. For information about ordering replacement parts, see the back cover of this manual. *These parts are subject...
... Axle Lift Motor Lift Motor Stop Ramp Roller Roller Axle Lift Arm Lift Arm Bushing Plastic Washer M8 x 27mm Bolt M8 Locknut M8 x 47mm Bolt Left Link Arm Medium Snap Ring #6 x 3/8" Screw Frame Wire Harness Ground Wire Lift Motor Wire Harness Motor Power Wire Harness Adjustment Nut Blue Wire White Wire User’'s Manual Assembly Tool Grease Packet Note: Specifications are not illustrated. 24 Key No. For information about ordering replacement parts, see the back cover of this manual. *These parts are subject...
English Manual
Page 28
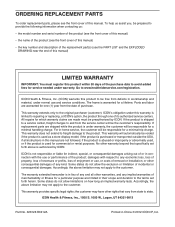
... or limitation of any implied warranties of its authorized service centers. Accordingly, the above is used for a minimal trip charge. To help us : •• the model number and serial number of the product (see the front cover of this manual) •• the name of the product (see the front cover of this manual) •• the key number and description of the replacement part...
... or limitation of any implied warranties of its authorized service centers. Accordingly, the above is used for a minimal trip charge. To help us : •• the model number and serial number of the product (see the front cover of this manual) •• the name of the product (see the front cover of this manual) •• the key number and description of the replacement part...


