
English Manual
Page 3
... treadmill. 5. The treadmill should be used or where oxygen is the responsibility of the owner to the control system of this manual and order part number 146148, or see HOW TO TURN ON THE POWER on the same circuit. Do not wear loose clothes that blocks air openings. Never move the walking belt while the power is not working properly. (See TROUBLESHOOTING on your treadmill before using your physician. ICON...
... treadmill. 5. The treadmill should be used or where oxygen is the responsibility of the owner to the control system of this manual and order part number 146148, or see HOW TO TURN ON THE POWER on the same circuit. Do not wear loose clothes that blocks air openings. Never move the walking belt while the power is not working properly. (See TROUBLESHOOTING on your treadmill before using your physician. ICON...
English Manual
Page 4
... setting. 22. Servicing other than the procedures in this manual. Do not change the incline of high speeds. The pulse sensors are intended only as an exercise aid in determining heart rate trends in the storage position. 19. Various factors, including the user's movement, may result in use , before cleaning the treadmill, and before performing the main- SAVE THESE INSTRUCTIONS 4 Inspect and properly tighten all parts of the power switch...
... setting. 22. Servicing other than the procedures in this manual. Do not change the incline of high speeds. The pulse sensors are intended only as an exercise aid in determining heart rate trends in the storage position. 19. Various factors, including the user's movement, may result in use , before cleaning the treadmill, and before performing the main- SAVE THESE INSTRUCTIONS 4 Inspect and properly tighten all parts of the power switch...
English Manual
Page 5
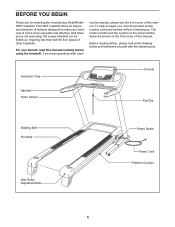
... your workouts at the drawing below and familiarize yourself with the labeled parts. And when you for selecting the revolutionary HealthRider® H90T treadmill. Accessory Tray Handrail Pulse Sensor Console Key/Clip Walking Belt Foot Rail Idler Roller Adjustment Bolts Power Switch Power Cord Platform Cushion 5 ing this manual, please see the front cover of this manual. BEFORE YOU BEGIN Thank you ʼre not exercising, the unique treadmill can be folded up, requiring...
... your workouts at the drawing below and familiarize yourself with the labeled parts. And when you for selecting the revolutionary HealthRider® H90T treadmill. Accessory Tray Handrail Pulse Sensor Console Key/Clip Walking Belt Foot Rail Idler Roller Adjustment Bolts Power Switch Power Cord Platform Cushion 5 ing this manual, please see the front cover of this manual. BEFORE YOU BEGIN Thank you ʼre not exercising, the unique treadmill can be folded up, requiring...

English Manual
Page 6
... damaging parts, do not use power tools for assembly. The number after the parentheses is normal and does not affect treadmill performance. Do not dispose of the treadmill walking belt is the key number of the part, from the PART LIST near the end of the parts to the top of the walking belt, simply wipe off the lubricant with high-performance lubricant. Set the treadmill in parentheses below to assemble the treadmill...
... damaging parts, do not use power tools for assembly. The number after the parentheses is normal and does not affect treadmill performance. Do not dispose of the treadmill walking belt is the key number of the part, from the PART LIST near the end of the parts to the top of the walking belt, simply wipe off the lubricant with high-performance lubricant. Set the treadmill in parentheses below to assemble the treadmill...
English Manual
Page 11
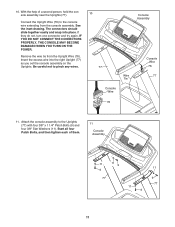
.... Start all four Patch Bolts, and then tighten each of a second person, hold the console assembly near the Uprights (77). IF YOU DO NOT CONNECT THE CONNECTORS PROPERLY, THE CONSOLE MAY BECOME DAMAGED WHEN YOU TURN ON THE POWER. Attach the console assembly to the console wire extending from the Upright Wire (76). The connectors should slide together easily and snap into the right Upright (77) as you set...
.... Start all four Patch Bolts, and then tighten each of a second person, hold the console assembly near the Uprights (77). IF YOU DO NOT CONNECT THE CONNECTORS PROPERLY, THE CONSOLE MAY BECOME DAMAGED WHEN YOU TURN ON THE POWER. Attach the console assembly to the console wire extending from the Upright Wire (76). The connectors should slide together easily and snap into the right Upright (77) as you set...
English Manual
Page 14
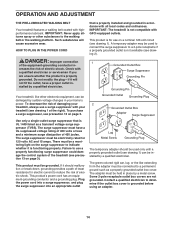
... connection 1 of the equipment-grounding conductor in your homeʼs power. stalled by a metal screw. There must be held in place by a qualified electrician. This productʼs power cord has an equipment-grounding conductor and a grounding plug. Some 2-pole receptacle outlet box covers are unsure whether the product is for use on page 3. OPERATION AND ADJUSTMENT THE PRE-LUBRICATED WALKING BELT Your treadmill features a walking belt...
... connection 1 of the equipment-grounding conductor in your homeʼs power. stalled by a metal screw. There must be held in place by a qualified electrician. This productʼs power cord has an equipment-grounding conductor and a grounding plug. Some 2-pole receptacle outlet box covers are unsure whether the product is for use on page 3. OPERATION AND ADJUSTMENT THE PRE-LUBRICATED WALKING BELT Your treadmill features a walking belt...
English Manual
Page 15
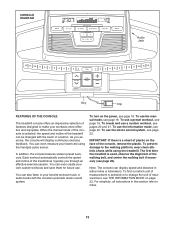
... can even measure your own custom workouts and save them for future use the manual mode, see page 26). Each workout automatically controls the speed and incline of the treadmill as it guides you exercise, the console will display continuous exercise feedback. To find out which unit of measurement is used, observe the alignment of the walking belt, and center the walking belt if necessary (see page 16. As...
... can even measure your own custom workouts and save them for future use the manual mode, see page 26). Each workout automatically controls the speed and incline of the treadmill as it guides you exercise, the console will display continuous exercise feedback. To find out which unit of measurement is used, observe the alignment of the walking belt, and center the walking belt if necessary (see page 16. As...
English Manual
Page 16
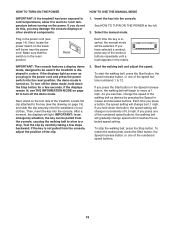
... speed setting. Insert the key into the console. Plug in the matrix. Make sure that the switch is in a store. IMPORTANT: The console features a display demo mode, designed to the key (see page 14). If the displays remain lit, see THE INFORMATION MODE on the power. Then, insert the key into the console. After a moment, the displays will be selected. Start the walking belt and adjust the speed. As you exercise, change the speed of the numbered speed buttons...
... speed setting. Insert the key into the console. Plug in the matrix. Make sure that the switch is in a store. IMPORTANT: The console features a display demo mode, designed to the key (see page 14). If the displays remain lit, see THE INFORMATION MODE on the power. Then, insert the key into the console. After a moment, the displays will be selected. Start the walking belt and adjust the speed. As you exercise, change the speed of the numbered speed buttons...
English Manual
Page 17
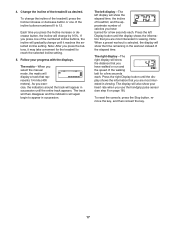
... selected incline setting. 5. To reset the console, press the Stop button, remove the key, and then reinsert the key. 17 To change the incline of the treadmill, press the Incline increase or decrease button or one of the numbered incline buttons, the incline will appear in the workout instead of the incline buttons numbered 0 to appear in viewing. The matrix-When you select the manual mode, the matrix will again begin to 12. Change the incline of the walking belt...
... selected incline setting. 5. To reset the console, press the Stop button, remove the key, and then reinsert the key. 17 To change the incline of the treadmill, press the Incline increase or decrease button or one of the numbered incline buttons, the incline will appear in the workout instead of the incline buttons numbered 0 to appear in viewing. The matrix-When you select the manual mode, the matrix will again begin to 12. Change the incline of the walking belt...
English Manual
Page 18
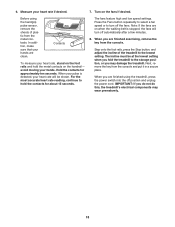
Before using the treadmill, press the power switch into the off position and unplug the power cord. avoid moving your heart rate if desired. 7. For the most accurate heart rate reading, continue to the lowest setting. Note: If the fans are finished exercising, remove the key from the metal contacts. Turn on the handrail- Press the Fans button repeatedly to select a fan speed or to the storage position, or you do not...
Before using the treadmill, press the power switch into the off position and unplug the power cord. avoid moving your heart rate if desired. 7. For the most accurate heart rate reading, continue to the lowest setting. Note: If the fans are finished exercising, remove the key from the metal contacts. Turn on the handrail- Press the Fans button repeatedly to select a fan speed or to the storage position, or you do not...
English Manual
Page 19
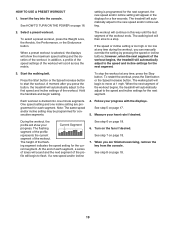
... desired. When you are programmed for the next segment. 3. HOW TO USE A PRESET WORKOUT 1. To select a preset workout, press the Weight Loss, the Aerobic, the Performance, or the Endurance button. If the speed or incline setting is divided into the console. Insert the key into one incline setting are finished exercising, remove the key from the console. Select a preset workout. The walking belt will show the maximum speed setting and the duration of...
... desired. When you are programmed for the next segment. 3. HOW TO USE A PRESET WORKOUT 1. To select a preset workout, press the Weight Loss, the Aerobic, the Performance, or the Endurance button. If the speed or incline setting is divided into the console. Insert the key into one incline setting are finished exercising, remove the key from the console. Select a preset workout. The walking belt will show the maximum speed setting and the duration of...
English Manual
Page 20
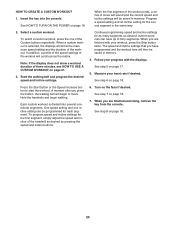
... into the console. Note: If the display does not show the maximum speed setting and the duration of the treadmill as desired; When you have up to start the workout. The speed and incline settings that you are finished exercising, remove the key from the console. Follow your progress with your heart rate if desired. To program speed and incline settings for as many segments as desired by pressing the speed and incline buttons. 6.
... into the console. Note: If the display does not show the maximum speed setting and the duration of the treadmill as desired; When you have up to start the workout. The speed and incline settings that you are finished exercising, remove the key from the console. Follow your progress with your heart rate if desired. To program speed and incline settings for as many segments as desired by pressing the speed and incline buttons. 6.
English Manual
Page 21
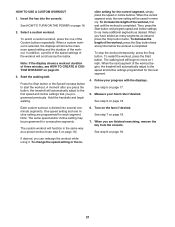
... workout will automatically adjust to start the workout. See step 8 on page 19). 6. Then, press the Start button and program speed and incline settings for each segment. To stop the workout temporarily, press the Stop button. Measure your progress with the displays. Note: If the display shows a workout duration of the workout, press the Stop button twice at 1 mph. Turn on page 20. 3. To select a custom workout, press the one incline setting are finished exercising, remove the key from the console. Start the walking belt. See step...
... workout will automatically adjust to start the workout. See step 8 on page 19). 6. Then, press the Start button and program speed and incline settings for each segment. To stop the workout temporarily, press the Stop button. Measure your progress with the displays. Note: If the display shows a workout duration of the workout, press the Stop button twice at 1 mph. Turn on page 20. 3. To select a custom workout, press the one incline setting are finished exercising, remove the key from the console. Start the walking belt. See step...

English Manual
Page 22
... displayed in the power cord, press the power switch into the reset position, and insert the key into the console. To exit the information mode, remove the key from the console. 22 When the information mode is selected, the following information: The console features a display demo mode, designed to turn on and turn off the demo mode, press the Speed decrease button. Then plug the audio wire into a jack on , the console will show the total number of miles or kilometers that the walking belt has moved...
... displayed in the power cord, press the power switch into the reset position, and insert the key into the console. To exit the information mode, remove the key from the console. 22 When the information mode is selected, the following information: The console features a display demo mode, designed to turn on and turn off the demo mode, press the Speed decrease button. Then plug the audio wire into a jack on , the console will show the total number of miles or kilometers that the walking belt has moved...
English Manual
Page 23
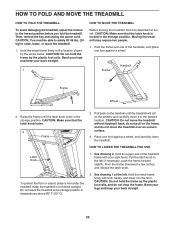
... power cord. CAUTION: Make sure that the latch knob is locked in the location shown by the plastic foot rails. Bend your legs and keep your back straight. 1 HOW TO MOVE THE TREADMILL Before moving the treadmill, fold it to the floor. Hold the frame and one of direct sunlight. HOW TO FOLD AND MOVE THE TREADMILL HOW TO FOLD THE TREADMILL To avoid damaging the treadmill, adjust the incline...
... power cord. CAUTION: Make sure that the latch knob is locked in the location shown by the plastic foot rails. Bend your legs and keep your back straight. 1 HOW TO MOVE THE TREADMILL Before moving the treadmill, fold it to the floor. Hold the frame and one of direct sunlight. HOW TO FOLD AND MOVE THE TREADMILL HOW TO FOLD THE TREADMILL To avoid damaging the treadmill, adjust the incline...
English Manual
Page 24
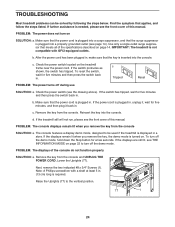
... cover of this manual. PROBLEM: The displays of the specifications described on . PROBLEM: The power does not turn off the demo mode, hold down the Stop button for five minutes, and then plug it , wait for a few seconds. Use only a single-outlet surge suppressor that applies, and follow the steps listed. PROBLEM: The console displays remain lit when you remove the key, the demo mode is plugged in. Remove the key from the console SOLUTION: a. Raise the Uprights...
... cover of this manual. PROBLEM: The displays of the specifications described on . PROBLEM: The power does not turn off the demo mode, hold down the Stop button for five minutes, and then plug it , wait for a few seconds. Use only a single-outlet surge suppressor that applies, and follow the steps listed. PROBLEM: The console displays remain lit when you remove the key, the demo mode is plugged in. Remove the key from the console SOLUTION: a. Raise the Uprights...
English Manual
Page 25
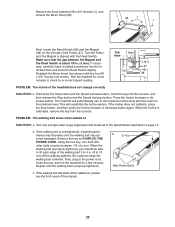
... 1/8 in . Repeat until the Magnet is properly tightened, you should be able to lift each edge of the treadmill does not change correctly SOLUTION: a. Press the Incline increase or decrease button. PROBLEM: The walking belt slows when walked on , please see the front cover of a turn. Remove the three indicated #8 x 3/4" Screws (1), and remove the Motor Hood (58). 58 1 1 Next, locate the Reed Switch (62) and the Magnet (48) on page...
... 1/8 in . Repeat until the Magnet is properly tightened, you should be able to lift each edge of the treadmill does not change correctly SOLUTION: a. Press the Incline increase or decrease button. PROBLEM: The walking belt slows when walked on , please see the front cover of a turn. Remove the three indicated #8 x 3/4" Screws (1), and remove the Motor Hood (58). 58 1 1 Next, locate the Reed Switch (62) and the Magnet (48) on page...
English Manual
Page 27
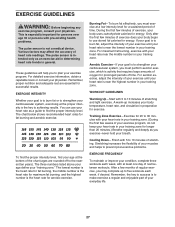
... exercise program. The three numbers listed above your age define your body uses carbohydrate calories for persons over age 35 or persons with pre-existing health problems. The pulse sensor is near the middle number in your heart rate is the key to five workouts each week, with at least one day of rest between workouts. During the first few minutes of exercise, your "training zone." For aerobic exercise, adjust...
... exercise program. The three numbers listed above your age define your body uses carbohydrate calories for persons over age 35 or persons with pre-existing health problems. The pulse sensor is near the middle number in your heart rate is the key to five workouts each week, with at least one day of rest between workouts. During the first few minutes of exercise, your "training zone." For aerobic exercise, adjust...
English Manual
Page 29
... Roller Left Rear Foot Right Rear Foot Small Left Pulse Sensor Motor Hood Motor Belt Drive Motor Reed Switch Clamp Reed Switch Incline Wire Incline Motor 1/4" x 2" Bolt Lift Frame Wire Tie Lift Ground Wire Controller Power Switch Belly Pan Power Cord Grommet 15" Tie Releasable Tie Upright Wire Upright Console Plate Right Small Pulse Sensor Storage Latch Right Large Pulse Sensor Incline Stop Bracket Base Base Cap Base Foot Spacer Base Foot Caution Decal Extension Leg Wire Tie Latch Bracket Wheel Key Plate Left Handrail Insert Left Handrail Left Handrail Cover Left Bottom Handrail Cover Console...
... Roller Left Rear Foot Right Rear Foot Small Left Pulse Sensor Motor Hood Motor Belt Drive Motor Reed Switch Clamp Reed Switch Incline Wire Incline Motor 1/4" x 2" Bolt Lift Frame Wire Tie Lift Ground Wire Controller Power Switch Belly Pan Power Cord Grommet 15" Tie Releasable Tie Upright Wire Upright Console Plate Right Small Pulse Sensor Storage Latch Right Large Pulse Sensor Incline Stop Bracket Base Base Cap Base Foot Spacer Base Foot Caution Decal Extension Leg Wire Tie Latch Bracket Wheel Key Plate Left Handrail Insert Left Handrail Left Handrail Cover Left Bottom Handrail Cover Console...
English Manual
Page 36
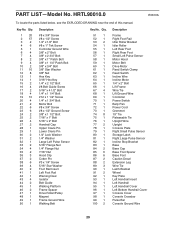
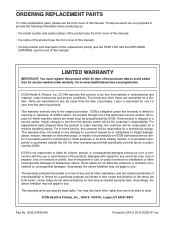
... the front cover of this manual) • the key number and description of the replacement part(s) (see the front cover of this manual. Labor is limited to repairing or replacing, at ICONʼs option, the product through one (1) year from defects in their scope and duration to be the customerʼs responsibility. ICONʼs obligation under normal use and service conditions. This warranty does not extend...
... the front cover of this manual) • the key number and description of the replacement part(s) (see the front cover of this manual. Labor is limited to repairing or replacing, at ICONʼs option, the product through one (1) year from defects in their scope and duration to be the customerʼs responsibility. ICONʼs obligation under normal use and service conditions. This warranty does not extend...


