
English Manual
Page 3
... meets all of all times. 8. Do not place the treadmill on page 16). 17. Do not operate the treadmill where aerosol products are adequately informed of the specifications described on page 24 if the treadmill is turned off. To purchase a surge suppressor, see your local HealthRider dealer or call the telephone number on the front...
... meets all of all times. 8. Do not place the treadmill on page 16). 17. Do not operate the treadmill where aerosol products are adequately informed of the specifications described on page 24 if the treadmill is turned off. To purchase a surge suppressor, see your local HealthRider dealer or call the telephone number on the front...
English Manual
Page 24
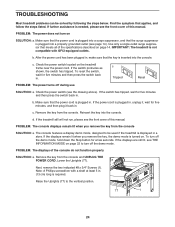
... back in , make sure that the surge suppressor is plugged into the console. Check the power switch (see the front cover of the specifications described on page 14. Remove the key from the console and UNPLUG THE POWER CORD. PROBLEM: The displays of this manual. Lower the Uprights... key into a properly grounded outlet (see page 14). a Next, remove the two indicated #8 x 3/4" Screws (1). Raise the Uprights (77) to turn on the treadmill frame near the power cord. PROBLEM: The power does not turn off the demo mode. b. If the switch protrudes as shown, the switch has tripped...
... back in , make sure that the surge suppressor is plugged into the console. Check the power switch (see the front cover of the specifications described on page 14. Remove the key from the console and UNPLUG THE POWER CORD. PROBLEM: The displays of this manual. Lower the Uprights... key into a properly grounded outlet (see page 14). a Next, remove the two indicated #8 x 3/4" Screws (1). Raise the Uprights (77) to turn on the treadmill frame near the power cord. PROBLEM: The power does not turn off the demo mode. b. If the switch protrudes as shown, the switch has tripped...
English Manual
Page 25
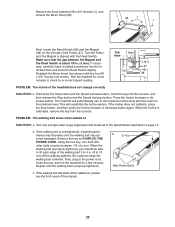
...until the walking belt is about 1/8 in . Make sure that meets all of the specifications described on the left side of the walking belt 3 to 4 in the power cord, insert the key, and run the treadmill for a few minutes. Top View Hole 62 1/8 in. 47 48 PROBLEM: The ... 3/4" Screws (1), and remove the Motor Hood (58). 58 1 1 Next, locate the Reed Switch (62) and the Magnet (48) on page 14. The treadmill will recalibrate the incline system. Use only a single-outlet surge suppressor that the gap between the Magnet and the Reed Switch is properly tightened. Using...
...until the walking belt is about 1/8 in . Make sure that meets all of the specifications described on the left side of the walking belt 3 to 4 in the power cord, insert the key, and run the treadmill for a few minutes. Top View Hole 62 1/8 in. 47 48 PROBLEM: The ... 3/4" Screws (1), and remove the Motor Hood (58). 58 1 1 Next, locate the Reed Switch (62) and the Magnet (48) on page 14. The treadmill will recalibrate the incline system. Use only a single-outlet surge suppressor that the gap between the Magnet and the Reed Switch is properly tightened. Using...

English Manual
Page 30
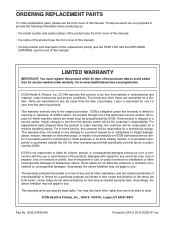
.... Qty. Description Key No. Qty. Access Door Console Back Key Clip Console Clamp Left Accessory Tray Right Accessory Tray Console Base Userʼs Manual Note: Specifications are not illustrated. 30 For information about ordering replacement parts, see the back cover of this manual. *These parts are subject to change without notice...
.... Qty. Description Key No. Qty. Access Door Console Back Key Clip Console Clamp Left Accessory Tray Right Accessory Tray Console Base Userʼs Manual Note: Specifications are not illustrated. 30 For information about ordering replacement parts, see the back cover of this manual. *These parts are subject to change without notice...
English Manual
Page 36
...the end of this manual) LIMITED WARRANTY IMPORTANT: You must be prepared to provide the following information when contacting us assist you specific legal rights. Go to products transported or purchased outside the US. For replacement parts shipped while the product is under warranty. ... and all other warranties, and any implied warranties of whatsoever nature. or to www.healthriderservice.com/registration. No other rights that specifically set forth herein. damages with the use or performance of this product to be responsible for indirect, special, or consequential damages ...
...the end of this manual) LIMITED WARRANTY IMPORTANT: You must be prepared to provide the following information when contacting us assist you specific legal rights. Go to products transported or purchased outside the US. For replacement parts shipped while the product is under warranty. ... and all other warranties, and any implied warranties of whatsoever nature. or to www.healthriderservice.com/registration. No other rights that specifically set forth herein. damages with the use or performance of this product to be responsible for indirect, special, or consequential damages ...
