
English Manual
Page 1
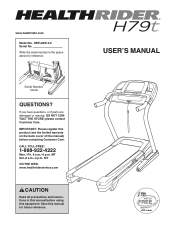
MT Sat. 8 a.m.-4 p.m. USERʼS MANUAL If you have questions, or if parts are damaged or missing, DO NOT CONTACT THE STORE; please contact Customer Care. Save this manual for reference. IMPORTANT: Please register this product (see the... before contacting Customer Care. MT ON THE WEB: www.healthriderservice.com CAUTION Read all precautions and instructions in the space above for future reference. www.healthrider.com Model No. Serial Number Decal QUESTIONS? HRTL80510.2 Serial No. CALL TOLL-FREE: 1-888-922-4222 Mon.-Fri. 6 a.m.-6 p.m. Write the serial number in this ...
MT Sat. 8 a.m.-4 p.m. USERʼS MANUAL If you have questions, or if parts are damaged or missing, DO NOT CONTACT THE STORE; please contact Customer Care. Save this manual for reference. IMPORTANT: Please register this product (see the... before contacting Customer Care. MT ON THE WEB: www.healthriderservice.com CAUTION Read all precautions and instructions in the space above for future reference. www.healthrider.com Model No. Serial Number Decal QUESTIONS? HRTL80510.2 Serial No. CALL TOLL-FREE: 1-888-922-4222 Mon.-Fri. 6 a.m.-6 p.m. Write the serial number in this ...
English Manual
Page 2
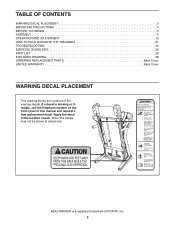
... BEFORE YOU BEGIN 5 ASSEMBLY 6 OPERATION AND ADJUSTMENT 13 HOW TO FOLD AND MOVE THE TREADMILL 21 TROUBLESHOOTING 22 EXERCISE GUIDELINES 25 PART LIST 26 EXPLODED DRAWING 28 ORDERING REPLACEMENT PARTS Back Cover LIMITED WARRANTY Back Cover WARNING DECAL PLACEMENT This drawing shows the locations of ICON IP..., Inc. 2 Note: The decals may not be shown at actual size. HEALTHRIDER is missing or...
... BEFORE YOU BEGIN 5 ASSEMBLY 6 OPERATION AND ADJUSTMENT 13 HOW TO FOLD AND MOVE THE TREADMILL 21 TROUBLESHOOTING 22 EXERCISE GUIDELINES 25 PART LIST 26 EXPLODED DRAWING 28 ORDERING REPLACEMENT PARTS Back Cover LIMITED WARRANTY Back Cover WARNING DECAL PLACEMENT This drawing shows the locations of ICON IP..., Inc. 2 Note: The decals may not be shown at actual size. HEALTHRIDER is missing or...

English Manual
Page 3
... responsibility for persons over age 35 or persons with bare feet, wearing only stockings, or in - Place the treadmill on a level surface, with at least 8 ft. (2.4 m) of this manual and order part number 146148, or see your local HEALTHRIDER dealer or call the telephone number on page 15). 17. Keep children under the...
... responsibility for persons over age 35 or persons with bare feet, wearing only stockings, or in - Place the treadmill on a level surface, with at least 8 ft. (2.4 m) of this manual and order part number 146148, or see your local HEALTHRIDER dealer or call the telephone number on page 15). 17. Keep children under the...

English Manual
Page 4
... not attempt to raise, lower, or move the treadmill. 22. nance and adjustment procedures described in this manual. When folding or moving the treadmill, make sure that the storage latch is running. Inspect and properly tighten all parts of the power switch.) 21. vice representative. Never... leave the treadmill unattended while it is intended for the location of the treadmill regularly. 20. DANGER: 25.
... not attempt to raise, lower, or move the treadmill. 22. nance and adjustment procedures described in this manual. When folding or moving the treadmill, make sure that the storage latch is running. Inspect and properly tighten all parts of the power switch.) 21. vice representative. Never... leave the treadmill unattended while it is intended for the location of the treadmill regularly. 20. DANGER: 25.

English Manual
Page 5
... decal are shown on the front cover of this manual. Before reading further, please review the drawing below and familiarize yourself with the labeled parts. Length: 6 ft. 5 in. (196 cm) Width: 3 ft. (91 cm) Tray Handrail Console Pulse Sensor Key/Clip Walking...number before using the treadmill. For your workouts at home more enjoyable and effective. If you for selecting the revolutionary HEALTHRIDER® H79T treadmill. ing this manual, please see the front cover of this manual. The H79T treadmill offers an impressive selection of other treadmills. BEFORE YOU BEGIN ...
... decal are shown on the front cover of this manual. Before reading further, please review the drawing below and familiarize yourself with the labeled parts. Length: 6 ft. 5 in. (196 cm) Width: 3 ft. (91 cm) Tray Handrail Console Pulse Sensor Key/Clip Walking...number before using the treadmill. For your workouts at home more enjoyable and effective. If you for selecting the revolutionary HEALTHRIDER® H79T treadmill. ing this manual, please see the front cover of this manual. The H79T treadmill offers an impressive selection of other treadmills. BEFORE YOU BEGIN ...
English Manual
Page 6
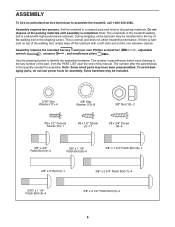
...(7)-4 3/8" x 4 1/2" Patch Bolt (5)-4 6 The number after the parentheses is normal and does not affect treadmill performance. The number in a cleared area and remove all packing materials. To avoid damaging parts, do not use power tools for assembly. Assembly requires two persons. This is the quantity needed for assembly...drawings below each drawing is lubricant on top of the treadmill walking belt is completed. Set the treadmill in parentheses below to the top of this manual. Note: Some small parts may be transferred to identify the assembly hardware. If ...
...(7)-4 3/8" x 4 1/2" Patch Bolt (5)-4 6 The number after the parentheses is normal and does not affect treadmill performance. The number in a cleared area and remove all packing materials. To avoid damaging parts, do not use power tools for assembly. Assembly requires two persons. This is the quantity needed for assembly...drawings below each drawing is lubricant on top of the treadmill walking belt is completed. Set the treadmill in parentheses below to the top of this manual. Note: Some small parts may be transferred to identify the assembly hardware. If ...
English Manual
Page 12
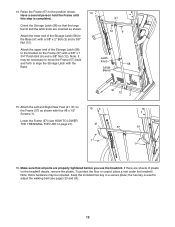
... 3/8" x 1 3/4" Patch Bolt (6) and a 3/8" Nut (12). Keep the included hex key in a secure place; Orient the Storage Latch (58) so that all parts are properly tightened before you use the treadmill. Attach the Left and Right Rear Feet (41, 61) to adjust the walking belt (see HOW TO LOWER THE...1 16. Note: Extra hardware may be included. To protect the floor or carpet, place a mat under the treadmill. the hex key is completed. Raise the Frame (57) to the bracket on the treadmill decals, remove the plastic. Attach the upper end of plastic on the Frame (57) with four #8 x 1/2"...
... 3/8" x 1 3/4" Patch Bolt (6) and a 3/8" Nut (12). Keep the included hex key in a secure place; Orient the Storage Latch (58) so that all parts are properly tightened before you use the treadmill. Attach the Left and Right Rear Feet (41, 61) to adjust the walking belt (see HOW TO LOWER THE...1 16. Note: Extra hardware may be included. To protect the floor or carpet, place a mat under the treadmill. the hex key is completed. Raise the Frame (57) to the bracket on the treadmill decals, remove the plastic. Attach the upper end of plastic on the Frame (57) with four #8 x 1/2"...
English Manual
Page 25
... intensity is near the middle number in your physician. EXERCISE INTENSITY Whether your goal is to burn fat or to make exercise a regular and enjoyable part of stretching and light exercise.
... intensity is near the middle number in your physician. EXERCISE INTENSITY Whether your goal is to burn fat or to make exercise a regular and enjoyable part of stretching and light exercise.

English Manual
Page 26
... Foot Rail Right Foot Rail Latch Warning Decal Walking Platform Walking Belt Belt Guide Front Left Platform Support Key No. HRTL80510.2 R0211A To locate the parts listed below, see the EXPLODED DRAWING near the end of this manual. Key No...
... Foot Rail Right Foot Rail Latch Warning Decal Walking Platform Walking Belt Belt Guide Front Left Platform Support Key No. HRTL80510.2 R0211A To locate the parts listed below, see the EXPLODED DRAWING near the end of this manual. Key No...

English Manual
Page 27
Key No. Qty. Description 101 4 102 1 103 1 104 1 Console Clamp Frame Ground Wire Console Base Left Tray 105 1 106 2 * - For information about ordering replacement parts, see the back cover of this manual. *These parts are subject to change without notice. Qty. Right Tray Cable Tie Userʼs Manual Note: Specifications are not illustrated. 27 Description Key No.
Key No. Qty. Description 101 4 102 1 103 1 104 1 Console Clamp Frame Ground Wire Console Base Left Tray 105 1 106 2 * - For information about ordering replacement parts, see the back cover of this manual. *These parts are subject to change without notice. Qty. Right Tray Cable Tie Userʼs Manual Note: Specifications are not illustrated. 27 Description Key No.

English Manual
Page 32
...and all other rights that specifically set forth herein. Some states do not allow limitations on how long an implied warranty lasts. Parts are warranted for commercial or rental purposes or as store display models; This warranty extends only to www.healthriderservice.com/registration. ICON...Accordingly, the above is shipped to a service center, freight charges to and from state to state. ORDERING REPLACEMENT PARTS To order replacement parts, please see the PART LIST and the EXPLODED DRAWING near the end of this manual) LIMITED WARRANTY IMPORTANT: You must be free from defects...
...and all other rights that specifically set forth herein. Some states do not allow limitations on how long an implied warranty lasts. Parts are warranted for commercial or rental purposes or as store display models; This warranty extends only to www.healthriderservice.com/registration. ICON...Accordingly, the above is shipped to a service center, freight charges to and from state to state. ORDERING REPLACEMENT PARTS To order replacement parts, please see the PART LIST and the EXPLODED DRAWING near the end of this manual) LIMITED WARRANTY IMPORTANT: You must be free from defects...


