
English Manual
Page 2
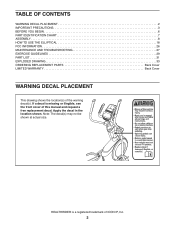
... PLACEMENT 2 IMPORTANT PRECAUTIONS 3 BEFORE YOU BEGIN 6 PART IDENTIFICATION CHART 7 ASSEMBLY 8 HOW TO USE THE ELLIPTICAL 18 FCC INFORMATION 26 MAINTENANCE AND TROUBLESHOOTING 27 EXERCISE GUIDELINES 29 PART LIST 31 EXPLODED DRAWING 33 ORDERING REPLACEMENT PARTS Back Cover LIMITED WARRANTY Back Cover WARNING DECAL PLACEMENT This drawing shows the location(s) of this manual and request a free replacement decal. If a decal is a registered trademark of ICON IP, Inc. 2 HEALTHRIDER is missing or illegible, see the...
... PLACEMENT 2 IMPORTANT PRECAUTIONS 3 BEFORE YOU BEGIN 6 PART IDENTIFICATION CHART 7 ASSEMBLY 8 HOW TO USE THE ELLIPTICAL 18 FCC INFORMATION 26 MAINTENANCE AND TROUBLESHOOTING 27 EXERCISE GUIDELINES 29 PART LIST 31 EXPLODED DRAWING 33 ORDERING REPLACEMENT PARTS Back Cover LIMITED WARRANTY Back Cover WARNING DECAL PLACEMENT This drawing shows the location(s) of this manual and request a free replacement decal. If a decal is a registered trademark of ICON IP, Inc. 2 HEALTHRIDER is missing or illegible, see the...

English Manual
Page 3
.... (0.9 m) of the owner to move until the flywheel stops. To protect the floor or carpet from moisture and dust. Before beginning any worn parts immediately. 8. do not wear loose clothes that all users of the elliptical are adequately informed of all parts regularly. Keep children under the elliptical. 12. Replace any exercise program, consult your pedaling speed in serious injury or death. ICON assumes no...
.... (0.9 m) of the owner to move until the flywheel stops. To protect the floor or carpet from moisture and dust. Before beginning any worn parts immediately. 8. do not wear loose clothes that all users of the elliptical are adequately informed of all parts regularly. Keep children under the elliptical. 12. Replace any exercise program, consult your pedaling speed in serious injury or death. ICON assumes no...
English Manual
Page 6
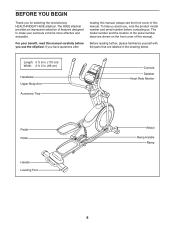
... us assist you have questions after reading this manual, please see the front cover of the serial number decal are labeled in . (66 cm) Handlebar Upper Body Arm Accessory Tray Console Speaker Heart Rate Monitor Pedal Roller Handle Leveling Foot Wheel Ramp Handle Ramp 6 If you , note the product model number and serial number before you for selecting the revolutionary HEALTHRIDER® H50E elliptical. BEFORE YOU BEGIN Thank you...
... us assist you have questions after reading this manual, please see the front cover of the serial number decal are labeled in . (66 cm) Handlebar Upper Body Arm Accessory Tray Console Speaker Heart Rate Monitor Pedal Roller Handle Leveling Foot Wheel Ramp Handle Ramp 6 If you , note the product model number and serial number before you for selecting the revolutionary HEALTHRIDER® H50E elliptical. BEFORE YOU BEGIN Thank you...
English Manual
Page 8
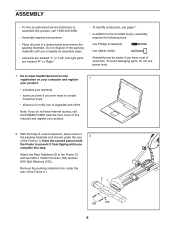
... included tool(s), assembly requires the following tools: one Phillips screwdriver one rubber mallet Assembly may be easier if you complete this manual) and register your warranty •• saves you time if you ever need to contact Customer Care •• allows us to notify you of upgrades and offers Note: If you do not use power tools. 1.
... included tool(s), assembly requires the following tools: one Phillips screwdriver one rubber mallet Assembly may be easier if you complete this manual) and register your warranty •• saves you time if you ever need to contact Customer Care •• allows us to notify you of upgrades and offers Note: If you do not use power tools. 1.
English Manual
Page 14
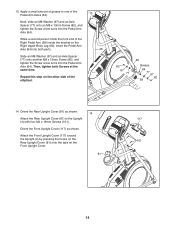
... Upright Cover (117) as shown. 14 Attach the Rear Upright Cover (81) to one of grease to the Upright 117 (4) with four M4 x 16mm Screws (101). Apply a small amount of the Pedal Arm Axles (64). 13 Next, slide an M8 Washer (97) and an Axle Spacer (77) onto an M8 x 13mm Screw (82), and tighten the Screw a few turns into the Pedal Arm Axle (64). Then, tighten both parts...
... Upright Cover (117) as shown. 14 Attach the Rear Upright Cover (81) to one of grease to the Upright 117 (4) with four M4 x 16mm Screws (101). Apply a small amount of the Pedal Arm Axles (64). 13 Next, slide an M8 Washer (97) and an Axle Spacer (77) onto an M8 x 13mm Screw (82), and tighten the Screw a few turns into the Pedal Arm Axle (64). Then, tighten both parts...
English Manual
Page 18
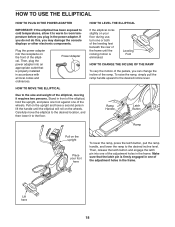
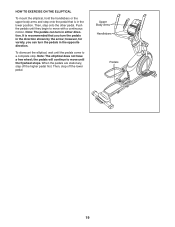
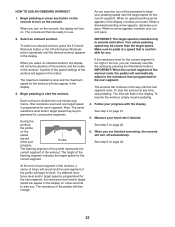
... to the floor. Power Adapter If the elliptical rocks slightly on the upright Place your floor during use, turn one of the pedals, you plug in accordance with all local codes and ordinances. HOW TO MOVE THE ELLIPTICAL Due to the size and weight of the adjustment holes in the frame. If you do not do this, you may damage the console displays or other electronic...
... to the floor. Power Adapter If the elliptical rocks slightly on the upright Place your floor during use, turn one of the pedals, you plug in accordance with all local codes and ordinances. HOW TO MOVE THE ELLIPTICAL Due to the size and weight of the adjustment holes in the frame. If you do not do this, you may damage the console displays or other electronic...
English Manual
Page 19
... Body Arms Handlebars Pedals 19 Note: The pedals can turn the pedals in either direction. Note: The elliptical does not have a free wheel; the pedals will continue to move until the flywheel stops. When the pedals are stationary, step off the lower pedal. Then, step off the higher pedal first. however, for variety, you turn in the opposite direction. Push the pedals until the pedals come to a complete stop. HOW TO EXERCISE ON THE ELLIPTICAL...
... Body Arms Handlebars Pedals 19 Note: The pedals can turn the pedals in either direction. Note: The elliptical does not have a free wheel; the pedals will continue to move until the flywheel stops. When the pedals are stationary, step off the lower pedal. Then, step off the higher pedal first. however, for variety, you turn in the opposite direction. Push the pedals until the pedals come to a complete stop. HOW TO EXERCISE ON THE ELLIPTICAL...
English Manual
Page 20
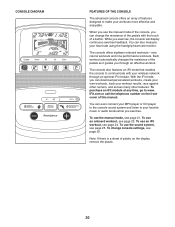
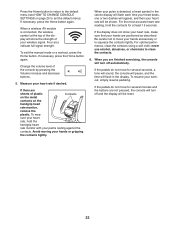
... number on the display, remove the plastic. 20 To use an iFit workout, see page 25. Each workout automatically changes the resistance of the pedals as it guides you can also measure your workouts more effective and enjoyable. CONSOLE DIAGRAM FEATURES OF THE CONSOLE The advanced console offers an array of features designed to make your heart rate using the handgrip heart rate monitor. When you use the manual mode of this manual. While you exercise, the console...
... number on the display, remove the plastic. 20 To use an iFit workout, see page 25. Each workout automatically changes the resistance of the pedals as it guides you can also measure your workouts more effective and enjoyable. CONSOLE DIAGRAM FEATURES OF THE CONSOLE The advanced console offers an array of features designed to make your heart rate using the handgrip heart rate monitor. When you use the manual mode of this manual. While you exercise, the console...
English Manual
Page 21
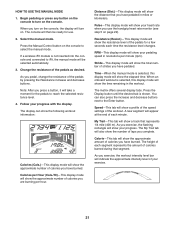
... console to turn on the console to iFit, the manual mode will show the number of laps you press a button, it will take a moment for use the handgrip heart rate monitor (see step 5 on . Select the manual mode. Note: After you complete. Distance (Dist.)—-This display mode will show the distance that you have pedaled in revolutions per minute (rpm). RPM—-This display mode will show your pedaling speed in miles or kilometers. Press the Display button...
... console to turn on the console to iFit, the manual mode will show the number of laps you press a button, it will take a moment for use the handgrip heart rate monitor (see step 5 on . Select the manual mode. Note: After you complete. Distance (Dist.)—-This display mode will show the distance that you have pedaled in revolutions per minute (rpm). RPM—-This display mode will show your pedaling speed in miles or kilometers. Press the Display button...
English Manual
Page 22
... handgrip heart rate monitor with your hands are not pressed, the console will turn off and the display will show your heart rate, make sure that your palms resting against the contacts. To resume your hands or gripping the contacts tightly. When a wireless iFit module is detected, a heart symbol in the display. To exit the manual mode or a workout, press the Home button. Avoid moving your workout, simply resume pedaling. Be...
... handgrip heart rate monitor with your hands are not pressed, the console will turn off and the display will show your heart rate, make sure that your palms resting against the contacts. To resume your hands or gripping the contacts tightly. When a wireless iFit module is detected, a heart symbol in the display. To exit the manual mode or a workout, press the Home button. Avoid moving your workout, simply resume pedaling. Be...
English Manual
Page 23
... to turn off automatically. Your actual pedaling speed may be slower than the target speed. The resistance of the workout. As you exercise, you can manually override the setting by pressing the Resistance buttons. To stop pedaling. See step 4 on page 22. 6. When a downward-pointing arrow appears, decrease your current pace. 2. IMPORTANT: When the current segment of the profile will appear in the display for use. Measure...
... to turn off automatically. Your actual pedaling speed may be slower than the target speed. The resistance of the workout. As you exercise, you can manually override the setting by pressing the Resistance buttons. To stop pedaling. See step 4 on page 22. 6. When a downward-pointing arrow appears, decrease your current pace. 2. IMPORTANT: When the current segment of the profile will appear in the display for use. Measure...
English Manual
Page 24
... you turn on the console, the display will turn on the iFit workouts, please see the instructions included with SSID broadcast enabled (hidden networks are not supported). Press the Compete button to download the next workout of the race. 5. The time will download, you through your schedule. If more information on the iFit mode, go to select a user. 4. See step 5 on page 25). HOW TO USE AN IFIT WORKOUT Note: To use...
... you turn on the console, the display will turn on the iFit workouts, please see the instructions included with SSID broadcast enabled (hidden networks are not supported). Press the Compete button to download the next workout of the race. 5. The time will download, you through your schedule. If more information on the iFit mode, go to select a user. 4. See step 5 on page 25). HOW TO USE AN IFIT WORKOUT Note: To use...
English Manual
Page 25
... connected, go to choose an audio setting for the voice of the personal trainer, set a default menu, check the status of hours that has been pedaled on the elliptical. 3. To select the information mode, press and hold down the Display button for downloads. 1. The display will show the words NO IFIT MODULE. After a few seconds. 9. Press the Resistance increase and decrease buttons to view the downloads display. Press the decrease button to adjust...
... connected, go to choose an audio setting for the voice of the personal trainer, set a default menu, check the status of hours that has been pedaled on the elliptical. 3. To select the information mode, press and hold down the Display button for downloads. 1. The display will show the words NO IFIT MODULE. After a few seconds. 9. Press the Resistance increase and decrease buttons to view the downloads display. Press the decrease button to adjust...

English Manual
Page 26
..., if not installed and used in accordance with the limits for help. FCC INFORMATION This equipment has been tested and found to comply with the instructions, may cause harmful interference to radio communications. FCC CAUTION: To assure continued compliance, use only shielded interface cables when connecting to provide reasonable protection against harmful interference in a particular installation. Changes or modifications not...
..., if not installed and used in accordance with the limits for help. FCC INFORMATION This equipment has been tested and found to comply with the instructions, may cause harmful interference to radio communications. FCC CAUTION: To assure continued compliance, use only shielded interface cables when connecting to provide reasonable protection against harmful interference in a particular installation. Changes or modifications not...
English Manual
Page 27
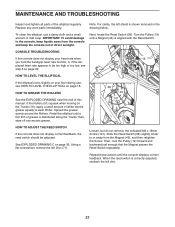
... Screw. Note: For clarity, the left disc. 27 HOW TO LEVEL THE ELLIPTICAL If the elliptical rocks slightly on your heart rate when 19 you hold the handgrip heart rate monitor, or if the dis- Using a flat screwdriver, remove the left Disc (71). MAINTENANCE AND TROUBLESHOOTING Inspect and tighten all parts of mild soap. Replace any excess grease. 38 43 101 HOW TO ADJUST THE REED SWITCH If the console...
... Screw. Note: For clarity, the left disc. 27 HOW TO LEVEL THE ELLIPTICAL If the elliptical rocks slightly on your heart rate when 19 you hold the handgrip heart rate monitor, or if the dis- Using a flat screwdriver, remove the left Disc (71). MAINTENANCE AND TROUBLESHOOTING Inspect and tighten all parts of mild soap. Replace any excess grease. 38 43 101 HOW TO ADJUST THE REED SWITCH If the console...

English Manual
Page 28
... TO ADJUST THE DRIVE BELT If the pedals slip while you are pedaling, even while the resistance is tight. Next, tighten the Belt Adjustment Screw (91) until the Drive Belt (113) is adjusted to the highest level, the drive belt may need to remove the Shield Cover (75) and the Shield Cover Cap (118). Then, retighten the Idler Screw. To adjust the drive belt, first see assembly step 16 on page 14 and remove the Right Pedal Arm (58...
... TO ADJUST THE DRIVE BELT If the pedals slip while you are pedaling, even while the resistance is tight. Next, tighten the Belt Adjustment Screw (91) until the Drive Belt (113) is adjusted to the highest level, the drive belt may need to remove the Shield Cover (75) and the Shield Cover Cap (118). Then, retighten the Idler Screw. To adjust the drive belt, first see assembly step 16 on page 14 and remove the Right Pedal Arm (58...
English Manual
Page 29
... middle number is the heart rate for maximum fat burning, and the highest number is to make exercise a regular and enjoyable part of your exercise program, do not keep your heart rate in your body uses carbohydrate calories for exercise. Remember, the key to success is the heart rate for energy. The heart rate monitor is not a medical device. For maximum fat burning, exercise with pre-existing health problems. The heart rate monitor is intended...
... middle number is the heart rate for maximum fat burning, and the highest number is to make exercise a regular and enjoyable part of your exercise program, do not keep your heart rate in your body uses carbohydrate calories for exercise. Remember, the key to success is the heart rate for energy. The heart rate monitor is not a medical device. For maximum fat burning, exercise with pre-existing health problems. The heart rate monitor is intended...
English Manual
Page 31
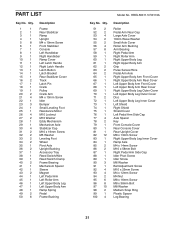
... Right Latch Handle Latch Button Latch Bracket Rear Stabilizer Cover Track Latch Pin Crank Pulley Crank Arm M4 x 10mm Screw Idler Bumper Small Leveling Foot Resistance Motor M10 Locknut M10 Washer Eddy Mechanism Mechanism Axle Stabilizer Cap M10 x 19mm Screw M5 Washer Leveling Foot Wheel Pivot Axle Upright Bushing Accessory Tray Reed Switch/Wire Reed Switch Clamp Frame Bearing Mechanism Spacer Sleeve Magnet Left Pedal Arm Left Roller Arm Left Upper Body Leg Left Upper Body Arm Ramp Spring Pedal Frame Bushing Model...
... Right Latch Handle Latch Button Latch Bracket Rear Stabilizer Cover Track Latch Pin Crank Pulley Crank Arm M4 x 10mm Screw Idler Bumper Small Leveling Foot Resistance Motor M10 Locknut M10 Washer Eddy Mechanism Mechanism Axle Stabilizer Cap M10 x 19mm Screw M5 Washer Leveling Foot Wheel Pivot Axle Upright Bushing Accessory Tray Reed Switch/Wire Reed Switch Clamp Frame Bearing Mechanism Spacer Sleeve Magnet Left Pedal Arm Left Roller Arm Left Upper Body Leg Left Upper Body Arm Ramp Spring Pedal Frame Bushing Model...

English Manual
Page 32
... Screw M10 x 60mm Bolt Upper Wire Lower Wire 112 3 113 1 114 6 115 2 116 2 117 1 118 1 119 1 * –- * –- * –- Qty. Description Key No. Qty. For information about ordering replacement parts, see the back cover of this manual. *These parts are subject to change without notice. Key No. M4 x 19mm Self-tapping Screw Drive Belt M4 x 42mm Screw M4 x 30mm Screw Disc Ring Front Upright Cover Shield Cover Cap Power Adapter Assembly Tool Grease Packet User’'s Manual Note: Specifications...
... Screw M10 x 60mm Bolt Upper Wire Lower Wire 112 3 113 1 114 6 115 2 116 2 117 1 118 1 119 1 * –- * –- * –- Qty. Description Key No. Qty. For information about ordering replacement parts, see the back cover of this manual. *These parts are subject to change without notice. Key No. M4 x 19mm Self-tapping Screw Drive Belt M4 x 42mm Screw M4 x 30mm Screw Disc Ring Front Upright Cover Shield Cover Cap Power Adapter Assembly Tool Grease Packet User’'s Manual Note: Specifications...

English Manual
Page 36
... model number and serial number of the product (see the front cover of this manual) •• the name of the product (see the front cover of this manual) •• the key number and description of the replacement part(s) (see the PART LIST and the EXPLODED DRAWING near the end of this manual) LIMITED WARRANTY IMPORTANT: To protect your fitness equipment with respect to any kind. ICON is...
... model number and serial number of the product (see the front cover of this manual) •• the name of the product (see the front cover of this manual) •• the key number and description of the replacement part(s) (see the PART LIST and the EXPLODED DRAWING near the end of this manual) LIMITED WARRANTY IMPORTANT: To protect your fitness equipment with respect to any kind. ICON is...


