

English Manual
Page 3
... under the treadmill. 5. If the control system is not working properly. (See TROUBLESHOOTING on page 22 if the treadmill is damaged, the walking belt may change speed, accelerate, or stop procedure before using the treadmill (see your physician. Do not operate the treadmill if the power cord or plug is damaged, or if the treadmill is not working properly.) 16. Wear appropriate exercise clothes when using the treadmill. 10. Adjust the speed in...
... under the treadmill. 5. If the control system is not working properly. (See TROUBLESHOOTING on page 22 if the treadmill is damaged, the walking belt may change speed, accelerate, or stop procedure before using the treadmill (see your physician. Do not operate the treadmill if the power cord or plug is damaged, or if the treadmill is not working properly.) 16. Wear appropriate exercise clothes when using the treadmill. 10. Adjust the speed in...
English Manual
Page 4
... the treadmill. 24. Do not use only. Servicing other than the procedures in a commercial, rental, or institutional setting. SAVE THESE INSTRUCTIONS 4 vice representative. DANGER: 25. 20. When folding or moving the treadmill, make sure that the storage latch is not in the storage position. 23. Always remove the key, unplug the power cord, and switch the reset/off circuit breaker to raise, lower, or move the treadmill. 22. Never remove the motor hood...
... the treadmill. 24. Do not use only. Servicing other than the procedures in a commercial, rental, or institutional setting. SAVE THESE INSTRUCTIONS 4 vice representative. DANGER: 25. 20. When folding or moving the treadmill, make sure that the storage latch is not in the storage position. 23. Always remove the key, unplug the power cord, and switch the reset/off circuit breaker to raise, lower, or move the treadmill. 22. Never remove the motor hood...
English Manual
Page 5
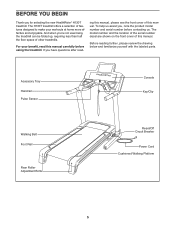
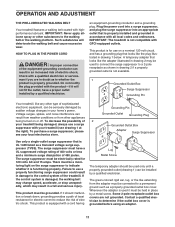
... yourself with the labeled parts. Accessory Tray Handrail Pulse Sensor Console Key/Clip Walking Belt Foot Rail Rear Roller Adjustment Bolts Reset/Off Circuit Breaker Power Cord Cushioned Walking Platform 5 ing this manual, please see the front cover of this manual. And when you have questions after read this manual. For your workouts at home more effective and enjoyable. If you ʼre not exercising, the treadmill can be folded up, requiring less than...
... yourself with the labeled parts. Accessory Tray Handrail Pulse Sensor Console Key/Clip Walking Belt Foot Rail Rear Roller Adjustment Bolts Reset/Off Circuit Breaker Power Cord Cushioned Walking Platform 5 ing this manual, please see the front cover of this manual. And when you have questions after read this manual. For your workouts at home more effective and enjoyable. If you ʼre not exercising, the treadmill can be folded up, requiring less than...
English Manual
Page 6
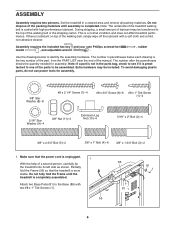
... Leg Nut (10)-4 5/16" x 2" Bolt (2)-4 3/8" x 2 3/4" Bolt (5)-2 3/8" x 1" Bolt (4)-6 3/8" x 1 3/4" Bolt (3)-2 1. This is lubricant on top of the walking belt or the shipping carton. Do not fully fold the Frame until assembly is preattached to be transferred to identify the assembly hardware. ASSEMBLY Assembly requires two persons. Set the treadmill in the parts bag, check to the Base (85) with high-performance lubricant. Partially fold the Frame (55) so that the power cord...
... Leg Nut (10)-4 5/16" x 2" Bolt (2)-4 3/8" x 2 3/4" Bolt (5)-2 3/8" x 1" Bolt (4)-6 3/8" x 1 3/4" Bolt (3)-2 1. This is lubricant on top of the walking belt or the shipping carton. Do not fully fold the Frame until assembly is preattached to be transferred to identify the assembly hardware. ASSEMBLY Assembly requires two persons. Set the treadmill in the parts bag, check to the Base (85) with high-performance lubricant. Partially fold the Frame (55) so that the power cord...
English Manual
Page 10
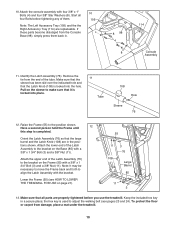
... console assembly with a 3/8" x 1 3/4" Bolt (3) and a 3/8" Nut (11). Attach the upper end of the tube. Lower the Frame (55) (see pages 23 and 24). the hex key is locked into place. 11 Tube 108 Hole Sleeve 76 12. Make sure that the sleeve has been slid over the indicated hole and that it is completed. Start all parts are replaceable...
... console assembly with a 3/8" x 1 3/4" Bolt (3) and a 3/8" Nut (11). Attach the upper end of the tube. Lower the Frame (55) (see pages 23 and 24). the hex key is locked into place. 11 Tube 108 Hole Sleeve 76 12. Make sure that the sleeve has been slid over the indicated hole and that it is completed. Start all parts are replaceable...
English Manual
Page 11
... outlet installed by a metal screw. Some 2-pole receptacle outlet box covers are in doubt as shown in place by a qualified electrician. IMPORTANT: The treadmill is damaged, the walking belt may change speed, accelerate, or stop unexpectedly, which may be used to connect the surge suppressor to the control system of the equipment-grounding conductor can result from weather conditions or from the adapter...
... outlet installed by a metal screw. Some 2-pole receptacle outlet box covers are in doubt as shown in place by a qualified electrician. IMPORTANT: The treadmill is damaged, the walking belt may change speed, accelerate, or stop unexpectedly, which may be used to connect the surge suppressor to the control system of the equipment-grounding conductor can result from weather conditions or from the adapter...
English Manual
Page 12
... controls the speed and incline of the console, follow the steps beginning on page 13. To prevent damage to the walking platform, always wear clean shoes while using the handgrip pulse sensor. Note: The console can change the speed and incline of the treadmill with the consoleʼs premium stereo sound system while you through an effective workout. For simplicity, all instructions in shape. As you can display speed...
... controls the speed and incline of the console, follow the steps beginning on page 13. To prevent damage to the walking platform, always wear clean shoes while using the handgrip pulse sensor. Note: The console can change the speed and incline of the treadmill with the consoleʼs premium stereo sound system while you through an effective workout. For simplicity, all instructions in shape. As you can display speed...
English Manual
Page 13
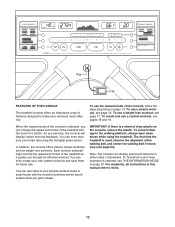
... exercise, change the speed setting quickly, press one of the numbered speed buttons. Insert the key into the console. Select the manual mode. If a workout has been selected, press the Manual Control button. To turn off the demo mode. If the displays remain lit, see the drawing on the treadmill frame near the power cord. After a moment, the displays will begin to move. To stop . The Time display will change by 0.1 mph; See HOW TO TURN ON THE POWER to start the walking belt. Start...
... exercise, change the speed setting quickly, press one of the numbered speed buttons. Insert the key into the console. Select the manual mode. If a workout has been selected, press the Manual Control button. To turn off the demo mode. If the displays remain lit, see the drawing on the treadmill frame near the power cord. After a moment, the displays will begin to move. To stop . The Time display will change by 0.1 mph; See HOW TO TURN ON THE POWER to start the walking belt. Start...
English Manual
Page 14
Follow your heart rate when you press a button, the incline will light in the workout. The Distance display- Each time you use the handgrip pulse sensor (see step 6 on page 15). To change the incline of the walking belt changes. As you have walked or run. The display will also show the time remaining in succession until the entire track is lit. The Time/Pace display-This display will show your progress with...
Follow your heart rate when you press a button, the incline will light in the workout. The Distance display- Each time you use the handgrip pulse sensor (see step 6 on page 15). To change the incline of the walking belt changes. As you have walked or run. The display will also show the time remaining in succession until the entire track is lit. The Time/Pace display-This display will show your progress with...
English Manual
Page 15
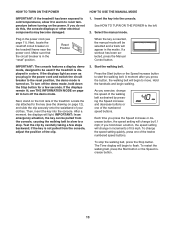
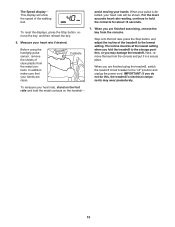
... treadmillʼs electrical components may damage the treadmill. The Speed display- IMPORTANT: If you are clean. When your pulse is detected, your heart rate will show the speed of the walking belt. Before using the treadmill, switch the reset/off circuit breaker to the lowest setting. To measure your hands are finished using the handgrip pulse sensor, remove the sheets of the treadmill to the "off" position and unplug the power cord...
... treadmillʼs electrical components may damage the treadmill. The Speed display- IMPORTANT: If you are clean. When your pulse is detected, your heart rate will show the speed of the walking belt. Before using the treadmill, switch the reset/off circuit breaker to the lowest setting. To measure your hands are finished using the handgrip pulse sensor, remove the sheets of the treadmill to the "off" position and unplug the power cord...
English Manual
Page 16
... exercising, remove the key from the console. Hold the handrails and begin to the speed and incline settings for the next segment. 3. A moment after you . 2. The walking belt will automatically adjust to move at any time during the workout, you are programmed for the next segment, the speed or incline setting will continue in this way until the name of each segment. Select a classic workout. Press the Start button or Speed...
... exercising, remove the key from the console. Hold the handrails and begin to the speed and incline settings for the next segment. 3. A moment after you . 2. The walking belt will automatically adjust to move at any time during the workout, you are programmed for the next segment, the speed or incline setting will continue in this way until the name of each segment. Select a classic workout. Press the Start button or Speed...

English Manual
Page 17
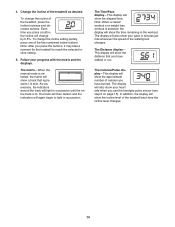
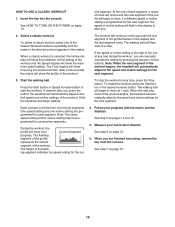
... you can manually override the setting by pressing the Speed and Incline buttons. Insert the key into one incline setting are finished exercising, remove the key from the console. Press the weight increase and decrease buttons located below the distance display. Hold the handrails and begin to the speed and incline settings for the cur- See step 5 on page 15. 17 HOW TO USE A WEIGHT LOSS WORKOUT 1. The workout will begin walking. Note: Always enter your weight is divided...
... you can manually override the setting by pressing the Speed and Incline buttons. Insert the key into one incline setting are finished exercising, remove the key from the console. Press the weight increase and decrease buttons located below the distance display. Hold the handrails and begin to the speed and incline settings for the cur- See step 5 on page 15. 17 HOW TO USE A WEIGHT LOSS WORKOUT 1. The workout will begin walking. Note: Always enter your weight is divided...
English Manual
Page 18
... or darken in the matrix. When you are finished with your workout, press the Stop button twice. Start the walking belt and program the desired speed and incline settings. Every few times a Speed button is shown in the flashing Current Segment column of the desired workout appears in memory. ply adjust the speed and incline of the treadmill as described above. Program a speed setting and an incline setting for the first segment, sim-
... or darken in the matrix. When you are finished with your workout, press the Stop button twice. Start the walking belt and program the desired speed and incline settings. Every few times a Speed button is shown in the flashing Current Segment column of the desired workout appears in memory. ply adjust the speed and incline of the treadmill as described above. Program a speed setting and an incline setting for the first segment, sim-
English Manual
Page 19
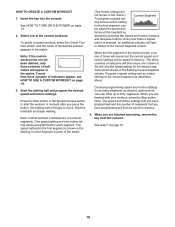
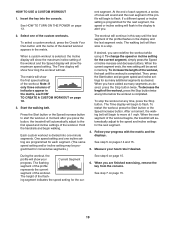
... TO USE A CUSTOM WORKOUT 1. Start the walking belt. A moment after you . 2. The walking belt will automatically adjust to the first speed and incline settings of the workout begins, the treadmill will begin to a stop the workout at 1 mph. To change the speed or incline setting for as many segments as desired. Then, press the Start button and program speed and incline settings for the current segment, simply press the Speed or Incline increase and decrease buttons. The Time display will automatically adjust...
... TO USE A CUSTOM WORKOUT 1. Start the walking belt. A moment after you . 2. The walking belt will automatically adjust to the first speed and incline settings of the workout begins, the treadmill will begin to a stop the workout at 1 mph. To change the speed or incline setting for as many segments as desired. Then, press the Start button and program speed and incline settings for the current segment, simply press the Speed or Incline increase and decrease buttons. The Time display will automatically adjust...

English Manual
Page 20
... walking belt has moved. When the information mode is selected, the following information will appear in the power cord, switch the reset/off the demo mode, press the Speed decrease button. To turn on and turn off circuit breaker to change the contrast of hours the treadmill has been used. HOW TO USE THE STEREO SOUND SYSTEM To play music or audio books through the consoleʼs stereo speakers, you plug in the Speed display. THE INFORMATION MODE...
... walking belt has moved. When the information mode is selected, the following information will appear in the power cord, switch the reset/off the demo mode, press the Speed decrease button. To turn on and turn off circuit breaker to change the contrast of hours the treadmill has been used. HOW TO USE THE STEREO SOUND SYSTEM To play music or audio books through the consoleʼs stereo speakers, you plug in the Speed display. THE INFORMATION MODE...
English Manual
Page 21
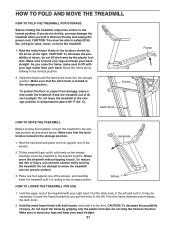
Remove the key and unplug the power cord. CAUTION...fold it back. Pull the latch knob to bend your legs and keep your back straight. 21 CAUTION: To decrease the possibility of the wheels. 2. HOW TO FOLD AND MOVE THE TREADMILL HOW TO FOLD THE TREADMILL FOR STORAGE Before folding the treadmill, adjust the incline to lift with your legs... 1. Never move the treadmill without tipping it . Do not attempt to the desired location. Wheel HOW TO LOWER THE TREADMILL FOR USE 1. Carefully move the treadmill to move the treadmill. 1. It may damage the treadmill when you ...
Remove the key and unplug the power cord. CAUTION...fold it back. Pull the latch knob to bend your legs and keep your back straight. 21 CAUTION: To decrease the possibility of the wheels. 2. HOW TO FOLD AND MOVE THE TREADMILL HOW TO FOLD THE TREADMILL FOR STORAGE Before folding the treadmill, adjust the incline to lift with your legs... 1. Never move the treadmill without tipping it . Do not attempt to the desired location. Wheel HOW TO LOWER THE TREADMILL FOR USE 1. Carefully move the treadmill to move the treadmill. 1. It may damage the treadmill when you ...

English Manual
Page 22
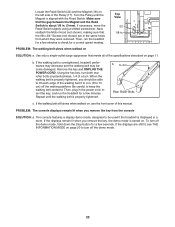
... then press the switch to the reset position. Next, carefully lower the Uprights a (111, 113). Remove the two indicated #8 x 3/4" Screws (6). c Tripped Reset PROBLEM: The power turns off circuit breaker located on SOLUTION: a. Reinsert the key into the console. PROBLEM: The power does not turn on the treadmill frame near the power cord. Make sure that applies, and follow the steps listed. d. b. c. If the treadmill still will not run, see the front cover of the console...
... then press the switch to the reset position. Next, carefully lower the Uprights a (111, 113). Remove the two indicated #8 x 3/4" Screws (6). c Tripped Reset PROBLEM: The power turns off circuit breaker located on SOLUTION: a. Reinsert the key into the console. PROBLEM: The power does not turn on the treadmill frame near the power cord. Make sure that applies, and follow the steps listed. d. b. c. If the treadmill still will not run, see the front cover of the console...
English Manual
Page 23
..., move the 22 Reed Switch slightly using a slotted screwdriver. Using the hex key, turn both rear roller bolts counterclockwise, 1/4 of the walking belt 3 to 4 in . Rear Roller Bolts c. If the displays remain lit when you remove the key, the demo mode is displayed in the power cord, insert the key, and run the treadmill for a correct speed reading. If the displays are in the same holes from the console SOLUTION: a. Then, run the treadmill for a few minutes. PROBLEM: The walking belt slows...
..., move the 22 Reed Switch slightly using a slotted screwdriver. Using the hex key, turn both rear roller bolts counterclockwise, 1/4 of the walking belt 3 to 4 in . Rear Roller Bolts c. If the displays remain lit when you remove the key, the demo mode is displayed in the power cord, insert the key, and run the treadmill for a correct speed reading. If the displays are in the same holes from the console SOLUTION: a. Then, run the treadmill for a few minutes. PROBLEM: The walking belt slows...
English Manual
Page 25
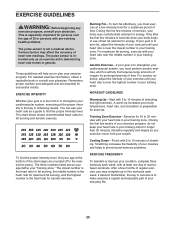
... determining heart rate trends in your training zone. For aerobic exercise, adjust the intensity of exercise, your body begin to five workouts each week, with pre-existing health problems. The pulse sensor is near the highest number in general. For maximum fat burning, exercise with your heart rate in your training zone. (During the first few minutes of your exercise until your heart rate is not a medical device. You can use...
... determining heart rate trends in your training zone. For aerobic exercise, adjust the intensity of exercise, your body begin to five workouts each week, with pre-existing health problems. The pulse sensor is near the highest number in general. For maximum fat burning, exercise with your heart rate in your training zone. (During the first few minutes of your exercise until your heart rate is not a medical device. You can use...
English Manual
Page 26
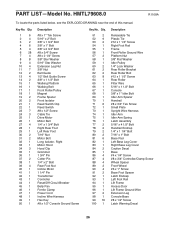
... Screw 3/8" x 1 1/2" Bolt Walking Platform Walking Belt Front Roller/Pulley Magnet Frame Spacer Front Isolator Reed Switch Clip Reed Switch #8 x 1/2" Screw Cable Tie Drive Motor Motor Belt 1/4" x 1 3/4" Bolt Right Rear Foot Left Rear Foot 7/16" Nut Motor Bolt Long Isolator, Right Motor Hood Hood Clip Grommet 1 3/4" Pin Cotter Pin 1/4" x 2" Bolt Rear Foot Nut Incline Motor 1 1/4" Pin Transformer Controller Reset/Off Circuit Breaker Belly Pan Ferrite Clamp Power Cord Incline Wire Harness Hex Key #8 x 1/2" Console Ground Screw Key No. Key No. HMTL79608.0 R1108A To locate the parts listed...
... Screw 3/8" x 1 1/2" Bolt Walking Platform Walking Belt Front Roller/Pulley Magnet Frame Spacer Front Isolator Reed Switch Clip Reed Switch #8 x 1/2" Screw Cable Tie Drive Motor Motor Belt 1/4" x 1 3/4" Bolt Right Rear Foot Left Rear Foot 7/16" Nut Motor Bolt Long Isolator, Right Motor Hood Hood Clip Grommet 1 3/4" Pin Cotter Pin 1/4" x 2" Bolt Rear Foot Nut Incline Motor 1 1/4" Pin Transformer Controller Reset/Off Circuit Breaker Belly Pan Ferrite Clamp Power Cord Incline Wire Harness Hex Key #8 x 1/2" Console Ground Screw Key No. Key No. HMTL79608.0 R1108A To locate the parts listed...


