
English Manual
Page 2
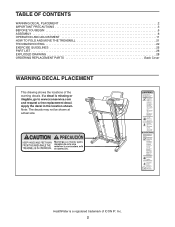
...OF CONTENTS WARNING DECAL PLACEMENT 2 IMPORTANT PRECAUTIONS 3 BEFORE YOU BEGIN 5 ASSEMBLY 6 OPERATION AND ADJUSTMENT 11 HOW TO FOLD AND MOVE THE TREADMILL 21 TROUBLESHOOTING 22 EXERCISE GUIDELINES 25 PART LIST 26 EXPLODED DRAWING 28 ORDERING REPLACEMENT PARTS Back Cover WARNING DECAL PLACEMENT This ...drawing shows the locations of ICON IP, Inc. 2 HealthRider is missing or illegible, go to www.iconservice.com and ...
...OF CONTENTS WARNING DECAL PLACEMENT 2 IMPORTANT PRECAUTIONS 3 BEFORE YOU BEGIN 5 ASSEMBLY 6 OPERATION AND ADJUSTMENT 11 HOW TO FOLD AND MOVE THE TREADMILL 21 TROUBLESHOOTING 22 EXERCISE GUIDELINES 25 PART LIST 26 EXPLODED DRAWING 28 ORDERING REPLACEMENT PARTS Back Cover WARNING DECAL PLACEMENT This ...drawing shows the locations of ICON IP, Inc. 2 HealthRider is missing or illegible, go to www.iconservice.com and ...
English Manual
Page 4
... representative only. 26. Do not use . (See the drawing on page 5 for the location of the treadmill regularly. DANGER: 25. Servicing other than the procedures in the storage position. 23. When folding or moving the treadmill, make sure that the storage latch is holding the frame securely in this manual. Always unplug the...
... representative only. 26. Do not use . (See the drawing on page 5 for the location of the treadmill regularly. DANGER: 25. Servicing other than the procedures in the storage position. 23. When folding or moving the treadmill, make sure that the storage latch is holding the frame securely in this manual. Always unplug the...
English Manual
Page 5
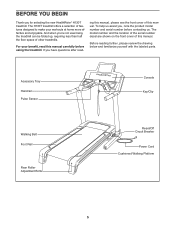
Before reading further, please review the drawing below and familiarize yourself with the labeled parts. The H130T treadmill offers a selection of this manual, please see the front cover of features designed to make your benefit, read - ing this manual. ...5 BEFORE YOU BEGIN Thank you , note the product model number and serial number before using the treadmill. If you ʼre not exercising, the treadmill can be folded up, requiring less than half the floor space of this manual carefully before contacting us assist you for selecting the new HealthRider® H130T treadmill.
Before reading further, please review the drawing below and familiarize yourself with the labeled parts. The H130T treadmill offers a selection of this manual, please see the front cover of features designed to make your benefit, read - ing this manual. ...5 BEFORE YOU BEGIN Thank you , note the product model number and serial number before using the treadmill. If you ʼre not exercising, the treadmill can be folded up, requiring less than half the floor space of this manual carefully before contacting us assist you for selecting the new HealthRider® H130T treadmill.
English Manual
Page 6
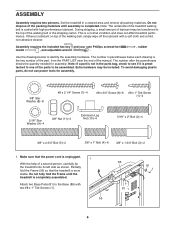
... belt is preattached to the top of the packing materials until the treadmill is completely assembled. Note: If a part is not in the parts bag, check to be transferred to one of the manual. Do not fully fold the Frame until assembly is the key number of the part, from the ... avoid damaging plastic parts, do not use power tools for assembly. This is more stable. Partially fold the Frame (55) so that the power cord is lubricant on top of a second person, carefully tip the treadmill onto its left side as shown. The number in a cleared area and remove all packing materials...
... belt is preattached to the top of the packing materials until the treadmill is completely assembled. Note: If a part is not in the parts bag, check to be transferred to one of the manual. Do not fully fold the Frame until assembly is the key number of the part, from the ... avoid damaging plastic parts, do not use power tools for assembly. This is more stable. Partially fold the Frame (55) so that the power cord is lubricant on top of a second person, carefully tip the treadmill onto its left side as shown. The number in a cleared area and remove all packing materials...
English Manual
Page 8
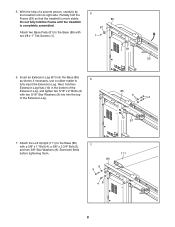
...the Extension Leg. 85 9 2 10 97 7. Next, hold two Extension Leg Nuts (10) in the bottom of a second person, carefully tip the treadmill onto its right side. Start both Bolts before tightening them. 111 85 8 5 48 8 With the help of the Extension Leg, and tighten two 5/...the Left Upright (111) to the Base (85) with a 3/8" x 1" Bolt (4), a 3/8" x 2 3/4" Bolt (5), 7 and two 3/8" Star Washers (8). Do not fully fold the Frame until the treadmill is more stable. Attach two Base Pads (81) to the Base (85) with two #8 x 1" Tek Screws (1). 5 85 81 1 1 81 55 6. 5. if necessary, ...
...the Extension Leg. 85 9 2 10 97 7. Next, hold two Extension Leg Nuts (10) in the bottom of a second person, carefully tip the treadmill onto its right side. Start both Bolts before tightening them. 111 85 8 5 48 8 With the help of the Extension Leg, and tighten two 5/...the Left Upright (111) to the Base (85) with a 3/8" x 1" Bolt (4), a 3/8" x 2 3/4" Bolt (5), 7 and two 3/8" Star Washers (8). Do not fully fold the Frame until the treadmill is more stable. Attach two Base Pads (81) to the Base (85) with two #8 x 1" Tek Screws (1). 5 85 81 1 1 81 55 6. 5. if necessary, ...
English Manual
Page 15
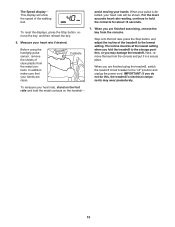
... onto the foot rails, press the Stop button, and adjust the incline of the treadmill to hold the metal contacts on the handrail- 15 The incline must be shown. ... To reset the displays, press the Stop button, remove the key, and then reinsert the key. 6. Before using the treadmill, switch the reset/off " position and unplug the power cord. Contacts 7. When you are clean. avoid moving your hands ...prematurely. The Speed display- This display will be at the lowest setting when you fold the treadmill to the "off circuit breaker to the storage position, or you do not do this, the...
... onto the foot rails, press the Stop button, and adjust the incline of the treadmill to hold the metal contacts on the handrail- 15 The incline must be shown. ... To reset the displays, press the Stop button, remove the key, and then reinsert the key. 6. Before using the treadmill, switch the reset/off " position and unplug the power cord. Contacts 7. When you are clean. avoid moving your hands ...prematurely. The Speed display- This display will be at the lowest setting when you fold the treadmill to the "off circuit breaker to the storage position, or you do not do this, the...
English Manual
Page 21
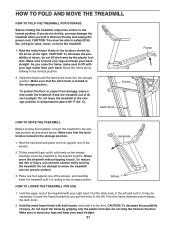
...wheels. Place one foot against one of injury, use extreme caution while moving the treadmill, convert the treadmill to bend your legs and keep your back straight. 21 Make sure to the storage position as you fold it . Hold the metal frame firmly in the storage position. As you raise the... lift with your back. Pivot the frame downward and release the latch knob. 2. HOW TO FOLD AND MOVE THE TREADMILL HOW TO FOLD THE TREADMILL FOR STORAGE Before folding the treadmill, adjust the incline to the floor. If you do not do not lift the frame by the arrow at the right. Make sure...
...wheels. Place one foot against one of injury, use extreme caution while moving the treadmill, convert the treadmill to bend your legs and keep your back straight. 21 Make sure to the storage position as you fold it . Hold the metal frame firmly in the storage position. As you raise the... lift with your back. Pivot the frame downward and release the latch knob. 2. HOW TO FOLD AND MOVE THE TREADMILL HOW TO FOLD THE TREADMILL FOR STORAGE Before folding the treadmill, adjust the incline to the floor. If you do not do not lift the frame by the arrow at the right. Make sure...


