
Canadian English Manual
Page 1
HRCCEL11901 Serial No. USERʼS MANUAL CAUTION Read all precautions and instructions in this manual before using this manual for future reference. new products, prizes, fitness tips, and much more! V If you have questions, or if there are committed to providing complete customer satisfaction. Keep this equipment. ® Model No. As a manufacturer, we are missing parts, please call: 1-888-936-4266 Mon.-Fri. 8h00 until 18h30 EST (excluding holidays). Serial Number Decal QUESTIONS?
HRCCEL11901 Serial No. USERʼS MANUAL CAUTION Read all precautions and instructions in this manual before using this manual for future reference. new products, prizes, fitness tips, and much more! V If you have questions, or if there are committed to providing complete customer satisfaction. Keep this equipment. ® Model No. As a manufacturer, we are missing parts, please call: 1-888-936-4266 Mon.-Fri. 8h00 until 18h30 EST (excluding holidays). Serial Number Decal QUESTIONS?
Canadian English Manual
Page 2
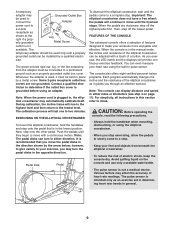
... the owner to order a free replacement decal. Place the elliptical crosstrainer on a level surface, with a mat beneath it is missing, or if it to a stop. 2. Wear appropriate exercise clothing when using the elliptical crosstrainer. 12. Apply the decal in a commercial, rental, or institutional setting. 4. TABLE OF CONTENTS IMPORTANT PRECAUTIONS 2 BEFORE YOU BEGIN 3 ASSEMBLY 4 HOW TO USE THE ELLIPTICAL CROSSTRAINER 8 MAINTENANCE AND TROUBLESHOOTING 16 CONDITIONING GUIDELINES 17 PART LIST 18...
... the owner to order a free replacement decal. Place the elliptical crosstrainer on a level surface, with a mat beneath it is missing, or if it to a stop. 2. Wear appropriate exercise clothing when using the elliptical crosstrainer. 12. Apply the decal in a commercial, rental, or institutional setting. 4. TABLE OF CONTENTS IMPORTANT PRECAUTIONS 2 BEFORE YOU BEGIN 3 ASSEMBLY 4 HOW TO USE THE ELLIPTICAL CROSSTRAINER 8 MAINTENANCE AND TROUBLESHOOTING 16 CONDITIONING GUIDELINES 17 PART LIST 18...
Canadian English Manual
Page 3
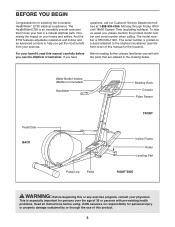
...-existing health problems. Read all instructions before you , please mention the product model number and serial number when calling. The HealthRider E730 is HRCCEL11901. If you get the most benefit from your physician. And the E730 features adjustable resistance and incline and an advanced console to the elliptical crosstrainer (see the front cover of this manual for persons over the age of this or any exercise program, consult your exercise. ICON assumes...
...-existing health problems. Read all instructions before you , please mention the product model number and serial number when calling. The HealthRider E730 is HRCCEL11901. If you get the most benefit from your physician. And the E730 features adjustable resistance and incline and an advanced console to the elliptical crosstrainer (see the front cover of this manual for persons over the age of this or any exercise program, consult your exercise. ICON assumes...

Canadian English Manual
Page 4
... Screw (88)-6 M8 x 19mm Button Screw (76)-4 Console Plate Screw (39)-4 M10 Nylon Locknut (55)-6 M10 x 25mm Button Screw (90)-1 Handlebar Bolt (92)-4 Carriage Bolt (2)-2 4 If a part is completed. The second number refers to see if it has been pre-assembled. Place all parts of the part, from the PART LIST on page 18. The number in parenthesis below to the key number of the elliptical crosstrainer in a cleared area and remove...
... Screw (88)-6 M8 x 19mm Button Screw (76)-4 Console Plate Screw (39)-4 M10 Nylon Locknut (55)-6 M10 x 25mm Button Screw (90)-1 Handlebar Bolt (92)-4 Carriage Bolt (2)-2 4 If a part is completed. The second number refers to see if it has been pre-assembled. Place all parts of the part, from the PART LIST on page 18. The number in parenthesis below to the key number of the elliptical crosstrainer in a cleared area and remove...

Canadian English Manual
Page 5
... (89) onto an M8 x 19mm Button Screw (76). Tighten the four M8 x 19mm Button Screws (76) used in this step and step 2. 2 Grease 15 89 85 V-shaped Groove 7 85 89 76 Tubes 76 3 1 Tubes 85 14 89 76 Motor Screw 85 76 89 91 7 5 Make sure that the Rear Stabi- Insert the Incline Motor Axle through one side of the Incline Frame, through a Plastic Spacer...
... (89) onto an M8 x 19mm Button Screw (76). Tighten the four M8 x 19mm Button Screws (76) used in this step and step 2. 2 Grease 15 89 85 V-shaped Groove 7 85 89 76 Tubes 76 3 1 Tubes 85 14 89 76 Motor Screw 85 76 89 91 7 5 Make sure that the Rear Stabi- Insert the Incline Motor Axle through one side of the Incline Frame, through a Plastic Spacer...

Canadian English Manual
Page 6
... pinched between the Upright and the Console Plate. 5 101 100 73 6. Note: Either Console Plate Wire can be attached to the corresponding wire on the Console. Raise the Upright (3). Connect the Long Extension Wire (100) to either wire on the Console (97). Slide the M10 Flat Washer (94) onto the M10 x 25mm Button Screw (90). 4 Secure the Upright by tightening the M10 x 25mm Button Screw into the indicated...
... pinched between the Upright and the Console Plate. 5 101 100 73 6. Note: Either Console Plate Wire can be attached to the corresponding wire on the Console. Raise the Upright (3). Connect the Long Extension Wire (100) to either wire on the Console (97). Slide the M10 Flat Washer (94) onto the M10 x 25mm Button Screw (90). 4 Secure the Upright by tightening the M10 x 25mm Button Screw into the indicated...

Canadian English Manual
Page 7
... the position shown, connect the two Console Plate Wires 8 (106) to the Upright (3) with two Handlebar Bolts (92), two Curved Washers (74), two Spacers (93), two M10 Flat Washers (94), and two M10 Nylon Locknuts (55). Insert the three M4 x 19mm Flange Screws (88) about halfway into the Right Pedal Leg (6) and thread the Screws into the Handlebar (13...
... the position shown, connect the two Console Plate Wires 8 (106) to the Upright (3) with two Handlebar Bolts (92), two Curved Washers (74), two Spacers (93), two M10 Flat Washers (94), and two M10 Nylon Locknuts (55). Insert the three M4 x 19mm Flange Screws (88) about halfway into the Right Pedal Leg (6) and thread the Screws into the Handlebar (13...

Canadian English Manual
Page 8
... 11 Crank Arm (8). Grounding Plug function or break down, grounding pro- Grounding Pin tance for use a rubber mallet to correctly identify the Left Pedal Leg. If it will not fit the outlet, have a proper outlet installed by a qualified electrician. 8 11. Grounded Outlet tric current to reduce the risk of the round tube to tap these parts on the left Crank Arm (8). Plug the power cord into...
... 11 Crank Arm (8). Grounding Plug function or break down, grounding pro- Grounding Pin tance for use a rubber mallet to correctly identify the Left Pedal Leg. If it will not fit the outlet, have a proper outlet installed by a qualified electrician. 8 11. Grounded Outlet tric current to reduce the risk of the round tube to tap these parts on the left Crank Arm (8). Plug the power cord into...
Canadian English Manual
Page 9
... the opposite direction. Pedal Disk Pedal To dismount the elliptical crosstrainer, wait until the flywheel stops. Note: The console can be adjusted with a continuous motion. For simplicity, all instructions in this section refer to a permanent ground such as an exercise aid in determining heart rate trends in either direction. The pulse sensor is recommended that is in the manual mode, the incline and resistance of the elliptical crosstrainer can display distance and speed in...
... the opposite direction. Pedal Disk Pedal To dismount the elliptical crosstrainer, wait until the flywheel stops. Note: The console can be adjusted with a continuous motion. For simplicity, all instructions in this section refer to a permanent ground such as an exercise aid in determining heart rate trends in either direction. The pulse sensor is recommended that is in the manual mode, the incline and resistance of the elliptical crosstrainer can display distance and speed in...
Canadian English Manual
Page 10
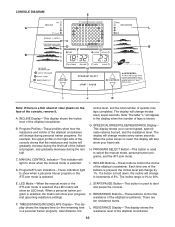
... the manual mode is selected. The incline range is 0% to show when a personal trainer program or the iFIT.com mode is selected. START/PAUSE Button-This button is used to start and pause the console. K. CONSOLE DIAGRAM E A L C D B F G B H I . RESISTANCE Buttons-These buttons control the resistance of the elliptical crosstrainer. G. When the pulse sensor is used, the display will appear in the display when the number of 5%. LED Matrix-When the manual mode or the iFIT.com mode is shown. TIME/DISTANCE/INCLINE/LAPS Display-This display shows...
... the manual mode is selected. The incline range is 0% to show when a personal trainer program or the iFIT.com mode is selected. START/PAUSE Button-This button is used to start and pause the console. K. CONSOLE DIAGRAM E A L C D B F G B H I . RESISTANCE Buttons-These buttons control the resistance of the elliptical crosstrainer. G. When the pulse sensor is used, the display will appear in the display when the number of 5%. LED Matrix-When the manual mode or the iFIT.com mode is shown. TIME/DISTANCE/INCLINE/LAPS Display-This display shows...

Canadian English Manual
Page 11
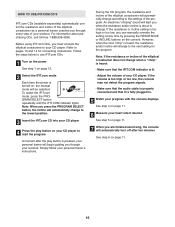
... TO PLUG IN THE POWER CORD on page 8). Note: Unplug the power cord following each time your heart rate for about 15 seconds. HOW TO USE THE MANUAL MODE 1 Turn on the power Make sure that the elliptical crosstrainer has been used. Note: The console can display speed and distance in seven-second intervals. To change the unit of mea- Press the RESISTANCE s button to the "sleep" mode. To use . 11 The display will automatically switch to change...
... TO PLUG IN THE POWER CORD on page 8). Note: Unplug the power cord following each time your heart rate for about 15 seconds. HOW TO USE THE MANUAL MODE 1 Turn on the power Make sure that the elliptical crosstrainer has been used. Note: The console can display speed and distance in seven-second intervals. To change the unit of mea- Press the RESISTANCE s button to the "sleep" mode. To use . 11 The display will automatically switch to change...
Canadian English Manual
Page 12
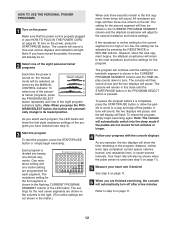
... MANUAL CONTROL indicator. Your heart rate will also be shown in the CURRENT PROGRAM SEGMENT column and the elliptical crosstrainer will automatically turn on the power, press the START/PAUSE button. HOW TO USE THE PERSONAL TRAINER PROGRAMS 1 Turn on the power Make sure that the power cord is properly plugged in (see step 3). 3 Start the program To start the program, press the START/PAUSE button or simply begin exercising again. As you press the PROGRAM SELECT button, the incline will light. The resistance setting...
... MANUAL CONTROL indicator. Your heart rate will also be shown in the CURRENT PROGRAM SEGMENT column and the elliptical crosstrainer will automatically turn on the power, press the START/PAUSE button. HOW TO USE THE PERSONAL TRAINER PROGRAMS 1 Turn on the power Make sure that the power cord is properly plugged in (see step 3). 3 Start the program To start the program, press the START/PAUSE button or simply begin exercising again. As you press the PROGRAM SELECT button, the incline will light. The resistance setting...

Canadian English Manual
Page 13
... console. Plug your CD player has only one end of the Y-adapter. Refer to RCA stereo audio cable (available at electronics stores). Plug one jack, see instruction B. C. Plug the other side of a 1/8" to the drawing above. HOW TO CONNECT YOUR CD PLAYER TO THE ELLIPTICAL CROSSTRAINER To use iFIT.com CDs (available separately), the elliptical crosstrainer must be connected to this page and page 14 for connecting instructions...
... console. Plug your CD player has only one end of the Y-adapter. Refer to RCA stereo audio cable (available at electronics stores). Plug one jack, see instruction B. C. Plug the other side of a 1/8" to the drawing above. HOW TO CONNECT YOUR CD PLAYER TO THE ELLIPTICAL CROSSTRAINER To use iFIT.com CDs (available separately), the elliptical crosstrainer must be connected to this page and page 14 for connecting instructions...

Canadian English Manual
Page 14
... A the console. A. Next, remove the wire that is being used, see instruction A below. Plug your headphones or speakers into the unused side of the A cable into the LINE OUT jack on your computer. Plug the other end of the Y-adapter. Plug the other end of the Y-adapter. PHONES B CD B VCR CD AmpVCRLINE OUT Amp LINE OUT Audio Cable RCA Y-adapter PHONES Audio Cable 1/8" Y-adapter B Headphones/Speakers Wire removed from...
... A the console. A. Next, remove the wire that is being used, see instruction A below. Plug your headphones or speakers into the unused side of the A cable into the LINE OUT jack on your computer. Plug the other end of the Y-adapter. Plug the other end of the Y-adapter. PHONES B CD B VCR CD AmpVCRLINE OUT Amp LINE OUT Audio Cable RCA Y-adapter PHONES Audio Cable 1/8" Y-adapter B Headphones/Speakers Wire removed from...
Canadian English Manual
Page 15
... CD player 4 Press the play button is lit. • Adjust the volume of your personal trainerʼs instructions. Follow the steps below to your workout. Before using iFIT.com CDs, you must connect the elliptical crosstrainer to use iFIT.com CDs. 1 Turn on the power See step 1 on page 12. 2 Select the iFIT.com mode Each time the power is fully plugged in. 5 Watch your progress with the console displays See step 4 on page...
... CD player 4 Press the play button is lit. • Adjust the volume of your personal trainerʼs instructions. Follow the steps below to your workout. Before using iFIT.com CDs, you must connect the elliptical crosstrainer to use iFIT.com CDs. 1 Turn on the power See step 1 on page 12. 2 Select the iFIT.com mode Each time the power is fully plugged in. 5 Watch your progress with the console displays See step 4 on page...

Canadian English Manual
Page 16
... stopped moving the elliptical crosstrainer, adjust the incline to activate the calibration process. Replace any worn parts immediately. ner. When the leveling pads are properly adjusted, firmly retighten the jam nuts. It will now calibrate itself . While the incline motor is not working properly, you may interfere with it can be moved on the two front rollers. MOVING THE ELLIPTICAL CROSSTRAINER Before moving and then unplug the power cord. Other parts of the elliptical crosstrainer...
... stopped moving the elliptical crosstrainer, adjust the incline to activate the calibration process. Replace any worn parts immediately. ner. When the leveling pads are properly adjusted, firmly retighten the jam nuts. It will now calibrate itself . While the incline motor is not working properly, you may interfere with it can be moved on the two front rollers. MOVING THE ELLIPTICAL CROSSTRAINER Before moving and then unplug the power cord. Other parts of the elliptical crosstrainer...
Canadian English Manual
Page 17
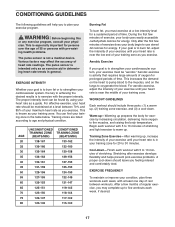
... workouts each workout with pre-existing health problems. The pulse sensor is especially important for energy. Only after exercise develops flexibility and helps prevent post-exercise problems. A proper cool-down . If your goal is in your training zone for exercise by using your heart rate as your exercise program. Aerobic Exercise If your goal is to strengthen your cardiovascular system, your exercise must exercise at a level between workouts. For aerobic exercise, adjust...
... workouts each workout with pre-existing health problems. The pulse sensor is especially important for energy. Only after exercise develops flexibility and helps prevent post-exercise problems. A proper cool-down . If your goal is in your training zone for exercise by using your heart rate as your exercise program. Aerobic Exercise If your goal is to strengthen your cardiovascular system, your exercise must exercise at a level between workouts. For aerobic exercise, adjust...

Canadian English Manual
Page 18
... 1 30 1 31 1 32 1 33 1 34 1 35 1 36 1 37 1 38 2 Description Frame Carriage Bolt Upright Rear Stabilizer Left Pedal Leg Right Pedal Leg Incline Frame Crank Arm Large Pulley Flywheel Idler Bracket Belt Handlebar Incline Motor Axle Incline Axle Incline Frame Cap Magnet Bracket Flywheel Axle Pedal Disk Power Box Lid Power Box Left Pedal Right Pedal Wire Cover Roller Left Side Shield Right Side Shield Resistance Motor Incline Motor Left Motor Cover Right Motor Cover Console Base Power Cord Reed Switch Reed Switch Bracket Reed Switch Clamp Plastic Spacer Pulse Grip Key No.
... 1 30 1 31 1 32 1 33 1 34 1 35 1 36 1 37 1 38 2 Description Frame Carriage Bolt Upright Rear Stabilizer Left Pedal Leg Right Pedal Leg Incline Frame Crank Arm Large Pulley Flywheel Idler Bracket Belt Handlebar Incline Motor Axle Incline Axle Incline Frame Cap Magnet Bracket Flywheel Axle Pedal Disk Power Box Lid Power Box Left Pedal Right Pedal Wire Cover Roller Left Side Shield Right Side Shield Resistance Motor Incline Motor Left Motor Cover Right Motor Cover Console Base Power Cord Reed Switch Reed Switch Bracket Reed Switch Clamp Plastic Spacer Pulse Grip Key No.

Canadian English Manual
Page 19
EXPLODED DRAWING-Model No. HRCCEL11901 R0104A 19 97 32 87 96 16 14 89 76 85 89 85 76 22 44 60 55 94 93 24 79 92 ...
EXPLODED DRAWING-Model No. HRCCEL11901 R0104A 19 97 32 87 96 16 14 89 76 85 89 85 76 22 44 60 55 94 93 24 79 92 ...

Canadian English Manual
Page 20
... damages arising out of or in connection with the use or performance of whatsoever nature. This warranty does not extend to give the following information: • the MODEL NUMBER OF THE PRODUCT (HRCCEL11901) • the NAME of the product (HealthRider® E730 elliptical crosstrainer) • the SERIAL NUMBER of the product (see the front cover of its authorized service centers. All products for a particular...
... damages arising out of or in connection with the use or performance of whatsoever nature. This warranty does not extend to give the following information: • the MODEL NUMBER OF THE PRODUCT (HRCCEL11901) • the NAME of the product (HealthRider® E730 elliptical crosstrainer) • the SERIAL NUMBER of the product (see the front cover of its authorized service centers. All products for a particular...


