
Instruction Manual
Page 1
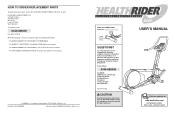
... instructions in China © 2000 ICON Health & Fitness, Inc. ® Model No. Serial Number Decal QUESTIONS? If you have questions, or if there are missing parts, we are committed to give the following information: • The MODEL NUMBER OF THE PRODUCT (HREMEL09984) • The NAME OF THE PRODUCT (HealthRider® E660 elliptical crosstrainer) • The SERIAL NUMBER OF THE PRODUCT (see the front cover of this manual) • The KEY NUMBER...
... instructions in China © 2000 ICON Health & Fitness, Inc. ® Model No. Serial Number Decal QUESTIONS? If you have questions, or if there are missing parts, we are committed to give the following information: • The MODEL NUMBER OF THE PRODUCT (HREMEL09984) • The NAME OF THE PRODUCT (HealthRider® E660 elliptical crosstrainer) • The SERIAL NUMBER OF THE PRODUCT (see the front cover of this manual) • The KEY NUMBER...
Instruction Manual
Page 2
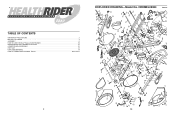
® EXPLODED DRAWING-Model No. HREMEL09984 R0600A 97 32 87 96 16 14 89 76 85 89 85 76 22 44 75 59 70 59 89 68 89 47 ... 43 24 41 102 48 60 44 67 TABLE OF CONTENTS IMPORTANT PRECAUTIONS 3 BEFORE YOU BEGIN 4 ASSEMBLY 5 HOW TO USE THE ELLIPTICAL CROSSTRAINER 10 MAINTENANCE AND TROUBLE-SHOOTING 15 CONDITIONING GUIDELINES 16 PART LIST 18 EXPLODED DRAWING 19 HOW TO ORDER REPLACEMENT PARTS Back Cover 35 84 77 71 36 105 3 102 55 78 28 85 76 74 49 100 43...
® EXPLODED DRAWING-Model No. HREMEL09984 R0600A 97 32 87 96 16 14 89 76 85 89 85 76 22 44 75 59 70 59 89 68 89 47 ... 43 24 41 102 48 60 44 67 TABLE OF CONTENTS IMPORTANT PRECAUTIONS 3 BEFORE YOU BEGIN 4 ASSEMBLY 5 HOW TO USE THE ELLIPTICAL CROSSTRAINER 10 MAINTENANCE AND TROUBLE-SHOOTING 15 CONDITIONING GUIDELINES 16 PART LIST 18 EXPLODED DRAWING 19 HOW TO ORDER REPLACEMENT PARTS Back Cover 35 84 77 71 36 105 3 102 55 78 28 85 76 74 49 100 43...
Instruction Manual
Page 3
... Bolt Console Upright Rear Stabiliser Left Pedal Leg Right Pedal Leg Incline Frame Crank Arm Large Pulley Flywheel Idler Bracket Belt Handlebar Incline Motor Axle Incline Axle Incline Frame Cap Magnet Bracket Flywheel Axle Pedal Disk Power Box Lid Power Box Left Pedal Right Pedal Wire Cover Roller Left Side Shield Right Side Shield Resistance Motor Incline Motor Left Motor Cover Right Motor Cover Console Base Power Cord Reed Switch Reed Switch Bracket Reed Switch Clamp Plastic Spacer Pulse Grip Key No. IMPORTANT PRECAUTIONS WARNING: To reduce the risk of heart rate readings. The elliptical...
... Bolt Console Upright Rear Stabiliser Left Pedal Leg Right Pedal Leg Incline Frame Crank Arm Large Pulley Flywheel Idler Bracket Belt Handlebar Incline Motor Axle Incline Axle Incline Frame Cap Magnet Bracket Flywheel Axle Pedal Disk Power Box Lid Power Box Left Pedal Right Pedal Wire Cover Roller Left Side Shield Right Side Shield Resistance Motor Incline Motor Left Motor Cover Right Motor Cover Console Base Power Cord Reed Switch Reed Switch Bracket Reed Switch Clamp Plastic Spacer Pulse Grip Key No. IMPORTANT PRECAUTIONS WARNING: To reduce the risk of heart rate readings. The elliptical...
Instruction Manual
Page 4
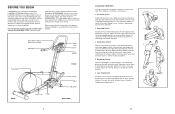
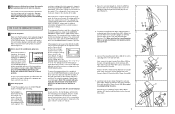
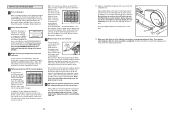
... well. Quadriceps Stretch With one hand against a wall. Repeat 3 times. The model number is an incredibly smooth exerciser that are labelled. Water Bottle Holders (bottles not included) Handlebar Book Rack Console Pulse Sensor Pedal Disk BACK Pedal Leg Pedal FRONT Incline Frame Roller Levelling Pad RIGHT SIDE 4 SUGGESTED STRETCHES The correct form for 15 counts, then relax. Hold for several basic stretches is...
... well. Quadriceps Stretch With one hand against a wall. Repeat 3 times. The model number is an incredibly smooth exerciser that are labelled. Water Bottle Holders (bottles not included) Handlebar Book Rack Console Pulse Sensor Pedal Disk BACK Pedal Leg Pedal FRONT Incline Frame Roller Levelling Pad RIGHT SIDE 4 SUGGESTED STRETCHES The correct form for 15 counts, then relax. Hold for several basic stretches is...
Instruction Manual
Page 5
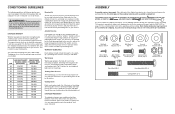
... exercise, adjust the intensity of your exercise until your heart rate is not in your training zone for exercise by using your cardiovascular system, the key to achieving the desired results is known as you exercise. As you assemble the elliptical crosstrainer, use stored fat calories for prolonged periods of stretching. The following guidelines will help you to five workouts each week, if desired. 16 ASSEMBLY Assembly...
... exercise, adjust the intensity of your exercise until your heart rate is not in your training zone for exercise by using your cardiovascular system, the key to achieving the desired results is known as you exercise. As you assemble the elliptical crosstrainer, use stored fat calories for prolonged periods of stretching. The following guidelines will help you to five workouts each week, if desired. 16 ASSEMBLY Assembly...
Instruction Manual
Page 6
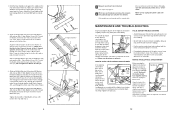
... heart rate if desired See step 5 on the Incline Frame (7) with a rubber mallet to the highest setting by pressing the INCLINE v button. Note: It may interfere with it. Next, apply a small amount of the pulse sensor, keep the metal contacts clean. Thread the Button Screw into the open end of the Incline Frame. MOVING THE ELLIPTICAL CROSSTRAINER Before moving and then unplug the power cord. 1. Attach the Rear Stabiliser with two Carriage Bolts...
... heart rate if desired See step 5 on the Incline Frame (7) with a rubber mallet to the highest setting by pressing the INCLINE v button. Note: It may interfere with it. Next, apply a small amount of the pulse sensor, keep the metal contacts clean. Thread the Button Screw into the open end of the Incline Frame. MOVING THE ELLIPTICAL CROSSTRAINER Before moving and then unplug the power cord. 1. Attach the Rear Stabiliser with two Carriage Bolts...
Instruction Manual
Page 7
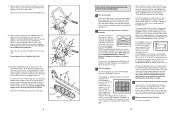
... and the elliptical crosstrainer will adjust to its lowest position. To adjust the difficulty level of the resistance settings, press the RESISTANCE buttons. Remove the M4 x 16mm Screw (60) from the console plate. Note: Unplug the power cord following each program, the LED matrix will show which fitness level is turned on, the manual mode will be shown when the pulse sensor is not pinched between the Upright and the Console Plate. 5 101...
... and the elliptical crosstrainer will adjust to its lowest position. To adjust the difficulty level of the resistance settings, press the RESISTANCE buttons. Remove the M4 x 16mm Screw (60) from the console plate. Note: Unplug the power cord following each program, the LED matrix will show which fitness level is turned on, the manual mode will be shown when the pulse sensor is not pinched between the Upright and the Console Plate. 5 101...
Instruction Manual
Page 8
... left display to the Console Upright (3) with the RESISTANCE buttons. The settings of the next seven segments are five "fitness levels" (fitness level 5 is turned on, the manual mode will already be shown when the pulse sensor is shown in (see step 3). 3 Start the program To start the program, press the START/PAUSE button or simply begin exercising again. The program will also be on the Right Pedal (23). If an incline program is properly plugged in...
... left display to the Console Upright (3) with the RESISTANCE buttons. The settings of the next seven segments are five "fitness levels" (fitness level 5 is turned on, the manual mode will already be shown when the pulse sensor is shown in (see step 3). 3 Start the program To start the program, press the START/PAUSE button or simply begin exercising again. The program will also be on the Right Pedal (23). If an incline program is properly plugged in...
Instruction Manual
Page 9
... a workout program has been selected, press the PROGRAM SELECT button repeatedly to correctly identify the Left Pedal Leg. A new lap will display the distance you exercise in miles. Avoid moving your heart rate if desired To use . 12 11. After a moment, three dashes (- - -) will appear and your heart rate will light. Be careful not to hold the contacts for ten minutes, the console will be displayed in manual mode, adjust the incline and resistance...
... a workout program has been selected, press the PROGRAM SELECT button repeatedly to correctly identify the Left Pedal Leg. A new lap will display the distance you exercise in miles. Avoid moving your heart rate if desired To use . 12 11. After a moment, three dashes (- - -) will appear and your heart rate will light. Be careful not to hold the contacts for ten minutes, the console will be displayed in manual mode, adjust the incline and resistance...
Instruction Manual
Page 10
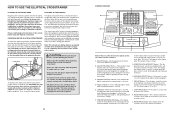
..., the matrix will change by the arrow below; For simplicity, all instructions in pulse sensor. A. START/PAUSE Button-This button is used to a complete stop . • Keep your heart rate. B. When the pulse sensor is used , the display will sound. You can be adjusted with a continuous motion. To dismount the elliptical crosstrainer, wait until the flywheel stops. HOW TO USE THE ELLIPTICAL CROSSTRAINER PLUGGING IN THE POWER CORD FEATURES OF THE CONSOLE Plug the power cord into a power converter (included...
..., the matrix will change by the arrow below; For simplicity, all instructions in pulse sensor. A. START/PAUSE Button-This button is used to a complete stop . • Keep your heart rate. B. When the pulse sensor is used , the display will sound. You can be adjusted with a continuous motion. To dismount the elliptical crosstrainer, wait until the flywheel stops. HOW TO USE THE ELLIPTICAL CROSSTRAINER PLUGGING IN THE POWER CORD FEATURES OF THE CONSOLE Plug the power cord into a power converter (included...

