
English Manual
Page 2
...moisture and dust. Keep your back straight when using the elliptical exerciser. Place the elliptical exerciser on the elliptical exerciser before using the elliptical exerciser. 1. Keep the elliptical exerciser indoors, away from the elliptical exerciser at all warnings on a level surface, with pre... 12. tions before using . TABLE OF CONTENTS IMPORTANT PRECAUTIONS 2 BEFORE YOU BEGIN 3 ASSEMBLY 4 HOW TO USE THE ELLIPTICAL EXERCISER 8 MAINTENANCE AND TROUBLESHOOTING 12 CONDITIONING GUIDELINES 13 PART LIST 14 EXPLODED DRAWING 15 HOW TO ORDER REPLACEMENT PARTS Back Cover...
...moisture and dust. Keep your back straight when using the elliptical exerciser. Place the elliptical exerciser on the elliptical exerciser before using the elliptical exerciser. 1. Keep the elliptical exerciser indoors, away from the elliptical exerciser at all warnings on a level surface, with pre... 12. tions before using . TABLE OF CONTENTS IMPORTANT PRECAUTIONS 2 BEFORE YOU BEGIN 3 ASSEMBLY 4 HOW TO USE THE ELLIPTICAL EXERCISER 8 MAINTENANCE AND TROUBLESHOOTING 12 CONDITIONING GUIDELINES 13 PART LIST 14 EXPLODED DRAWING 15 HOW TO ORDER REPLACEMENT PARTS Back Cover...
English Manual
Page 3
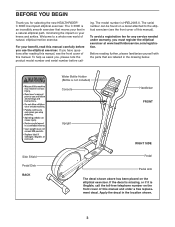
... please note the product model number and serial number before you have questions after reading this manual, see the front cover of natural, elliptical-motion exercise. The C 300E is illegible, call - If the decal is missing, or if it is an incredibly smooth exerciser that... in the location shown. 3 To avoid a registration fee for any service needed under warranty, you for selecting the new HEALTHRIDER® C 300E low-impact elliptical exerciser. The model number is not included) Console Handlebar FRONT Side Shield Pedal Disk BACK Upright RIGHT SIDE Pedal Pedal Arm...
... please note the product model number and serial number before you have questions after reading this manual, see the front cover of natural, elliptical-motion exercise. The C 300E is illegible, call - If the decal is missing, or if it is an incredibly smooth exerciser that... in the location shown. 3 To avoid a registration fee for any service needed under warranty, you for selecting the new HEALTHRIDER® C 300E low-impact elliptical exerciser. The model number is not included) Console Handlebar FRONT Side Shield Pedal Disk BACK Upright RIGHT SIDE Pedal Pedal Arm...
English Manual
Page 4
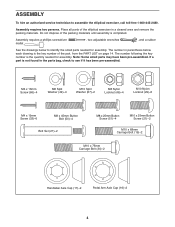
.... Place all parts of the part, from the PART LIST on page 14. The number following the key number is the key number of the elliptical exerciser in a cleared area and remove the packing materials. If a part is completed. The number in the parts bag, check to assemble the... elliptical exerciser, call toll-free 1-800-445-2480. M4 x 16mm Screw (66)-4 M8 Split Washer (49)-4 M10 Split Washer (67)-2 M8 Nylon Locknut (46)-4 M10 Nylon ...
.... Place all parts of the part, from the PART LIST on page 14. The number following the key number is the key number of the elliptical exerciser in a cleared area and remove the packing materials. If a part is completed. The number in the parts bag, check to assemble the... elliptical exerciser, call toll-free 1-800-445-2480. M4 x 16mm Screw (66)-4 M8 Split Washer (49)-4 M10 Split Washer (67)-2 M8 Nylon Locknut (46)-4 M10 Nylon ...
English Manual
Page 5
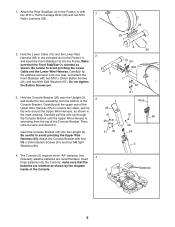
.... Do not tighten the Button Screws yet. 3. Carefully pull the upper end of the Console Bracket. Insert three batteries into the Upright (2). Carefully tip the elliptical exerciser onto one side, and attach the Front Stabilizer with four M8 x 25mm Button Screws (51) and four M8 Split Washers (49). 3 26 51 49...
.... Do not tighten the Button Screws yet. 3. Carefully pull the upper end of the Console Bracket. Insert three batteries into the Upright (2). Carefully tip the elliptical exerciser onto one side, and attach the Front Stabilizer with four M8 x 25mm Button Screws (51) and four M8 Split Washers (49). 3 26 51 49...
English Manual
Page 6
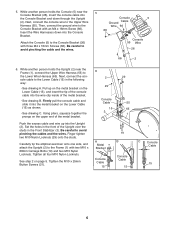
..., connect the console cable to the Wire 66 Console Bracket with two M10 x 68mm Carriage Bolts (19) and two M10 Nylon Locknuts. Carefully tip the elliptical exerciser onto one side, and attach the Upright (2) to the Lower Wire Harness (65). Attach the Console (5) to avoid pinching the cable and the wires...
..., connect the console cable to the Wire 66 Console Bracket with two M10 x 68mm Carriage Bolts (19) and two M10 Nylon Locknuts. Carefully tip the elliptical exerciser onto one side, and attach the Upright (2) to the Lower Wire Harness (65). Attach the Console (5) to avoid pinching the cable and the wires...
English Manual
Page 8
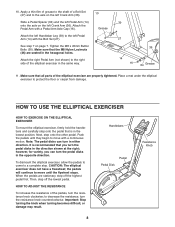
... shown at the right; Attach the left Handlebar Leg (39) to decrease the resistance, turn the resistance knob clockwise; Place a mat under the elliptical exerciser to move with a continuous motion. HOW TO ADJUST THE RESISTANCE To increase the resistance of a Bolt Set (27) and to the shaft ... Arm (36). Push the pedals until the flywheel stops. Note: The pedal disks can turn the pedal disks in the opposite direction. CAUTION: The elliptical exerciser does not have a freewheel; Apply a thin film of grease to the axle on page 7. Next, step onto the other pedal. Then, ...
... shown at the right; Attach the left Handlebar Leg (39) to decrease the resistance, turn the resistance knob clockwise; Place a mat under the elliptical exerciser to move with a continuous motion. HOW TO ADJUST THE RESISTANCE To increase the resistance of a Bolt Set (27) and to the shaft ... Arm (36). Push the pedals until the flywheel stops. Note: The pedal disks can turn the pedal disks in the opposite direction. CAUTION: The elliptical exerciser does not have a freewheel; Apply a thin film of grease to the axle on page 7. Next, step onto the other pedal. Then, ...
English Manual
Page 12
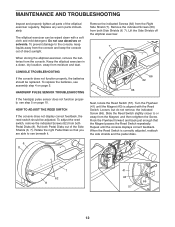
... should be adjusted. When the Reed Switch is aligned with a soft cloth and mild detergent. Do not use abrasives or solvents. Keep the elliptical exerciser in a clean, dry location, away from the Magnet, and then retighten the Screw. Lift the Side Shields off the... 6 66 62 66 Next, locate the Reed Switch (57). Slide the Reed Switch slightly closer to the console, keep the console out of the elliptical exerciser regularly. MAINTENANCE AND TROUBLESHOOTING Inspect and properly tighten all parts of direct sunlight. Replace any worn parts immediately. To prevent damage to or away ...
... should be adjusted. When the Reed Switch is aligned with a soft cloth and mild detergent. Do not use abrasives or solvents. Keep the elliptical exerciser in a clean, dry location, away from the Magnet, and then retighten the Screw. Lift the Side Shields off the... 6 66 62 66 Next, locate the Reed Switch (57). Slide the Reed Switch slightly closer to the console, keep the console out of the elliptical exerciser regularly. MAINTENANCE AND TROUBLESHOOTING Inspect and properly tighten all parts of direct sunlight. Replace any worn parts immediately. To prevent damage to or away ...
English Manual
Page 16
... do not allow limitations on how long an implied warranty lasts. HOW TO ORDER REPLACEMENT PARTS To order replacement parts, see page 14) HEALTHRIDER is authorized by ICON. LIMITED WARRANTY ICON Health & Fitness, Inc. (ICON), warrants this product to be the customer's responsibility. products ... to give the following information when calling: • the MODEL NUMBER of the product (HREL2005.0) • the NAME of the product (HEALTHRIDER C 300E elliptical exerciser) • the SERIAL NUMBER of the product (see the front cover of this manual. All repairs for a minimal trip charge....
... do not allow limitations on how long an implied warranty lasts. HOW TO ORDER REPLACEMENT PARTS To order replacement parts, see page 14) HEALTHRIDER is authorized by ICON. LIMITED WARRANTY ICON Health & Fitness, Inc. (ICON), warrants this product to be the customer's responsibility. products ... to give the following information when calling: • the MODEL NUMBER of the product (HREL2005.0) • the NAME of the product (HEALTHRIDER C 300E elliptical exerciser) • the SERIAL NUMBER of the product (see the front cover of this manual. All repairs for a minimal trip charge....


