

English Manual
Page 2
TABLE OF CONTENTS IMPORTANT PRECAUTIONS 3 BEFORE YOU BEGIN 4 ASSEMBLY 5 HOW TO USE THE ELLIPTICAL EXERCISER 10 MAINTENANCE AND TROUBLESHOOTING 22 CONDITIONING GUIDELINES 23 PART LIST 24 EXPLODED DRAWING 26 HOW TO ORDER REPLACEMENT PARTS Back Cover LIMITED WARRANTY Back Cover HealthRider is a registered trademark of ICON Health & Fitness, Inc. 2
TABLE OF CONTENTS IMPORTANT PRECAUTIONS 3 BEFORE YOU BEGIN 4 ASSEMBLY 5 HOW TO USE THE ELLIPTICAL EXERCISER 10 MAINTENANCE AND TROUBLESHOOTING 22 CONDITIONING GUIDELINES 23 PART LIST 24 EXPLODED DRAWING 26 HOW TO ORDER REPLACEMENT PARTS Back Cover LIMITED WARRANTY Back Cover HealthRider is a registered trademark of ICON Health & Fitness, Inc. 2

English Manual
Page 3
... handlebars or the upper body arms when mounting, dismounting, or using the elliptical exerciser. The pulse sensor is intended only as an exercise aid in determining heart rate trends in -home use of this or any worn parts immediately. 6. Do not use and before using the elliptical exerciser; WARNING: Before beginning this product. 3 Always wear athletic shoes for in general. 3. The elliptical exerciser does not have a free wheel; do not...
... handlebars or the upper body arms when mounting, dismounting, or using the elliptical exerciser. The pulse sensor is intended only as an exercise aid in determining heart rate trends in -home use of this or any worn parts immediately. 6. Do not use and before using the elliptical exerciser; WARNING: Before beginning this product. 3 Always wear athletic shoes for in general. 3. The elliptical exerciser does not have a free wheel; do not...

English Manual
Page 4
... HealthRider® AIRE STRIDER E60 elliptical exerciser. If you use the elliptical exerciser. Mountain Time (excluding holidays). The model number is included 4 Water Bottle Holder* Bookrack Console Upright Fan Upper Body Arm Pulse Sensor Handlebar FRONT Ramp Wheel BACK Power Socket Leveling Foot Pedal Pedal Leg RIGHT SIDE *No water bottle is HREL59930. And the unique AIRE STRIDER E60 features adjustable resistance and incline to the elliptical exerciser (see the front cover of natural, ellipticalmotion exercise from your benefit, read this manual...
... HealthRider® AIRE STRIDER E60 elliptical exerciser. If you use the elliptical exerciser. Mountain Time (excluding holidays). The model number is included 4 Water Bottle Holder* Bookrack Console Upright Fan Upper Body Arm Pulse Sensor Handlebar FRONT Ramp Wheel BACK Power Socket Leveling Foot Pedal Pedal Leg RIGHT SIDE *No water bottle is HREL59930. And the unique AIRE STRIDER E60 features adjustable resistance and incline to the elliptical exerciser (see the front cover of natural, ellipticalmotion exercise from your benefit, read this manual...

English Manual
Page 5
...)-2 M10 x 25mm Button Screw (114)-3 M4 x 16mm Round Head Screw (96)-1 M4 x 16mm Screw (98)-4 M10 x 92mm Carriage Bolt (63)-2 M10 x 105mm Carriage Bolt (115)-2 M8 x 42mm Button Bolt (85)-4 M8 x 35mm Button Bolt (105)-2 1. The number in a cleared area and remove the packing materials. ASSEMBLY Assembly requires two persons. As you assemble the elliptical exerciser, use the drawings below each drawing is not in the parts bag, check...
...)-2 M10 x 25mm Button Screw (114)-3 M4 x 16mm Round Head Screw (96)-1 M4 x 16mm Screw (98)-4 M10 x 92mm Carriage Bolt (63)-2 M10 x 105mm Carriage Bolt (115)-2 M8 x 42mm Button Bolt (85)-4 M8 x 35mm Button Bolt (105)-2 1. The number in a cleared area and remove the packing materials. ASSEMBLY Assembly requires two persons. As you assemble the elliptical exerciser, use the drawings below each drawing is not in the parts bag, check...
English Manual
Page 6
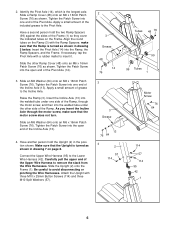
... a small amount of the included grease to the Incline Axle. Insert the Incline Axle (13) into the open end of the Pivot Axle. Slide the Upright (2) onto the Frame (1). Attach the Upright with a rubber mallet to avoid disconnecting or pinching the Wire Harnesses. 2. Tighten the Patch Screw into one side of the Frame (1) so they cover the indicated tubes on the...
... a small amount of the included grease to the Incline Axle. Insert the Incline Axle (13) into the open end of the Pivot Axle. Slide the Upright (2) onto the Frame (1). Attach the Upright with a rubber mallet to avoid disconnecting or pinching the Wire Harnesses. 2. Tighten the Patch Screw into one side of the Frame (1) so they cover the indicated tubes on the...

English Manual
Page 9
... opening in the position shown, with the chest pulse sensor, attach the receiver to the wire harness on the wires snap together. Connect the wire on the Console (17). Have another person hold the Console (17) near the Upright (2). Plug the Power Cord (93) into the Upright (2). If you have purchased the optional chest pulse sensor (see page 21), see the instructions below. 9 17 Do not pinch the wires during this step...
... opening in the position shown, with the chest pulse sensor, attach the receiver to the wire harness on the wires snap together. Connect the wire on the Console (17). Have another person hold the Console (17) near the Upright (2). Plug the Power Cord (93) into the Upright (2). If you have purchased the optional chest pulse sensor (see page 21), see the instructions below. 9 17 Do not pinch the wires during this step...

English Manual
Page 10
... grounded outlet box cover. equipped outlets. Handlebar A temporary adapter may automatically calibrate itself. The temporary adapter should Grounding Plug malfunction or break down, grounding provides a Grounding Pin path of electric shock. the pedals will move with all local codes and ordinances. HOW TO USE THE ELLIPTICAL EXERCISER HOW TO PLUG IN THE POWER CORD This product must be installed by a qualified electrician. Plug the power cord into an appropriate...
... grounded outlet box cover. equipped outlets. Handlebar A temporary adapter may automatically calibrate itself. The temporary adapter should Grounding Plug malfunction or break down, grounding provides a Grounding Pin path of electric shock. the pedals will move with all local codes and ordinances. HOW TO USE THE ELLIPTICAL EXERCISER HOW TO PLUG IN THE POWER CORD This product must be installed by a qualified electrician. Plug the power cord into an appropriate...

English Manual
Page 11
... can be changed with the touch of the console is like having a personal trainer in your workouts more information. High-energy music provides added motivation. With the elliptical exerciser connected to make your home. The console also features iFIT.com interactive technology. CONSOLE DIAGRAM Left Display Matrix Training Zone Bar Note: If there are available separately). Using a stereo audio cable (available at www.iFIT.com and access programs directly from our Web...
... can be changed with the touch of the console is like having a personal trainer in your workouts more information. High-energy music provides added motivation. With the elliptical exerciser connected to make your home. The console also features iFIT.com interactive technology. CONSOLE DIAGRAM Left Display Matrix Training Zone Bar Note: If there are available separately). Using a stereo audio cable (available at www.iFIT.com and access programs directly from our Web...

English Manual
Page 12
... a track representing 440 revolutions (a distance of approximately 1/4 mile). Note: When a program is selected, the matrix will take a moment for use the handgrip pulse sensor or the optional chest pulse sensor, the display will light. When the power is properly plugged in (see FAT BURNING on , the manual mode will again begin to light in succession. Note: After the buttons are lit, the bar shows that the power cord is turned...
... a track representing 440 revolutions (a distance of approximately 1/4 mile). Note: When a program is selected, the matrix will take a moment for use the handgrip pulse sensor or the optional chest pulse sensor, the display will light. When the power is properly plugged in (see FAT BURNING on , the manual mode will again begin to light in succession. Note: After the buttons are lit, the bar shows that the power cord is turned...

English Manual
Page 13
... elliptical exerciser has been used and the total number of revolutions pedaled. your heart rate along with the other modes. For the most accurate heart rate reading, hold the handgrip pulse sensor and wear the optional chest pulse sensor at low speed, press the Fan button. Be careful not to the desired angle. Press the Start button. Pivot the fan to move your Contacts heart rate, hold down the Program button for about three seconds. To turn...
... elliptical exerciser has been used and the total number of revolutions pedaled. your heart rate along with the other modes. For the most accurate heart rate reading, hold the handgrip pulse sensor and wear the optional chest pulse sensor at low speed, press the Fan button. Be careful not to the desired angle. Press the Start button. Pivot the fan to move your Contacts heart rate, hold down the Program button for about three seconds. To turn...

English Manual
Page 14
... in the bar will show the first ten resistance settings of the elliptical exerciser will then be slower than the current pace setting. However, when the next segment begins, the resistance will automatically change to the resistance setting for several time segments of the six resistance and pace programs. When the power is turned on, the manual mode will pause. HOW TO USE RESISTANCE AND PACE PROGRAMS 1 Press any lit...
... in the bar will show the first ten resistance settings of the elliptical exerciser will then be slower than the current pace setting. However, when the next segment begins, the resistance will automatically change to the resistance setting for several time segments of the six resistance and pace programs. When the power is turned on, the manual mode will pause. HOW TO USE RESISTANCE AND PACE PROGRAMS 1 Press any lit...

English Manual
Page 15
... the fan if desired. and + buttons repeatedly to step 4. See step 4 on , the manual mode will appear in memory. 15 See step 5 on the console. Each time a heartbeat is designed to turn off. During heart rate programs, the matrix will flash in the right display. If you have selected heart rate program 7, the word "AGE" and the current age setting will display a graphic that you have already...
... the fan if desired. and + buttons repeatedly to step 4. See step 4 on , the manual mode will appear in memory. 15 See step 5 on the console. Each time a heartbeat is designed to turn off. During heart rate programs, the matrix will flash in the right display. If you have selected heart rate program 7, the word "AGE" and the current age setting will display a graphic that you have already...

English Manual
Page 16
... display. If you have selected heart rate program 8, the letters "PLS" and the current target heart rate setting will flash in the bar will then flash to prompt you to increase or decrease your pace to bring your heart rate near the target heart rate setting. and + buttons repeatedly to hold the handgrip pulse sensor, the console will end. To use a heart rate program, you must use only part of the elliptical exerciser will periodically change...
... display. If you have selected heart rate program 8, the letters "PLS" and the current target heart rate setting will flash in the bar will then flash to prompt you to increase or decrease your pace to bring your heart rate near the target heart rate setting. and + buttons repeatedly to hold the handgrip pulse sensor, the console will end. To use a heart rate program, you must use only part of the elliptical exerciser will periodically change...

English Manual
Page 18
... jack on your computer. A. Plug one end of the Y-adapter. Plug the other end of the cable into the jack beneath the console. Next, remove the wire that is being used, see instruction B. Plug one end of the cable into the PHONES jack on your computer has only a PHONES jack, see instruction B. Plug the other end of a 1/8" to 1/8" stereo audio cable (available at electronics stores...
... jack on your computer. A. Plug one end of the Y-adapter. Plug the other end of the cable into the jack beneath the console. Next, remove the wire that is being used, see instruction B. Plug one end of the cable into the PHONES jack on your computer has only a PHONES jack, see instruction B. Plug the other end of a 1/8" to 1/8" stereo audio cable (available at electronics stores...

English Manual
Page 20
... VIDEO PROGRAMS To use an iFIT.com CD or video program. 1 Press any button on the console or begin guiding you are using an iFIT.com videocassette, insert the videocassette into your personal trainer will be connected to your workout. A moment after the play button on page 12. 2 Select the iFIT.com mode. When the console is lit. • Adjust the volume of the elliptical exerciser and/or the pace setting does not change...
... VIDEO PROGRAMS To use an iFIT.com CD or video program. 1 Press any button on the console or begin guiding you are using an iFIT.com videocassette, insert the videocassette into your personal trainer will be connected to your workout. A moment after the play button on page 12. 2 Select the iFIT.com mode. When the console is lit. • Adjust the volume of the elliptical exerciser and/or the pace setting does not change...

English Manual
Page 21
... to use programs from our Web site. 1 Press any button on the console or begin pedaling. Follow the steps below to your progress with the two displays. See step 7 on our Web site. A list of specific system requirements is about to play iFIT.com audio and video programs directly from the internet. See HOW TO CONNECT YOUR HOME COMPUTER on -line instructions to start an internet connection. 7 Return to select a program. Read...
... to use programs from our Web site. 1 Press any button on the console or begin pedaling. Follow the steps below to your progress with the two displays. See step 7 on our Web site. A list of specific system requirements is about to play iFIT.com audio and video programs directly from the internet. See HOW TO CONNECT YOUR HOME COMPUTER on -line instructions to start an internet connection. 7 Return to select a program. Read...

English Manual
Page 22
... following the steps below . Press the Program button again. HOW TO LEVEL THE ELLIPTICAL EXERCISER If the elliptical exerciser rocks during use . Then, place one foot against the ramp in the normal operating mode and the elliptical exerciser will move the elliptical exerciser to the size and weight of the elliptical exerciser, inspect Ramp and clean the ramp regularly using a soft cloth and mild detergent. Handlebars PULSE SENSOR TROUBLESHOOTING If the handgrip pulse sensor does...
... following the steps below . Press the Program button again. HOW TO LEVEL THE ELLIPTICAL EXERCISER If the elliptical exerciser rocks during use . Then, place one foot against the ramp in the normal operating mode and the elliptical exerciser will move the elliptical exerciser to the size and weight of the elliptical exerciser, inspect Ramp and clean the ramp regularly using a soft cloth and mild detergent. Handlebars PULSE SENSOR TROUBLESHOOTING If the handgrip pulse sensor does...

English Manual
Page 23
... body uses easily accessible carbohydrate calories for aerobic exercise. the highest number is to success is near the highest number in your training zone. (During the first few minutes of exercising with pre-existing health problems. The pulse sensor is activity that proper nutrition and adequate rest are your physician. Remember that requires large amounts of stretching. The chart below shows recommended heart rates...
... body uses easily accessible carbohydrate calories for aerobic exercise. the highest number is to success is near the highest number in your training zone. (During the first few minutes of exercising with pre-existing health problems. The pulse sensor is activity that proper nutrition and adequate rest are your physician. Remember that requires large amounts of stretching. The chart below shows recommended heart rates...

English Manual
Page 24
... Shield Right Side Shield Console Flywheel Cover Arm Axle Pulse Sensor w/Wire Right Incline Cover Left Incline Cover Right Handlebar Left Handlebar Handlebar Cover Axle Cover "J"-Bolt Pedal Wheel Wheel Bearing Frame Bushing Upper Body Leg "C" Magnet Pedal Leg Cover Left Crank Arm 29.5mm Pulley Spacer Flywheel Magnet Pulley/Crank Control Box Cover Control Board Control Box Lower Wire Harness Plastic Washer Crank Bearing Idler Foot Ramp Bushing Ramp Cover Incline Sensor Sensor Cover Pedal Leg Bushing Resistance Motor Reed Switch Bracket Key No. PART LIST-Model No. HREL59930 Key No. Qty. 54...
... Shield Right Side Shield Console Flywheel Cover Arm Axle Pulse Sensor w/Wire Right Incline Cover Left Incline Cover Right Handlebar Left Handlebar Handlebar Cover Axle Cover "J"-Bolt Pedal Wheel Wheel Bearing Frame Bushing Upper Body Leg "C" Magnet Pedal Leg Cover Left Crank Arm 29.5mm Pulley Spacer Flywheel Magnet Pulley/Crank Control Box Cover Control Board Control Box Lower Wire Harness Plastic Washer Crank Bearing Idler Foot Ramp Bushing Ramp Cover Incline Sensor Sensor Cover Pedal Leg Bushing Resistance Motor Reed Switch Bracket Key No. PART LIST-Model No. HREL59930 Key No. Qty. 54...

English Manual
Page 28
... information when calling: • The MODEL NUMBER of the product (HREL59930) • The NAME of the product (HealthRider® AIRE STRIDER E60 elliptical exerciser) • The SERIAL NUMBER of the product (see the front cover of this manual) • The KEY NUMBER and DESCRIPTION of the part(s) (see pages 24 to 27) LIMITED WARRANTY ICON Health & Fitness, Inc. (ICON), warrants this product to be pre-authorized by an ICON authorized service center; No other warranties...
... information when calling: • The MODEL NUMBER of the product (HREL59930) • The NAME of the product (HealthRider® AIRE STRIDER E60 elliptical exerciser) • The SERIAL NUMBER of the product (see the front cover of this manual) • The KEY NUMBER and DESCRIPTION of the part(s) (see pages 24 to 27) LIMITED WARRANTY ICON Health & Fitness, Inc. (ICON), warrants this product to be pre-authorized by an ICON authorized service center; No other warranties...


