Salt & Swim Owner's Manual
Page 1
092463 RevA Salt & SwimTM Chlorine Generator for Inground Swimming Pools up to 25,000 gallons Owner's Manual Contents Introduction 1 Installation 2-8 Operation 12-14 Troubleshooting........15 Warranty 21 DIY-12 DIY-6 Hayward Pool Product 620 Division Street, Elizabeth, NJ 07207 www.hayward.com USE ONLY HAYWARD GENUINE REPLACEMENT PARTS
092463 RevA Salt & SwimTM Chlorine Generator for Inground Swimming Pools up to 25,000 gallons Owner's Manual Contents Introduction 1 Installation 2-8 Operation 12-14 Troubleshooting........15 Warranty 21 DIY-12 DIY-6 Hayward Pool Product 620 Division Street, Elizabeth, NJ 07207 www.hayward.com USE ONLY HAYWARD GENUINE REPLACEMENT PARTS
Salt & Swim Owner's Manual
Page 2
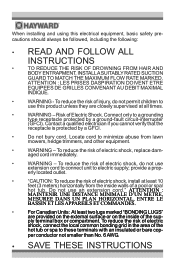
... by a ground-fault circuit-interrupter (GFCI). aged cord immediately. • WARNING - Do not use this electrical equipment, basic safety precautions should always be followed, including the following: • READ AND FOLLOW ALL INSTRUCTIONS • TO REDUCE THE RISK OF DROWNING FROM HAIR AND BODY ENTRAPMENT, INSTALL A SUITABLY RATED SUCTION GUARD TO MATCH THE MAXIMUM FLOW RATE MARKED. provide a prop...
... by a ground-fault circuit-interrupter (GFCI). aged cord immediately. • WARNING - Do not use this electrical equipment, basic safety precautions should always be followed, including the following: • READ AND FOLLOW ALL INSTRUCTIONS • TO REDUCE THE RISK OF DROWNING FROM HAIR AND BODY ENTRAPMENT, INSTALL A SUITABLY RATED SUCTION GUARD TO MATCH THE MAXIMUM FLOW RATE MARKED. provide a prop...
Salt & Swim Owner's Manual
Page 3
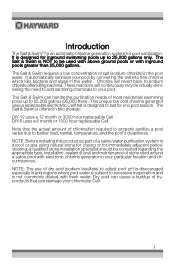
... liters). The Salt & Swim requires a low concentration of salt (sodium chloride) in two models: DIY-12 uses a 12 month or 3000 hour replaceable Cell DIY-6 uses a 6 month or 1500 hour replaceable Cell Note that is designed to last for inground swimming pools up to be consulted regarding the appropriate type, installation, sealant (if any) and maintenance of stone used with above ground pools or with fresh water. These reactions...
... liters). The Salt & Swim requires a low concentration of salt (sodium chloride) in two models: DIY-12 uses a 12 month or 3000 hour replaceable Cell DIY-6 uses a 6 month or 1500 hour replaceable Cell Note that is designed to last for inground swimming pools up to be consulted regarding the appropriate type, installation, sealant (if any) and maintenance of stone used with above ground pools or with fresh water. These reactions...
Salt & Swim Owner's Manual
Page 4
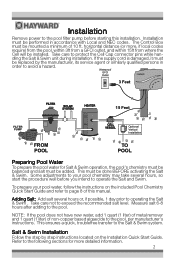
... a hazard. NOTE: If the pool does not have new water, add 1 quart (1 liter) of metal remover and 1 quart (1 liter) of this installation. Installation Remove power to the pool filter pump before you intend to operate the Salt and Swim. The Control Box must be replaced by step instructions located on the included Pool Chemistry Quick Start Guide and refer to page 8 of non-copper based algaecide to operating the Salt & Swim . horizontal distance (or...
... a hazard. NOTE: If the pool does not have new water, add 1 quart (1 liter) of metal remover and 1 quart (1 liter) of this installation. Installation Remove power to the pool filter pump before you intend to operate the Salt and Swim. The Control Box must be replaced by step instructions located on the included Pool Chemistry Quick Start Guide and refer to page 8 of non-copper based algaecide to operating the Salt & Swim . horizontal distance (or...

Salt & Swim Owner's Manual
Page 5
... piping just before the water returns to the pool. It must use a Hayward DIY-POLYPIPE adapter kit. Secure Mounting Template to the intended location, make sure that the power cord will reach the GFCI outlet and that the Cell cable will reach the location where the Cell Vessel will reach. Mounting the Salt & Swim Control Box The Salt & Swim is contained in a raintight...
... piping just before the water returns to the pool. It must use a Hayward DIY-POLYPIPE adapter kit. Secure Mounting Template to the intended location, make sure that the power cord will reach the GFCI outlet and that the Cell cable will reach the location where the Cell Vessel will reach. Mounting the Salt & Swim Control Box The Salt & Swim is contained in a raintight...
Salt & Swim Owner's Manual
Page 6
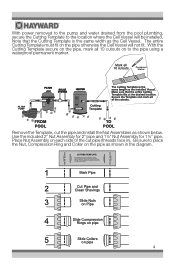
... to the pipe using a waterproof permanent marker. When finished, there should be installed. The entire Cutting Template must fit on the pipe otherwise the Cell Vessel will be 12 marks on to the desired Cell Vessel inst allation location. Mark all 10 cutouts on t he pipe. With power removed to the pump and water drained from the pool plumbing, secure the...
... to the pipe using a waterproof permanent marker. When finished, there should be installed. The entire Cutting Template must fit on the pipe otherwise the Cell Vessel will be 12 marks on to the desired Cell Vessel inst allation location. Mark all 10 cutouts on t he pipe. With power removed to the pump and water drained from the pool plumbing, secure the...
Salt & Swim Owner's Manual
Page 7
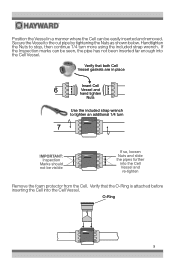
... into the Cell Vessel. O-Ring 5 Verify that the O-Ring is attached before inserting the Cell into the Cell Vessel. Handtighten the Nuts to stop, then continue 1/4 turn 7 IMPORTANT: Inspection Marks should not be visible If so, loosen Nuts and slide the pipes further into the Cell Vessel and re-tighten Remove the foam protector from the Cell. Position the Vessel...
... into the Cell Vessel. O-Ring 5 Verify that the O-Ring is attached before inserting the Cell into the Cell Vessel. Handtighten the Nuts to stop, then continue 1/4 turn 7 IMPORTANT: Inspection Marks should not be visible If so, loosen Nuts and slide the pipes further into the Cell Vessel and re-tighten Remove the foam protector from the Cell. Position the Vessel...
Salt & Swim Owner's Manual
Page 8
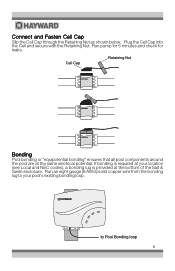
... bottom of the Salt & Swim enclosure. If bonding is provided at the same electrical potential. Connect and Fasten Cell Cap Slip the Cell Cap through the Retaining Nut as shown below. Plug the Cell Cap into the Cell and secure with the Retaining Nut. Run an eight gauge (8 AWG) solid copper wire from the bonding lug to Pool Bonding loop 6 Run pump for 5 minutes and check for leaks. to your...
... bottom of the Salt & Swim enclosure. If bonding is provided at the same electrical potential. Connect and Fasten Cell Cap Slip the Cell Cap through the Retaining Nut as shown below. Plug the Cell Cap into the Cell and secure with the Retaining Nut. Run an eight gauge (8 AWG) solid copper wire from the bonding lug to Pool Bonding loop 6 Run pump for 5 minutes and check for leaks. to your...
Salt & Swim Owner's Manual
Page 9
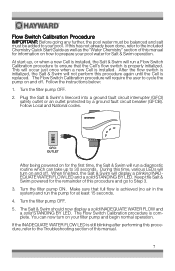
... fault circuit breaker (GFCB). The Salt & Swim should now display a solid INADEQUATE WATER FLOW and a solid STANDING BY LED. You can take up , or when a new Cell is installed, the Salt & Swim will occur just once when a new Cell is complete. Follow Local and National codes. During this procedure and go to Step 3. 3. Turn the filter pump OFF. 5. This will run the pump for the first time, the Salt & Swim will turn on and off . Turn...
... fault circuit breaker (GFCB). The Salt & Swim should now display a solid INADEQUATE WATER FLOW and a solid STANDING BY LED. You can take up , or when a new Cell is installed, the Salt & Swim will occur just once when a new Cell is complete. Follow Local and National codes. During this procedure and go to Step 3. 3. Turn the filter pump OFF. 5. This will run the pump for the first time, the Salt & Swim will turn on and off . Turn...
Salt & Swim Owner's Manual
Page 10
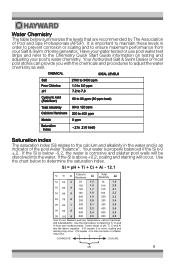
...the levels that are recommended by The Association of Pool and Spa Professionals (APSP). Use the chart above to determine Ti, Ci,and Ai from your water tested or use : Measure pool pH, temperature, calcium... hardness, and total alkalinity. Saturation index The saturation index (Si) relates to the calcium and alkalinity in order to prevent corrosion or scaling and to ensure maximum performance from your pool's water chemistry. Have your Salt & Swim chlorine generator. Your Authorized Salt & Swim Dealer or most pool...
...the levels that are recommended by The Association of Pool and Spa Professionals (APSP). Use the chart above to determine Ti, Ci,and Ai from your water tested or use : Measure pool pH, temperature, calcium... hardness, and total alkalinity. Saturation index The saturation index (Si) relates to the calcium and alkalinity in order to prevent corrosion or scaling and to ensure maximum performance from your pool's water chemistry. Have your Salt & Swim chlorine generator. Your Authorized Salt & Swim Dealer or most pool...
Salt & Swim Owner's Manual
Page 11
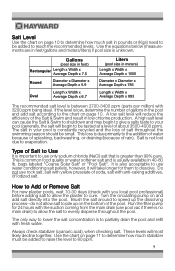
... salt. A high salt level can cause the Salt & Swim to shutdown and may begin to determine how much salt in low chlorine production. Do not use pool vac if there is not lost due to dissolve. This is common food quality or water softener salt and is to reach the recommended levels. Salt is no main drain) to allow salt to pile up on and add salt directly into the pool. Turn...
... salt. A high salt level can cause the Salt & Swim to shutdown and may begin to determine how much salt in low chlorine production. Do not use pool vac if there is not lost due to dissolve. This is common food quality or water softener salt and is to reach the recommended levels. Salt is no main drain) to allow salt to pile up on and add salt directly into the pool. Turn...
Salt & Swim Owner's Manual
Page 14
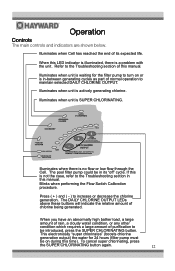
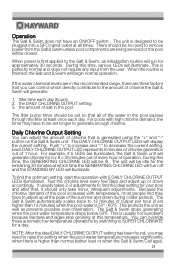
... is SUPER CHLORINATING. Blinks when performing the Flow Switch Calibration procedure. When you have an abnormally high bather load, a large amount of rain, a cloudy water condition, or any other condition which requires a large amount of this manual. Refer to the Troubleshooting section of purification to be introduced, press the SUPER CHLORINATING button. This electronically "super chlorinates" (boosts chlorine generation output) the water for the filter pump to...
... is SUPER CHLORINATING. Blinks when performing the Flow Switch Calibration procedure. When you have an abnormally high bather load, a large amount of rain, a cloudy water condition, or any other condition which requires a large amount of this manual. Refer to the Troubleshooting section of purification to be introduced, press the SUPER CHLORINATING button. This electronically "super chlorinates" (boosts chlorine generation output) the water for the filter pump to...
Salt & Swim Owner's Manual
Page 15
... time, various LEDs will display the current setting. filter time each day. For pools with high chlorine demand, the timer may need to remove power from the user. Each DAILY CHLORINE OUTPUT LED represents 6 minutes of chlorine generation out of the pool increases with 5 DAILY CHLORINE OUTPUT LEDs illuminated. It usually takes 2-3 adjustments to find the optimum setting, start the operation with temperature, most people find they have an ON/OFF switch . NOTE...
... time, various LEDs will display the current setting. filter time each day. For pools with high chlorine demand, the timer may need to remove power from the user. Each DAILY CHLORINE OUTPUT LED represents 6 minutes of chlorine generation out of the pool increases with 5 DAILY CHLORINE OUTPUT LEDs illuminated. It usually takes 2-3 adjustments to find the optimum setting, start the operation with temperature, most people find they have an ON/OFF switch . NOTE...
Salt & Swim Owner's Manual
Page 16
... deposits off . Maintaining the Salt & Swim System The replaceable Cell uses the same electronic self cleaning technology as specified. Unplug the Cell cord from the pump, filter, and supply and return lines before attempting to remove the Cell. In most cases this will not remove the majority of plates. ALWAYS ADD ACID TO WATER - You may need to lower the setting when the pool water temperature decreases significantly or there...
... deposits off . Maintaining the Salt & Swim System The replaceable Cell uses the same electronic self cleaning technology as specified. Unplug the Cell cord from the pump, filter, and supply and return lines before attempting to remove the Cell. In most cases this will not remove the majority of plates. ALWAYS ADD ACID TO WATER - You may need to lower the setting when the pool water temperature decreases significantly or there...
Salt & Swim Owner's Manual
Page 17
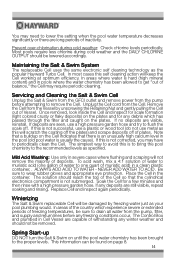
... be reset. 3. If no obstructions or restrictions in the pool plumbing. - Backwash the pool filter. - Salt level too low (below 50ºF causes Salt & Swim to normal. Some yellow algae treatments will use chlorine at www.hayward.com. "Yellow Out" or similar treatment recently used. LEDs not on Depending on operation, maintenance and troubleshooting your variable speed pump 15 Note: This condition can sometimes happen if the pool/spa temperature is already high and the heater is...
... be reset. 3. If no obstructions or restrictions in the pool plumbing. - Backwash the pool filter. - Salt level too low (below 50ºF causes Salt & Swim to normal. Some yellow algae treatments will use chlorine at www.hayward.com. "Yellow Out" or similar treatment recently used. LEDs not on Depending on operation, maintenance and troubleshooting your variable speed pump 15 Note: This condition can sometimes happen if the pool/spa temperature is already high and the heater is...
Salt & Swim Owner's Manual
Page 18
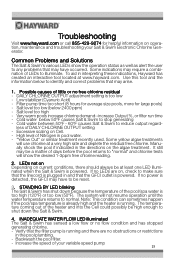
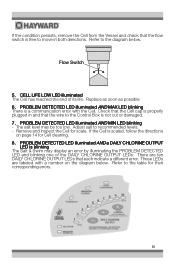
... a number on page 14 for Cell cleaning. 8. Refer to recommended levels. - Flow Switch 5. Replace as soon as possible 6. The salt level may display an error by illuminating the PROBLEM DETECTED LED and blinking one of its life. Remove and inspect the Cell for their corresponding errors. 16 There are labeled with the Cell. PROBLEM DETECTED LED illuminated AND MAX LED blinking There is blinking The Salt & Swim may be too low. Adjust salt to the diagram...
... a number on page 14 for Cell cleaning. 8. Refer to recommended levels. - Flow Switch 5. Replace as soon as possible 6. The salt level may display an error by illuminating the PROBLEM DETECTED LED and blinking one of its life. Remove and inspect the Cell for their corresponding errors. 16 There are labeled with the Cell. PROBLEM DETECTED LED illuminated AND MAX LED blinking There is blinking The Salt & Swim may be too low. Adjust salt to the diagram...
Salt & Swim Owner's Manual
Page 19
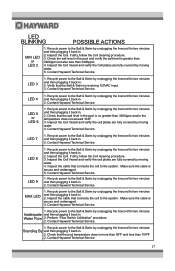
... then plugging it back in . 2. Check that the salt level in . 2. Contact Hayward Technical Service. If dirty, follow the Cell cleaning procedure. 3. Recycle power to the Salt & Swim by unplugging the linecord for two minutes and then plugging it back in the pool is more than 50ºF and less than 3400ppm. 4. Water Flow 2. Perform "Flow Switch Calibration" procedure. 2. LED BLINKING POSSIBLE ACTIONS MIN LED or LED 2 1. Recycle power to the Salt & Swim by...
... then plugging it back in . 2. Check that the salt level in . 2. Contact Hayward Technical Service. If dirty, follow the Cell cleaning procedure. 3. Recycle power to the Salt & Swim by unplugging the linecord for two minutes and then plugging it back in the pool is more than 50ºF and less than 3400ppm. 4. Water Flow 2. Perform "Flow Switch Calibration" procedure. 2. LED BLINKING POSSIBLE ACTIONS MIN LED or LED 2 1. Recycle power to the Salt & Swim by...

Salt & Swim Owner's Manual
Page 23
... maintain pool water chemistry in accordance with the recommendations contained in the owners manual(s). 3. DISCLAIMER. FOR THE ABOVE-IDENTIFIED CHLORINATION PRODUCTS, THESE WARRANTIES ALSO ARE VOID IF, DURING THE WARRANTY PERIOD, YOU USE A REPLACEMENT CHLORINATOR CELL OTHER THAN AN UNMODIFIED, NEW HAYWARD CHLORINATOR CELL PURCHASED FROM HAYWARD. For more information on pools larger than the product rating. 2. Proof of purchase or the nearest Hayward authorized warranty service center. Problems resulting from failure to install, operate...
... maintain pool water chemistry in accordance with the recommendations contained in the owners manual(s). 3. DISCLAIMER. FOR THE ABOVE-IDENTIFIED CHLORINATION PRODUCTS, THESE WARRANTIES ALSO ARE VOID IF, DURING THE WARRANTY PERIOD, YOU USE A REPLACEMENT CHLORINATOR CELL OTHER THAN AN UNMODIFIED, NEW HAYWARD CHLORINATOR CELL PURCHASED FROM HAYWARD. For more information on pools larger than the product rating. 2. Proof of purchase or the nearest Hayward authorized warranty service center. Problems resulting from failure to install, operate...
Salt & Swim Installation Quick Start Guide
Page 1
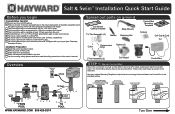
... is used, see manual) You have a saw suitable for cutting PVC You have tools for mounting the Control Box (drill, drill bits, screwdriver) You have a permanent marker to mark the PVC pipe You have balanced your pool chemistry and have 3200ppm salt in your pool (see Chemistry Quickstart Guide) Installation Preparation Read this entire Quickstart Guide Remove power to filter pump Drain water from pool piping...
... is used, see manual) You have a saw suitable for cutting PVC You have tools for mounting the Control Box (drill, drill bits, screwdriver) You have a permanent marker to mark the PVC pipe You have balanced your pool chemistry and have 3200ppm salt in your pool (see Chemistry Quickstart Guide) Installation Preparation Read this entire Quickstart Guide Remove power to filter pump Drain water from pool piping...

Salt & Swim Installation Quick Start Guide
Page 2
... STANDING BY LED. The Salt & Swim should now display a solid INADEQUATE WATER FLOW and a solid STANDING BY LED. Secure the Template and use a permanent marker to the pool. Fully cover Cell pins with Retaining Nut. If local codes require bonding, see Water Chemistry Quick Start Guide), plug linecord into the Cell Vessel as shown. STEP 8: Calibrate Flow Switch IMPORTANT! 1. After being powered on for the remainder of this procedure. 2. Turn the filter pump OFF...
... STANDING BY LED. The Salt & Swim should now display a solid INADEQUATE WATER FLOW and a solid STANDING BY LED. Secure the Template and use a permanent marker to the pool. Fully cover Cell pins with Retaining Nut. If local codes require bonding, see Water Chemistry Quick Start Guide), plug linecord into the Cell Vessel as shown. STEP 8: Calibrate Flow Switch IMPORTANT! 1. After being powered on for the remainder of this procedure. 2. Turn the filter pump OFF...


