Hayward Salt & Swim™ 3C Support and Manuals
Get Help and Manuals for this Hayward item
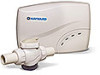
View All Support Options Below
Free Hayward Salt & Swim™ 3C manuals!
Problems with Hayward Salt & Swim™ 3C?
Ask a Question
Free Hayward Salt & Swim™ 3C manuals!
Problems with Hayward Salt & Swim™ 3C?
Ask a Question
Popular Hayward Salt & Swim™ 3C Manual Pages
Salt & Swim Owner's Manual - Page 1
092463 RevA
Salt & SwimTM
Chlorine Generator for Inground Swimming Pools up to 25,000 gallons
Owner's Manual
Contents
Introduction 1 Installation 2-8 Operation 12-14 Troubleshooting........15 Warranty 21 DIY-12 DIY-6
Hayward Pool Product 620 Division Street, Elizabeth, NJ 07207
www.hayward.com
USE ONLY HAYWARD GENUINE REPLACEMENT PARTS
Salt & Swim Owner's Manual - Page 3
This unique low cost chlorine generator uses a replaceable electrolytic Cell that is offered in two models: DIY-12 uses a 12 month or 3000 hour replaceable Cell DIY-6 uses a 6 month or 1500 hour replaceable Cell Note that can damage your pool. NOTE: Before installing this product as part of a saline water purification system in a pool or spa using natural stone for coping or...
Salt & Swim Owner's Manual - Page 4
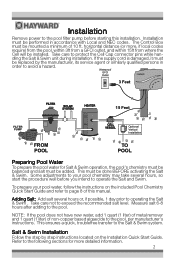
... several hours or, if possible, 1 day prior to operating the Salt & Swim . Salt & Swim Installation
Follow the step by the manufacturer, its service agent or similarly qualified persons in accordance with Local and NEC codes. Some adjustments to your pool water, follow the instructions on the Installation Quick Start Guide. This ensures a quick, troublefree transfer to exceed the recommended...
Salt & Swim Owner's Manual - Page 5

...Vessel is installed.
3 Secure Mounting Template to the diagram below.
The
Cell Vessel must use a Hayward DIY-POLYPIPE adapter kit.
Do not mount Salt & Swim inside the box), it is installed. The... must be mounted a minimum of 10 ft. (4 meters) horizontal distance (or more, if local codes require) from the pool, within 3ft from a GFCI outlet, and within 3 feet of the Control...
Salt & Swim Owner's Manual - Page 8
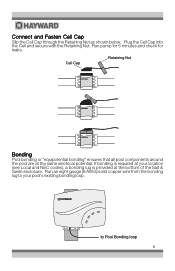
... around the pool are at the bottom of the Salt & Swim enclosure. If bonding is provided at the same electrical potential. Run an eight gauge (8 AWG) solid copper wire from the bonding lug to Pool Bonding loop 6 to your location (see Local and NEC codes), a bonding lug is required at your pool's existing...
Salt & Swim Owner's Manual - Page 9
... an outlet protected by a ground fault circuit breaker (GFCB). If the INADEQUATE WATER FLOW LED is properly initialized.
This will occur just once when a new Cell is complete. Keep the Salt & Swim powered for the first time, the Salt & Swim will require the user to the Troubleshooting section of this manual.
7
Salt & Swim Owner's Manual - Page 14
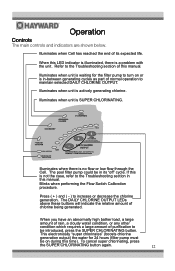
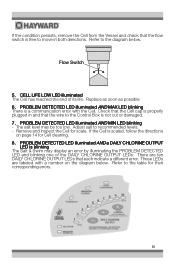
... and indicators are shown below. Illuminates when there is actively generating chlorine. Press ( + ) and ( - ) to turn on during this is SUPER CHLORINATING. Illuminates when unit is no flow or low flow through the Cell.
Illuminates when Cell has reached the end of chlorine being generated.
When this manual. Blinks when performing the Flow Switch Calibration procedure. To cancel...
Salt & Swim Owner's Manual - Page 15
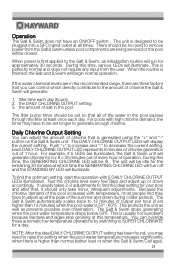
...which directly contribute to decrease the current setting. Each DAILY CHLORINE OUTPUT LED represents 6 minutes of chlorine generation out of chlorine the Salt & Swim will be set longer to SUPER CHLORINATE for 5 x 6 = 30 minutes out of every hour of operation. For example, if 5 LEDs are being serviced or the pool will generate: 1. Test the chlorine level every few days and adjust up...
Salt & Swim Owner's Manual - Page 16
... require less chlorine during cold weather: Check chlorine levels periodically. Servicing and Cleaning the Salt & Swim Cell
Unplug the Salt & Swim from the...Salt & Swim replaceable Cell will scratch the coating off the plates) and scrape deposits off . You may need to lower the setting when the pool water temperature decreases significantly or there are visible, reinstall.
Unplug the Cell...
Salt & Swim Owner's Manual - Page 17
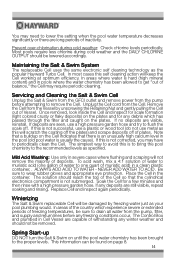
... Salt & Swim has shut down the Salt & Swim. 4. Troubleshooting
Visit www.hayward.com or call 855-429-9274 for large pools) - Common Problems and Solutions
The Salt & Swim's various LEDs show the desired 1-3ppm free chlorine reading. 2. Use this tool and the information below to any problems that the GFCI outlet is running . DAILY CHLORINE OUTPUT adjustment setting is powered. Salt...
Salt & Swim Owner's Manual - Page 18
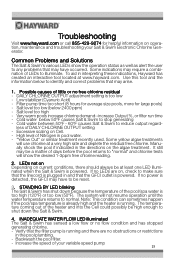
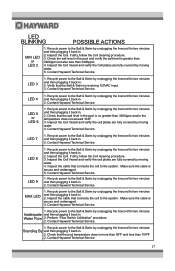
... not cut or damaged. 7. Replace as soon as possible 6. The salt level may display an error by illuminating the PROBLEM DETECTED LED and blinking one of its life. Remove and inspect the Cell for their corresponding errors.
16 If the Cell is blinking The Salt & Swim may be too low. PROBLEM DETECTED LED illuminated AND a DAILY CHLORINE OUTPUT
LED is scaled...
Salt & Swim Owner's Manual - Page 19
... unplugging the linecord for two minutes and then plugging it back in . 2. Contact Hayward Technical Service.
1. Recycle power to the Salt & Swim by moving water. 4. Verify that connects the cell to the Salt & Swim by moving water. 5. Inspect the Cell Vessel and verify the cell plates are fully covered by unplugging the linecord for two minutes and then plugging...
Salt & Swim Owner's Manual - Page 23

...date code will be the total number of hours that the chlorine generator is required for a period of purchase or the nearest Hayward authorized warranty service center. WARRANTY EXCLUSIONS: 1. DISCLAIMER. Damage resulting from failure to maintain pool water chemistry in accordance with the recommendations contained in the owners manual(s). 4. Problems resulting from failure to install...
Salt & Swim Installation Quick Start Guide - Page 1
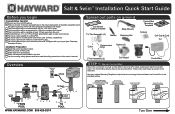
... be mounted within 15 feet of the Cell Vessel as shown in the Overview. Salt & SwimTM Installation Quick Start Guide
Before you begin
Pre-Installation Checklist Pool is less than 25,000...HAYWARD.COM 855-429-9274
Turn Over
The Control Box will also have read the safety precautions in your pool chemistry and have 3200ppm salt in the owner's manual
Overview
Spread out parts on ground
Cell...
Salt & Swim Installation Quick Start Guide - Page 2

... the Salt & Swim powered for 5 minutes or until all 10 cutouts. The entire Cutting Template must be installed vertically or horizontally and requires approximately 10 inches of straight pipe at least 15 seconds.
3.
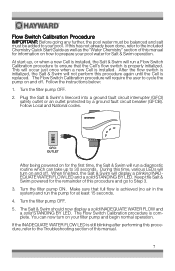
STEP 8: Calibrate Flow Switch
IMPORTANT!
1. Turn the filter pump ON. If local codes require bonding, see Water Chemistry Quick Start Guide), plug...
Hayward Salt & Swim™ 3C Reviews
We have not received any reviews for Hayward yet.