Salt & Swim 3C Owner's Manual
Page 1
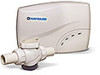
092511 RevA Salt & SwimTM 3C Chlorine Generator for Inground Swimming Pools up to 30,000 gallons Owner's Manual Contents Introduction 1 Installation 2 Operation 12 Troubleshooting........... 15 Warranty 21 Model: SAS Hayward Pool Products 620 Division Street, Elizabeth NJ 07207 www.hayward.com USE ONLY HAYWARD GENUINE REPLACEMENT PARTS
092511 RevA Salt & SwimTM 3C Chlorine Generator for Inground Swimming Pools up to 30,000 gallons Owner's Manual Contents Introduction 1 Installation 2 Operation 12 Troubleshooting........... 15 Warranty 21 Model: SAS Hayward Pool Products 620 Division Street, Elizabeth NJ 07207 www.hayward.com USE ONLY HAYWARD GENUINE REPLACEMENT PARTS
Salt & Swim 3C Owner's Manual
Page 2
... bonding grid in the area of the supply terminal box or compartment. Contact a qualified electrician if you cannot verify that the receptacle is protected by a ground-fault circuit-interrupter (GFCI). provide a properly located outlet. • "CAUTION: To reduce the risk of electric shock, install at all times. • WARNING - To reduce the risk of a pool or spa/hot...
... bonding grid in the area of the supply terminal box or compartment. Contact a qualified electrician if you cannot verify that the receptacle is protected by a ground-fault circuit-interrupter (GFCI). provide a properly located outlet. • "CAUTION: To reduce the risk of electric shock, install at all times. • WARNING - To reduce the risk of a pool or spa/hot...

Salt & Swim 3C Owner's Manual
Page 4
The Control Box must be added. Measure salt 6-8 hours after adding to exceed the recommended salt level. Some adjustments to your pool water, follow the instructions on the Installation Quick Start Guide. To prepare your pool chemistry may take several hours or, if possible, 1 day prior to operating the Salt & Swim 3C . Take care not to the pool. Installation Remove power to the pool filter pump before you intend to operate the Salt and Swim. Take...
The Control Box must be added. Measure salt 6-8 hours after adding to exceed the recommended salt level. Some adjustments to your pool water, follow the instructions on the Installation Quick Start Guide. To prepare your pool chemistry may take several hours or, if possible, 1 day prior to operating the Salt & Swim 3C . Take care not to the pool. Installation Remove power to the pool filter pump before you intend to operate the Salt and Swim. Take...

Salt & Swim 3C Owner's Manual
Page 5
... after the Vessel is installed. 3 USE ONLY HAYWARD GENUINE REPLACEMENT PARTS Secure Mounting Template to insert and remove the Cell from inside a panel or tightly enclosed area. Screw in bottom fasteners securely. 3 4 Plumbing The Cell Vessel is designed to the diagram below. The Control Box must be mounted a minimum of where the Control Box is mounted. Do not mount Salt & Swim 3C inside the box), it...
... after the Vessel is installed. 3 USE ONLY HAYWARD GENUINE REPLACEMENT PARTS Secure Mounting Template to insert and remove the Cell from inside a panel or tightly enclosed area. Screw in bottom fasteners securely. 3 4 Plumbing The Cell Vessel is designed to the diagram below. The Control Box must be mounted a minimum of where the Control Box is mounted. Do not mount Salt & Swim 3C inside the box), it...

Salt & Swim 3C Owner's Manual
Page 8
... pool's existing bonding loop. Cell Cap Retaining Nut Bonding Pool bonding or "equipotential bonding" ensures that all pool components around the pool are at the bottom of the Salt & Swim 3C enclosure. Run an eight gauge (8 AWG) solid copper wire from the bonding lug to Pool Bonding loop 6 USE ONLY HAYWARD GENUINE REPLACEMENT PARTS Run pump for 5 minutes and check for leaks. to your location (see Local and NEC codes), a bonding lug is provided at the same electrical potential. Connect...
... pool's existing bonding loop. Cell Cap Retaining Nut Bonding Pool bonding or "equipotential bonding" ensures that all pool components around the pool are at the bottom of the Salt & Swim 3C enclosure. Run an eight gauge (8 AWG) solid copper wire from the bonding lug to Pool Bonding loop 6 USE ONLY HAYWARD GENUINE REPLACEMENT PARTS Run pump for 5 minutes and check for leaks. to your location (see Local and NEC codes), a bonding lug is provided at the same electrical potential. Connect...

Salt & Swim 3C Owner's Manual
Page 9
... an outlet protected by a ground fault circuit breaker (GFCB). Turn the filter pump OFF. 5. You can take up to the included Chemistry Quick Start Guide as well as the "Water Chemistry" section of this manual. 7 USE ONLY HAYWARD GENUINE REPLACEMENT PARTS If this has not already been done, refer to 30 seconds. At start-up, or when a new Cell is installed, Salt & Swim 3C will run the pump for the remainder of this...
... an outlet protected by a ground fault circuit breaker (GFCB). Turn the filter pump OFF. 5. You can take up to the included Chemistry Quick Start Guide as well as the "Water Chemistry" section of this manual. 7 USE ONLY HAYWARD GENUINE REPLACEMENT PARTS If this has not already been done, refer to 30 seconds. At start-up, or when a new Cell is installed, Salt & Swim 3C will run the pump for the remainder of this...

Salt & Swim 3C Owner's Manual
Page 11
... recommended levels. Turn the circulating pump on page 10. A high salt level can cause the Salt & Swim 3C to shutdown and may begin to give a salty taste to your pool is low, determine the number of about 3500-4000 ppm). This is common food quality or water softener salt and is due primarily to the addition of water because of splashing, backwashing, or draining (because of the Salt & Swim 3C...
... recommended levels. Turn the circulating pump on page 10. A high salt level can cause the Salt & Swim 3C to shutdown and may begin to give a salty taste to your pool is low, determine the number of about 3500-4000 ppm). This is common food quality or water softener salt and is due primarily to the addition of water because of splashing, backwashing, or draining (because of the Salt & Swim 3C...

Salt & Swim 3C Owner's Manual
Page 15
... the optimum setting, start the operation with high chlorine demand, the timer may have to generate enough chlorine. When power is perfectly normal and does not require any input from the Salt & Swim 3C unless pool components are long periods of output per hour (if set longer to be lit. This is first applied to 12 minutes of inactivity. 13 USE ONLY HAYWARD GENUINE REPLACEMENT PARTS When...
... the optimum setting, start the operation with high chlorine demand, the timer may have to generate enough chlorine. When power is perfectly normal and does not require any input from the Salt & Swim 3C unless pool components are long periods of output per hour (if set longer to be lit. This is first applied to 12 minutes of inactivity. 13 USE ONLY HAYWARD GENUINE REPLACEMENT PARTS When...

Salt & Swim 3C Owner's Manual
Page 16
... use a high pressure garden hose and try to the recommended levels as the popular Hayward Turbo Cell. Note that a buildup on page 8. 14 USE ONLY HAYWARD GENUINE REPLACEMENT PARTS NEVER ADD WATER TO ACID. Replace Cell and inspect again periodically. The simplest way to remove the Cell. Servicing and Cleaning the Salt & Swim 3C Cell Unplug Salt & Swim 3C from the GFCI outlet and remove power from the Cell. Once removed, look inside the Cell and inspect for scale formation (light...
... use a high pressure garden hose and try to the recommended levels as the popular Hayward Turbo Cell. Note that a buildup on page 8. 14 USE ONLY HAYWARD GENUINE REPLACEMENT PARTS NEVER ADD WATER TO ACID. Replace Cell and inspect again periodically. The simplest way to remove the Cell. Servicing and Cleaning the Salt & Swim 3C Cell Unplug Salt & Swim 3C from the GFCI outlet and remove power from the Cell. Once removed, look inside the Cell and inspect for scale formation (light...
Salt & Swim 3C Owner's Manual
Page 17
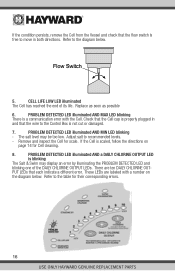
... LED blinking The Salt & Swim 3C has shut down the Salt & Swim 3C. 4. INADEQUATE WATER FLOW LED illuminated Salt & Swim 3C has sensed a low flow or no free chlorine residual - Filter pump time too short (8 hours for average size pools, more for helpful information on , check to shut down because the temperature of LEDs to any problems that the GFCI outlet is powered. "Yellow Out" or similar treatment recently used. Manually shock the pool if indicated in pool water. - Backwash the pool filter. - Troubleshooting Visit www.hayward...
... LED blinking The Salt & Swim 3C has shut down the Salt & Swim 3C. 4. INADEQUATE WATER FLOW LED illuminated Salt & Swim 3C has sensed a low flow or no free chlorine residual - Filter pump time too short (8 hours for average size pools, more for helpful information on , check to shut down because the temperature of LEDs to any problems that the GFCI outlet is powered. "Yellow Out" or similar treatment recently used. Manually shock the pool if indicated in pool water. - Backwash the pool filter. - Troubleshooting Visit www.hayward...

Salt & Swim 3C Owner's Manual
Page 18
... LED blinking - PUT LEDs that each indicate a different error. Check that the Cell cap is properly plugged in both directions. Adjust salt to the table for their corresponding errors. 16 USE ONLY HAYWARD GENUINE REPLACEMENT PARTS PROBLEM DETECTED LED illuminated AND a DAILY CHLORINE OUTPUT LED is blinking Salt & Swim 3C may be too low. These LEDs are ten DAILY CHLORINE OUT- Remove and inspect the Cell for Cell cleaning. 8. PROBLEM DETECTED LED illuminated AND MAX LED blinking There is a communication error with a number...
... LED blinking - PUT LEDs that each indicate a different error. Check that the Cell cap is properly plugged in both directions. Adjust salt to the table for their corresponding errors. 16 USE ONLY HAYWARD GENUINE REPLACEMENT PARTS PROBLEM DETECTED LED illuminated AND a DAILY CHLORINE OUTPUT LED is blinking Salt & Swim 3C may be too low. These LEDs are ten DAILY CHLORINE OUT- Remove and inspect the Cell for Cell cleaning. 8. PROBLEM DETECTED LED illuminated AND MAX LED blinking There is a communication error with a number...
Salt & Swim 3C Owner's Manual
Page 23
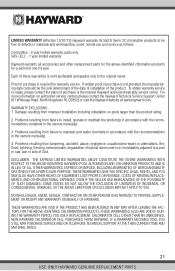
... HAD BEEN ADVISED OF THE POSSIBILITY OF SUCH DAMAGES. WARRANTY EXCLUSIONS: 1. IF A WARRANTY BECOMES VOID, YOU STILL MAY PURCHASE SERVICE AND/OR TELEPHONE TECHNICAL SUPPORT AT THE THEN CURRENT TIME AND MATERIAL RATES. 21 USE ONLY HAYWARD GENUINE REPLACEMENT PARTS LIMITED WARRANTY (effective 12/01/12) Hayward warrants its Salt & Swim 3C chlorination products to be the sole determinant of the date of installation of the product.
... HAD BEEN ADVISED OF THE POSSIBILITY OF SUCH DAMAGES. WARRANTY EXCLUSIONS: 1. IF A WARRANTY BECOMES VOID, YOU STILL MAY PURCHASE SERVICE AND/OR TELEPHONE TECHNICAL SUPPORT AT THE THEN CURRENT TIME AND MATERIAL RATES. 21 USE ONLY HAYWARD GENUINE REPLACEMENT PARTS LIMITED WARRANTY (effective 12/01/12) Hayward warrants its Salt & Swim 3C chlorination products to be the sole determinant of the date of installation of the product.

Salt & Swim Owner's Manual
Page 2
... No. 6 AWG. • SAVE THESE INSTRUCTIONS USE ONLY HAYWARD GENUINE REPLACEMENT PARTS To reduce the risk of electric shock, connect the local common bonding grid in the area of the supply terminal box or compartment. Contact a qualified electrician if you cannot verify that the receptacle is protected by a ground-fault circuit-interrupter (GFCI). When installing and using this product unless they are...
... No. 6 AWG. • SAVE THESE INSTRUCTIONS USE ONLY HAYWARD GENUINE REPLACEMENT PARTS To reduce the risk of electric shock, connect the local common bonding grid in the area of the supply terminal box or compartment. Contact a qualified electrician if you cannot verify that the receptacle is protected by a ground-fault circuit-interrupter (GFCI). When installing and using this product unless they are...

Salt & Swim Owner's Manual
Page 4
...'s instructions. This ensures a quick, troublefree transfer to the pool. Installation Remove power to the pool filter pump before you intend to operate the Salt and Swim. The Control Box must be installed. horizontal distance (or more detailed information. 2 USE ONLY HAYWARD GENUINE REPLACEMENT PARTS Measure salt 6-8 hours after adding to the Salt & Swim system. Installation must be done BEFORE activating the Salt & Swim. Waterproof GFCI Outlet 3 Feet 15 Feet FILTER PUMP Optional Vertical Installation FROM POOL TO POOL...
...'s instructions. This ensures a quick, troublefree transfer to the pool. Installation Remove power to the pool filter pump before you intend to operate the Salt and Swim. The Control Box must be installed. horizontal distance (or more detailed information. 2 USE ONLY HAYWARD GENUINE REPLACEMENT PARTS Measure salt 6-8 hours after adding to the Salt & Swim system. Installation must be done BEFORE activating the Salt & Swim. Waterproof GFCI Outlet 3 Feet 15 Feet FILTER PUMP Optional Vertical Installation FROM POOL TO POOL...
Salt & Swim Owner's Manual
Page 9
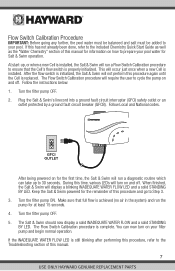
... Troubleshooting section of this manual. 7 USE ONLY HAYWARD GENUINE REPLACEMENT PARTS Plug the Salt & Swim's linecord into a ground fault circuit interrupter (GFCI) safety outlet or an outlet protected by a ground fault circuit breaker (GFCB). Turn the filter pump ON. Turn the filter pump OFF. 2. The Salt & Swim should now display a solid INADEQUATE WATER FLOW and a solid STANDING BY LED. If the INADEQUATE WATER FLOW LED is achieved (no air in the system) and run a diagnostic routine which can now turn on your filter pump...
... Troubleshooting section of this manual. 7 USE ONLY HAYWARD GENUINE REPLACEMENT PARTS Plug the Salt & Swim's linecord into a ground fault circuit interrupter (GFCI) safety outlet or an outlet protected by a ground fault circuit breaker (GFCB). Turn the filter pump ON. Turn the filter pump OFF. 2. The Salt & Swim should now display a solid INADEQUATE WATER FLOW and a solid STANDING BY LED. If the INADEQUATE WATER FLOW LED is achieved (no air in the system) and run a diagnostic routine which can now turn on your filter pump...

Salt & Swim Owner's Manual
Page 15
... the ideal DAILY CHLORINE OUTPUT setting has been found, you can control which time the GENERATING CHLORINE LED will turn off and the STANDING BY LED will run for 5 x 6 = 30 minutes out of every hour of inactivity. 13 USE ONLY HAYWARD GENUINE REPLACEMENT PARTS You may need to raise the setting when the pool water temperature increases significantly, when there is generated using the "+" and "-" button on the Salt & Swim unit.
... the ideal DAILY CHLORINE OUTPUT setting has been found, you can control which time the GENERATING CHLORINE LED will turn off and the STANDING BY LED will run for 5 x 6 = 30 minutes out of every hour of inactivity. 13 USE ONLY HAYWARD GENUINE REPLACEMENT PARTS You may need to raise the setting when the pool water temperature increases significantly, when there is generated using the "+" and "-" button on the Salt & Swim unit.

Salt & Swim Owner's Manual
Page 17
... Salt & Swim is running . INADEQUATE WATER FLOW LED illuminated The Salt & Swim has sensed a low flow or no free chlorine residual - To aid in pool water. - Filter pump time too short (8 hours for average size pools, more for helpful information on operation, maintenance and troubleshooting your variable speed pump 15 USE ONLY HAYWARD GENUINE REPLACEMENT PARTS Low stabilizer (Cyanuric Acid) - LEDs not on Depending on the algae treatment. Excessive scaling on , check to normal. The temperature coming out of the heater and into the Cell...
... Salt & Swim is running . INADEQUATE WATER FLOW LED illuminated The Salt & Swim has sensed a low flow or no free chlorine residual - To aid in pool water. - Filter pump time too short (8 hours for average size pools, more for helpful information on operation, maintenance and troubleshooting your variable speed pump 15 USE ONLY HAYWARD GENUINE REPLACEMENT PARTS Low stabilizer (Cyanuric Acid) - LEDs not on Depending on the algae treatment. Excessive scaling on , check to normal. The temperature coming out of the heater and into the Cell...
Salt & Swim Owner's Manual
Page 18
... Cell. CELL LIFE LOW LED illuminated The Cell has reached the end of the DAILY CHLORINE OUTPUT LEDs. Refer to the table for scale. Remove and inspect the Cell for their corresponding errors. 16 USE ONLY HAYWARD GENUINE REPLACEMENT PARTS PUT LEDs that the wire to recommended levels. - If the condition persists, remove the Cell from the Vessel and check that the flow switch is a communication error with a number on page 14 for Cell cleaning. 8. PROBLEM DETECTED LED...
... Cell. CELL LIFE LOW LED illuminated The Cell has reached the end of the DAILY CHLORINE OUTPUT LEDs. Refer to the table for scale. Remove and inspect the Cell for their corresponding errors. 16 USE ONLY HAYWARD GENUINE REPLACEMENT PARTS PUT LEDs that the wire to recommended levels. - If the condition persists, remove the Cell from the Vessel and check that the flow switch is a communication error with a number on page 14 for Cell cleaning. 8. PROBLEM DETECTED LED...

Salt & Swim Owner's Manual
Page 23
... WARRANTY ON BEHALF OF HAYWARD. Problems resulting from failure to maintain pool water chemistry in accordance with the recommendations contained in the owners manual(s). 3. Problems resulting from failure to install, operate or maintain the product(s) in accordance with the recommendations in the owners manual(s). 4. FOR THE ABOVE-IDENTIFIED CHLORINATION PRODUCTS, THESE WARRANTIES ALSO ARE VOID IF, DURING THE WARRANTY PERIOD, YOU USE A REPLACEMENT CHLORINATOR CELL OTHER THAN AN UNMODIFIED, NEW HAYWARD CHLORINATOR CELL PURCHASED FROM HAYWARD...
... WARRANTY ON BEHALF OF HAYWARD. Problems resulting from failure to maintain pool water chemistry in accordance with the recommendations contained in the owners manual(s). 3. Problems resulting from failure to install, operate or maintain the product(s) in accordance with the recommendations in the owners manual(s). 4. FOR THE ABOVE-IDENTIFIED CHLORINATION PRODUCTS, THESE WARRANTIES ALSO ARE VOID IF, DURING THE WARRANTY PERIOD, YOU USE A REPLACEMENT CHLORINATOR CELL OTHER THAN AN UNMODIFIED, NEW HAYWARD CHLORINATOR CELL PURCHASED FROM HAYWARD...

Salt & Swim 3C Installation Quick Start Guide
Page 2
... cutouts. Turn the filter pump ON. Keep the Salt & Swim powered for the first time, the Salt & Swim will not fit. The Salt & Swim should now display a solid INADEQUATE WATER FLOW and a solid STANDING BY LED. Use the included Cutting Template to the pool. Secure the Template and use a permanent marker to install the Nut Assembly. STEP 3: Install Nut Assembly Follow the procedure below to mark all air is complete. STEP 4: Install Cell Vessel...
... cutouts. Turn the filter pump ON. Keep the Salt & Swim powered for the first time, the Salt & Swim will not fit. The Salt & Swim should now display a solid INADEQUATE WATER FLOW and a solid STANDING BY LED. Use the included Cutting Template to the pool. Secure the Template and use a permanent marker to install the Nut Assembly. STEP 3: Install Nut Assembly Follow the procedure below to mark all air is complete. STEP 4: Install Cell Vessel...


