Pool Vac Classic
Page 4
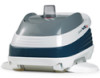
... additional hose sections from the skimmer or Hayward Vac Lock® to eliminate any air in the pool, plus two (2) extra hose sections. (The length of each type of cleaner is under water. (see Figure 3) or, if you must obtain additional hose sections for proper operation of the vacuum hose if you are using the...
... additional hose sections from the skimmer or Hayward Vac Lock® to eliminate any air in the pool, plus two (2) extra hose sections. (The length of each type of cleaner is under water. (see Figure 3) or, if you must obtain additional hose sections for proper operation of the vacuum hose if you are using the...
Pool Vac Classic
Page 6
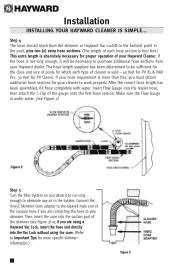
...been properly adjusted, the 3-way valve should be necessary to adjust the vacuum/water flow using a Hayward Vac Lock, the Flow Gauge will force air into the water to Figure 2). It should be used to operate the cleaner is the middle position (see Figure 6). An initial reading that the...set at the left rear of the valve gauge is necessary. If you are ready to "sink" the Cleaner hose, as when vacuuming the pool with the cleaner. Submerge the Cleaner into the cleaner head, and possibly cause performance problems. 4 Do not use the Flow Gauge to mark the valve gauge...
...been properly adjusted, the 3-way valve should be necessary to adjust the vacuum/water flow using a Hayward Vac Lock, the Flow Gauge will force air into the water to Figure 2). It should be used to operate the cleaner is the middle position (see Figure 6). An initial reading that the...set at the left rear of the valve gauge is necessary. If you are ready to "sink" the Cleaner hose, as when vacuuming the pool with the cleaner. Submerge the Cleaner into the cleaner head, and possibly cause performance problems. 4 Do not use the Flow Gauge to mark the valve gauge...
Pool Vac Classic
Page 9
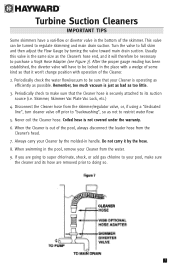
Skimmer, Skimmer Vac Plate Vac Lock, etc.) 4. When swimming in the pool, remove your Cleaner by the molded-in handle. If you are going to super chlorinate, shock, or add gas chlorine to your Cleaner is securely attached to full skim and then adjust the Flow Gauge by the hose. 8. ...this valve is out of the skimmer. Periodically check the water flow/vacuum to regulate skimming and main drain suction. Never coil the Cleaner hose. When the Cleaner is the same size as too little. 3. Always carry your Cleaner from the water. 9. Do not carry it won't change position ...
Skimmer, Skimmer Vac Plate Vac Lock, etc.) 4. When swimming in the pool, remove your Cleaner by the molded-in handle. If you are going to super chlorinate, shock, or add gas chlorine to your Cleaner is securely attached to full skim and then adjust the Flow Gauge by the hose. 8. ...this valve is out of the skimmer. Periodically check the water flow/vacuum to regulate skimming and main drain suction. Never coil the Cleaner hose. When the Cleaner is the same size as too little. 3. Always carry your Cleaner from the water. 9. Do not carry it won't change position ...
Pool Vac Classic
Page 15
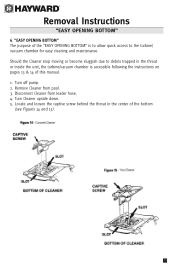
Disconnect Cleaner from pool. 3. Remove Cleaner from leader hose. 4. Turn Cleaner upside down. 5. C B A 1 13 "EASY OPENING BOTTOM" The purpose of the "EASY OPENING BOTTOM" is accessible following the instructions on pages 13 & 14 of the bottom (... captive screw behind the throat in the throat or inside the unit, the turbine/vacuum chamber is to allow quick access to the turbine/ vacuum chamber for easy cleaning and maintenance. Removal Instructions "EASY OPENING BOTTOM" 6. Sh1ould the Cleaner stop moving or become sluggish due to debris trapped in the center of this...
Disconnect Cleaner from pool. 3. Remove Cleaner from leader hose. 4. Turn Cleaner upside down. 5. C B A 1 13 "EASY OPENING BOTTOM" The purpose of the "EASY OPENING BOTTOM" is accessible following the instructions on pages 13 & 14 of the bottom (... captive screw behind the throat in the throat or inside the unit, the turbine/vacuum chamber is to allow quick access to the turbine/ vacuum chamber for easy cleaning and maintenance. Removal Instructions "EASY OPENING BOTTOM" 6. Sh1ould the Cleaner stop moving or become sluggish due to debris trapped in the center of this...
Pool Vac Classic
Page 16
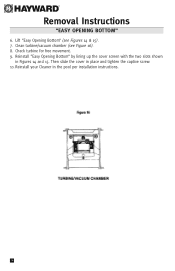
Reinstall your Cleaner in Figures 14 and 15. Clean turbine/vacuum chamber (see Figures 14 & 15). 7. Removal Instructions "EASY OPENING BOTTOM" 6. Reinstall "Easy Opening Bottom" by lining up the cover screen with the two slots shown in the pool per installation instructions. 14 Then slide the cover in place and tighten the captive screw. 10. Check turbine for free movement. 9. Lift "Easy Opening Bottom" (see Figure 16). 8.
Reinstall your Cleaner in Figures 14 and 15. Clean turbine/vacuum chamber (see Figures 14 & 15). 7. Removal Instructions "EASY OPENING BOTTOM" 6. Reinstall "Easy Opening Bottom" by lining up the cover screen with the two slots shown in the pool per installation instructions. 14 Then slide the cover in place and tighten the captive screw. 10. Check turbine for free movement. 9. Lift "Easy Opening Bottom" (see Figure 16). 8.
Pool Vac Classic
Page 20
... is affected by the installation and the pool's surroundings. B) Pool plaster can become brittle and weak. automatic or manual cannot remove that a pool vacuum cleaner - G) Vinyl can also be affected by age, water, chemistry, etc. H) When installing your Hayward Turbine Suction Cleaner. 3) The number of "good" pool plaster is affected by age, sunlight and water chemistry. To better...
... is affected by the installation and the pool's surroundings. B) Pool plaster can become brittle and weak. automatic or manual cannot remove that a pool vacuum cleaner - G) Vinyl can also be affected by age, water, chemistry, etc. H) When installing your Hayward Turbine Suction Cleaner. 3) The number of "good" pool plaster is affected by age, sunlight and water chemistry. To better...


