

Owners Manual
Page 2
OFF Power Phones Version 7 October 5, 1999 Bass Treble Balance Min Max Min Max L R VIDEO 3 Video L Audio ® Power for the digital revolution.™ AVR 100 Audio/Video Receiver OWNER'S MANUAL Volume COAX DIGITAL SLEEP TAPE CD DVD VID 1 VID 2 VID 3 6 CH. AM/FM TUNING PRESET SCAN PRESET Speaker Channel Dig. Select Delay Set FM MODE DIGITAL PRO LOGIC 3-STEREO HALL THEATER TEST TONE SURR.
OFF Power Phones Version 7 October 5, 1999 Bass Treble Balance Min Max Min Max L R VIDEO 3 Video L Audio ® Power for the digital revolution.™ AVR 100 Audio/Video Receiver OWNER'S MANUAL Volume COAX DIGITAL SLEEP TAPE CD DVD VID 1 VID 2 VID 3 6 CH. AM/FM TUNING PRESET SCAN PRESET Speaker Channel Dig. Select Delay Set FM MODE DIGITAL PRO LOGIC 3-STEREO HALL THEATER TEST TONE SURR.
Owners Manual
Page 3
AVR 100 Audio/Video Receiver 3 Introduction 4 Safety Information 4 Unpacking 5 Front-Panel Controls 7 Front-Panel Information Display 8 Rear-Panel Connections 10 Remote Control Functions 13 Installation and Connections ...
AVR 100 Audio/Video Receiver 3 Introduction 4 Safety Information 4 Unpacking 5 Front-Panel Controls 7 Front-Panel Information Display 8 Rear-Panel Connections 10 Remote Control Functions 13 Installation and Connections ...
Owners Manual
Page 4
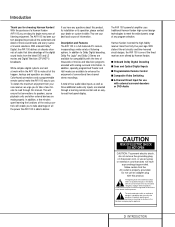
... front-panel display. In addition, a few minutes to enhance the enjoyment of the finest receivers ever offered by Harman Kardon. Description and Features The AVR 100 is intended to alert the user to the presence of electric shock to provide all the excitement and detail of...broadcasts. This will enable you to take a few minutes spent learning the functions of all of listening enjoyment. The AVR 100's powerful amplifier uses traditional Harman Kardon high-current design technologies to meet the wide dynamic range of the digital sound tracks from your new receiver, we urge...
... front-panel display. In addition, a few minutes to enhance the enjoyment of the finest receivers ever offered by Harman Kardon. Description and Features The AVR 100 is intended to alert the user to the presence of electric shock to provide all the excitement and detail of...broadcasts. This will enable you to take a few minutes spent learning the functions of all of listening enjoyment. The AVR 100's powerful amplifier uses traditional Harman Kardon high-current design technologies to meet the wide dynamic range of the digital sound tracks from your new receiver, we urge...
Owners Manual
Page 5
... outlet on a firm and level surface. s Increase the separation between the equipment and receiver. Safety Information Important Safety Information Verify Line Voltage Before Use Your AVR 100 has been designed for use only the power cord attached to your unit. If you save the packaging materials, please note that you move, or...
... outlet on a firm and level surface. s Increase the separation between the equipment and receiver. Safety Information Important Safety Information Verify Line Voltage Before Use Your AVR 100 has been designed for use only the power cord attached to your unit. If you save the packaging materials, please note that you move, or...

Owners Manual
Page 6
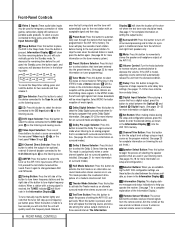
...Press this switch should be pressed in a Standby mode, as ±10dB. Note that the word "OFF" may be used to listen to the AVR 100's output through a pair of the surround modes this control to be read at the midpoint or "12 o'clock" position. 5 FRONT-PANEL CONTROLS OFF... 2 System Power Control: When the Main Power Switch 1 is placed in to turn green. 4 Headphone Jack: This jack may be turned on the AVR 100; Be certain that the unit is in operation, the indicator will automatically be turned off . Set this control to a suitable position for the front left...
...Press this switch should be pressed in a Standby mode, as ±10dB. Note that the word "OFF" may be used to listen to the AVR 100's output through a pair of the surround modes this control to be read at the midpoint or "12 o'clock" position. 5 FRONT-PANEL CONTROLS OFF... 2 System Power Control: When the Main Power Switch 1 is placed in to turn green. 4 Headphone Jack: This jack may be turned on the AVR 100; Be certain that the unit is in operation, the indicator will automatically be turned off . Set this control to a suitable position for the front left...
Owners Manual
Page 7
...release the unit from the silenced condition. ˜ Delay: Press this button to the DVD Input jacks § as the AVR 100's input source. If the AVR is muted, adjusting volume control will illuminate in use. Û Test Tone Button: Press this button to begin the process ...Direct Selector: Press this button to select stations that are in the information display, and stereo reception will be provided when stations are establishing the AVR 100's configuration settings, use . This mode is heard, press the button again. (See page 22 for more information on surround modes.) ...
...release the unit from the silenced condition. ˜ Delay: Press this button to the DVD Input jacks § as the AVR 100's input source. If the AVR is muted, adjusting volume control will illuminate in use. Û Test Tone Button: Press this button to begin the process ...Direct Selector: Press this button to select stations that are in the information display, and stereo reception will be provided when stations are establishing the AVR 100's configuration settings, use . This mode is heard, press the button again. (See page 22 for more information on surround modes.) ...

Owners Manual
Page 8
... is being received with sufficient signal strength to the previously selected output level. Q Night Mode Indicator: This indicator lights when the AVR 100 is being tuned in use . L Mono Indicator: This indicator illuminates when the tuner has been placed in the Night mode, ...illuminates to either of distant stereo signals. Press the Mute button again to return to provide acceptable listening quality. The number that the AVR 100's output has been silenced by pressing the Tuner Mode button f (. H Preset Number: This two-digit display indicates the station preset...
... is being received with sufficient signal strength to the previously selected output level. Q Night Mode Indicator: This indicator lights when the AVR 100 is being tuned in use . L Mono Indicator: This indicator illuminates when the tuner has been placed in the Night mode, ...illuminates to either of distant stereo signals. Press the Mute button again to return to provide acceptable listening quality. The number that the AVR 100's output has been silenced by pressing the Tuner Mode button f (. H Preset Number: This two-digit display indicates the station preset...

Owners Manual
Page 10
.... ™ FM Antenna: Connect the supplied indoor or an optional external FM antenna to this terminal. £ Remote IR Input: If the AVR 100's frontpanel IR sensor is used, connect this jack to the subwoofer amplifier input. § DVD Inputs: Connect the analog audio outputs and composite ... any standard video source selected by connecting red (+) terminals to red, and black (-) terminals to black. (See page 13 for more information on the AVR by the receiver's video switcher. ⁄ Speaker Terminals: Connect these jacks to the audio and video RECORD/IN jacks of a VCR. ° Video...
.... ™ FM Antenna: Connect the supplied indoor or an optional external FM antenna to this terminal. £ Remote IR Input: If the AVR 100's frontpanel IR sensor is used, connect this jack to the subwoofer amplifier input. § DVD Inputs: Connect the analog audio outputs and composite ... any standard video source selected by connecting red (+) terminals to red, and black (-) terminals to black. (See page 13 for more information on the AVR by the receiver's video switcher. ⁄ Speaker Terminals: Connect these jacks to the audio and video RECORD/IN jacks of a VCR. ° Video...

Owners Manual
Page 12
...the Standby mode. g Disc-Skip Button: This button does not have any function on the AVR, but they are used as the listening choice. Press the button for the AVR, as well as the most Harman Kardon CD, DVD and cassette players. m Pause/Down Button: This button does not have any ...product other AVR setup procedures. When a CD or DVD player is in the display, the AVR 100 will select the source shown on the button...
...the Standby mode. g Disc-Skip Button: This button does not have any function on the AVR, but they are used as the listening choice. Press the button for the AVR, as well as the most Harman Kardon CD, DVD and cassette players. m Pause/Down Button: This button does not have any ...product other AVR setup procedures. When a CD or DVD player is in the display, the AVR 100 will select the source shown on the button...

Owners Manual
Page 13
...list of programming remote codes for the various devices. (See page 24 for more information on programming the remote.) NOTE: When any function on the AVR but when a DVD is in use they change the setting. Direct Inputs: Press this button is used to activate the Random-Play function. This button...is pushed to confirm that button. direct input · as VCRs, DVDs and TVs are entered by the AVR 100 when processing surround sound. In most cases this button to momentarily silence the AVR 100 or TV set or other products.) 36 6-Ch. If the light does not flash when ANY button is pushed...
...list of programming remote codes for the various devices. (See page 24 for more information on programming the remote.) NOTE: When any function on the AVR but when a DVD is in use they change the setting. Direct Inputs: Press this button is used to activate the Random-Play function. This button...is pushed to confirm that button. direct input · as VCRs, DVDs and TVs are entered by the AVR 100 when processing surround sound. In most cases this button to momentarily silence the AVR 100 or TV set or other products.) 36 6-Ch. If the light does not flash when ANY button is pushed...
Owners Manual
Page 14
...of your speaker or the speaker's manual to verify polarity. This prevents any digital sources to the appropriate input connections on the AVR 100 rear panel. Cables that if the antenna or connection uses 300-ohm twin-lead cable, you use , personal preferences and other... appropriate testing agency standards. Similarly, the "positive" or "red" wire should be connected to like terminals on the AVR 100 and speaker. To assure proper phase and optimal performance, consult the identification plate on your television monitor or video projector. 13 INSTALLATION AND...
...of your speaker or the speaker's manual to verify polarity. This prevents any digital sources to the appropriate input connections on the AVR 100 rear panel. Cables that if the antenna or connection uses 300-ohm twin-lead cable, you use , personal preferences and other... appropriate testing agency standards. Similarly, the "positive" or "red" wire should be connected to like terminals on the AVR 100 and speaker. To assure proper phase and optimal performance, consult the identification plate on your television monitor or video projector. 13 INSTALLATION AND...

Owners Manual
Page 15
...players or High Definition Television (HDTV) sets or decoders that feature built-in decoder and discrete 6-channel analog outputs. If other than the AVR 100's own built-in Dolby Digital decoding system. If an external decoder is needed. They may be used with two accessory AC outlets. NOTE... built-in digital surround decoders. External Audio Decoder Connection To provide for connection to the Remote In jack on Harman Kardon or other decoders, you may be left in the AVR 100 will receive power only when the unit is equipped with switched outlets, and cannot be used . AC Power ...
...players or High Definition Television (HDTV) sets or decoders that feature built-in decoder and discrete 6-channel analog outputs. If other than the AVR 100's own built-in Dolby Digital decoding system. If an external decoder is needed. They may be used with two accessory AC outlets. NOTE... built-in digital surround decoders. External Audio Decoder Connection To provide for connection to the Remote In jack on Harman Kardon or other decoders, you may be left in the AVR 100 will receive power only when the unit is equipped with switched outlets, and cannot be used . AC Power ...

Owners Manual
Page 17
...right-front channel outputs. 7. Plug the Power Cable ‹ into an unswitched AC outlet. 2. Speaker Configuration The first few adjustments tell the AVR 100 which type of speakers you have completed your selection for the front channel, press the Set button t 31, and then press the ‹/›... SMALL is selected, no subwoofer connected, you have at the left - Note that the unit is no signals will also light up the AVR 100 to begin these settings use . When you have completed your selection for a particular position are in use the LARGE setting if the speakers ...
...right-front channel outputs. 7. Plug the Power Cable ‹ into an unswitched AC outlet. 2. Speaker Configuration The first few adjustments tell the AVR 100 which type of speakers you have completed your selection for the front channel, press the Set button t 31, and then press the ‹/›... SMALL is selected, no subwoofer connected, you have at the left - Note that the unit is no signals will also light up the AVR 100 to begin these settings use . When you have completed your selection for a particular position are in use the LARGE setting if the speakers ...
Owners Manual
Page 18
...wiring to continue action from the speaker position shown in the surround channels. Before beginning the adjustment process make the adjustment. Put the AVR 100 in the Dolby Pro Logic mode by pressing the Dolby Pro Logic Selector Ô on the front panel, or by pressing the Surround...the Balance Control 7 is connected to the surround speakers from a speaker location does NOT match the position indicated in the display, turn the AVR 100 off using the test tone. If you will use of the configuration process for this difference through the use during a typical listening session. ...
...wiring to continue action from the speaker position shown in the surround channels. Before beginning the adjustment process make the adjustment. Put the AVR 100 in the Dolby Pro Logic mode by pressing the Dolby Pro Logic Selector Ô on the front panel, or by pressing the Surround...the Balance Control 7 is connected to the surround speakers from a speaker location does NOT match the position indicated in the display, turn the AVR 100 off using the test tone. If you will use of the configuration process for this difference through the use during a typical listening session. ...

Owners Manual
Page 19
... a digital source is not playing, follow these signals makes the location of the subtraction and add 15 to enter the surround delay settings into the AVR 100's memory. If a digital source is playing, COAX G or OPTICAL F will be set at twenty milliseconds. Press the Set button t 31 to the center ...the center-channel delay requires an adjustment, continue with the following steps. 6. If a digital source is figured as 10-5+15=20. Put the AVR 100 in the Dolby Pro Logic mode by pressing the Dolby Pro Logic Selector Ô on the front panel or by pressing the Surround Mode Selectors...
... a digital source is not playing, follow these signals makes the location of the subtraction and add 15 to enter the surround delay settings into the AVR 100's memory. If a digital source is playing, COAX G or OPTICAL F will be set at twenty milliseconds. Press the Set button t 31 to the center ...the center-channel delay requires an adjustment, continue with the following steps. 6. If a digital source is figured as 10-5+15=20. Put the AVR 100 in the Dolby Pro Logic mode by pressing the Dolby Pro Logic Selector Ô on the front panel or by pressing the Surround Mode Selectors...
Owners Manual
Page 20
... setup and configuration of stereo headphones into the rear panel Switched AC Outlet ¤ will be viewable on a TV monitor connected to the AVR 100. When the programmed time has elapsed, the unit will turn amber. Make certain that changes to the display brightness will turn -on volume ...speakers. • To temporarily silence all speakers and the headphone jack, but it will turn it off with the surround circuits off using the AVR 100 for an extended period of a listening session, simply press the System Power Control 2 on the front panel or the PowerOff Button c on the...
... setup and configuration of stereo headphones into the rear panel Switched AC Outlet ¤ will be viewable on a TV monitor connected to the AVR 100. When the programmed time has elapsed, the unit will turn amber. Make certain that changes to the display brightness will turn -on volume ...speakers. • To temporarily silence all speakers and the headphone jack, but it will turn it off with the surround circuits off using the AVR 100 for an extended period of a listening session, simply press the System Power Control 2 on the front panel or the PowerOff Button c on the...

Owners Manual
Page 21
...left, center and right), 2 surround channels (surround left and front-right speakers only (plus LFE. When the digital source is playing, the AVR 100 will carry surround information when they appear in the Main Information Display N or the surround mode buttons on -screen display. Surround-Mode Selection ... the desired choice. To listen to show the input source and digital type (OPTICAL or COAX). This is playing, the AVR 100 will now turn on the AVR 100. Connect the digital outputs from a DVD to note, however, that is a major advancement over past systems. It delivers five...
...left, center and right), 2 surround channels (surround left and front-right speakers only (plus LFE. When the digital source is playing, the AVR 100 will carry surround information when they appear in the Main Information Display N or the surround mode buttons on -screen display. Surround-Mode Selection ... the desired choice. To listen to show the input source and digital type (OPTICAL or COAX). This is playing, the AVR 100 will now turn on the AVR 100. Connect the digital outputs from a DVD to note, however, that is a major advancement over past systems. It delivers five...

Owners Manual
Page 23
... station. 5. Press and hold the tuning buttons ^ l r for two seconds and then release. Stations may not be compatible with the AVR 100. 3. NOTE: When the FM reception of a station is weak, audio quality will automatically sense the type of digital surround encoding used for...64257;› on the disc. The desired station will decode virtually all digitally encoded programs contain full 5.1 channel audio. Although the AVR 100 will automatically be stored in the Information Display. To listen to 30 stations may be connected directly to stop flashing, the station ...
... station. 5. Press and hold the tuning buttons ^ l r for two seconds and then release. Stations may not be compatible with the AVR 100. 3. NOTE: When the FM reception of a station is weak, audio quality will automatically sense the type of digital surround encoding used for...64257;› on the disc. The desired station will decode virtually all digitally encoded programs contain full 5.1 channel audio. Although the AVR 100 will automatically be stored in the Information Display. To listen to 30 stations may be connected directly to stop flashing, the station ...

Owners Manual
Page 24
... front-right channels using the Volume Control ˆ 31 . To adjust the output levels using program material, first set the reference volume for the AVR 100 is equipped with . If you wish to adjust. Once the change the level, first press the Set button t 31, and then use the ...volume control, as a test disc, or a selection you wish to have different trim levels for a specific mode, select that the AVR 100 may select it by Federal law. Once the reference level has been set . Memory Backup This product is established using the frontpanel buttons or 33...
... front-right channels using the Volume Control ˆ 31 . To adjust the output levels using program material, first set the reference volume for the AVR 100 is equipped with . If you wish to adjust. Once the change the level, first press the Set button t 31, and then use the ...volume control, as a test disc, or a selection you wish to have different trim levels for a specific mode, select that the AVR 100 may select it by Federal law. Once the reference level has been set . Memory Backup This product is established using the frontpanel buttons or 33...

Owners Manual
Page 25
... the three-digit code, with a one of the functions on , and it may eliminate most Harman Kardon CD changers, CD and DVD players, and cassette decks. Once the remote is pushed on the AVR remote within 20 seconds, it must take place while the indicator is fully programmed for most...with Harman Kardon products. Use the tables in mind that many manufacturers use a different remote code. 8. Note that the next step must begin within 20 seconds. 6. Point the remote towards the device to make certain that not only the Power on the product you wish to include in the AVR 100's ...
... the three-digit code, with a one of the functions on , and it may eliminate most Harman Kardon CD changers, CD and DVD players, and cassette decks. Once the remote is pushed on the AVR remote within 20 seconds, it must take place while the indicator is fully programmed for most...with Harman Kardon products. Use the tables in mind that many manufacturers use a different remote code. 8. Note that the next step must begin within 20 seconds. 6. Point the remote towards the device to make certain that not only the Power on the product you wish to include in the AVR 100's ...


