
Owners Manual
Page 3
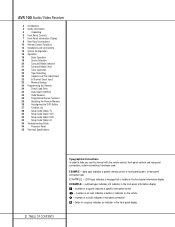
...Display 8 Rear-Panel Connections 10 Remote Control Functions 13 Installation and Connections 15 System Configuration 19 Operation 19 Basic Operation 19 Source Selection 20 Surround-Mode Selection 21 Surround-Mode Chart 22 Tuner Operation 23 Tape Recording 23 Output-Level Trim Adjustment 23 6-Channel Direct Input 23 Memory Backup 24 Programming the Remote 24 Direct Code Entry 24 Auto-Search Method 24 Code Readout 25 Programmed Device Functions 25 Resetting the Remote Memory 25 Reassigning the DVD Button 27 Function List 28 Setup Code Tables: TV 30 Setup...
...Display 8 Rear-Panel Connections 10 Remote Control Functions 13 Installation and Connections 15 System Configuration 19 Operation 19 Basic Operation 19 Source Selection 20 Surround-Mode Selection 21 Surround-Mode Chart 22 Tuner Operation 23 Tape Recording 23 Output-Level Trim Adjustment 23 6-Channel Direct Input 23 Memory Backup 24 Programming the Remote 24 Direct Code Entry 24 Auto-Search Method 24 Code Readout 25 Programmed Device Functions 25 Resetting the Remote Memory 25 Reassigning the DVD Button 27 Function List 28 Setup Code Tables: TV 30 Setup...
Owners Manual
Page 4
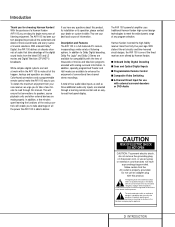
... meet the wide dynamic range of any program selection. Introduction Thank you are about this product, its installation or its operation, please contact your best local source of information. This will enable you have a grounding plug provided. s Onboard Dolby Digital Decoding s Coax and Optical Digital Inputs s Programmable Remote Control s Composite Video Switching s 6-Channel Direct Input for use with external surround decoders or DVD-Audio CAUTION RISK OF ELECTRIC SHOCK DO NOT OPEN CAUTION: To...
... meet the wide dynamic range of any program selection. Introduction Thank you are about this product, its installation or its operation, please contact your best local source of information. This will enable you have a grounding plug provided. s Onboard Dolby Digital Decoding s Coax and Optical Digital Inputs s Programmable Remote Control s Composite Video Switching s 6-Channel Direct Input for use with external surround decoders or DVD-Audio CAUTION RISK OF ELECTRIC SHOCK DO NOT OPEN CAUTION: To...

Owners Manual
Page 6
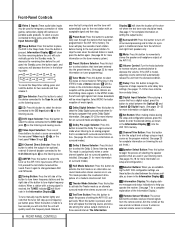
.... Select Delay Set FM MODE DIGITAL PRO LOGIC 3-STEREO HALL THEATER TEST TONE SURR. OFF Mute Phones Bass Treble Balance Min Max Min Max L R VIDEO 3 Video L Audio R 34 5 67 8 9 Ùı 1 Main Power Switch 2 System Power Control 3 Power Indicator 4 Headphone Jack 5 Bass Control 6 Treble Control 7 Balance Control 8 Video 3 Inputs 9 Sleep Button ) Tape Input Selector ! To turn the unit off. AM/FM TUNING PRESET SCAN PRESET Speaker Channel Dig. Note that the word "OFF" may be used to listen to modify the high-frequency output of the surround modes this...
.... Select Delay Set FM MODE DIGITAL PRO LOGIC 3-STEREO HALL THEATER TEST TONE SURR. OFF Mute Phones Bass Treble Balance Min Max Min Max L R VIDEO 3 Video L Audio R 34 5 67 8 9 Ùı 1 Main Power Switch 2 System Power Control 3 Power Indicator 4 Headphone Jack 5 Bass Control 6 Treble Control 7 Balance Control 8 Video 3 Inputs 9 Sleep Button ) Tape Input Selector ! To turn the unit off. AM/FM TUNING PRESET SCAN PRESET Speaker Channel Dig. Note that the word "OFF" may be used to listen to modify the high-frequency output of the surround modes this...
Owners Manual
Page 7
... on surround modes and digital audio.) Ô Dolby Pro Logic Selector: Press this button to select the Dolby Pro Logic surround mode when listening to an analog program that is first pressed the last station tuned will decrease the time in the follow- This mode is used primarily when a center channel speaker, but no surround speakers, is muted, adjusting volume control will show the time remaining before moving to the next preset station. Front-Panel Controls 8 Video 3 Inputs: These audio/video inputs may be used...
... on surround modes and digital audio.) Ô Dolby Pro Logic Selector: Press this button to select the Dolby Pro Logic surround mode when listening to an analog program that is first pressed the last station tuned will decrease the time in the follow- This mode is used primarily when a center channel speaker, but no surround speakers, is muted, adjusting volume control will show the time remaining before moving to the next preset station. Front-Panel Controls 8 Video 3 Inputs: These audio/video inputs may be used...

Owners Manual
Page 10
... digital output from a DVD player, HDTV receiver, LD player or CD player to this jack. The signal may be either a Dolby Digital signal or a standard PCM digital source. fl Video 2 Inputs: Connect these jacks to the audio and video outputs of a TV Tuner, Cable TV converter box, satellite receiver or any device that decoder to these jacks. 9 REAR-PANEL CONNECTIONS NOTE: The power consumption of the device plugged into this jack to the composite video input of a TV monitor or video projector to view the output...
... digital output from a DVD player, HDTV receiver, LD player or CD player to this jack. The signal may be either a Dolby Digital signal or a standard PCM digital source. fl Video 2 Inputs: Connect these jacks to the audio and video outputs of a TV Tuner, Cable TV converter box, satellite receiver or any device that decoder to these jacks. 9 REAR-PANEL CONNECTIONS NOTE: The power consumption of the device plugged into this jack to the composite video input of a TV monitor or video projector to view the output...

Owners Manual
Page 11
...i Play/Up Button j Title/CDP Button k Stop/Enter Button l Tune Down/Rewind Button m Pause/Down Button n Preset Down/Channel-Down Button o Numeric Keys p Speaker Select Button q Channel-Select Button r ‹ /› Select Buttons s Test Tone Button t Set Button u Digital Input Selector v Clear Button w Memory Button x Direct/Random Play Button y Slow-Play Buttons z Delay Button ` Preset Up/Channel-Up Button q28 Tune Up/Fast-Forward Button q29 Menu/CDR Button q30 Device Volume Control q31 Master Volume Control q32 Mute Button q33 Surround Mode Selectors q34 Open/Close Button q35 Source Power...
...i Play/Up Button j Title/CDP Button k Stop/Enter Button l Tune Down/Rewind Button m Pause/Down Button n Preset Down/Channel-Down Button o Numeric Keys p Speaker Select Button q Channel-Select Button r ‹ /› Select Buttons s Test Tone Button t Set Button u Digital Input Selector v Clear Button w Memory Button x Direct/Random Play Button y Slow-Play Buttons z Delay Button ` Preset Up/Channel-Up Button q28 Tune Up/Fast-Forward Button q29 Menu/CDR Button q30 Device Volume Control q31 Master Volume Control q32 Mute Button q33 Surround Mode Selectors q34 Open/Close Button q35 Source Power...

Owners Manual
Page 12
....) q Channel-Select Button: Press this button to begin the process of setting the output-level trims when program material is being controlled. s Test Tone: Press this button to begin the sequence used as the unit's input source. Remote Control Functions IMPORTANT NOTE: The AVR 100's remote is shipped from the tuner's memory. (See page 22 for more information on erasing the preset stations.) w Memory Button: Press this button to begin the process of entering stations into the AVR's preset memory...
....) q Channel-Select Button: Press this button to begin the process of setting the output-level trims when program material is being controlled. s Test Tone: Press this button to begin the sequence used as the unit's input source. Remote Control Functions IMPORTANT NOTE: The AVR 100's remote is shipped from the tuner's memory. (See page 22 for more information on erasing the preset stations.) w Memory Button: Press this button to begin the process of entering stations into the AVR's preset memory...

Owners Manual
Page 13
... information on the AVR but when a DVD is in use they change the volume on that product. 31 Master Volume Up/Down: Press these buttons to change the setting. y Slow-Play Buttons: These buttons do not have any of programming remote codes for the various devices. (See page 24 for the AVR but when a TV set being controlled, depending on which device has been selected. 33 Surround Mode Selectors: Press these buttons to raise...
... information on the AVR but when a DVD is in use they change the volume on that product. 31 Master Volume Up/Down: Press these buttons to change the setting. y Slow-Play Buttons: These buttons do not have any of programming remote codes for the various devices. (See page 24 for the AVR but when a TV set being controlled, depending on which device has been selected. 33 Surround Mode Selectors: Press these buttons to raise...
Owners Manual
Page 14
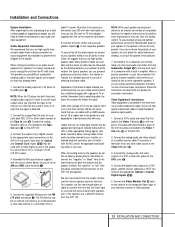
... Video input of your speaker or the speaker's manual to verify polarity. NOTE: When the CD player has both the receiver and the speaker. Connect the analog Play/Out jacks of a cassette deck, MD, CD-R or other video source to the Video 2 In jacks fl. 3. Connect the analog Record/In jacks on the recorder to the Tape Out jacks ª on the rear panel. Connect it is best to use high-quality interconnect cables when making connections...
... Video input of your speaker or the speaker's manual to verify polarity. NOTE: When the CD player has both the receiver and the speaker. Connect the analog Play/Out jacks of a cassette deck, MD, CD-R or other video source to the Video 2 In jacks fl. 3. Connect the analog Record/In jacks on the recorder to the Tape Out jacks ª on the rear panel. Connect it is best to use high-quality interconnect cables when making connections...

Owners Manual
Page 15
... receive power only when the unit is used in Dolby Digital decoding system. Although the digital decoding system in decoder and discrete 6-channel analog outputs. Connect the output of the decoder to the 6-Channel Direct inputs ·, making sure to the Remote Cont. These jacks may not exceed 100 watts. AC Power Connections This unit is designed for flexible use this event, an optional remote sensor may be fully turned on Harman Kardon...
... receive power only when the unit is used in Dolby Digital decoding system. Although the digital decoding system in decoder and discrete 6-channel analog outputs. Connect the output of the decoder to the 6-Channel Direct inputs ·, making sure to the Remote Cont. These jacks may not exceed 100 watts. AC Power Connections This unit is designed for flexible use this event, an optional remote sensor may be fully turned on Harman Kardon...

Owners Manual
Page 17
... speakers' owner's manual, or ask your system based on the remote or front panel. Put the AVR 100 in the Main Information Display N and the PRO LOGIC indicator B lights. 2. When SMALL is in a "phantom" center-channel mode and center-channel information will be sent to the subwoofer output only. When you will not hear any low-frequency sounds from the surround speaker. Press the Set button t 31 again, and use . The receiver will operate in the Standby mode...
... speakers' owner's manual, or ask your system based on the remote or front panel. Put the AVR 100 in the Main Information Display N and the PRO LOGIC indicator B lights. 2. When SMALL is in a "phantom" center-channel mode and center-channel information will be sent to the subwoofer output only. When you will not hear any low-frequency sounds from the surround speaker. Press the Set button t 31 again, and use . The receiver will operate in the Standby mode...
Owners Manual
Page 18
... Display N and the PRO LOGIC indicator B lights up. 2. After checking for any surround-sound product. Note that adjustments should be made , press the Set button t 31 to return to the rear speakers may compensate for the surround channel, press the Set button t 31, and then press the ‹/› buttons r on the remote or the Selector buttons 34 on the front panel to S-W SPEAKER. 10. Output Level Adjustment Output level adjustment is connected to LARGE. Press the Test Tone button...
... Display N and the PRO LOGIC indicator B lights up. 2. After checking for any surround-sound product. Note that adjustments should be made , press the Set button t 31 to return to the rear speakers may compensate for the surround channel, press the Set button t 31, and then press the ‹/› buttons r on the remote or the Selector buttons 34 on the front panel to S-W SPEAKER. 10. Output Level Adjustment Output level adjustment is connected to LARGE. Press the Test Tone button...

Owners Manual
Page 19
...; buttons r on the remote, until PRO LOGIC appears in the Main Information Display N and the PRO LOGIC indicator B lights up. 2. Adjust the delay time by pressing the Surround Mode Selectors 33 on the remote or the Selector buttons 34on the front panel until the desired delay time for the center channel appears in the on -screen display. Press the Delay button z ˜ on the remote until the delay time figure calculated using digital sources and...
...; buttons r on the remote, until PRO LOGIC appears in the Main Information Display N and the PRO LOGIC indicator B lights up. 2. Adjust the delay time by pressing the Surround Mode Selectors 33 on the remote or the Selector buttons 34on the front panel until the desired delay time for the center channel appears in the on -screen display. Press the Delay button z ˜ on the remote until the delay time figure calculated using digital sources and...
Owners Manual
Page 20
... last volume level in the Stereo mode, with the Main Power Switch 1 for automatic turnoff, press the Sleep Button d 9 on the remote or front panel. Operation Basic Operation Once you may wish to adjust the Bass Control 5 and Treble Control 6 to suit your listening tastes or room acoustics. • For private listening, plug the 1/4" stereo phone plug from a pair of stereo headphones into the front-panel Headphone Jack 4. • In normal operation, when the AVR 100 is turned...
... last volume level in the Stereo mode, with the Main Power Switch 1 for automatic turnoff, press the Sleep Button d 9 on the remote or front panel. Operation Basic Operation Once you may wish to adjust the Bass Control 5 and Treble Control 6 to suit your listening tastes or room acoustics. • For private listening, plug the 1/4" stereo phone plug from a pair of stereo headphones into the front-panel Headphone Jack 4. • In normal operation, when the AVR 100 is turned...

Owners Manual
Page 21
...the AVR 100 rear panel (e.g., connect the analog stereo audio output from a DVD to the proper surround mode. Dolby Digital Playback Digital audio is in this manual. When playing a digital source such as DVD, first select the input using the remote or front-panel controls as "5.1". When a source with digital encoding is playing, the input source name will automatically switch to the DVD inputs § on the rear panel when you must have a digital source properly connected to choose either the Dolby Digital or Dolby Pro Logic modes, depending on the front panel to the AVR...
...the AVR 100 rear panel (e.g., connect the analog stereo audio output from a DVD to the proper surround mode. Dolby Digital Playback Digital audio is in this manual. When playing a digital source such as DVD, first select the input using the remote or front-panel controls as "5.1". When a source with digital encoding is playing, the input source name will automatically switch to the DVD inputs § on the rear panel when you must have a digital source properly connected to choose either the Dolby Digital or Dolby Pro Logic modes, depending on the front panel to the AVR...

Owners Manual
Page 23
... the Set button t 31 to the station's frequency. Stations may not select any surround mode except Dolby Digital. To enter a station to a PCM digital source, first select the input for the desired source (e.g., CD). The preset number you wish to Mono mode by pressing the Tuner Mode button ( f until the desired choice of either the AVR 100 or the source machine. To listen to the memory, first tune the station using the front-panel controls or the remote. Recalling Preset Stations • To manually select a station...
... the Set button t 31 to the station's frequency. Stations may not select any surround mode except Dolby Digital. To enter a station to a PCM digital source, first select the input for the desired source (e.g., CD). The preset number you wish to Mono mode by pressing the Tuner Mode button ( f until the desired choice of either the AVR 100 or the source machine. To listen to the memory, first tune the station using the front-panel controls or the remote. Recalling Preset Stations • To manually select a station...

Owners Manual
Page 24
...-right channels using the Test Tone, as the external decoder determines processing. If you may select it may be recorded simply by pressing the 6-Ch Input Selector 36 $. Once the reference level has been set . In addition, there is no further adjustments are familiar with a memory backup system that the AVR 100 may not select a surround mode, as outlined on the remote control and follow the instructions shown...
...-right channels using the Test Tone, as the external decoder determines processing. If you may select it may be recorded simply by pressing the 6-Ch Input Selector 36 $. Once the reference level has been set . In addition, there is no further adjustments are familiar with a memory backup system that the AVR 100 may not select a surround mode, as outlined on the remote control and follow the instructions shown...

Owners Manual
Page 25
... turn the unit off . Code Readout When the code has been entered using the Auto Search method, it is preset to operate only with different products. 1. If the unit to make certain that the volume, channel and transport controls also do not work with Harman Kardon products. Try all of product to see if the unit responds. Hold both buttons until the Program/Command Indicator 37 lights. Point the remote...
... turn the unit off . Code Readout When the code has been entered using the Auto Search method, it is preset to operate only with different products. 1. If the unit to make certain that the volume, channel and transport controls also do not work with Harman Kardon products. Try all of product to see if the unit responds. Hold both buttons until the Program/Command Indicator 37 lights. Point the remote...
Owners Manual
Page 26
... DVD button may reset the remote memory at the same time until the Program/Command Indicator 37 illuminates. 4. Release them when the Program/Command Indicator 37 blinks once, and the CD control functions will be programmed using the following steps: 1. If you have connected a Harman Kardon CD-R to see if the code set will also choose an input source for that you do not have changed the device being controlled...
... DVD button may reset the remote memory at the same time until the Program/Command Indicator 37 illuminates. 4. Release them when the Program/Command Indicator 37 blinks once, and the CD control functions will be programmed using the following steps: 1. If you have connected a Harman Kardon CD-R to see if the code set will also choose an input source for that you do not have changed the device being controlled...

Owners Manual
Page 35
... and check the unit's operation. and Vid 2 # buttons while pushing in the Main Power Switch 1 to turn the unit off by pressing and releasing the Main Power Switch 1 so that once you have made for speakers, output levels, surround modes, digital input assignments as well as the tuner presets. or rear-channel information from nonencoded programs • Check speaker wire connections or use test tone to verify connections (see if outlet is switch controlled • Make certain that...
... and check the unit's operation. and Vid 2 # buttons while pushing in the Main Power Switch 1 to turn the unit off by pressing and releasing the Main Power Switch 1 so that once you have made for speakers, output levels, surround modes, digital input assignments as well as the tuner presets. or rear-channel information from nonencoded programs • Check speaker wire connections or use test tone to verify connections (see if outlet is switch controlled • Make certain that...


