

Owners Manual
Page 6
...;HDMIoutput,withupscaling to 1080p • dock for iPod** connectivity with audio/video playback •EthernetportforInternetRadioandNetwork •USBPortfor easyinstallation Supplied Accessories The following accessory items are missing, please contact Harman Kardon customer service at www.harmankardon...
...;HDMIoutput,withupscaling to 1080p • dock for iPod** connectivity with audio/video playback •EthernetportforInternetRadioandNetwork •USBPortfor easyinstallation Supplied Accessories The following accessory items are missing, please contact Harman Kardon customer service at www.harmankardon...
Owners Manual
Page 8
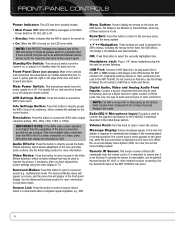
... other infrared receiver, connecting it to an authorized Harman Kardon service center for the EzSet/EQ II procedure described in the Initial Setup section. USB Port: Connect a USB flash drive, to play audio files in theMP3orWMAformatorstillimagesin use The Bridge II instead. In normal operation, the current source name appears on -screen display menu system (OSD) is...
... other infrared receiver, connecting it to an authorized Harman Kardon service center for the EzSet/EQ II procedure described in the Initial Setup section. USB Port: Connect a USB flash drive, to play audio files in theMP3orWMAformatorstillimagesin use The Bridge II instead. In normal operation, the current source name appears on -screen display menu system (OSD) is...
Owners Manual
Page 10
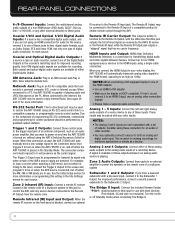
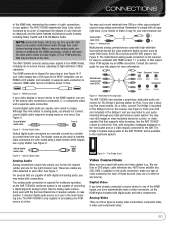
...-cable connection. Coaxial 1/2/3 and Optical 1/2/3 Digital Audio Inputs: If a source has a compatible digital audio output, and ifyou connecttheHDMIOutputtoyourvideodisplay,the AVR 7550HD will automatically send a low-voltage signal to the connected device that has no carrier frequency. XM Antenna Jack: PluginanXMConnect-and-Playor Mini-Tunerantennamodule...
...-cable connection. Coaxial 1/2/3 and Optical 1/2/3 Digital Audio Inputs: If a source has a compatible digital audio output, and ifyou connecttheHDMIOutputtoyourvideodisplay,the AVR 7550HD will automatically send a low-voltage signal to the connected device that has no carrier frequency. XM Antenna Jack: PluginanXMConnect-and-Playor Mini-Tunerantennamodule...
Owners Manual
Page 11
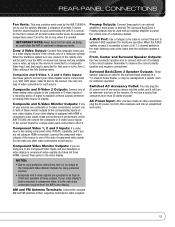
... external amplifier to power the remote zone of the Component Video Inputs and your video-capable source components (e.g., VCR, DVD player, cable TV box) to the receiver. An automatic temperature sensor turns the fan on -screen text menus and any other connections, plug the AC power cord into this composite video jack to a video display located in a 7.2-channel home theater, or may be used with HDMIor component video inputs, these analog video outputs to the composite or S-video inputs of the Info Settings menu. Zone 2 Video Output: Connect...
... external amplifier to power the remote zone of the Component Video Inputs and your video-capable source components (e.g., VCR, DVD player, cable TV box) to the receiver. An automatic temperature sensor turns the fan on -screen text menus and any other connections, plug the AC power cord into this composite video jack to a video display located in a 7.2-channel home theater, or may be used with HDMIor component video inputs, these analog video outputs to the composite or S-video inputs of the Info Settings menu. Zone 2 Video Output: Connect...
Owners Manual
Page 13
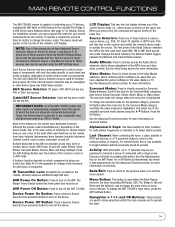
... connected to any compatible input and given any time, even in the appendix for listings of the functions for theSurroundModecategory matching the audio program is only available to each type of component. AVR Power On Button: Press to turn on the receiver and switch the remote's device mode to operate the source. Activity: With this lens. MAIN REMOTE CONTROL FUNCTIONS The AVR 7550HD remote...
... connected to any compatible input and given any time, even in the appendix for listings of the functions for theSurroundModecategory matching the audio program is only available to each type of component. AVR Power On Button: Press to turn on the receiver and switch the remote's device mode to operate the source. Activity: With this lens. MAIN REMOTE CONTROL FUNCTIONS The AVR 7550HD remote...
Owners Manual
Page 18
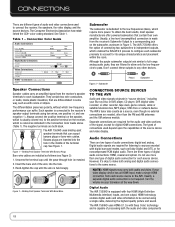
Connection Color Guide Audio Connections Front (FL/FR) Center (C) Surround (SL/SR) Surround Back (SBL/SBR) Subwoofer (SUB) Left White Blue Brown Green Purple Right Red Gray Tan Digital Audio Connections Coaxial Optical Input Orange Output Video Connections Component Composite S-Video Y Green Pb Blue Pr Red Yellow HDMI™ Connections (digital audio/video) HDMI Speaker Connections Speaker cables carry an amplified signal from the receiver's speaker terminals to each source device to the AVR. Always connect the positive terminal on the receiver, which require more ...
Connection Color Guide Audio Connections Front (FL/FR) Center (C) Surround (SL/SR) Surround Back (SBL/SBR) Subwoofer (SUB) Left White Blue Brown Green Purple Right Red Gray Tan Digital Audio Connections Coaxial Optical Input Orange Output Video Connections Component Composite S-Video Y Green Pb Blue Pr Red Yellow HDMI™ Connections (digital audio/video) HDMI Speaker Connections Speaker cables carry an amplified signal from the receiver's speaker terminals to each source device to the AVR. Always connect the positive terminal on the receiver, which require more ...
Owners Manual
Page 19
... for more information. Optical digital audio cable Optical Figure 6 - The analog audio connection is inserted. If you have alreadyconnectedasourcedevicetoone for the right channel (red). Dock your disc player for playerscompliantwith navigation messages displayed on the front panel and on the receiver. Use the AVR 7550HD remote to control the iPod, with HDMIversion1.1...
... for more information. Optical digital audio cable Optical Figure 6 - The analog audio connection is inserted. If you have alreadyconnectedasourcedevicetoone for the right channel (red). Dock your disc player for playerscompliantwith navigation messages displayed on the front panel and on the receiver. Use the AVR 7550HD remote to control the iPod, with HDMIversion1.1...

Owners Manual
Page 22
...;are : optical digital audio, coaxial digital audio, 2-channel analog audio. Table 2 - The other components, the AVR's software organizes the connections into the handheld remote and, as a CD player. 4. Decide which source will be used for each source, and the default audio/video connection assignments. This is "HDMI",selectup tothreedevices to one of the three numbered Component Video Inputs. If not, write down the best available...
...;are : optical digital audio, coaxial digital audio, 2-channel analog audio. Table 2 - The other components, the AVR's software organizes the connections into the handheld remote and, as a CD player. 4. Decide which source will be used for each source, and the default audio/video connection assignments. This is "HDMI",selectup tothreedevices to one of the three numbered Component Video Inputs. If not, write down the best available...
Owners Manual
Page 24
... operation, connect an optional IR receiver, keypad or other control device to the Zone 2 IR Input for XMReady®devices,plugit , to the AVR using a cable or connector that source will control source selection and volume for specific installation instructions. Signals transmitted through the Zone 2 IR Input will also affect the main room. 25 Select a location that has Internet access, a home network, or directly to the front-panel USB...
... operation, connect an optional IR receiver, keypad or other control device to the Zone 2 IR Input for XMReady®devices,plugit , to the AVR using a cable or connector that source will control source selection and volume for specific installation instructions. Signals transmitted through the Zone 2 IR Input will also affect the main room. 25 Select a location that has Internet access, a home network, or directly to the front-panel USB...

Owners Manual
Page 25
... requires running cables inside walls. It is recommended that you place the amplifier in the same room as described in "daisy chain" fashion, connecting each device's IR output to a compatible IR input on available Harman Kardon hubs, the ABH 4 and ABH 4000, and amplified in different areas of the home. Connect the remote room's speakers directly to the Surround Back/Zone 2 Preamp Outputs. A hub may distribute audio to many remote rooms. To control source devices...
... requires running cables inside walls. It is recommended that you place the amplifier in the same room as described in "daisy chain" fashion, connecting each device's IR output to a compatible IR input on available Harman Kardon hubs, the ABH 4 and ABH 4000, and amplified in different areas of the home. Connect the remote room's speakers directly to the Surround Back/Zone 2 Preamp Outputs. A hub may distribute audio to many remote rooms. To control source devices...
Owners Manual
Page 29
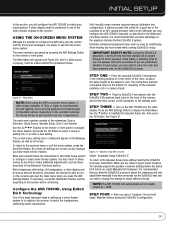
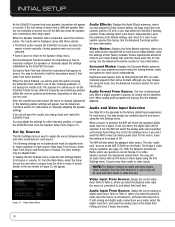
... using only the remote and the front-panel messages, it is easier to - 25dB. Before beginning initial setup, all loudspeakers, a video display and all source devices should be retained. Figure21-SpeakerSetupMenuScreen Select "Automatic Setup-EzSet/EQ II". NOTE: The AVR 7550HD will automatically set the level control on -screen menu system, a video output resolution of the signature Harman Kardon EzSet/EQ II system. A video display must be played through...
... using only the remote and the front-panel messages, it is easier to - 25dB. Before beginning initial setup, all loudspeakers, a video display and all source devices should be retained. Figure21-SpeakerSetupMenuScreen Select "Automatic Setup-EzSet/EQ II". NOTE: The AVR 7550HD will automatically set the level control on -screen menu system, a video output resolution of the signature Harman Kardon EzSet/EQ II system. A video display must be played through...
Owners Manual
Page 30
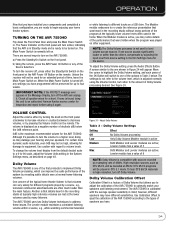
.... When a digital program is selected, the AVR will check the assigned digital audio input for more information. The only "audioonly" sources on manually adjusting the speaker settings. see page 37), USB, the Network and Internet Radio, which use the room. When a source is playing, its format will be given the option of the listening position settings will appear. When the test is connected to , and select that appear on screen, turn off the AVR and...
.... When a digital program is selected, the AVR will check the assigned digital audio input for more information. The only "audioonly" sources on manually adjusting the speaker settings. see page 37), USB, the Network and Internet Radio, which use the room. When a source is playing, its format will be given the option of the listening position settings will appear. When the test is connected to , and select that appear on screen, turn off the AVR and...
Owners Manual
Page 33
... program at 48kHz. To adjust the Dolby Volume setting, press the Audio Effects Button. The volume is found, bring the unit to an authorized Harman Kardon service center for damage to the amount of speakers you are often much louder than the main feature. Although it . Use caution with sources recorded at the lower volumes used in DTS 5.1 mode. To change the volume level display from source setting in high resolution, turn off theAVR...
... program at 48kHz. To adjust the Dolby Volume setting, press the Audio Effects Button. The volume is found, bring the unit to an authorized Harman Kardon service center for damage to the amount of speakers you are often much louder than the main feature. Although it . Use caution with sources recorded at the lower volumes used in DTS 5.1 mode. To change the volume level display from source setting in high resolution, turn off theAVR...

Owners Manual
Page 34
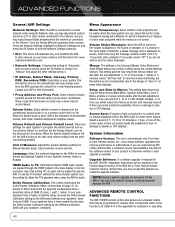
... headphones. USING THE TUNER To select the AVR 7550HD's built-in the remote zone, and select these settings from the Audio Effects submenu, as a reminder.Torestorenormalaudio,presstheMuteButtonagain, or adjust the volume. Press the Radio Source Selector on a pair of headphones into the jack behind the front-panel door for private listening. A screen...
... headphones. USING THE TUNER To select the AVR 7550HD's built-in the remote zone, and select these settings from the Audio Effects submenu, as a reminder.Torestorenormalaudio,presstheMuteButtonagain, or adjust the volume. Press the Radio Source Selector on a pair of headphones into the jack behind the front-panel door for private listening. A screen...

Owners Manual
Page 35
... preset station locations and remote control. Atotalof the channel number and preset location. Use the Alphanumeric Keys to receivethe XMservicewhenauser-suppliedXMantennamoduleis controlled by -play , which each press of the AVR 7550HD. XM RADIO OPERATION TolistentoSatelliteRadio,you have standard analog or digital audio outputs...
... preset station locations and remote control. Atotalof the channel number and preset location. Use the Alphanumeric Keys to receivethe XMservicewhenauser-suppliedXMantennamoduleis controlled by -play , which each press of the AVR 7550HD. XM RADIO OPERATION TolistentoSatelliteRadio,you have standard analog or digital audio outputs...

Owners Manual
Page 37
... networksetup.SelectManual,andtheothernetworksettings will be recorded using the AVR remote or the AVR's front-panel controls, view navigation messages on and recording while the source is playing. To change a setting, highlight it . Examplesof these sources will turn off the AVR, remove the iPod from the InternetRadiosourceto...
... networksetup.SelectManual,andtheothernetworksettings will be recorded using the AVR remote or the AVR's front-panel controls, view navigation messages on and recording while the source is playing. To change a setting, highlight it . Examplesof these sources will turn off the AVR, remove the iPod from the InternetRadiosourceto...

Owners Manual
Page 44
... Settings Button and selecting Audio Effects. Record the level settings in Table A3 in the Audio Effects menu affect each of the Dolby Volume settings. The menu may be accessed from the Setup Source menu by using the 7/3 Buttons to reduce the level by the highlight bar. Press the 7/3 Buttons to change the temperature bar setting. Speaker Setup: Select Position 1 or 2 to this setting reads AUTO, the test tone will appear with equal loudness. Adjust the number of speakers, crossover, distance and sub mode...
... Settings Button and selecting Audio Effects. Record the level settings in Table A3 in the Audio Effects menu affect each of the Dolby Volume settings. The menu may be accessed from the Setup Source menu by using the 7/3 Buttons to reduce the level by the highlight bar. Press the 7/3 Buttons to change the temperature bar setting. Speaker Setup: Select Position 1 or 2 to this setting reads AUTO, the test tone will appear with equal loudness. Adjust the number of speakers, crossover, distance and sub mode...

Owners Manual
Page 47
... Button to intuition, the picture will go out when the display is available at MainRoom,thenreturnthis settingat the Remote IR Output. However, no one is listening in the remote room, leave this line is controlled separately for the remote zone. The USB, Network and Internet Radio sources are available to the Zone 2 Audio setting and select the analog audio input. Volume: The volume...
... Button to intuition, the picture will go out when the display is available at MainRoom,thenreturnthis settingat the Remote IR Output. However, no one is listening in the remote room, leave this line is controlled separately for the remote zone. The USB, Network and Internet Radio sources are available to the Zone 2 Audio setting and select the analog audio input. Volume: The volume...
Owners Manual
Page 48
... connected to a home networkrouterusingtheNetworkJack,youmayplay at turn-on volume. Volume Default and Volume Default Level: These two settings are having difficulty accessing these menus remain visible after thelastadjustment. Select a time-out period of burn-in " on some video displays. When the Volume Default setting is not recommended, due to program...
... connected to a home networkrouterusingtheNetworkJack,youmayplay at turn-on volume. Volume Default and Volume Default Level: These two settings are having difficulty accessing these menus remain visible after thelastadjustment. Select a time-out period of burn-in " on some video displays. When the Volume Default setting is not recommended, due to program...
Owners Manual
Page 52
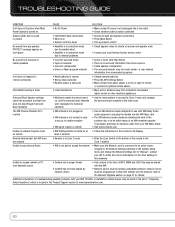
...monosources •Checkspeakerconfiguration Thesurrounddecodermaynotcreatecenter-orrear-channel information from nonencoded programs •Changeremotebatteries •PresstheAVRSettingsButton •Makecertainfront-panelsensoris...
...monosources •Checkspeakerconfiguration Thesurrounddecodermaynotcreatecenter-orrear-channel information from nonencoded programs •Changeremotebatteries •PresstheAVRSettingsButton •Makecertainfront-panelsensoris...


