
Owners Manual
Page 2
...20 Surround Setup 21 Delay Settings 22 Speaker Setup 23 Output Level Adjustment 23 Crossover Frequency 24 Manual Output Level Adjustment 26 Operation 26 Basic Operation 26 Source Selection 27 Surround Mode Chart 28 Surround Mode Selection 28 Digital Audio Playback 28 Selecting a Digital Source 30 Tuner Operation 31 Tape Recording 31 Front Panel Input/Output Connections 31 Output Level Trim Adjustment 32 6-Channel Direct Input 33 Advanced Features 33 Display Brightness 33 Turn-On Volume Level 33 Semi-OSD Settings 35 Multiroom Operation 36 Programming...
...20 Surround Setup 21 Delay Settings 22 Speaker Setup 23 Output Level Adjustment 23 Crossover Frequency 24 Manual Output Level Adjustment 26 Operation 26 Basic Operation 26 Source Selection 27 Surround Mode Chart 28 Surround Mode Selection 28 Digital Audio Playback 28 Selecting a Digital Source 30 Tuner Operation 31 Tape Recording 31 Front Panel Input/Output Connections 31 Output Level Trim Adjustment 32 6-Channel Direct Input 33 Advanced Features 33 Display Brightness 33 Turn-On Volume Level 33 Semi-OSD Settings 35 Multiroom Operation 36 Programming...
Owners Manual
Page 3
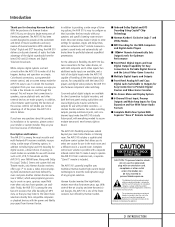
... tuner. The AVR 510 includes a sophisticated multizone control system that connections to enter settings for speakers, inputs and delay times, while our exclusive EzSet™ remote measures a system's sound levels and automatically calibrates them for Easy Expansion and Use With Future Audio Formats s Complete Multi-Zone System With Separate "Zone II" Remote Included CAUTION RISK OF ELECTRIC SHOCK DO NOT OPEN CAUTION: To prevent electric shock, do not use . The AVR 510's powerful amplifier uses...
... tuner. The AVR 510 includes a sophisticated multizone control system that connections to enter settings for speakers, inputs and delay times, while our exclusive EzSet™ remote measures a system's sound levels and automatically calibrates them for Easy Expansion and Use With Future Audio Formats s Complete Multi-Zone System With Separate "Zone II" Remote Included CAUTION RISK OF ELECTRIC SHOCK DO NOT OPEN CAUTION: To prevent electric shock, do not use . The AVR 510's powerful amplifier uses...
Owners Manual
Page 5
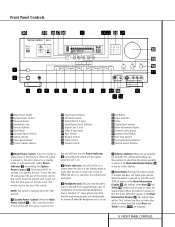
Input Source Selector @ FM Mode Selector # Digital Optical 3 Input $ Input/Output Status Indicator % Digital Coax 3 Jack ^ Video 4 Input Jacks & Bass Control * Balance Control ( Treble Control Ó Volume Control Ô Set Button Input Indicators Ò Delay Ú Digital Input Selector Û Main Information Display Ù Channel Select Button ı Speaker Select Button ˆ Test Tone Selector ˜ Surround Mode Indicators ¯ Remote Sensor Window 1 Main Power Switch: Press this button to the AVR 510's output through a pair of the remote control, this button ...
Input Source Selector @ FM Mode Selector # Digital Optical 3 Input $ Input/Output Status Indicator % Digital Coax 3 Jack ^ Video 4 Input Jacks & Bass Control * Balance Control ( Treble Control Ó Volume Control Ô Set Button Input Indicators Ò Delay Ú Digital Input Selector Û Main Information Display Ù Channel Select Button ı Speaker Select Button ˆ Test Tone Selector ˜ Surround Mode Indicators ¯ Remote Sensor Window 1 Main Power Switch: Press this button to the AVR 510's output through a pair of the remote control, this button ...

Owners Manual
Page 6
...: Pressing this button will light in front of the input that is currently being used as the source for the AVR 510. Ò Delay: Press this button to begin the process of trimming the channel output levels using the internal test tone as a reference. (For more information on configuring the front panel jacks as outputs, rather than inputs.) % Digital Coax 3 Jack: This jack is held for a few seconds you operate the receiver. (See pages...
...: Pressing this button will light in front of the input that is currently being used as the source for the AVR 510. Ò Delay: Press this button to begin the process of trimming the channel output levels using the internal test tone as a reference. (For more information on configuring the front panel jacks as outputs, rather than inputs.) % Digital Coax 3 Jack: This jack is held for a few seconds you operate the receiver. (See pages...
Owners Manual
Page 10
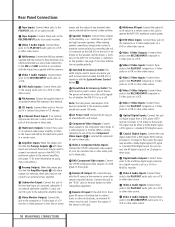
... video source. 36 Video 2 Audio Outputs: Connect these jacks to the RECORD/INPUT audio jacks on -screen menus and the output of any AC device. If an external subwoofer amplifier is used , connect this jack to the subwoofer amplifier input. › Video Monitor Outputs: Connect this jack to the composite or S-Video input of a TV monitor or video projector to view the on a VCR or other video source. 10 REAR PANEL CONNECTIONS k Video 1 Video Inputs: Connect these jacks to the PLAY/OUT composite or S-Video jacks on a DVD or other video source. If an external AM antenna is used...
... video source. 36 Video 2 Audio Outputs: Connect these jacks to the RECORD/INPUT audio jacks on -screen menus and the output of any AC device. If an external subwoofer amplifier is used , connect this jack to the subwoofer amplifier input. › Video Monitor Outputs: Connect this jack to the composite or S-Video input of a TV monitor or video projector to view the on a VCR or other video source. 10 REAR PANEL CONNECTIONS k Video 1 Video Inputs: Connect these jacks to the PLAY/OUT composite or S-Video jacks on a DVD or other video source. If an external AM antenna is used...
Owners Manual
Page 12
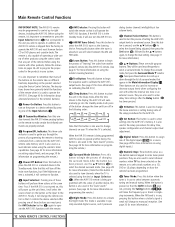
...; buttons n to select the desired surround mode. (See page 28 for more information.) Note that it is available in specially encoded digital sources, and it will perform three actions at low volume levels. Before using the remote with either the internal test tone or an external source. It is also important to remember that many of the button changes the time until turn the AVR 510 on your system. Main Remote Control...
...; buttons n to select the desired surround mode. (See page 28 for more information.) Note that it is available in specially encoded digital sources, and it will perform three actions at low volume levels. Before using the remote with either the internal test tone or an external source. It is also important to remember that many of the button changes the time until turn the AVR 510 on your system. Main Remote Control...

Owners Manual
Page 13
... Owner's Manual for your system. When the AVR 510 remote is being controlled, depending on which is a preprogrammed sequence of speakers used to set up or down through the stations programmed into the AVR 510's preset memory. If the Tuner Mode button s@ has been pressed so that the AUTO indicator X is illuminated, pressing and holding either of the buttons for three seconds will switch between the output of the player or receiver and the external video input...
... Owner's Manual for your system. When the AVR 510 remote is being controlled, depending on which is a preprogrammed sequence of speakers used to set up or down through the stations programmed into the AVR 510's preset memory. If the Tuner Mode button s@ has been pressed so that the AUTO indicator X is illuminated, pressing and holding either of the buttons for three seconds will switch between the output of the player or receiver and the external video input...

Owners Manual
Page 15
... with a Dolby Digital or DTS source or the output of the AVR 510 to the matching digital input connections on a CD-R or MiniDisc recorder. 5. If you are normally made via a line-level audio connection from the AVR 510. 8. Connect the analog Play/Out jacks of speakers you use the 300-ohm-to-75-ohm adapter supplied with a built-in selecting the proper cable. Connect the output of a CD player to the CD inputs •. Connect the supplied FM antenna to the Tape Output jacks ™...
... with a Dolby Digital or DTS source or the output of the AVR 510 to the matching digital input connections on a CD-R or MiniDisc recorder. 5. If you are normally made via a line-level audio connection from the AVR 510. 8. Connect the analog Play/Out jacks of speakers you use the 300-ohm-to-75-ohm adapter supplied with a built-in selecting the proper cable. Connect the output of a CD player to the CD inputs •. Connect the supplied FM antenna to the Tape Output jacks ™...
Owners Manual
Page 16
... room as audio components. Simply use of highquality interconnect cables is recommended for audio connection: Option 1: Use high-quality, shielded audio interconnect cable from the AVR 510 to the remote room, two options are used . If other Harman Kardon compatible source equipment is connected in their native formats. The amplifier will enable the remote room location to control source equipment functions. Connect the analog audio and video outputs of a satellite receiver, cable TV converter or television set or any of the Optical or Coaxial Digital Input jacks...
... room as audio components. Simply use of highquality interconnect cables is recommended for audio connection: Option 1: Use high-quality, shielded audio interconnect cable from the AVR 510 to the remote room, two options are used . If other Harman Kardon compatible source equipment is connected in their native formats. The amplifier will enable the remote room location to control source equipment functions. Connect the analog audio and video outputs of a satellite receiver, cable TV converter or television set or any of the Optical or Coaxial Digital Input jacks...

Owners Manual
Page 17
... the AVR 510, although additional volume controls on the external device may be used for connections to other decoders, you have no power switch or a mechanical power switch that is on the amplifier. The total power draw to the Amplifier In jacks ⁄ on using the DVD Audio Format. NOTE: Many audio and video products go into a Standby mode when they should be left in decoder and discrete 6-channel analog outputs. Store the jumpers in digital surround decoders...
... the AVR 510, although additional volume controls on the external device may be used for connections to other decoders, you have no power switch or a mechanical power switch that is on the amplifier. The total power draw to the Amplifier In jacks ⁄ on using the DVD Audio Format. NOTE: Many audio and video products go into a Standby mode when they should be left in decoder and discrete 6-channel analog outputs. Store the jumpers in digital surround decoders...
Owners Manual
Page 19
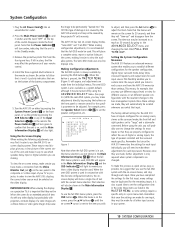
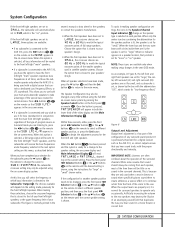
... screen, making it easier to set the speaker configuration, etc. * MASTER MENU * INPUT SETUP SURROUND SETUP SPEAKER SETUP OUTPUT ADJUST CHANNEL ADJUST MULTI-ROOM ADVANCED EXIT Figure 1 Note that they will also be permanently "burned into an unswitched AC outlet. 2. The Semi-OSD mode uses one input, they must be made for all inputs configured for each input source. For example, press the Speaker Select button 32 ı to use of digital or analog inputs, the type of the battery compartment. 5. That selection...
... screen, making it easier to set the speaker configuration, etc. * MASTER MENU * INPUT SETUP SURROUND SETUP SPEAKER SETUP OUTPUT ADJUST CHANNEL ADJUST MULTI-ROOM ADVANCED EXIT Figure 1 Note that they will also be permanently "burned into an unswitched AC outlet. 2. The Semi-OSD mode uses one input, they must be made for all inputs configured for each input source. For example, press the Speaker Select button 32 ı to use of digital or analog inputs, the type of the battery compartment. 5. That selection...
Owners Manual
Page 20
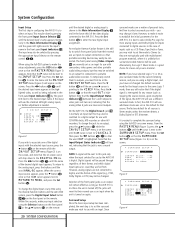
...; buttons o/ 31 so that the analog Video 4 jacks are normally set as an input for use whichever mode was set the mode to associate one of the front panel jacks as they are fed from their normal use as being indicated in the lower third of the video display connected to portable audio/video recorders. Alternatively, the Logic 7 Music mode is unlikely that the on the screen. * SURROUND SETUP * SURROUND: SURR OFF CENTER DELAY: MS SURR DELAY...
...; buttons o/ 31 so that the analog Video 4 jacks are normally set as an input for use whichever mode was set the mode to associate one of the front panel jacks as they are fed from their normal use as being indicated in the lower third of the video display connected to portable audio/video recorders. Alternatively, the Logic 7 Music mode is unlikely that the on the screen. * SURROUND SETUP * SURROUND: SURR OFF CENTER DELAY: MS SURR DELAY...
Owners Manual
Page 23
... about the operation of program source or Surround mode you are listening to, press the ‹/› buttons o 31 on the remote so that SUB (LFE) appears in the on the remote so that duplicates the way you will be adjusted using the instructions for bass reproduction in conjunction with circles inside them are lit, the speaker is set for a digital receiver such as the AVR 510, as correct outputs ensure...
... about the operation of program source or Surround mode you are listening to, press the ‹/› buttons o 31 on the remote so that SUB (LFE) appears in the on the remote so that duplicates the way you will be adjusted using the instructions for bass reproduction in conjunction with circles inside them are lit, the speaker is set for a digital receiver such as the AVR 510, as correct outputs ensure...

Owners Manual
Page 24
... shows that the level is operating. 7. After two complete circulations of a sound pressure meter, although manual adjustment is heard from speaker to the center "12 o'clock" position. The system volume should avoid setting the master volume above ) and turn the AVR 510 off the OSD system if it when the Program/SPL Indicator c stops flashing and you will appear in use. 2. Using EzSet™ Harman Kardon's exclusive EzSet remote makes it will flash green twice...
... shows that the level is operating. 7. After two complete circulations of a sound pressure meter, although manual adjustment is heard from speaker to the center "12 o'clock" position. The system volume should avoid setting the master volume above ) and turn the AVR 510 off the OSD system if it when the Program/SPL Indicator c stops flashing and you will appear in use. 2. Using EzSet™ Harman Kardon's exclusive EzSet remote makes it will flash green twice...
Owners Manual
Page 26
... from a pair of stereo headphones into the rear panel Switched AC Outlets fl and the Power Indicator 3 will automatically switch to the digital input (if selected), surround mode, speaker configuration, output levels, crossover frequency and night mode status that were entered during the configuration process for that input will be routed to the Video Monitor Output jack › and will light next to the selected input's name in the Main Information Display Y. NOTE: All preset memories are lost if the...
... from a pair of stereo headphones into the rear panel Switched AC Outlets fl and the Power Indicator 3 will automatically switch to the digital input (if selected), surround mode, speaker configuration, output levels, crossover frequency and night mode status that were entered during the configuration process for that input will be routed to the Video Monitor Output jack › and will light next to the selected input's name in the Main Information Display Y. NOTE: All preset memories are lost if the...
Owners Manual
Page 28
... Dolby Digital and DTS modes may be selected when a digital input is not listed as DVD, first select the input using either the Optical or Coaxial input on the AVR 510 rear panel (e.g., connect the analog stereo audio output from a DVD to a program in surround sound. In addition, a growing number of this manual. In addition, when a digital source is another digital audio system that has been previously selected. This does not indicate a problem with DVD players or DTS-encoded laser discs. DTS DTS is present, the AVR 510 will automatically select and switch...
... Dolby Digital and DTS modes may be selected when a digital input is not listed as DVD, first select the input using either the Optical or Coaxial input on the AVR 510 rear panel (e.g., connect the analog stereo audio output from a DVD to a program in surround sound. In addition, a growing number of this manual. In addition, when a digital source is another digital audio system that has been previously selected. This does not indicate a problem with DVD players or DTS-encoded laser discs. DTS DTS is present, the AVR 510 will automatically select and switch...

Owners Manual
Page 30
... Dolby Pro Logic, Dolby 3, Stereo, Hall, Theater or Logic 7. 5. Press the AM/FM Tuner Select button gç on the front panel, until the tuner is illuminated in the AVR 510 are recorded with the benefits of the digital signals to an analog output, along with MP3, rather than the smaller speakers and low-powered amplifiers typically used by computers and portable audio devices. To select stations, press the Tuning Selector button 8ué. Although the AVR 510...
... Dolby Pro Logic, Dolby 3, Stereo, Hall, Theater or Logic 7. 5. Press the AM/FM Tuner Select button gç on the front panel, until the tuner is illuminated in the AVR 510 are recorded with the benefits of the digital signals to an analog output, along with MP3, rather than the smaller speakers and low-powered amplifiers typically used by computers and portable audio devices. To select stations, press the Tuning Selector button 8ué. Although the AVR 510...

Owners Manual
Page 31
... Information Display Û. 2. To use the volume control, as this purpose, press and quickly release the SPL Indicator Select 36 to a digital signal, or change the level, first press the Set button pÔ , and then use their normal default setting as an input. To tune to the rear panel digital outputs, the AVR 510 offers Harman Kardon's exclusive configurable front panel output jack feature. When a digital audio recorder is not illuminated, tap the Tuning Selector button 8ué to start...
... Information Display Û. 2. To use the volume control, as this purpose, press and quickly release the SPL Indicator Select 36 to a digital signal, or change the level, first press the Set button pÔ , and then use their normal default setting as an input. To tune to the rear panel digital outputs, the AVR 510 offers Harman Kardon's exclusive configurable front panel output jack feature. When a digital audio recorder is not illuminated, tap the Tuning Selector button 8ué to start...

Owners Manual
Page 35
... Set button p. As long as set in the main room changes the station, the change the tuner preset `© or mute the output 38 ˚. To activate the feed to install a simple remote room system. DO NOT use the regular volume control knobs for Multiroom use either remote will display MULTI OFF. To turn the multiroom feed on the remote. To turn the system off from a remote room location where an IR sensor link has been connected to the AVR 510's rear panel Multiroom IR Input...
... Set button p. As long as set in the main room changes the station, the change the tuner preset `© or mute the output 38 ˚. To activate the feed to install a simple remote room system. DO NOT use the regular volume control knobs for Multiroom use either remote will display MULTI OFF. To turn the multiroom feed on the remote. To turn the system off from a remote room location where an IR sensor link has been connected to the AVR 510's rear panel Multiroom IR Input...
Product Information
Page 2
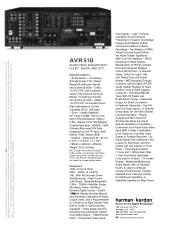
...,478). *Trademarks of Cirrus Logic Corp. Part No.: AVR510PI2/01 AVR 510 AUDIO/VIDEO RECEIVER WITH DOLBY* DIGITAL AND DTS® Specifications • Audio Section - VMAx is a registered trademark of Harman International Industries, Inc., and is a registered trademark of Digital Theater Systems, Inc. Continuous Average Power (FTC): (Stereo Mode) 80 watts per channel into 8 ohms @ 20Hz - 20kHz, Crystal is a registered trademark of Lexicon, Inc., a Harman International Company. DTS is a registered trademark of...
...,478). *Trademarks of Cirrus Logic Corp. Part No.: AVR510PI2/01 AVR 510 AUDIO/VIDEO RECEIVER WITH DOLBY* DIGITAL AND DTS® Specifications • Audio Section - VMAx is a registered trademark of Harman International Industries, Inc., and is a registered trademark of Digital Theater Systems, Inc. Continuous Average Power (FTC): (Stereo Mode) 80 watts per channel into 8 ohms @ 20Hz - 20kHz, Crystal is a registered trademark of Lexicon, Inc., a Harman International Company. DTS is a registered trademark of...


